Android 4
11. Android JUnit Test

This chapter
Android offers a powerful but easy-to-use testing framework that is well integrated with the SDK tools.
Because writing tests is an important part of any development effort, this chapter introduces the basics of testing and helps us to get started testing quickly. It guides us through the process of setting up a test project, adding a test, and running the test against the Hello World application, all from inside the Eclipse environment.
A unit test is used to verify a minimal unit of source code, such as a method or a class. The purpose of unit testing is to isolate the smallest testable parts and verify that they function correctly in isolation.
These kinds of tests tend to run very fast and often take the form of a sequence of assertion that return either true or false, where any false return will fail the test. Usually these tests are located within the code that they test, and they can be compiled and run at the same time that the code itself is compiled. Unit test tend to be written by developers using knowledge of the implementation. In other words, unit testing is a white box testing.
JUnit is a unit testing framework that was originally developed by Kent Beck and Erich Gamma. It is designed around two key design patterns: command and composite.
Each test case is a command object that defines one or more test*() methods, such as testMyObject, as well as optional setUp() and tearDown() methods. Multiple test cases can be collated within a test suite. In other words, the test suite is a composite of test cases that automatically calls all of the test*() methods.
JUnit provides several assertion-based testing, such as assertNull(), assertEquals(), assertTrue(), and assertSame(). If any of these returns false, then the test case is considered as failure.
In the Hello World tutorial, we created Android application project called HelloAndroid. A test of an Android application is also an Android application, and we create it within an Eclipse project. The Eclipse with ADT New Android Test Project dialog creates a new test project and the framework of a new test application at the same time.
To create the test project and test application framework in Eclipse with ADT,
In Eclipse, select New > Project...
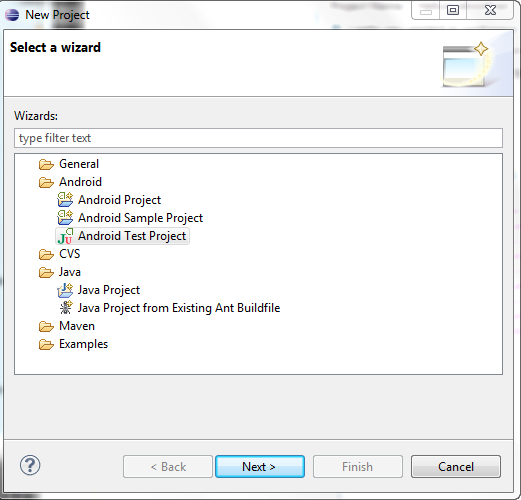
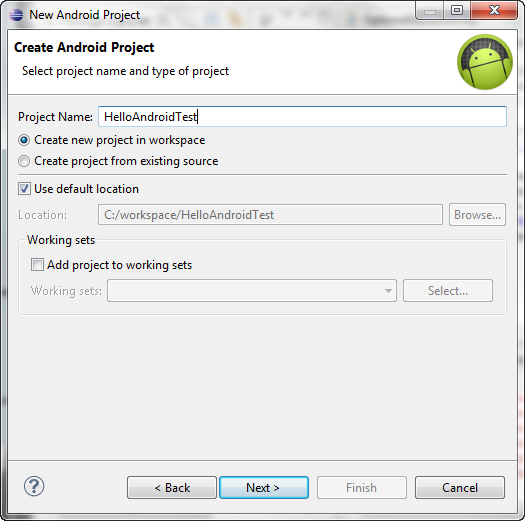
Set the following values:
- Test Project Name: "HelloAndroidTest"
- Test Target: Set "An existing Android project:"
- Build Target: Set a target whose platform is Android 2.1 or above.
- Application name: "HelloAndroidTest"
- Package name: "com.bogotobogo.android.first"
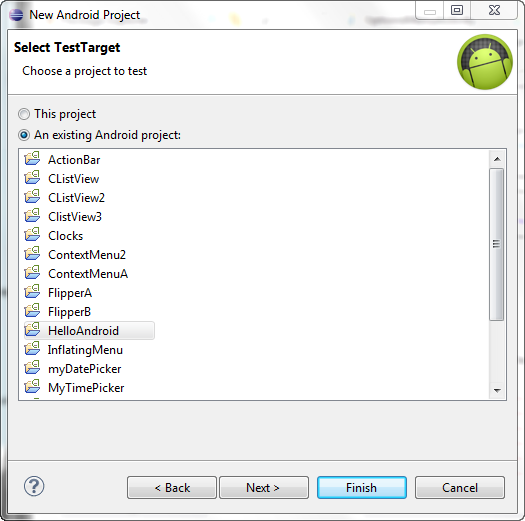
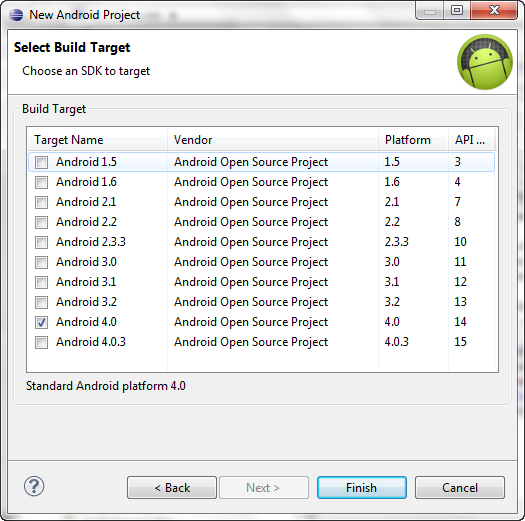
Click Finish. The new project appears in the Package Explorer.
We now have a test project HelloAndroidTest, and the basic structure of a test application also called HelloAndroidTest. The basic structure includes all the files and directories we need to build and run a test application, except for the class that contains our tests, the "test case class".
The next step is to define the test case class. In this tutorial, we define a test case class that extends one of Android's test case classes designed for Activities. The class contains definitions for four methods:
- HelloAndroidTest:
This defines the constructor for the class. It is required by the Android testing framework. - setUp():
This overrides the JUnit setUp() method. You use it to initialize the environment before each test runs. - testPreconditions():
This defines a small test that ensures the Hello, Android application starts up correctly. - testText():
This tests that what is displayed on the screen is the same as what is contained in the application's string resources. It is an example of a real unit test you would perform against an application's UI.
To add the Java file for the test case class, follow these steps
- In Eclipse, open the HelloAndroidTest project if it is not already open.
- Within HelloAndroidTest, expand the src/ folder and then find the package icon for com.bogotobogo.android.first. Right-click on the package icon and select New > Class:
The New Java Class dialog appears.
- In the dialog, enter the following:
- Name: HelloAndroidTest.
This becomes the name of your test class. - Superclass: android.test.ActivityInstrumentationTestCase2<HelloAndroid>.
The superclass is parameterized by an Activity class name.
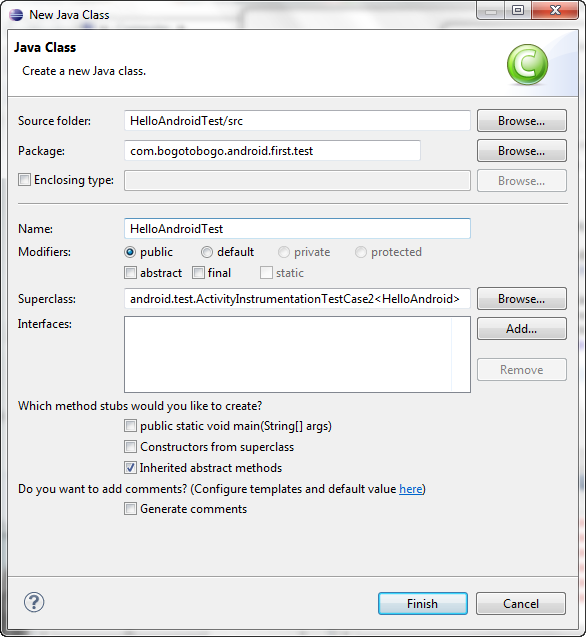
Click Finish with no more changes in the setting. - Name: HelloAndroidTest.
- We now have a new file HelloAndroidTest.java in the project. This file contains the class HelloAndroidTest, which extends the Activity test case class ActivityInstrumentationTestCase2<T>. We parameterize the class with HelloAndroid, which is the class name of the activity under test.
- Open HelloAndroidTest.java. It should look like this:
package com.bogotobogo.android.first.test; import android.test.ActivityInstrumentationTestCase2; public class HelloAndroidTestActivity extends ActivityInstrumentationTestCase2<HelloAndroidActivity> { } - The test case class depends on the HelloAndroid class, which is not yet imported. To import the class, add the following line just before the current import statement:
import com.bogotobogo.android.first.HelloAndroidActivity;
The, we will have:
package com.bogotobogo.android.first.test;

import com.bogotobogo.android.first.HelloAndroidActivity;
import android.test.ActivityInstrumentationTestCase2;

public class HelloAndroidTestActivity extends
		ActivityInstrumentationTestCase2<HelloAndroidActivity> {

	public HelloAndroidTestActivity() {
		super("com.bogotobogo.android.first", HelloAndroidActivity.class);
	}
}
The test case class constructor is used by the Android testing framework when you run the test. It calls the super constructor with parameters that tell the framework what Android application should be tested.
Add the following constructor method immediately after the class definition:
    public HelloAndroidTest() {
      super("com.bogotobogo.helloandroid", HelloAndroid.class);
    }
Save the file HelloAndroidTest.java:
package com.bogotobogo.helloandroid.test; import com.bogotobogo.helloandroid.HelloAndroid; import android.test.ActivityInstrumentationTestCase2; public class HelloAndroidTest extends ActivityInstrumentationTestCase2{ public HelloAndroidTest() { super("com.bogotobogo.helloandroid", HelloAndroid.class); } }
The setUp() method overrides the JUnit
First, add the following code immediately after the constructor method:
	protected void setUp() throws Exception {
			super.setUp();
			mActivity = this.getActivity();
			mView = (TextView) mActivity.findViewById
                                            (com.bogotobogo.android.first.R.id.textview);
			resourceString = mActivity.getString
                                            (com.bogotobogo.android.first.R.string.hello);
	}
For this code to work, you must also add some class members and another import statement. To add the class members, add the following code immediately after the class definition:
    private HelloAndroid mActivity;
    private TextView mView;
    private String resourceString;
To add the import statement, add the following statement just after the import for android.test.ActivityInstrumentationTestCase2:
import android.widget.TextView;
A preconditions test checks the initial application conditions prior to executing other tests. It's similar to setUp(), but with less overhead, since it only runs once.
Although a preconditions test can check for a variety of different conditions, in this application it only needs to check whether the application under test is initialized properly and the target TextView exists. To do this, it calls the inherited assertNotNull() method, passing a reference to the TextView. The test succeeds only if the object reference is not null.
	public void testPreconditions() {
		assertNotNull(mView);
	}
Now add a simple unit test to the test case class. The method testText() will call a JUnit Assert method to check whether the target TextView is displaying the expected text.
For this example, the test expects that the TextView is displaying the string resource that was originally declared for it in HelloAndroid's main.xml file, referred to by the resource ID hello. The call to assertEquals(String,String) compares the expected value, read directly from the hellostring resource, to the text displayed by the TextView, obtained from the TextView's getText() method. The test succeeds only if the strings match.
To add this test, add the following code immediately after the testPreconditions() method:
	public void testText() {
		assertEquals(resourceString,(String)mView.getText());
	}
We've just finished coding for the test. This is what the complete test case class should look like:
package com.bogotobogo.android.first.test;

import com.bogotobogo.android.first.HelloAndroidActivity;
import android.test.ActivityInstrumentationTestCase2;
import android.widget.TextView;

public class HelloAndroidTestActivity extends
		ActivityInstrumentationTestCase2<HelloAndroidActivity> {

	private HelloAndroidActivity mActivity;
	private TextView mView;
	private String resourceString;

	public HelloAndroidTestActivity() {
		super("com.bogotobogo.android.first", HelloAndroidActivity.class);
	}

	@Override
	protected void setUp() throws Exception {
			super.setUp();
			mActivity = this.getActivity();
			mView = (TextView) mActivity.findViewById
                                               (com.bogotobogo.android.first.R.id.textview);
			resourceString = mActivity.getString
                                               (com.bogotobogo.android.first.R.string.hello);
	}

	public void testPreconditions() {
		assertNotNull(mView);
	}

	public void testText() {
		assertEquals(resourceString,(String)mView.getText());
	}
}
The layout for the HelloAndroidActivity's main.xml should look like this:
<?xml version="1.0" encoding="utf-8"?>
<LinearLayout xmlns:android="http://schemas.android.com/apk/res/android"
    android:layout_width="fill_parent"
    android:layout_height="fill_parent"
    android:orientation="vertical" >

    <TextView
        android:id="@+id/textview"
        android:layout_width="fill_parent"
        android:layout_height="wrap_content"
        android:text="@string/hello" />

</LinearLayout>
with the strings.xml:
<?xml version="1.0" encoding="utf-8"?>
<resources>

    <string name="hello">Hello World, HelloAndroidActivity!</string>
    <string name="app_name">HelloAndroid</string>

</resources>
The java code, HelloAndroidActivity.java:
package com.bogotobogo.android.first;

import android.app.Activity;
import android.os.Bundle;

public class HelloAndroidActivity extends Activity {
    /** Called when the activity is first created. */
    @Override
    public void onCreate(Bundle savedInstanceState) {
        super.onCreate(savedInstanceState);
        setContentView(R.layout.main);
    }
}
We can now run the tests we've created against the Hello, Android application. In Eclipse with ADT, we run a test application as an Android JUnit test rather than a regular Android application.
To run the test application as an Android JUnit test, in the Package Explorer right-click the HelloAndroidTest project and select Run As > Android JUnit Test
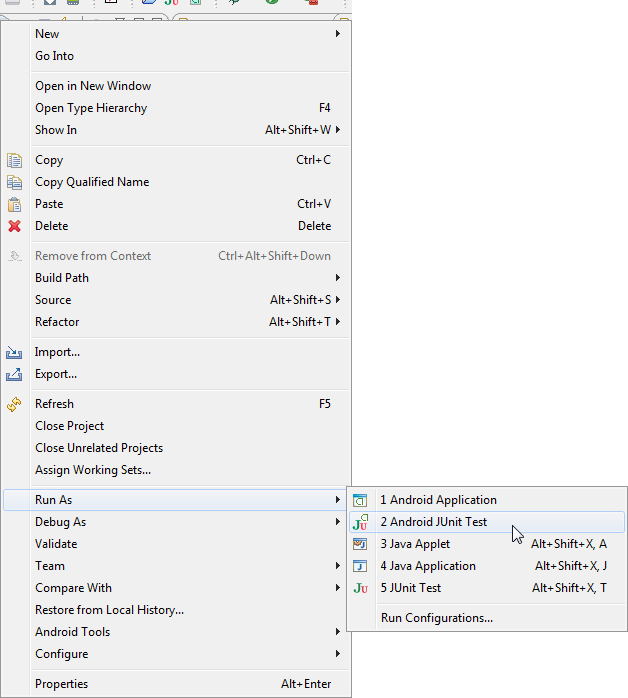
The ADT plugin then launches the test application and the application under test on a the target emulator or device. When both applications are running, the testing framework runs the tests and reports the results in the JUnit view of Eclipse, which appears by default as a tab next to the Package Explorer.
As shown below, the JUnit view shows test results in two separate panes: an upper pane summarizes the tests that were run and a lower pane reports the failure traces for the tests. In this case, the tests in this example have run successfully, so there is no failure reported in the view:
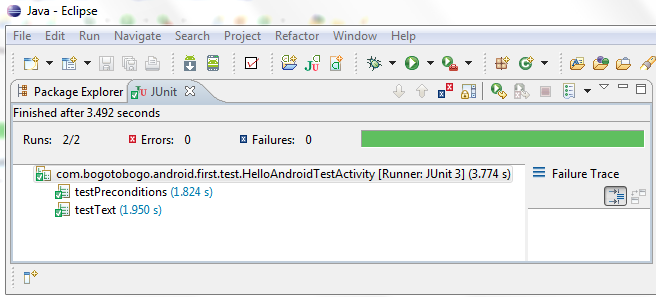
The left pane summarizes the test:
- "Finished after x seconds": How long the test took to run.
- "Runs": The number of tests run.
- "Errors:": The number of program errors and exceptions encountered during the test run.
- "Failures:": The number of assertion failures encountered during the test run.
- A progress bar. The progress bar extends from left to right as the tests run. If all the tests succeed, the bar remains green. If a test fails, the bar turns from green to red.
- A test method summary. Below the bar, you see a line for each class in the test application, labeled by its fully-qualified class name. To look at the results for the individual methods in a test case class, click the arrow at the left of the class to expand the line. You see the name of each test method. To the right of the method name, you see the time needed to run that method. You can look at the method's code by double-clicking its name.
The right pane contains the failure trace. If all the tests are successful, this pane is empty. If some tests fail, then if you select a failed test in the upper pane, the lower view contains a stack trace for the test.
Ph.D. / Golden Gate Ave, San Francisco / Seoul National Univ / Carnegie Mellon / UC Berkeley / DevOps / Deep Learning / Visualization