Android 4
2. My First Android Application - Hello World: Part A

In this chapter:
- 2.0 Android Development Tools
- 2.1 Creating a New Project
- 2.2 Adding UI Elements
- 2.3 Creating Attributes
- 2.4 Coding
- 2.5 Connecting Methods to Buttons
- 2.6 Running Android Application
- 2.7 Adding It to the Menu
- 2.8 Testing on a Real Android Device (Phone/Tablet) - Part A (Using SD Card)
- 2.9 Testing on a Real Android Device (Phone/Tablet) - Part B (Using USB)
- 2.10 Using Relative Layout instead of main.xml's Linear Layout
Before anything else, let us watch video from Google I/O 2010 for "A beginer's guide to Android."
Android Beginners Guide (pdf)
Before we start a new project, let us get used to our tools.
The Android SDK includes several tools and utilities to help us create, test, and debug our projects.
ADT plug-in incorporates most of tools into the Eclipse IDE, where you can access them from the DDMS perspective, including:
- Android SDK and Virtual Device Manager
Used to create and manage Android Virtual Devices (AVD) and SDK packages. The AVD hosts an emulator running a particular build of Android, letting you specify the supported SDK version, screen resolution, SD card storage etc. So, you might have several AVDs for different set of hardware. - Android Emulator
An implementation of the Android virtual machine designed to run within a virtual device on our development computer. - Dalvik Debug Monitoring Service (DDMS)
Use DDMS to monitor and control the Dlavik virtual machines on which we are debugging our applications. - Android Asset Packaging Tool (AAPT)
Constructs the distributable Android package files. - Android Debug Bridge (ADB)
A client-server application that provides a link to a running emulator. It lets us copy files, install compiled application package (.apk) and run shell commands.
Select File -> New -> Project... -> Android -> Android Project
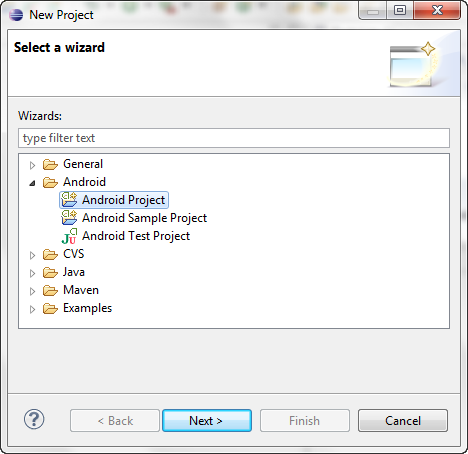
->Next and create the Android project as in the picture below.
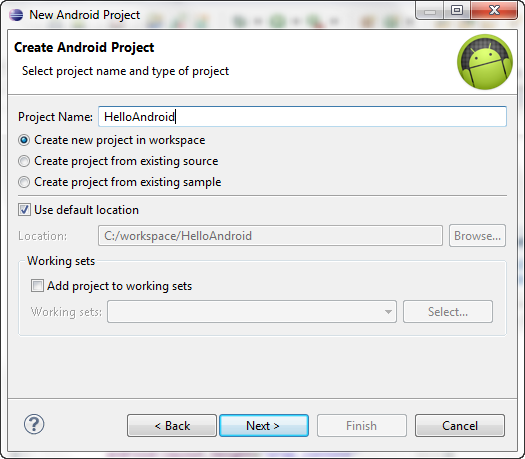
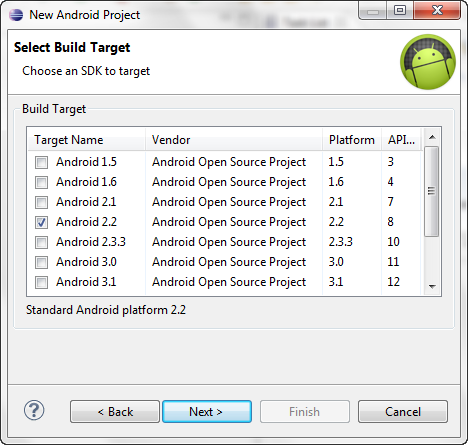
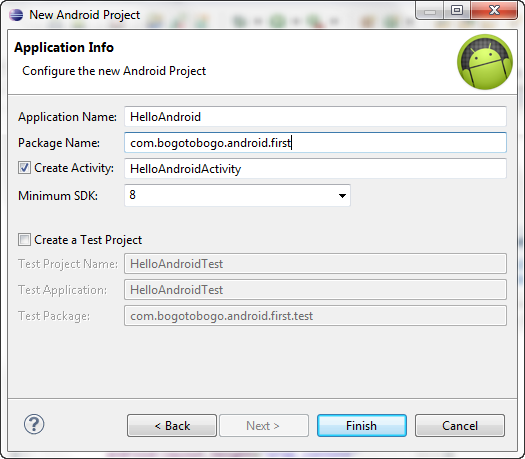
During the process, we entered the following information for our new project.
- Project name
the name of your project file - Package name
specifies its java package - Create Activity
lets you specify the name of a class that will be your initial Activity
(note) An Activity represents a screen that an application can present to its users. The more complicated an application, the more screens it needs. - Application name
friendly name for your application - Min SDK Version
the minimum version of the SDK that your application will run on
- android:minSdkVersion
An integer designating the minimum API Level required for the application to run. The Android system will prevent the user from installing the application if the system's API Level is lower than the value specified in this attribute. We should always declare this attribute.
Caution: If we do not declare this attribute, the system assumes a default value of "1", which indicates that our application is compatible with all versions of Android. If our application is not compatible with all versions (for instance, it uses APIs introduced in API Level 8) and we have not declared the proper android:minSdkVersion, then when installed on a system with an API Level less than 8, the application will crash during runtime when attempting to access the unavailable APIs. For this reason, be certain to declare the appropriate API Level in the minSdkVersion attribute. - android:targetSdkVersion
An integer designating the API Level that the application is targetting.
With this attribute set, the application says that it is able to run on older versions (down to minSdkVersion), but was explicitly tested to work with the version specified here. Specifying this target version allows the platform to disable compatibility settings that are not required for the target version (which may otherwise be turned on in order to maintain forward-compatibility) or enable newer features that are not available to older applications. This does not mean that we can program different features for different versions of the platform-it simply informs the platform that we have tested against the target version and the platform should not perform any extra work to maintain forward-compatibility with the target version.
Introduced in: API Level 4 - For more details, see http://developer.android.com/guide/topics/manifest/uses-sdk-element.html.
Press "Finish"
This should show the following directory structure in the Package Explorer.
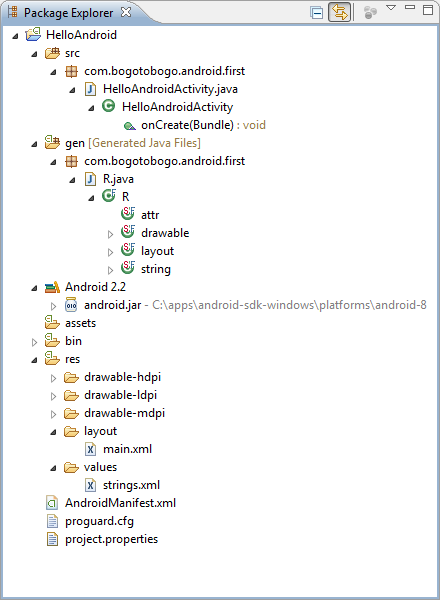
When you create a new Android project, you get several items in the project's root directory:
- src /
A folder that holds the Java source code - gen /
This is where Android's build tools will place source code that they generate.
R.java" is a generated class which contains the text and the UI elements. Android projects come with this free class 'R' which is short for Resource. This is an automatically generated class that we can use to reference resources in our project. We should not try to modify this class manually. - assets /
A folder that holds other static files you wish packaged with the application for deployment onto the device. - bin /
In Eclipse, the ADT plugin incrementally builds our project as we make changes to the source code. Eclipse outputs an .apk file automatically to the bin folder of the project, so we do not have to do anything extra to generate the .apk. - res /
A folder that holds resources such as icons, graphic user interface (GUI) layouts, etc. that are packaged with the compiled Java in the application. - AndroidMainFest.xml
An XML file describing the application being built and which components (activities, services, and so on) are being supplied by the application. This file is the foundation for any Android application. This is where you declare what is inside your application. You also indicate how these pieces attach themselves to the overall Android systems; for example, you can indicate which activity or activities should appear on the device's main menu (a.k.a. the launcher).
When you create your application, a starter manifest will be generated for you automatically. For a simple application, offering a single activity and nothing else, the auto generated manifest will probably work out fine, or perhaps require a few minor modifications. But on the other spectrum, the manifest file for the Android API demo suite is more that 1,000 lines long. Your production applications will probably falls somewhere in the middle.
Most of the manifest will be describes detail in later chapters. - project.properties
Property files used by the Ant build script.
In Android app that we create using Elicpse, the GUI layout is stored in an XML file called main.xml, by default. Defining the GUI in XML, allows us to easily separate our app's logic (Model) from the presentation (View). The layout files are considered app resources and are stored in the project's res folder, and GUI layouts are put into the layout subfolder of the folder.
From the Package Explorer, under res folder, double click layout/main.xml to open the editor as shown in the picture below.
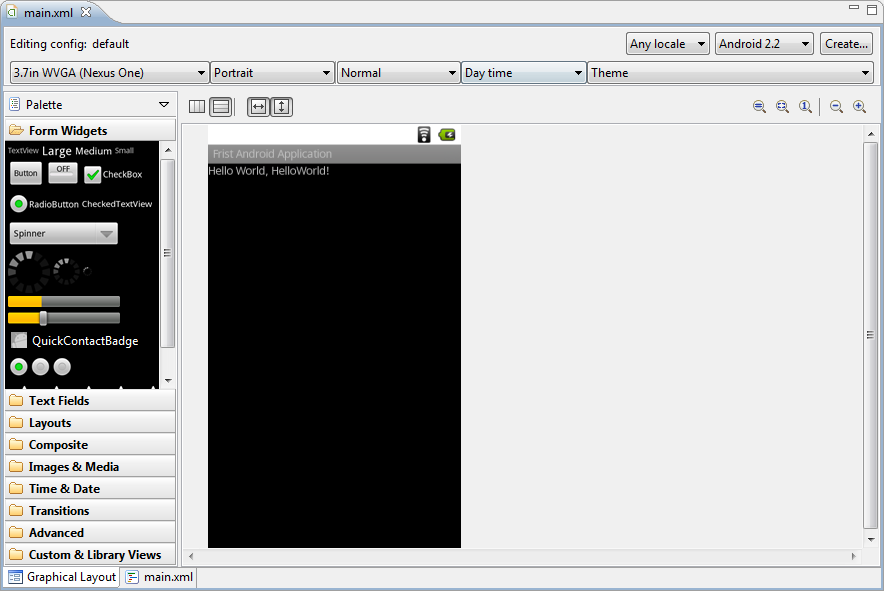
The default GUI for a new Android app has a LinearLayout with a balck background and has a TextView with the text "Hello World, Welcome!". The LinearLayout sets up GUI components in a line either horizontally or vertically. The TextView allows us to display text.
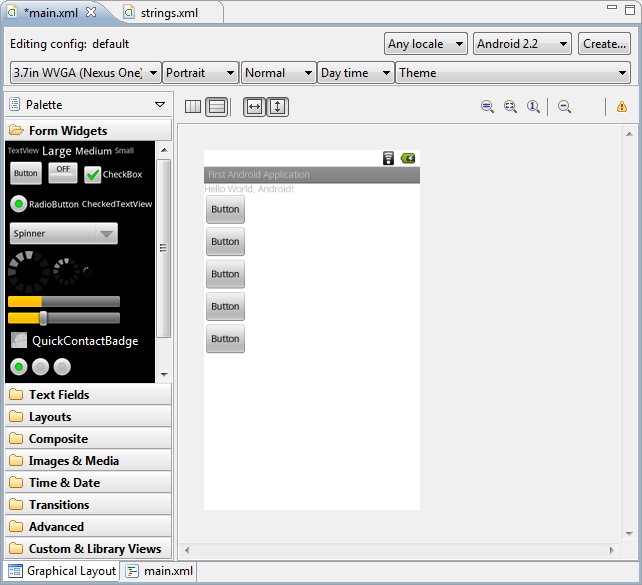
From the "Form Widgets" folder, drag five "Button"s and place them on the view.
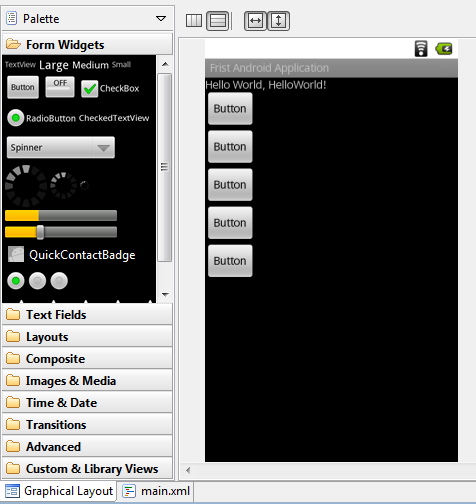
Double click on "strings.xml" under "res/values" folder to open "values/string.xml" tab window.
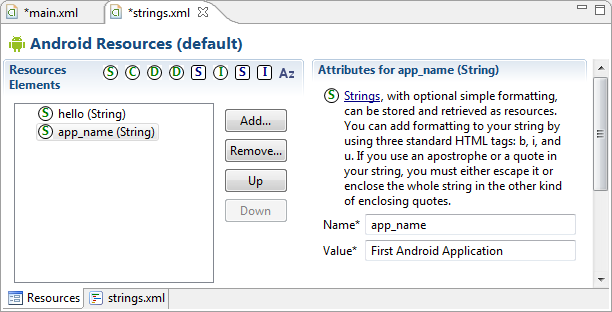
Select hello(String) and change the Value* to "Hello World, Android!".
To add Color to the resources, press "Add" and select "Color", then OK.
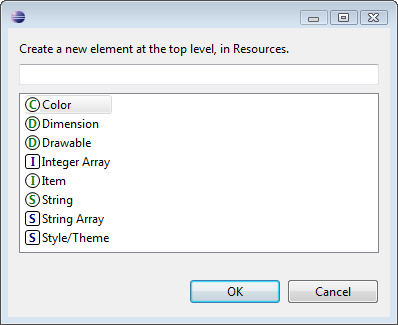
Type in the Name* of the color and its Value* as in the picture.
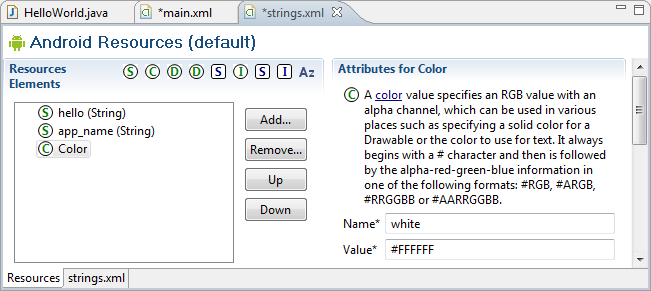
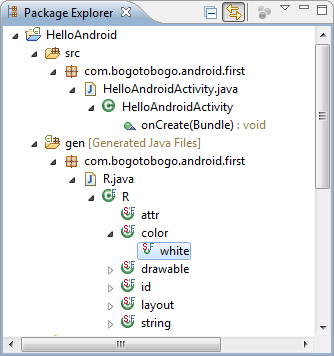
Then you will see the changes both in the "strings.xml" tab window and we have a new color resources in R.java.
We want to assign a background color to this LinearLayout. Right-click on an empty space in Graphical Layout mode, then select Other Properties -> All by Name -> Background. Select "Color" and then "white" in the list. Then, we can see the color for the background of our widget has been changed to white
Time to change the properties of EditText and Buttons. First we should add strings to Android Resources. So, open "strings.xml" tab, and press "Add...". From the popup, select string and hit OK. Then type in Name* and Value*. The resource strings I made are in the list below.
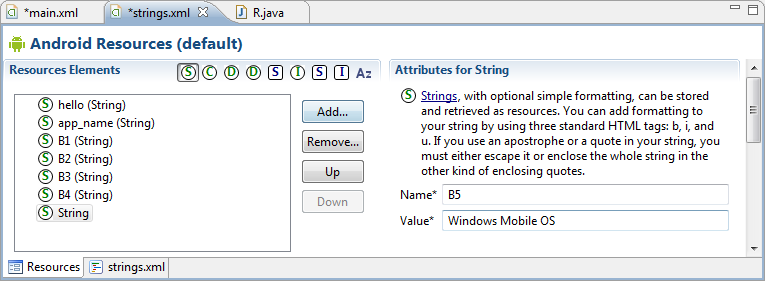
Save the "strings.xml" file.
Right mouse click on a button. Select "Edit Text...", and choose the proper string from the string resources.
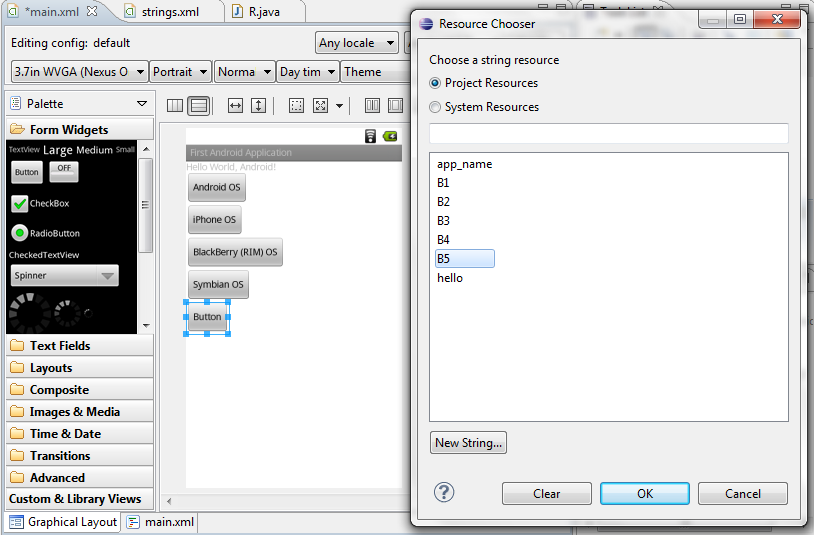
Now, we want to insert Text Field to display OS selection.
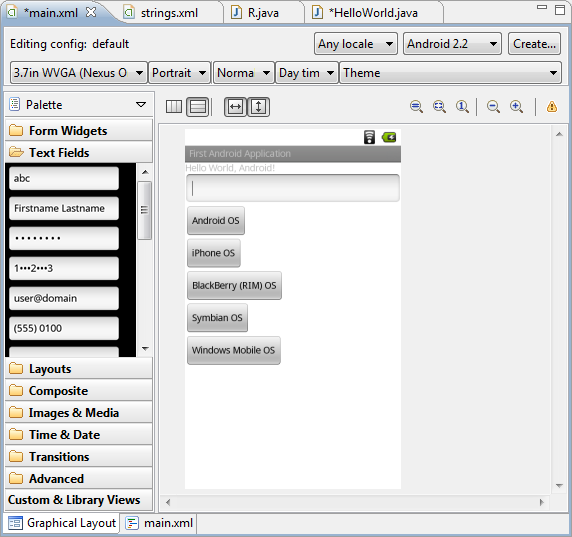
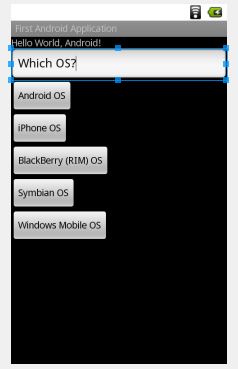
Create a new string for initial string for the field, and we need to couple the string with the Text Field and set the InputType as Text.
Next sections:
- 2.4 Coding
- 2.5 Connecting Methods to Buttons
- 2.6 Running Android Application
- 2.7 Adding It to the Menu
- 2.8 Testing on a Real Android Device (Phone/Tablet) - Part A (Using SD Card)
- 2.9 Testing on a Real Android Device (Phone/Tablet) - Part B (Using USB)
- 2.10 Using Relative Layout instead of main.xml's Linear Layout
Ph.D. / Golden Gate Ave, San Francisco / Seoul National Univ / Carnegie Mellon / UC Berkeley / DevOps / Deep Learning / Visualization