Android 4.0
2. My First Android Application
- Hello World: Part B

In this chapter:
- 2.0 Android Development Tools
- 2.1 Creating a New Project
- 2.2 Adding UI Elements
- 2.3 Creating Attributes
- 2.4 Coding
- 2.5 Connecting Methods to Buttons
- 2.6 Running Android Application
- 2.7 Adding It to the Menu
- 2.8 Testing on a Real Android Device (Phone/Tablet) - Part A (Using SD Card)
- 2.9 Testing on a Real Android Device (Phone/Tablet) - Part B (Using USB)
- 2.10 Using Relative Layout instead of main.xml's Linear Layout
Now, it's time to write something.
Let us modify our "HelloWorld.java".
package com.bogotobogo.android.first;

import android.app.Activity;
import android.os.Bundle;
import android.view.View;
import android.widget.EditText;

public class HelloAndroidActivity extends Activity {

	private EditText text;

	/** Called when the activity is first created. */
	@Override
	public void onCreate(Bundle savedInstanceState) {
		super.onCreate(savedInstanceState);
		// bind the layout to the activity
		setContentView(R.layout.main);
		text =
                  (EditText) findViewById(R.id.editText1);
		text.setText("No button pressed");
	}

	// Will be connected with the buttons via XML
	public void myOnClick(View view) {
		switch (view.getId()) {
		case R.id.button1:
			text.setText( R.string.B1);
			break;
		case R.id.button2:
			text.setText(R.string.B2 );
			break;
		case R.id.button3:
			text.setText(R.string.B3 );
			break;
		case R.id.button4:
			text.setText(R.string.B4 );
			break;
		case R.id.button5:
			text.setText(R.string.B5 );
			break;
		}
	}
}
We may not want to go too deep into the code because it has more than just Hello World.
Activity, a public class, inheriting from the android.app.Activity, is the base class for the visual, interactive components of an application. It is similar to a Form for desktop environment.
We see that the code extends Activity, and overrides the onCreate() method.
The onCreate() method is invoked when the activity is started.
The first
thing we do is to chain upward to the superclass, so the stock
Android activity initialization can be done.
Then, set the activity's content view to be the layout,
R.layout.main.
The setContentView() lays out the user interface by inflating a layout resource:
	@Override
	public void onCreate(Bundle savedInstanceState) {
		super.onCreate(savedInstanceState);
		setContentView(R.layout.main);
The resources for an Android project are stored in the res folder. It includes "drawable", "layout", and "values" subfolders. The ADT plug-in interprets these resources to provide design-time access to them through the R variable.
We have one EditText and five buttons in our application. When one of the five buttons clicked it will trigger Android:onClick which is turn call myOnClick via the string @string/ButtonHandlr defined in main.xml. In the method, we set a new text depending on the button clicked and the new text will be displayed in the EditText.
This section shows how to connect the handler methods with the buttons via XML.
Open main.xml and select your first button. Then, go to the property view tab and assign the method @string/ButtonHandlr to the On Click property of the first button. We set the value of the string as myOnClick(). Note that we defined the myOnClick() method in the code we wrote in 2.4 Coding
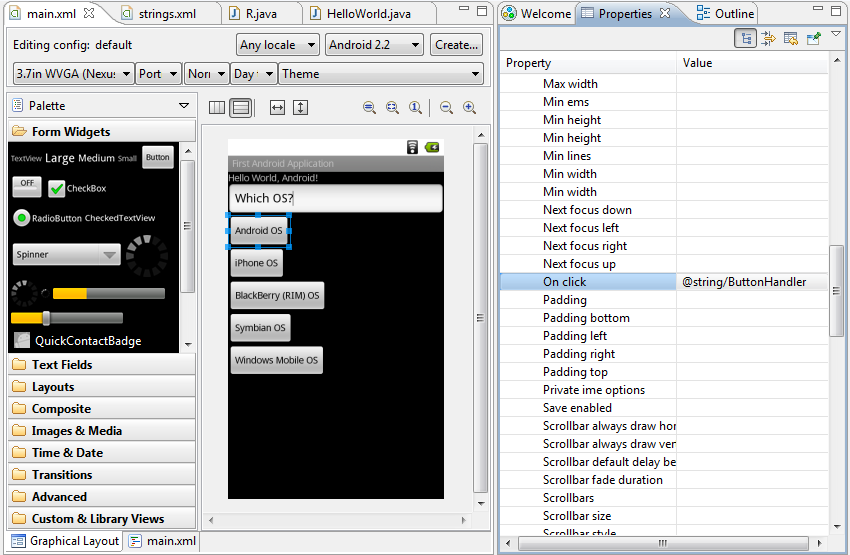
Do the same thing to the other buttons.
We can see how the xml file look like: go to the bottom of the main.xml tab view and switch to main.xml from "Layout"
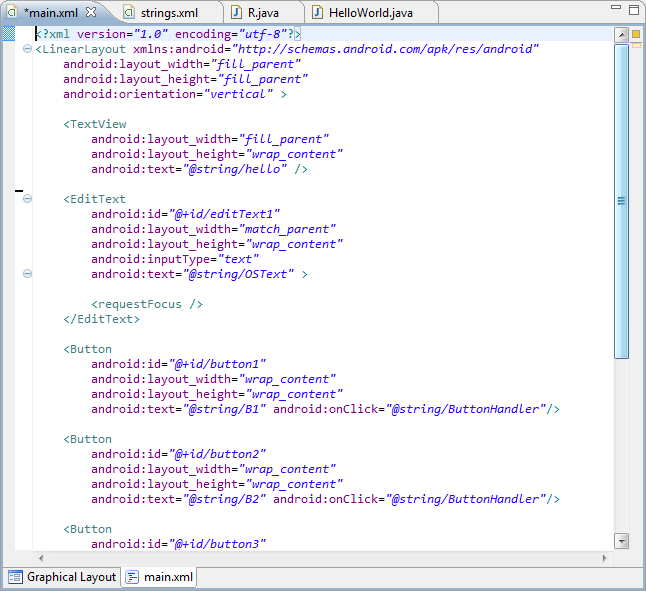
Defining an application's UI in XML and inflating it is the preferred way of implementing user interfaces. In that way, it clearly decouples an application logic from its UI design.
Many widgets and containers need to appear only in the XLM layout file and do not need to be referenced in our Java code. For example, a static label, TextView, frequently needs to be in the layout file just to indicate where it should appear. These sorts of elements in the XML file do not need to have the android:id attribute to give them a new.
But anything we do want to use in our Java code, needs an android:id. So, to get access to UI elements in code, we add identifier attributes to them in the XML definition.
android:id = "@+id/Button"
Convention is to use @+id/... as the id value, and ... represents our local unique name for the widget. In our case, @+id/button1 is one of the identifiers for the Button widgets.
We can then use the findViewById() method to return a reference to each named item. The following XML snippet shows an ID attribute added to the EditText widget:
<EditText
        android:id="@+id/editText1"
        android:layout_width="match_parent"
        android:layout_height="wrap_content"
        android:inputType="text"
        android:text="@string/OSText" >
        <requestFocus />
</EditText>
And the following code shows how to get access to it in code:
text = (EditText) findViewById(R.id.editText1);
All the properties available in code can be set with attributes in the XML layout.
We set up the widgets and containers in an XML layout file, main.xml stored in res/layout.
Now, how do we attach the layout to our Java application?
All we need is just one statement in our activity's onCreate()
callback to use the layout we set up:
setContentView(R.layout.main);
as in the code:
	@Overrid:
	public void onCreate(Bundle savedInstanceState) {
		super.onCreate(savedInstanceState);
		setContentView(R.layout.main);
            ....
	}
The Android-built View, constructed from out layout, is accessed from that code-generated R class. All of the layouts are accessible under R.layout, keyed by the base name of the layout file, for example, res/layout/main.xml results in R.layout.main.
To run the Android Application, select your project, right click on it, Run-As-> Android Application.
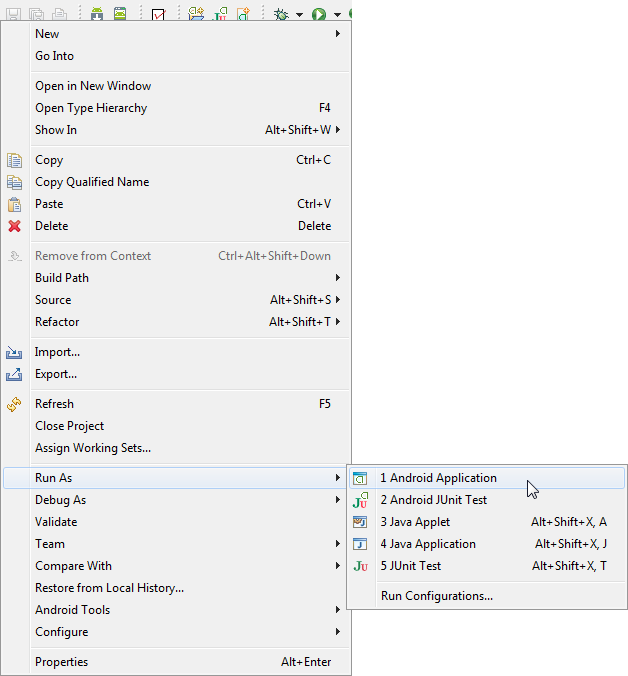
If you are using ADT plugin, it does following at the run
- Compiles the current project and converts it to an Android executable (.dex)
- Packages the executable and external resources into an Android package(.apk)
- Starts the selected virtual device (if you have selected an AVD and it's not already running)
- Installs the application onto the target device
- Starts the application
If you are debugging, the Eclipse debugger will then be attached. It will allow you to set breakpoint.
If things work out well, you will see a new Activity running in the emulator
After you press MENU button on the phone, you will see what you've done.
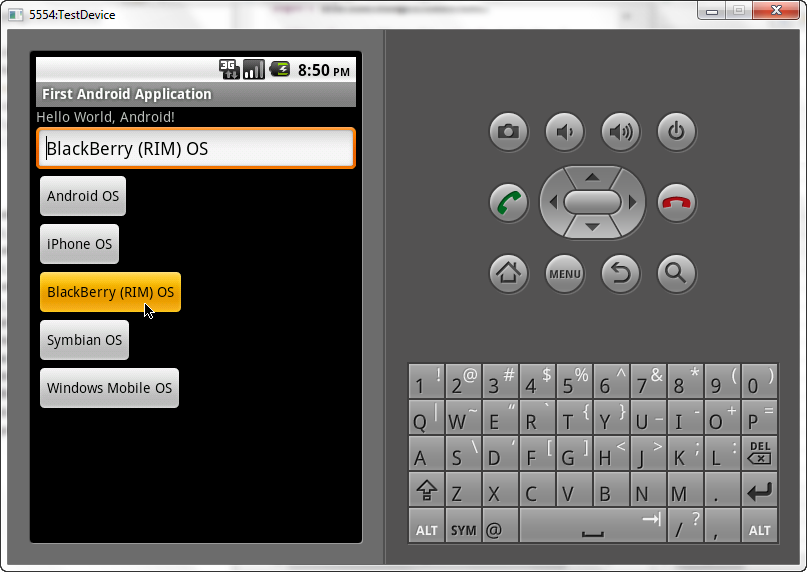
Here is the string.xml:
<?xml version="1.0" encoding="utf-8"?>
<resources>

    <string name="hello">Hello World, Android!</string>
    <string name="app_name">First Android Application</string>
    <color name="white">#FFFFFF</color>
    <string name="B1">Android OS</string>
    <string name="B2">iPhone OS</string>
    <string name="B3">BlackBerry (RIM) OS</string>
    <string name="B4">Symbian OS</string>
    <string name="B5">Windows Mobile OS</string>
    <string name="OSText">Which OS?</string>
    <string name="ButtonHandler">myOnClick</string>

</resources>
main.xml looks like this:
<?xml version="1.0" encoding="utf-8"?>
<LinearLayout xmlns:android="http://schemas.android.com/apk/res/android"
    android:layout_width="fill_parent"
    android:layout_height="fill_parent"
    android:orientation="vertical" >

    <TextView
        android:layout_width="fill_parent"
        android:layout_height="wrap_content"
        android:text="@string/hello" />

    <EditText
        android:id="@+id/editText1"
        android:layout_width="match_parent"
        android:layout_height="wrap_content"
        android:inputType="text"
        android:text="@string/OSText" >

        <requestFocus />
    </EditText>

    <Button
        android:id="@+id/button1"
        android:layout_width="wrap_content"
        android:layout_height="wrap_content"
        android:text="@string/B1" android:onClick="@string/ButtonHandler"/>

    <Button
        android:id="@+id/button2"
        android:layout_width="wrap_content"
        android:layout_height="wrap_content"
        android:text="@string/B2" android:onClick="@string/ButtonHandler"/>

    <Button
        android:id="@+id/button3"
        android:layout_width="wrap_content"
        android:layout_height="wrap_content"
        android:text="@string/B3" android:onClick="@string/ButtonHandler"/>


    <Button
        android:id="@+id/button4"
        android:layout_width="wrap_content"
        android:layout_height="wrap_content"
        android:text="@string/B4" android:onClick="@string/ButtonHandler"/>


    <Button
        android:id="@+id/button5"
        android:layout_width="wrap_content"
        android:layout_height="wrap_content"
        android:text="@string/B5" android:onClick="@string/ButtonHandler"/>

</LinearLayout>
We can add our First Android Application to the menu.
Starting from phone MENU, MENU->Add->Shortcuts->Applications and then select First Android Application.
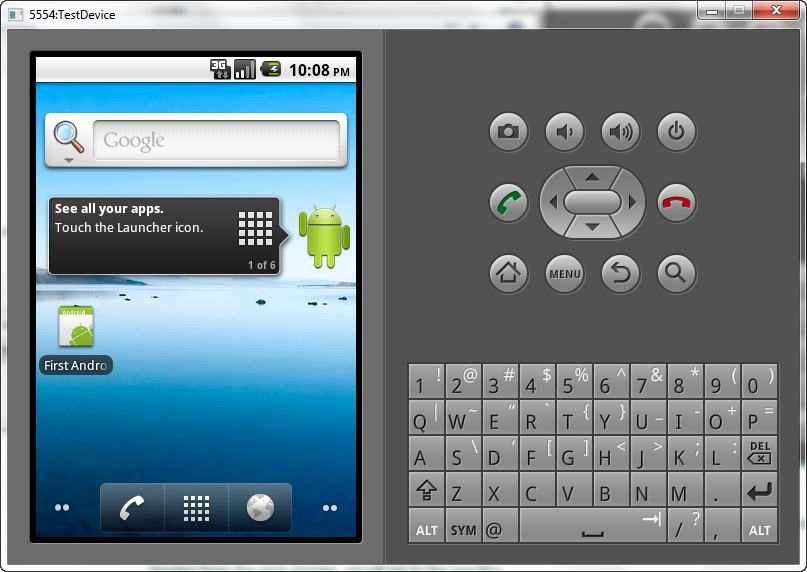
Probably this wasn't just Hello World at all. I did not go through the details of the code. My intention was having a quick tour from the start to the end of Android Application.
Starting from the next chapter, we will get to the specifics.
Emulater is slow, so we want faster testing platform. It's the phone itself.
Any application must be signed, otherwise an application won't be installed on an emulator or a device if it is not signed.
To test and debug your application, the build tools sign your application with a special debug key that is created by the Android SDK build tools.
Window->Preferences->Android->Build
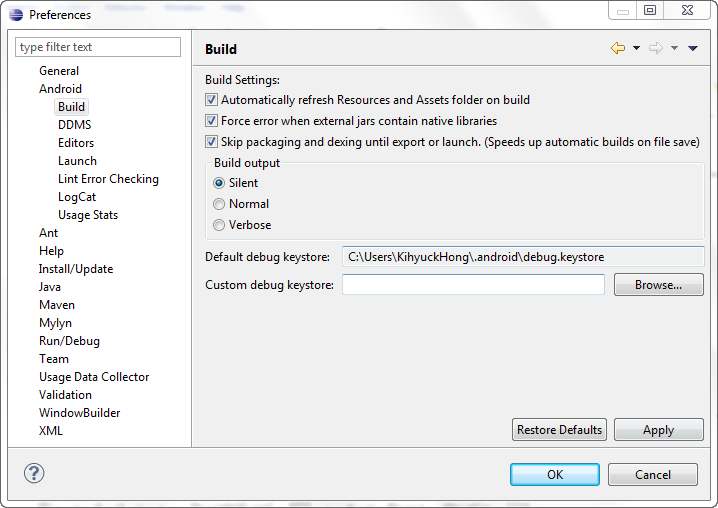
For testing purpose, debug key is enough. On the dialog, check where the key is, and just click OK.
File->Export
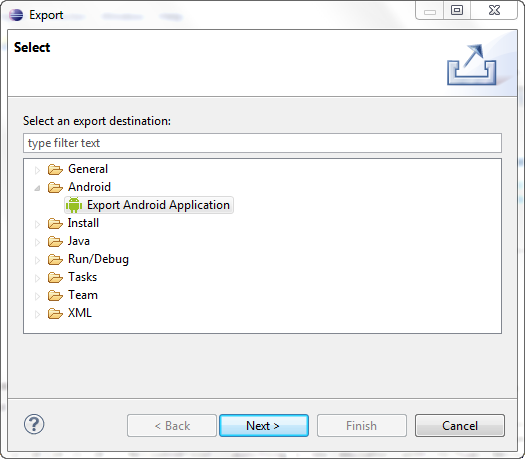
->Next
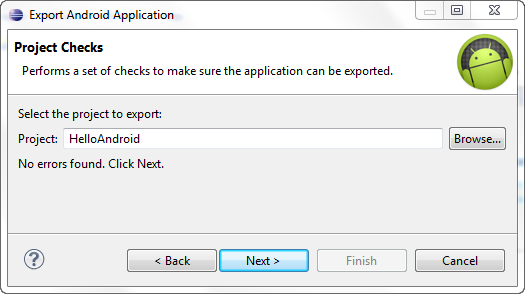
->Next.
Browse the key-store location, and type in password such as "android".
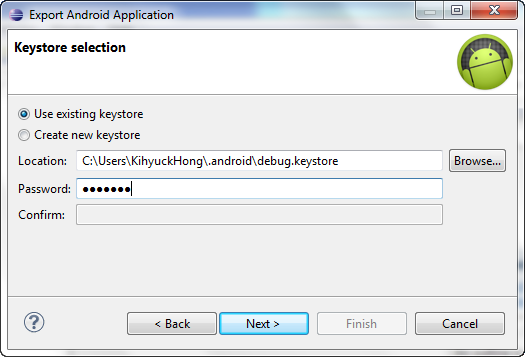
->Next.
Select the place for .apk file.
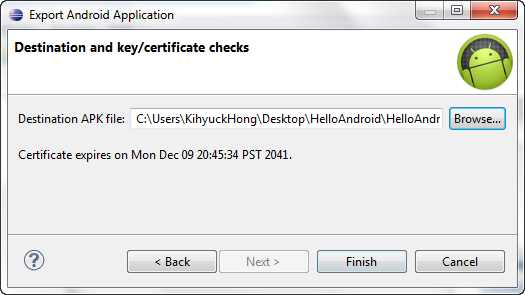
Hit "Finish".
Copy the .apk file we want to install to our phone's memory card.
- Go to Android Market and search for the Apps Installer, App Installer, z-App Installer or Fast Installer application.
- Open it and click on the Install button.
- After it is installed, just open it. It will show us all the APK files stored directly in the root directory of our memory card.
- Just click on the application we want to install and it will be installed.
Actually, we can execute our app on the device for testing purposes without using any 3rd party install apps.
- Declare our application as debuggable in our Android Manifest.
In Eclipse, we can do this from the Application tab when viewing the Manifest (on the right side, set Debuggable to true).
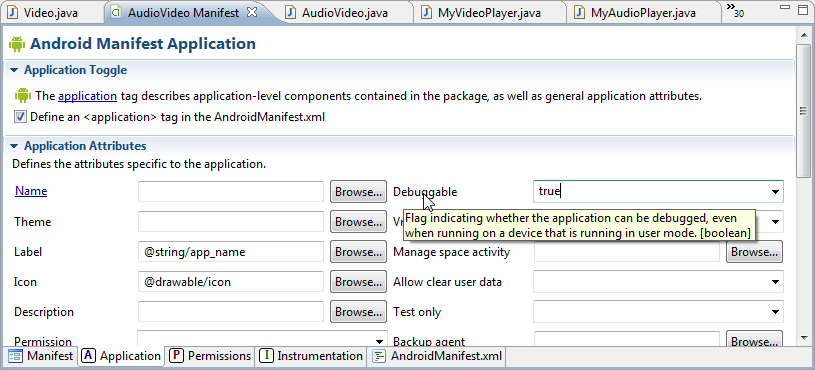
Otherwise, in the AndroidManifest.xml file, add android:debuggable="true" to theelement. - Set up your device to allow installation of non-Market applications. On the device, go to Settings > Applications and enable Unknown sources (on an Android 4.0 device, the setting is located in Settings > Security).
- We must enable debugging on the device.
On the device (phone/tablet), Settings > Applications > Development and ensure USB Debugging is checked.
On an Android 4.0 device, the setting is located in Settings > {} Developer Options. Check USB debugging (Debug mode when USB is connected). - Connect the device to the computer via a USB cable.
We can verify that our device is connected by executing adb devices from our SDK platform-tools/ directory. If connected, we'll see the device name listed as a "device."
// Not connected
$ adb devices
List of devices attached
emulator-5554   device

// Connected
$ adb devices
List of devices attached
emulator-5554   device
015DB9AD11028004        device"
When not connected, on Windows, we need to install a USB driver for adb. If we're using an Android Developer Phone (ADP), Nexus One, or Nexus S, see the Google Windows USB Driver. Otherwise, you can find a link to the appropriate OEM driver in the OEM USB Drivers document. I got the drive for My Galaxy Nexus phone from Samsung (listed as model SCH-I515) - Run As -> Android Application
-
If we do not have any AVDs open, but do have an Android device connected, the IDE will automatically install the app on our device and execute it. If we have one or more AVDs open while devices connected, the Android Device Chooser dialog should show up so that we can select the AVD or device on which to install and execute the app.
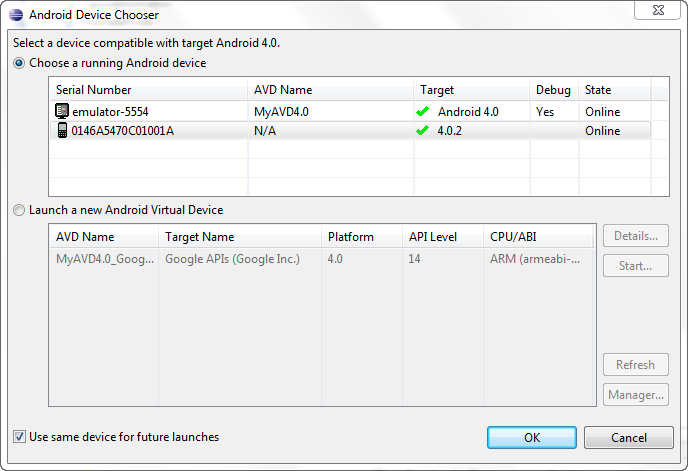
- (Note)You may get "SD Card in unmounted or unavailable" message from your phone when you tried to access files from SD Card in your app. This happens when your app tries to grab audio/video/image (mp3/mp4/png) files from SD Card. Then, all you have to do is to disconnect the phone from your Laptop from which you installed your apk.
Previous sections:
- 2.0 Android Development Tools
- 2.1 Creating a New Project
- 2.2 Adding UI Elements
- 2.3 Creating Attributes
Next sections:
Ph.D. / Golden Gate Ave, San Francisco / Seoul National Univ / Carnegie Mellon / UC Berkeley / DevOps / Deep Learning / Visualization