Android 4
9. TabWidget, Flipper, and SlidingDrawer

This chapter
A TabWidget offers the ability to easily draw an interface that uses tabs to navigate between different views.
It displays a list of tab labels representing each page in the parent's tab collection. The container object for this widget is TabHost. When the user selects a tab, this object sends a message to the parent container, TabHost, to tell it to switch the displayed page. We typically won't use many methods directly on this object. The container TabHost is used to add labels, add the callback handler, and manage callbacks. We might call this object to iterate the list of tabs, or to tweak the layout of the tab list, but most methods should be called on the containing TabHost object.
Here is the layout we're using in this example:
<?xml version="1.0" encoding="utf-8"?>
<TabHost xmlns:android="http://schemas.android.com/apk/res/android"
	android:id="@+id/tabhost"
	android:layout_width="fill_parent"
	android:layout_height="fill_parent">
	<LinearLayout
		android:orientation="vertical"
		android:layout_width="fill_parent"
		android:layout_height="fill_parent">
		<TabWidget android:id="@android:id/tabs"
			android:layout_width="fill_parent"
			android:layout_height="wrap_content"/>
		<FrameLayout android:id="@android:id/tabcontent"
			android:layout_width="fill_parent"
			android:layout_height="fill_parent">
			<AnalogClock android:id="@+id/tab1"
				android:layout_width="fill_parent"
				android:layout_height="fill_parent"/>
			<DigitalClock android:id="@+id/tab2"
				android:layout_width="fill_parent"
				android:layout_height="fill_parent"/>
			<Button android:id="@+id/tab3"
				android:layout_width="fill_parent"
				android:layout_height="fill_parent"
				android:text="@string/do_nothing"/>
		</FrameLayout>
	</LinearLayout>
</TabHost>
The TabWidget and FrameLayout are immediate children of the TabHost, and the FrameLayout itself has children representing the various tabs. In out case, there are three tabs: a analog clock, a digital clock, and a button.
Our Java code needs to tell the TabHost which views represent the tab content and what the tab buttons should look like. This is all wrapped up in TabSpec objects. We get a TabSpec instance from the host via
TabSpec has two key methods:
- setContent()
Indicated what goes in the tab content for this tab, typically the android:id of the view we want shown when this tab is selected. - setIndicator()
Sets the caption for the tab button and, in some flavors of this method, supplies a Drawable to represent the icon for the tab.
Note that we must call setup() on the TabHost before configuring any of these TabSpec objects. The call to setup() is not needed if we're using the TabActivity base class for our activity.
Here is our Java code:
package com.bogotobogo.TabWidget;

import android.app.Activity;
import android.os.Bundle;
import android.widget.TabHost;

public class TabWidget extends Activity {
	@Override
	public void onCreate(Bundle icicle) {
		super.onCreate(icicle);
		setContentView(R.layout.main);

		TabHost tabs=(TabHost)findViewById(R.id.tabhost);

		tabs.setup();

		TabHost.TabSpec spec=tabs.newTabSpec("tag1");

		spec.setContent(R.id.tab1);
		spec.setIndicator("Analog Clock");
		tabs.addTab(spec);

		spec=tabs.newTabSpec("tag2");
		spec.setContent(R.id.tab2);
		spec.setIndicator("DigitalClock");
		tabs.addTab(spec);

		spec=tabs.newTabSpec("tag3");
		spec.setContent(R.id.tab3);
		spec.setIndicator("Button");
		tabs.addTab(spec);
	}
}
We find our TabHost using findViewById() method, and then we call setup(). Then we get a TabSpec via newTabSpec(), supplying a tab. Given the spec, we call setContent() and setIndicator(), and then call addTab() back on the TabHost to register the tab as available for use. Finally, we can choose which tab is the one to show via setCurrentTab(), providing the 0-based index of the tab.
The results are shown below.
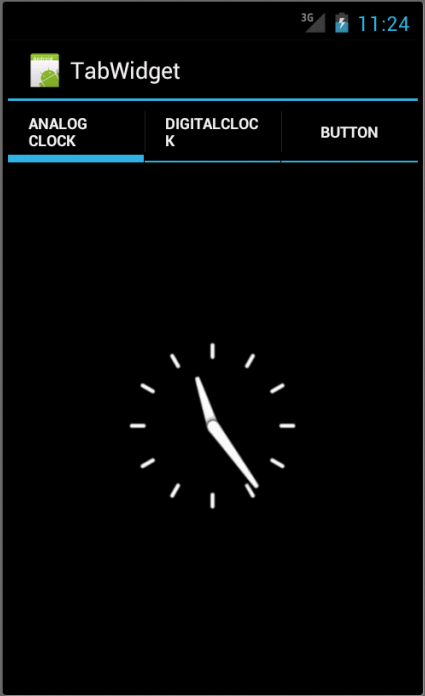
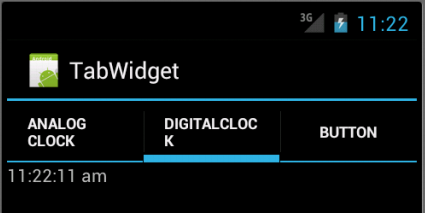
In TabWidget examples, the contents of each tab were set to be a View. This is easy and straightforward, but it is not the only option. We can also integrate another activity from our application via an intent.
Intent is the way of specifying something we want accomplished, and then telling Android to go find something to accomplish it. Intent is an abstract description of an operation to be performed.
It can be used with startActivity to launch an Activity, broadcastIntent to send it to any interested BroadcastReceiver components, and startService(Intent) or bindService(Intent, ServiceConnection, int) to communicate with a background Service.
An Intent provides a facility for performing late runtime binding between the code in different applications. Its most significant use is in the launching of activities, where it can be thought of as the glue between activities. It is basically a passive data structure holding an abstract description of an action to be performed. The primary pieces of information in an intent are:
- action
The general action to be performed, such as ACTION_VIEW, ACTION_EDIT, ACTION_MAIN, etc. - data
The data to operate on, such as a person record in the contacts database, expressed as a Uri.
Frequently, intents are used to cause activities to spawn. For example, whenever we launch an application from the main Android application launcher, the launcher creates an Intent and has Android open the activity associated with that Intent.
Sometimes, we want the overall effect of tabs, but we do not want the actual UI implementation of tabs. Maybe the tabs take up too much screen space. Maybe we want to switch between perspectives based on a gesture or a device shake.
Fortunately, we can find the same logic of view-flipping from tabs in ViewFlipper container, which can be used in other ways that the regular tab.
ViewFlipper inherits from FrameLayout, in the same way we use it to describe the innards of a TabWidget. However, initially, the ViewFlipper container just shows the first child view. It is up to us to arrange for the views to flip, either manually by user interaction or automatically utilizing timer.
Here is an example of a layout for a simple activity using a Button and a ViewFlipper:
<?xml version="1.0" encoding="utf-8"?>
<LinearLayout xmlns:android=
	"http://schemas.android.com/apk/res/android"
		android:orientation="vertical"
		android:layout_width="fill_parent"
		android:layout_height="fill_parent">
	<Button android:id="@+id/flip_me"
			android:layout_width="fill_parent"
			android:layout_height="wrap_content"
			android:text="@string/FlipMe"/>
	<ViewFlipper android:id="@+id/details"
		android:layout_width="fill_parent"
		android:layout_height="fill_parent">
		<TextView
			android:layout_width="fill_parent"
			android:layout_height="wrap_content"
			android:textStyle="bold"
			android:textColor="#FF00FF00"
			android:text="@string/First"/>
		<TextView
			android:layout_width="fill_parent"
			android:layout_height="wrap_content"
			android:textStyle="bold"
			android:textColor="#FFFF0000"
			android:text="@string/Second"/>
		<TextView
			android:layout_width="fill_parent"
			android:layout_height="wrap_content"
			android:textStyle="bold"
			android:textColor="#FFFFFF00"
			android:text="@string/Third"/>
	</ViewFlipper>
</LinearLayout>
and strings.xml:
<?xml version="1.0" encoding="utf-8"?>
<resources>

    <string name="hello">Hello World, FlipperAActivity!</string>
    <string name="app_name">FlipperA</string>
    <string name="FlipMe">FlipMe</string>
    <string name="First">This is the first panel</string>
    <string name="Second">This is the second panel</string>
    <string name="Third">This is the third panel</string>

</resources>
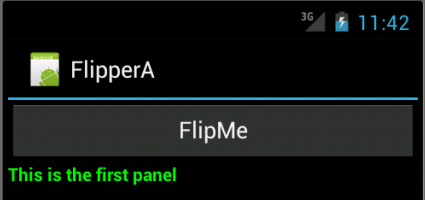
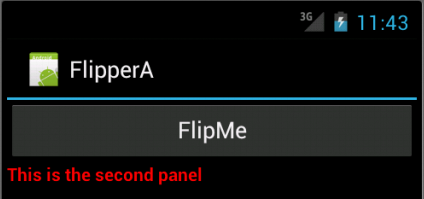
The layout defines three child views for the ViewFlipper, each a TextView with a simple message.
To flip manually we need to hook into the Button and flip them when the button is clicked.
package com.bogotobogo.FlipperA;

import android.app.Activity;
import android.os.Bundle;
import android.view.View;
import android.widget.Button;
import android.widget.ViewFlipper;

public class FlipperAActivity extends Activity {
	ViewFlipper flipper;

	@Override
	public void onCreate(Bundle icicle) {
		super.onCreate(icicle);
		setContentView(R.layout.main);

		flipper=(ViewFlipper)findViewById(R.id.details);

		Button btn=(Button)findViewById(R.id.flip_me);

		btn.setOnClickListener(new View.OnClickListener() {
			public void onClick(View view) {
				flipper.showNext();
			}
		});
	}
}
This is just a matter of calling showNext() on the ViewFlipper on any ViewAnimator class.
The result is a simple activity: click the button, and the next TextView in sequence is displayed, wrapping around to the first after viewing the last, as shown in the pictures below.
As with the TabWidget, sometimes, our ViewFlipper contents may not be known at compile time. And as with TabWidget, we can add new contents on the fly with ease.
Let's look at the activity from the following layout:
<?xml version="1.0" encoding="utf-8"?>
<LinearLayout xmlns:android="http://schemas.android.com/apk/res/android"
	android:orientation="vertical"
	android:layout_width="fill_parent"
	android:layout_height="fill_parent">
	<ViewFlipper android:id="@+id/details"
		android:layout_width="fill_parent"
		android:layout_height="fill_parent">
	</ViewFlipper>
</LinearLayout>
The ViewFlipper does not have contents at compile time. Also notice that there is not Button for flipping between contents. For the ViewFlipper contents, we'll create large Button widgets, each containing ones of the 16 countries in the WorldCup 2010. Then we'll set up the ViewFlipper to automatically rotate between the Button widgets, using an animation for transition.
package com.bogotobogo.FlipperB;

import android.app.Activity;
import android.os.Bundle;
import android.view.ViewGroup;
import android.view.animation.AnimationUtils;
import android.widget.Button;
import android.widget.ViewFlipper;

public class FlipperBActivity extends Activity {
	static final String[] WORLDCUP16 = new String[] {
		"Argentina", "Brazil", "Chile", "England",
		"Germany","Ghana", "Japan", "Mexico",
		"Netherlands","Paraguay", "Portugal",
		"Slovakia", "Slovenia", "South Korea", "Spain",
		"United States", "Uruguay" };

	ViewFlipper flipper;

	@Override
	public void onCreate(Bundle icicle) {
		super.onCreate(icicle);
		setContentView(R.layout.main);

		flipper=(ViewFlipper)findViewById(R.id.details);

		flipper.setInAnimation(AnimationUtils.loadAnimation(this,
							R.anim.push_up_in));
		flipper.setOutAnimation(AnimationUtils.loadAnimation(this,
							R.anim.push_up_out));

		for (String item : WORLDCUP16) {
			Button btn=new Button(this);

			btn.setText(item);

			flipper.addView(btn, new ViewGroup.LayoutParams(
					ViewGroup.LayoutParams.FILL_PARENT,
					ViewGroup.LayoutParams.FILL_PARENT));
		}

		flipper.setFlipInterval(2000);
		flipper.startFlipping();
	}
}
After getting our ViewFlipper widget from the layout, we first set up the "in" and "out" animations.
	flipper.setInAnimation(AnimationUtils.loadAnimation(this,
						R.anim.push_up_in));
	flipper.setOutAnimation(AnimationUtils.loadAnimation(this,
						R.anim.push_up_out));
In Android terms, an animation is a description of how a widget leaves (out) or enters (in) the viewable area. Animations are resources, stored in res/anim/ in our project. For this example, we're using a pair of animations supplied by the SDK samples. Widgets are "pushed" to the up, either to enter or leave the viewable area.
We need to create anim folder under res, and then import the xml files: right click on anim -> import...-> General -> File System
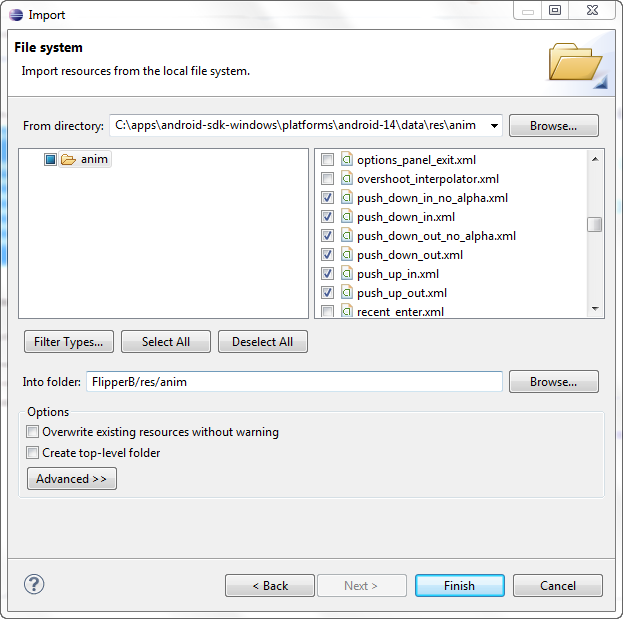
Then, hit Finish.
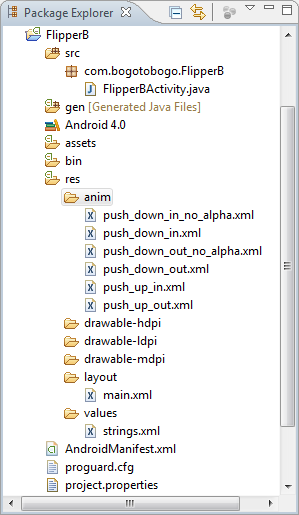
Setting up the flipper to automatically flip between children
flipper.setFlipInterval(2000);
and to start flipping.
flipper.startFlipping();
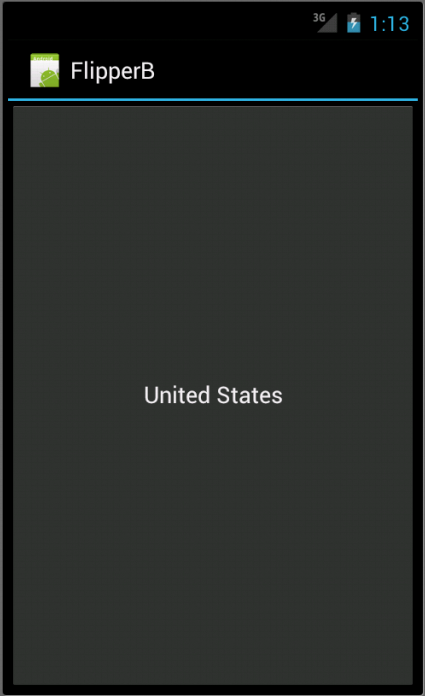
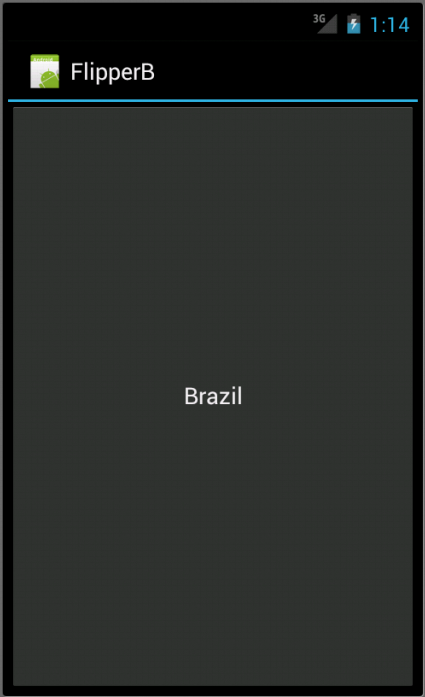
The result is an endless series of buttons. Each appears and then slides out to the left after 2 seconds, being replaced by the next button in sequence, wrapping around to the first after the last has been shown.
Unlike most other Android containers, SlidingDrawer moves, switching from a closed to an open position. This puts some restrictions on which container holds the SlidingDrawer. It needs to be in a container that allows multiple widgets to sit atop each other. RelativeLayout and FrameLayout satisfy this requirement; FrameLayout is a container purely for stacking widgets atop one another. On the flip side, LinearLayout does not allow widgets to stack (they fall one after another in a row or column), and so we should not have a SlidingDrawer as an immediate child of a LinearLayout.
But in the example, we do not need those layouts:
<?xml version="1.0" encoding="utf-8"?>

<SlidingDrawer
	xmlns:android="http://schemas.android.com/apk/res/android"
	android:background="#FF4444CC"
	android:id="@+id/drawer"
	android:layout_width="fill_parent"
	android:layout_height="fill_parent"
	android:handle="@+id/handle"
	android:content="@+id/content">
	<ImageView
		android:contentDescription="@string/normal_tray"
		android:id="@id/handle"
		android:layout_width="wrap_content"
		android:layout_height="wrap_content"
		android:src="@drawable/tray_handle_normal"/>
	<Button
		android:id="@id/content"
		android:layout_width="fill_parent"
		android:layout_height="fill_parent"
		android:text="@string/sliding_drawer"/>
</SlidingDrawer>
and the strings.xml like this:
<?xml version="1.0" encoding="utf-8"?>
<resources>

    <string name="hello">Hello World, SlidingDrawerActivity!</string>
    <string name="app_name">SlidingDrawer</string>
    <string name="sliding_drawer">I am a SlidingDrawer!</string>
    <string name="normal_tray">Normal Tray</string>

</resources>
Our java code should look like this:
package com.bogotobogo.SlidingDrawer;

import android.app.Activity;
import android.os.Bundle;

public class SlidingDrawerActivity extends Activity {
    /** Called when the activity is first created. */
    @Override
    public void onCreate(Bundle savedInstanceState) {
        super.onCreate(savedInstanceState);
        setContentView(R.layout.main);
    }
}
The SlidingDrawer should contain two things:
- A handle, frequently an ImageView or something along those lines, such as the one used here, pulled from the Android open source project.
- The contents of the drawer itself, usually some sort of container, but a Button in this case.
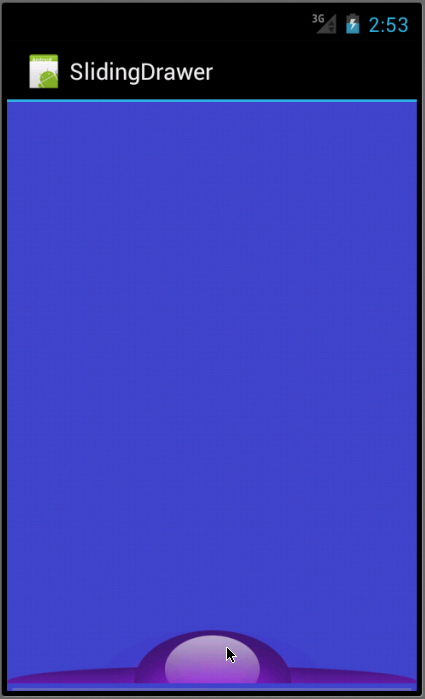
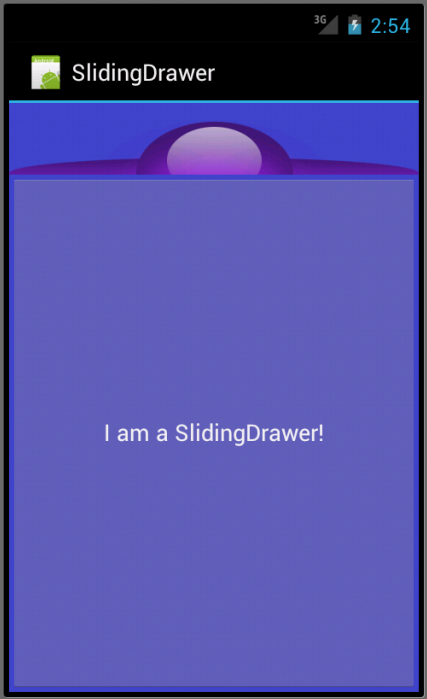
SlidingDrawer needs to know the android:id values of the handle and contents, via the android:handle and android:content attributes, respectively. This tells the drawer how to animate itself as it slides open and closed.
Here is the tray_handle_normal.png:

We can open and close the drawer from Java code, as well as via user touch events (which are handled by the widget, so that's not something we need to worry about). However, we have two sets of these methods: ones that take place instantaneous (open(), close(), and toggle()) and ones that use the animation (animation(), animateClose(), animateToggle()).
We can lock() and unlock() the drawer; while locked, the drawer will not respond to touch event.
We can also register three types of callbacks if we wish:
- A listener to be invoked when the drawer is opened
- A listener to be invoked when the drawer is closed
- A listener to be invoked when the drawer is "scrolled"
Ph.D. / Golden Gate Ave, San Francisco / Seoul National Univ / Carnegie Mellon / UC Berkeley / DevOps / Deep Learning / Visualization