Linux Tips 1

DevOps
DevOps / Sys Admin Q & A
# default login shell not necessarily the current shell
$ echo $SHELL
/bin/bash

# current shell
$ echo $0
bash

# current shell, $$ is the process ID of the current shell.
$ ps -p $$
  PID TTY          TIME CMD
 1790 pts/0    00:00:00 bash

# list shells
$ cat /etc/shells
# List of acceptable shells for chpass(1).
# Ftpd will not allow users to connect who are not using
# one of these shells.

/bin/bash
/bin/csh
/bin/ksh
/bin/sh
/bin/tcsh
/bin/zsh

# switch shell
$ /bin/csh

# login shell
% echo $SHELL
/bin/bash

% current shell
% ps -p $$
  PID TTY           TIME CMD
 2307 ttys002    0:00.05 -bin/csh

# current shell
% echo $0
/bin/csh

# switch it back
% /bin/bash
$
w tells who is logged in and what they are doing:
$ w
11:44  up 11 days, 18:17, 9 users, load averages: 1.85 2.65 2.65
USER     TTY      FROM              LOGIN@  IDLE WHAT
kihyuckhong console  -                24Jul20 11days -
kihyuckhong s000     -                24Jul20    45 -bash
kihyuckhong s002     -                24Jul20     2 /bin/bash
kihyuckhong s003     -                Thu14   5days -bash
kihyuckhong s004     -                Sun15      45 -bash
kihyuckhong s005     -                Fri14       - w
kihyuckhong s006     -                Sat13   3days -bash
kihyuckhong s007     -                Thu11      45 -bash
kihyuckhong s008     -                Sat13   3days -bash
last indicates last logins of users and what happened such as "shutdown" or "crash" etc.:
$ last
kihyuckhong  ttys004                   Sun Aug  2 15:10   still logged in
kihyuckhong  console                   Wed Jun 24 15:57 - crash (30+01:43)
reboot    ~                         Wed Jun 24 15:57
...
We can delete a word we entered by typing cntr-w.
apropos is often a wrapper for the man -k command, the apropos command is used to search all manual pages for the string specified. This is often useful if one knows the action that is desired, but does not remember the exact command.
$ apropos zip
bunzip2 (1)          - a block-sorting file compressor, v1.0.6
bzcmp (1)            - compare bzip2 compressed files
bzdiff (1)           - compare bzip2 compressed files
bzgrep (1)           - search possibly bzip2 compressed files for a regular e...
bzip2 (1)            - a block-sorting file compressor, v1.0.6
bzip2recover (1)     - recovers data from damaged bzip2 files
bzless (1)           - file perusal filter for crt viewing of bzip2 compresse...
bzmore (1)           - file perusal filter for crt viewing of bzip2 compresse...
funzip (1)           - filter for extracting from a ZIP archive in a pipe
gpg-zip (1)          - Encrypt or sign files into an archive
grubby (8)           - command line tool for configuring grub, lilo, elilo, y...
gunzip (1)           - compress or expand files
gzip (1)             - compress or expand files
mzip (1)             - change protection mode and eject disk on Zip/Jaz drive
unzip (1)            - list, test and extract compressed files in a ZIP archive
unzipsfx (1)         - self-extracting stub for prepending to ZIP archives
zforce (1)           - force a '.gz' extension on all gzip files
zip (1)              - package and compress (archive) files
zipcloak (1)         - encrypt entries in a zipfile
zipgrep (1)          - search files in a ZIP archive for lines matching a pat...
zipinfo (1)          - list detailed information about a ZIP archive
zipnote (1)          - write the comments in zipfile to stdout, edit comments...
zipsplit (1)         - split a zipfile into smaller zipfiles

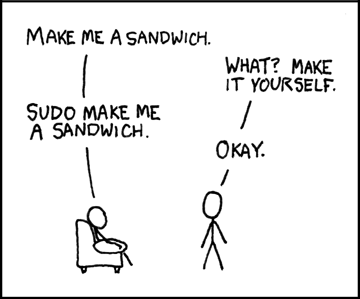
http://xkcd.com/149/
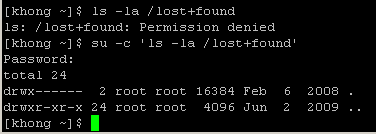
We can obtain root privileges with a command su (substitute user). The example below shows how to use su command:

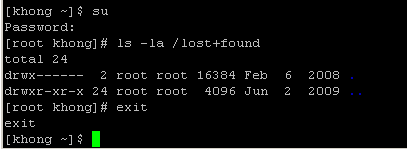
The command uses su with -c (command) option. We used single quote (') to make sure the shell interprets the commands properly. After the execution of the command, the user does not have root privileges any more. We can see it by using su with no arguments, and what it does is exactly the same as below:

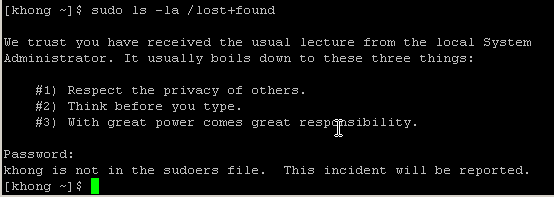
sudo also can be used to obtain root privileges. It requires us to enter our password, not the root password:

It did not succeed because the user is not allowed to do sudo. In this case, we can add the user to a group which can do sudo. For example, we need to add the existing user khong to a group wheel using:
usermod -g wheel khongThen, we can do as in the picture below.

bzip2 can be efficiently used when a file contains repeated information. As an example, I made a 1000 line file with a letter 'k'.

To display the compressed file, we can use bzcat, and it displays uncompressed data:

As we see, the file has shrinked to 49 bytes from 73,000 bytes.
We can put it back using bunzip2:

Standard output is a place a program can send information to. The program does not know where the information it sends to standard output is heading. It can go to a file, printer, or the screen. In this section, we will see, by default, the shell directs standard output from a command to the screen and explain how we can cause the shell to redirect this output to a file. Standard input is a place a program can get information from.
- fd = open(pathname, flags, mode) opens the file identified by pathname, returning a file descriptor used to refer to the open file in subsequent calls. If the file doesn't exist, open() may create it, depending on the settings of the flags bitmask argument. The flags argument also specifies whether the file is to be opened for reading, writing, or both. The mode argument specifies the permissions to be placed on the file if it is created by this call. If the open() call is not being used to create a file, this argument is ignored and can be omitted.
- byte_read = read(fd, buffer, count) reads at most count bytes from the open file referred to by fd and stores them in buffer. The read() call returns the number of bytes actually read. If no further bytes could be read (i.e., end-of-file was encountered), read() returns 0.
- byte_written = write(fd, buffer, count) writes up to count bytes from buffer to the open file referred to by fd. The write() call returns the number of bytes actually written, which may be less than count.
- status = close(fd) is called after all I/O has been completed, in order to release the file descriptor fd and its associated kernel resources.
A device file is one of the types of file, and it resides in the /dev directory. It represents a peripheral device, such as keyboard, printer, disk drive, or screen.
The device name that the who displays after username is the filename of the screen:
[khong ~]$ who
root     tty1         2010-08-06 10:59
khong    pts/0        2011-07-19 21:31
root     pts/1        2011-07-19 19:06
khong    pts/3        2011-07-19 22:21
So, in the above example, the device name is pts/3, and the pathname of the screen is /dev/pts/3.
[khong ~]$ tty
/dev/pts/3
[khong ~]$
When we first log in, the shell directs standard output of our commands to the device file that represents the screen. The cat command copies a file to standard output. It's because the shell directs the standard output to the screen. Though we usually use cat with an argument, if we do not give cat an argument, i.e., hit RETURN, cat takes its input from standard input. So, it copies standard input to standard output, one line at a time.
The cat keeps copying text until we enter CONTROL-D. It sends an EOF signal to cat to indicate that it has reached the end of standard input and there is no more text to be copied. Then, it finishes execution and returns control to the shell so that the shell can display a prompt.
We can make the shell to redirect standard input/output to/from other than the device file representing the keyboard/screen. The redirect output symbol (>) tells the shell to redirect the out to the specified file rather than to the screen:
$cat > redirected_output_file_name
We can also redirect input using redirect input symbol (<):
$cat < input_file_name
The shell provides noclobber that prevents overwriting a file when we use redirection. In bash, we can enable this by set -o noclobber:
[khong ~]$ set -o noclobber
[khong ~]$ echo "add more to myfile" > myfile
-bash: myfile: cannot overwrite existing file
[khong ~]$ set +o noclobber
[khong ~]$ echo "add more to myfile" > myfile
For more on Standard Error Redirection.
There is also an append output symbol (>>) tells the shell to add to the end of a file.
/dev/null device is called data sink or bit bucket. We can redirect output that we do not want to /dev/null:
$echo "Go to bit bucket" > /dev/null
We can use a pipe to connect standard output of a command to a standard input of another command. The pipe has the same effect as redirecting standard output of one command to a file and then using that file as standard input to another command:
commandA args | commandB argsActually, what it does is:
commandA args > tmp
commandB args < tmp
rm tmp
The tee copies its standard input to both a file and to standard output. As the name suggests, it takes a single stream of input and sends the output in two directions. The tee saves a copy of standard input into a vmstat.out, and vmstat.out also sends a copy to standard output. Standard output from tee goes through a pipe to standard input of grep, which displays only those lines containing the string id

Let' briefly what the vmstat is doing.
The first row shows our server averages. The si (swap in) and so (swap out) columns show if we have been swapping (i.e. needing to dip into 'virtual' memory) in order to run our server's applications. The si/so numbers should be 0 (or close to it). Numbers in the hundreds or thousands indicate our server is swapping heavily. This consumes a lot of CPU and other server resources and we would get a significant benefit from adding more memory to our server.
The r (runnable) b (blocked) and w (waiting) columns help see our server load. Waiting processes are swapped out. Blocked processes are typically waiting on I/O. The runnable column is the number of processes trying to something. These numbers combine to form the 'load' value on our server. Typically we want the load value to be one or less per CPU in our server. The bi (bytes in) and bo (bytes out) column show disk I/O (including swapping memory to/from disk) on our server. The us (user), sy (system) and id (idle) show the amount of CPU our server is using. The higher the idle value, the better.
If we want to catch vmstat every one minute and write it to a log, we need to use crontab.
- Set cron schedule using crontab -e to run vmstat.sh at 00:02 am every day.
2 0 * * * /usr/local/work/vmstat.sh > /dev/null 2>&1
- vmstat.sh script should be look like this:
/usr/bin/vmstat 60 1440 > /usr/local/work/log/vmstat_`date +%Y%m%d`.log
Note that the vmstat.sh needs permission for x.chmod u+x vmstat.sh
It runs in every 60 second, 1440 times a day, and it writes the log to vmstat_20130420.log. - To see if cron is running by viewing log file"
# tail -f /var/log/cron
A link is a pointer to a file. Whenever we create a file, we're putting a pointer in a directory. There are two kinds of links: hard links and symbolic (soft) links. Hard links are becoming outdated.
- Soft (symbolic) links:
- Soft linked files have different inode number from the source's. A soft link is a link to another name in the file system.
- When the original file is deleted, then soft link file is of no use.
- Can create links between directories.
- Can work across file systems.
- Hard links:
- Hard linked files have the same inode number as source.
- Deleting, renaming or moving the original file will not affect the hard link as it links to the underlying inode.
- Cannot create links between directories.
- Cannot work across file systems.
To make a hard link :
ln /target/file /new/link
This makes /target/file and /new/link the same file. In other words, if we edit one and the other will be changed. The file will not be gone until both /target/file and /new/link are deleted.
We can only do this with files. Hard link not allowed for directory. For folders, we must make a "soft" link. To make a soft symbolic link :
ln -s /target/file /new/link
For example:
ln -s /usr/bin/target_folder /usr/local/bin/folder
A hard link to a file appears as another file. If the file appears in the same directory as the file link-to file, the links should have different name.
We use ln to create a hard link to an existing file using the following:
ln existing_file link_name

In the example above, there are two directories, folderA and folderB. The folderA has a file called myfileA and we made a link to that file in folderB with a link name link_to_myfileA.
A hard link is a pointer to a file and it's the directory entry points to the inode. But a symbolic link is an indirect pointer to a file, and the directory entry contains the pathname of the pointed-to file - a pointer to the hard link to the file.
Symbolic link can be used to create a link to a directory while hard link can not. Because Linux filesystem keeps separate control information (separate inode tables of filesystem structure) for the files it holds, it is impossible to create hard links between files in different filesystems. A symbolic link can point to any file but a hard link to a file must be in the same filesystem as the other hard link to the file.
A major advantage of a symbolic link is that it can point to a file that's not existing. This is useful if we need a link to a file that is periodically removed and recreated. A hard link keeps pointing to a removed file, which the link keeps alive even after a new file is created. On the other hand, a symbolic link always points to the newly created file and does not interfere with deleted old file. As an example, a symbolic link could point to a file that gets checked in and out under a version control system, a .o file that is re-created by the compiler each time we run make.
But symbolic link has some disadvantages. While all hard links to a file have equal status, symbolic links do not have the same status as hard links. Having several hard links is the same as having several legal names while soft links are link aliases.
To create a symbolic link, we use ln with --symbolic or (-s) option.

Note that the size and times of the last modifications of the two files are different. A symbolic link to a file does not have the same status information as the file itself. We can also use ln to create a symbolic link to a directory.
The -f option overwrites old link:
$ ln -s file1 link
$ ls -la link
lrwxrwxrwx 1 k k 5 Nov 21 11:16 link -> file1

$ ln -s file2 link
ln: failed to create symbolic link 'link': File exists

$ ln -sf file2 link
$ ls -la link
lrwxrwxrwx 1 k k 5 Nov 21 11:17 link -> file2
I used rsync to copy about 3TB to NAS (Network Attached Storage). Source side has /data partition and target side has /data2 share. The /data2 has been mounted on old storage server using the following commands:
mkdir /data2
mount -t nfs 192.168.100.54:/data2 /data2
To prevent sending HUP signal during the copying process, I used it with nohup, and ran it background. Here is the rsync syntax for copying files from /data/mydir to /data2/mydir:
nohup rsync -a mydir /data2 &
It worked perfectly, and the output is stored in the default nohup.out. When I need to update /data2/mydir, I just re-issued the same rsync command, and it copied only the new files.
Using issue command, we can find what OS is currently running.
$ cat /etc/issue
CentOS release 5.4 (Final)
Kernel \r on an \m
Using cpuinfo command, we can find what CPU we are using.
$ cat /proc/cpuinfo
[root@tmi ~]# cat /proc/cpuinfo
processor       : 0
vendor_id       : GenuineIntel
cpu family      : 6
model           : 23
model name      : Intel(R) Xeon(R) CPU           E5405  @ 2.00GHz
stepping        : 6
cpu MHz         : 1995.182
cache size      : 6144 KB
....
Linux - system, cmds & shell
- Linux Tips - links, vmstats, rsync
- Linux Tips 2 - ctrl a, curl r, tail -f, umask
- Linux - bash I
- Linux - bash II
- Linux - Uncompressing 7z file
- Linux - sed I (substitution: sed 's///', sed -i)
- Linux - sed II (file spacing, numbering, text conversion and substitution)
- Linux - sed III (selective printing of certain lines, selective definition of certain lines)
- Linux - 7 File types : Regular, Directory, Block file, Character device file, Pipe file, Symbolic link file, and Socket file
- Linux shell programming - introduction
- Linux shell programming - variables and functions (readonly, unset, and functions)
- Linux shell programming - special shell variables
- Linux shell programming : arrays - three different ways of declaring arrays & looping with $*/$@
- Linux shell programming : operations on array
- Linux shell programming : variables & commands substitution
- Linux shell programming : metacharacters & quotes
- Linux shell programming : input/output redirection & here document
- Linux shell programming : loop control - for, while, break, and break n
- Linux shell programming : string
- Linux shell programming : for-loop
- Linux shell programming : if/elif/else/fi
- Linux shell programming : Test
- Managing User Account - useradd, usermod, and userdel
- Linux Secure Shell (SSH) I : key generation, private key and public key
- Linux Secure Shell (SSH) II : ssh-agent & scp
- Linux Secure Shell (SSH) III : SSH Tunnel as Proxy - Dynamic Port Forwarding (SOCKS Proxy)
- Linux Secure Shell (SSH) IV : Local port forwarding (outgoing ssh tunnel)
- Linux Secure Shell (SSH) V : Reverse SSH Tunnel (remote port forwarding / incoming ssh tunnel) /)
- Linux Processes and Signals
- Linux Drivers 1
- tcpdump
- Linux Debugging using gdb
- Embedded Systems Programming I - Introduction
- Embedded Systems Programming II - gcc ARM Toolchain and Simple Code on Ubuntu/Fedora
- LXC (Linux Container) Install and Run
- Linux IPTables
- Hadoop - 1. Setting up on Ubuntu for Single-Node Cluster
- Hadoop - 2. Runing on Ubuntu for Single-Node Cluster
- ownCloud 7 install
- Ubuntu 14.04 guest on Mac OSX host using VirtualBox I
- Ubuntu 14.04 guest on Mac OSX host using VirtualBox II
- Windows 8 guest on Mac OSX host using VirtualBox I
- Ubuntu Package Management System (apt-get vs dpkg)
- RPM Packaging
- How to Make a Self-Signed SSL Certificate
- Linux Q & A
- DevOps / Sys Admin questions
Ph.D. / Golden Gate Ave, San Francisco / Seoul National Univ / Carnegie Mellon / UC Berkeley / DevOps / Deep Learning / Visualization