HashiCorp Vault and Consul on AWS with Terraform
This post is based on vault-guides/operations/provision-vault/quick-start/terraform-aws/, and not many new things are added. The guide given as an output from terraform apply is good in general but I feel it would have been better if we have more detailed one. So, here you go.
repo:Vault-Consul-on-AWS-with-Terraform
We'll be using network_aws, vault_aws, and consul_aws modules.
If you like to have Vault and Consul containerized, please check out these:
- Docker Compose - Hashicorp's Vault and Consul Part A (install vault, ing, static secrets, and policies)
- Docker Compose - Hashicorp's Vault and Consul Part B (EaaS, dynamic secrets, leases, and revocation)
- Docker Compose - Hashicorp's Vault and Consul Part C (Consul)
- Docker & Kubernetes : HashiCorp's Vault and Consul on minikube
- Docker & Kubernetes : HashiCorp's Vault and Consul - Auto-unseal using Transit Secrets Engine
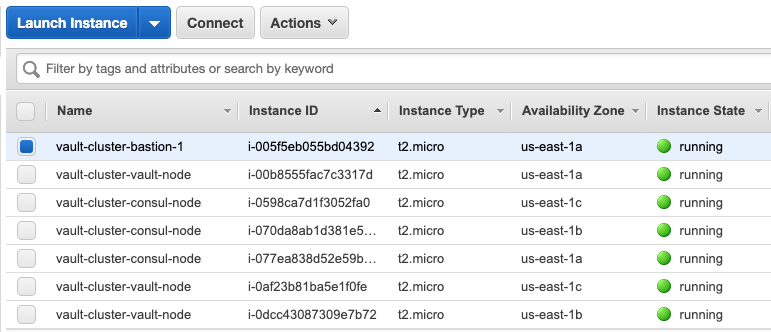
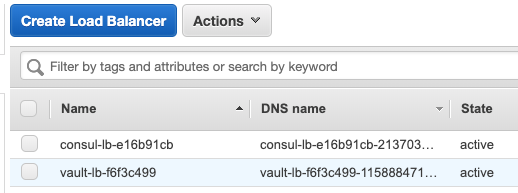
At the end, we'll have the following:
instances:
-
Two load balancers:
-
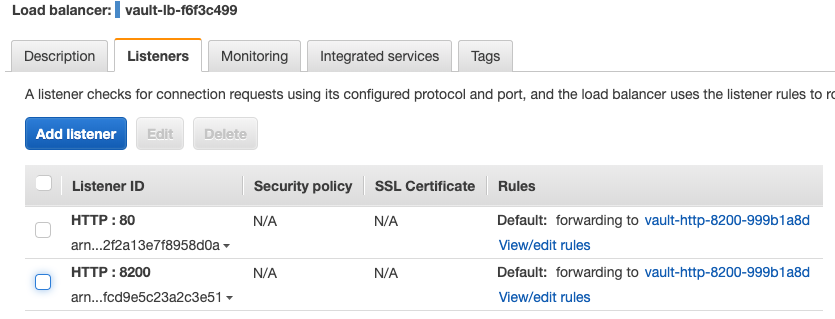
Vault LB Listeners:
-
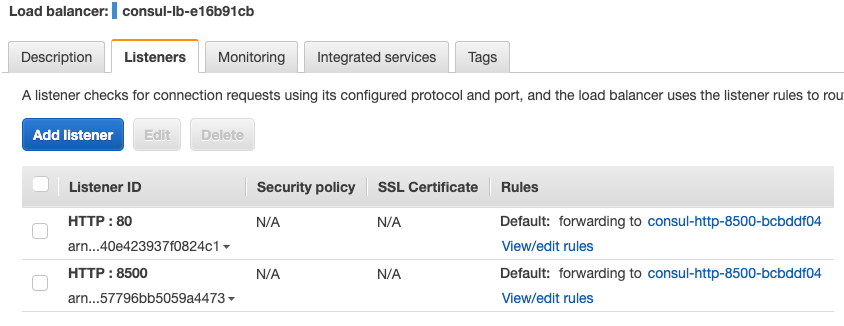
Consul LB Listeners:
-
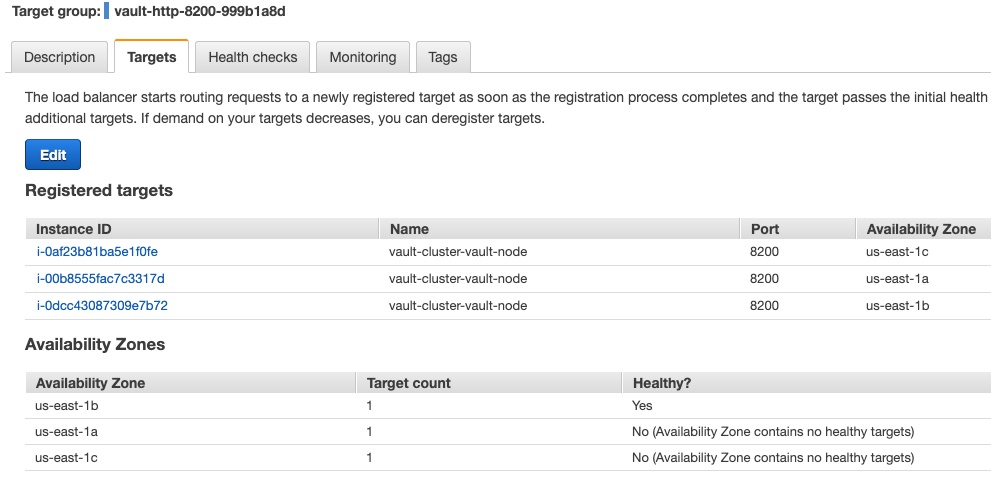
Targets in Vault LB Listeners:
-
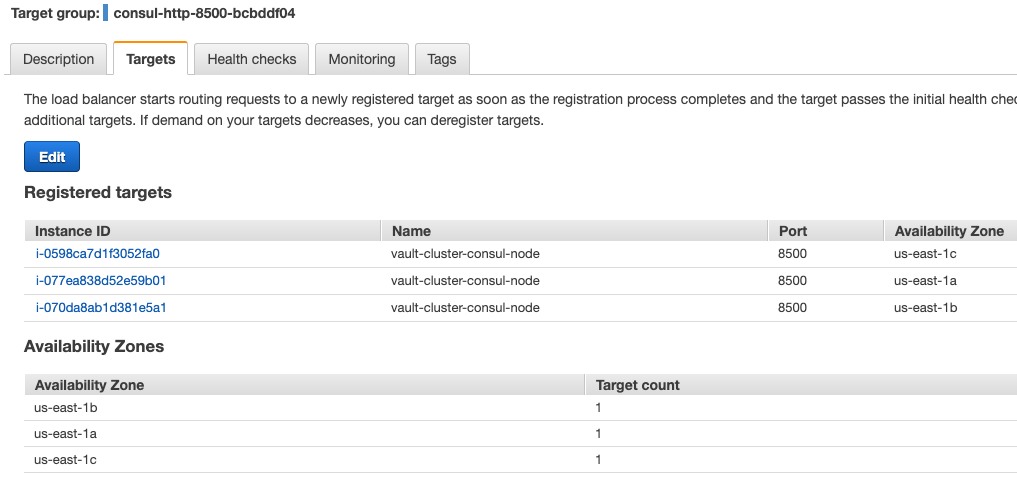
Targets in Consul LB Listeners:
-
Auto scaling groups:

The provider is defined in variables.tf:
variable "provider" { default = "aws" }
The AWS provider offers a flexible means of providing credentials for authentication. Among them, we'll use Environment variables:
$ export AWS_ACCESS_KEY_ID="anaccesskey"
$ export AWS_SECRET_ACCESS_KEY="asecretkey"
$ export AWS_DEFAULT_REGION="us-ease-1"
The number of instances (ASG) is dependent on the number of subnets:
desired_capacity = "${var.count != -1 ? var.count : length(var.subnet_ids)}"
If no arguments are given, the configuration in the current working directory is initialized.
The terraform init command is used to initialize a working directory containing Terraform configuration files. This is the first command that should be run after writing a new Terraform configuration.
$ terraform init
Initializing modules...
- module.network_aws
- module.consul_aws
- module.vault_aws
- module.network_aws.consul_auto_join_instance_role
- module.network_aws.ssh_keypair_aws
- module.network_aws.bastion_consul_client_sg
- module.network_aws.ssh_keypair_aws.tls_private_key
- module.consul_aws.consul_auto_join_instance_role
- module.consul_aws.consul_server_sg
- module.consul_aws.consul_lb_aws
- module.consul_aws.consul_server_sg.consul_client_ports_aws
- module.vault_aws.consul_auto_join_instance_role
- module.vault_aws.vault_server_sg
- module.vault_aws.consul_client_sg
- module.vault_aws.vault_lb_aws

Initializing provider plugins...

The following providers do not have any version constraints in configuration,
so the latest version was installed.

To prevent automatic upgrades to new major versions that may contain breaking
changes, it is recommended to add version = "..." constraints to the
corresponding provider blocks in configuration, with the constraint strings
suggested below.

* provider.aws: version = "~> 2.11"
* provider.null: version = "~> 2.1"
* provider.random: version = "~> 2.1"
* provider.template: version = "~> 2.1"
* provider.tls: version = "~> 2.0"

Terraform has been successfully initialized!
...
The terraform plan command is used to create an execution plan. Terraform performs a refresh and then determines what actions are necessary to achieve the desired state specified in the configuration files.
terraform plan command is a convenient way to check whether the execution plan for a set of changes matches your expectations without making any changes to real resources or to the state.
$ terraform plan
Refreshing Terraform state in-memory prior to plan...
The refreshed state will be used to calculate this plan, but will not be
persisted to local or remote state storage.

data.template_file.base_install: Refreshing state...
data.template_file.consul_install: Refreshing state...
data.template_file.vault_install: Refreshing state...
data.template_file.bastion: Refreshing state...
data.template_file.vault: Refreshing state...
data.template_file.vault_init: Refreshing state...
data.template_file.bastion_init: Refreshing state...
data.aws_elb_service_account.vault_lb_access_logs: Refreshing state...
data.aws_ami.base: Refreshing state...
data.aws_iam_policy_document.consul: Refreshing state...
data.aws_availability_zones.main: Refreshing state...
data.aws_iam_policy_document.assume_role: Refreshing state...
data.aws_elb_service_account.consul_lb_access_logs: Refreshing state...
data.aws_iam_policy_document.consul: Refreshing state...
data.aws_iam_policy_document.assume_role: Refreshing state...
data.aws_iam_policy_document.assume_role: Refreshing state...
data.aws_iam_policy_document.consul: Refreshing state...
...
The terraform apply command is used to apply the changes required to reach the desired state of the configuration:
$ terraform apply
...
Outputs:

bastion_ips_public = [
    18.207.107.201
]
...
bastion_username = ec2-user
...
consul_lb_dns = consul-lb-e16b91cb-2137033131.us-east-1.elb.amazonaws.com
...
vault_lb_dns = vault-lb-f6f3c499-1158884718.us-east-1.elb.amazonaws.com
...
Here is additional output from the terraform apply command:
# ------------------------------------------------------------------------------
# vault-cluster Network
# ------------------------------------------------------------------------------
A private RSA key has been generated and downloaded locally. The file
permissions have been changed to 0600 so the key can be used immediately for
SSH or scp.

If you're not running Terraform locally (e.g. in TFE or Jenkins) but are using
remote state and need the private key locally for SSH, run the below command to
download.

  $ echo "$(terraform output private_key_pem)" \
      > vault-cluster-346cee5b.key.pem \
      && chmod 0600 vault-cluster-346cee5b.key.pem

Run the below command to add this private key to the list maintained by
ssh-agent so you're not prompted for it when using SSH or scp to connect to
hosts with your public key.

  $ ssh-add vault-cluster-346cee5b.key.pem

The public part of the key loaded into the agent ("public_key_openssh" output)
has been placed on the target system in ~/.ssh/authorized_keys.

  $ ssh -A -i vault-cluster-346cee5b.key.pem ec2-user@18.207.107.201

To force the generation of a new key, the private key instance can be "tainted"
using the below command if the private key was not overridden.

  $ terraform taint -module=network_aws.ssh_keypair_aws.tls_private_key \
      tls_private_key.key

# ------------------------------------------------------------------------------
# Local HTTP API Requests
# ------------------------------------------------------------------------------

If you're making HTTP API requests outside the Bastion (locally), set
the below env vars.

The `vault_public` and `consul_public` variables must be set to true for
requests to work.

`vault_public`: 1
`consul_public`: 1

  $ export VAULT_ADDR=http://vault-lb-f6f3c499-1158884718.us-east-1.elb.amazonaws.com:8200
  $ export CONSUL_ADDR=http://consul-lb-e16b91cb-2137033131.us-east-1.elb.amazonaws.com:8500

# ------------------------------------------------------------------------------
# Vault Cluster
# ------------------------------------------------------------------------------

Once on the Bastion host, you can use Consul's DNS functionality to seamlessly
SSH into other Consul or Nomad nodes if they exist.

  $ ssh -A ec2-user@consul.service.consul

  # Vault must be initialized & unsealed for this command to work
  $ ssh -A ec2-user@vault.service.consul

# ------------------------------------------------------------------------------
# vault-cluster Vault Dev Guide Setup
# ------------------------------------------------------------------------------

If you're following the "Dev Guide" with the provided defaults, Vault is
running in -dev mode and using the in-memory storage backend.

The Root token for your Vault -dev instance has been set to "root" and placed in
`/srv/vault/.vault-token`, the `VAULT_TOKEN` environment variable has already
been set by default.

  $ echo ${VAULT_TOKEN} # Vault Token being used to authenticate to Vault
  $ sudo cat /srv/vault/.vault-token # Vault Token has also been placed here

If you're using a storage backend other than in-mem (-dev mode), you will need
to initialize Vault using steps 2 & 3 below.

# ------------------------------------------------------------------------------
# vault-cluster Vault Quick Start/Best Practices Guide Setup
# ------------------------------------------------------------------------------

If you're following the "Quick Start Guide" or "Best Practices" guide, you won't
be able to start interacting with Vault from the Bastion host yet as the Vault
server has not been initialized & unsealed. Follow the below steps to set this
up.

1.) SSH into one of the Vault servers registered with Consul, you can use the
below command to accomplish this automatically (we'll use Consul DNS moving
forward once Vault is unsealed).

  $ ssh -A ec2-user@$(curl http://127.0.0.1:8500/v1/agent/members | jq -M -r \
      '[.[] | select(.Name | contains ("vault-cluster-vault")) | .Addr][0]')

2.) Initialize Vault

  $ vault operator init

3.) Unseal Vault using the "Unseal Keys" output from the `vault init` command
and check the seal status.

  $ vault operator unseal <UNSEAL_KEY_1>
  $ vault operator unseal <UNSEAL_KEY_2>
  $ vault operator unseal <UNSEAL_KEY_3>
  $ vault status

Repeat steps 1.) and 3.) to unseal the other "standby" Vault servers as well to
achieve high availablity.

4.) Logout of the Vault server (ctrl+d) and check Vault's seal status from the
Bastion host to verify you can interact with the Vault cluster from the Bastion
host Vault CLI.

  $ vault status

# ------------------------------------------------------------------------------
# vault-cluster Vault Getting Started Instructions
# ------------------------------------------------------------------------------

You can interact with Vault using any of the
CLI (https://www.vaultproject.io/docs/commands/index.html) or
API (https://www.vaultproject.io/api/index.html) commands.

Vault UI: http://vault-lb-f6f3c499-1158884718.us-east-1.elb.amazonaws.com (Public)

The Vault nodes are in a public subnet with UI & SSH access open from the
internet. WARNING - DO NOT DO THIS IN PRODUCTION!

To start interacting with Vault, set your Vault token to authenticate requests.

If using the "Vault Dev Guide", Vault is running in -dev mode & this has been set
to "root" for you. Otherwise we will use the "Initial Root Token" that was output
from the `vault operator init` command.

  $ echo ${VAULT_ADDR} # Address you will be using to interact with Vault
  $ echo ${VAULT_TOKEN} # Vault Token being used to authenticate to Vault
  $ export VAULT_TOKEN= # If Vault token has not been set

Use the CLI to write and read a generic secret.

  $ vault kv put secret/cli foo=bar
  $ vault kv get secret/cli

Use the HTTP API with Consul DNS to write and read a generic secret with
Vault's KV secret engine.

If you're making HTTP API requests to Vault from the Bastion host,
the below env var has been set for you.

  $ export VAULT_ADDR=http://vault.service.vault:8200

  $ curl \
      -H "X-Vault-Token: ${VAULT_TOKEN}" \
      -X POST \
      -d '{"data": {"foo":"bar"}}' \
      ${VAULT_ADDR}/v1/secret/data/api | jq '.' # Write a KV secret
  $ curl \
      -H "X-Vault-Token: ${VAULT_TOKEN}" \
      ${VAULT_ADDR}/v1/secret/data/api | jq '.' # Read a KV secret

# ------------------------------------------------------------------------------
# vault-cluster Consul
# ------------------------------------------------------------------------------

You can now interact with Consul using any of the CLI
(https://www.consul.io/docs/commands/index.html) or
API (https://www.consul.io/api/index.html) commands.

Consul UI: consul-lb-e16b91cb-2137033131.us-east-1.elb.amazonaws.com (Public)

The Consul nodes are in a public subnet with UI & SSH access open from the
internet. WARNING - DO NOT DO THIS IN PRODUCTION!

Use the CLI to retrieve the Consul members, write a key/value, and read
that key/value.

  $ consul members # Retrieve Consul members
  $ consul kv put cli bar=baz # Write a key/value
  $ consul kv get cli # Read a key/value

Use the HTTP API to retrieve the Consul members, write a key/value,
and read that key/value.

If you're making HTTP API requests to Consul from the Bastion host,
the below env var has been set for you.

  $ export CONSUL_ADDR=http://127.0.0.1:8500

  $ curl \
      -X GET \
      ${CONSUL_ADDR}/v1/agent/members | jq '.' # Retrieve Consul members
  $ curl \
      -X PUT \
      -d 'bar=baz' \
      ${CONSUL_ADDR}/v1/kv/api | jq '.' # Write a KV
  $ curl \
      -X GET \
      ${CONSUL_ADDR}/v1/kv/api | jq '.' # Read a KV
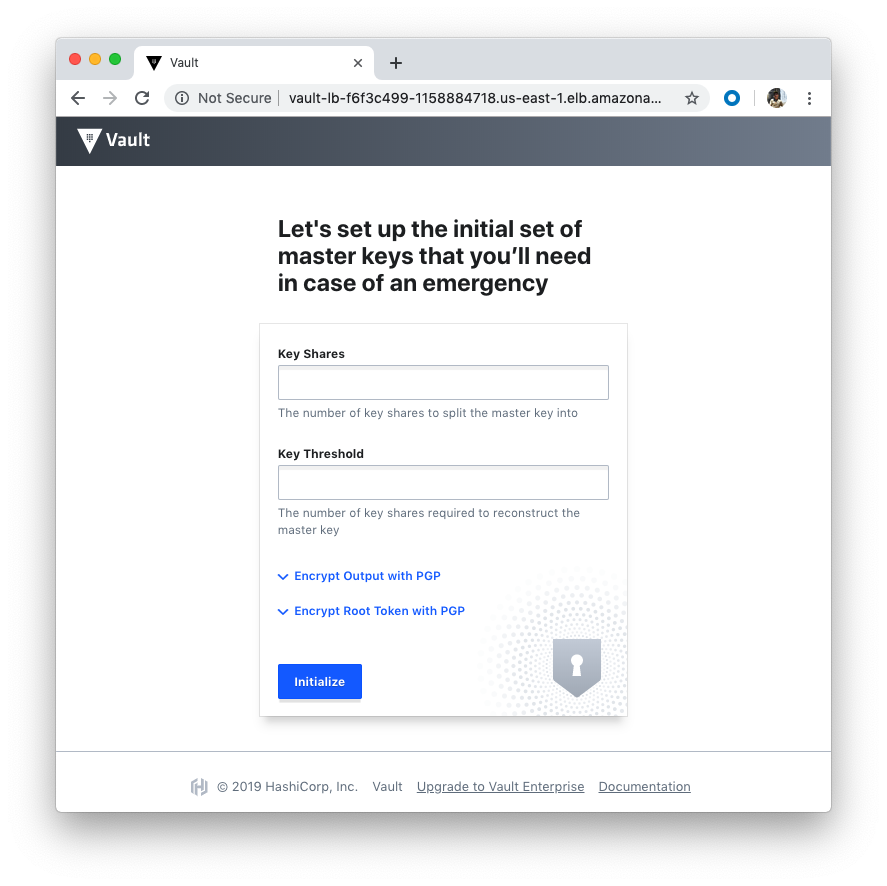
Our Vault nodes are in a public subnet with UI & SSH access open from the internet and this is not recommended for production.
So, we can access using Vault UI: http://vault-lb-f6f3c499-1158884718.us-east-1.elb.amazonaws.com:
We need the private key locally for SSH to Bastion. Let's run the below in the Terraform root directory to download:
$ echo "$(terraform output private_key_pem)" \
      > vault-cluster-346cee5b.key.pem \
      && chmod 0600 vault-cluster-346cee5b.key.pem
We can log on to the Bastion using the downloaded key:
$ ssh -i vault-cluster-346cee5b.key.pem ec2-user@18.207.107.201
[ec2-user@vault-cluster-bastion-1-i-005f5eb055bd04392 ~]$
[ec2-user@vault-cluster-bastion-1-i-005f5eb055bd04392 .ssh]$ export vault_public=1
[ec2-user@vault-cluster-bastion-1-i-005f5eb055bd04392 .ssh]$ export consul_public=1
[ec2-user@vault-cluster-bastion-1-i-005f5eb055bd04392 .ssh]$ echo $vault_public
1
[ec2-user@vault-cluster-bastion-1-i-005f5eb055bd04392 .ssh]$ export VAULT_ADDR=http://vault-lb-f6f3c499-1158884718.us-east-1.elb.amazonaws.com:8200
[ec2-user@vault-cluster-bastion-1-i-005f5eb055bd04392 .ssh]$ export CONSUL_ADDR=http://consul-lb-e16b91cb-2137033131.us-east-1.elb.amazonaws.com:8500
[ec2-user@vault-cluster-bastion-1-i-005f5eb055bd04392 .ssh]$ ssh -A ec2-user@consul.service.consul
The authenticity of host 'consul.service.consul (10.139.1.121)' can't be established.
ECDSA key fingerprint is 87:f1:3a:53:f0:f1:21:e6:c6:0d:0f:63:64:13:8a:bf.
Are you sure you want to continue connecting (yes/no)? yes
Warning: Permanently added 'consul.service.consul,10.139.1.121' (ECDSA) to the list of known hosts.

[ec2-user@vault-cluster-consul-i-077ea838d52e59b01 ~]$ ssh -A ec2-user@vault.service.consul
ssh: Could not resolve hostname vault.service.consul: Name or service not known
Now that we're on the Bastion, we're ready to setup the Vault cluster.
Note that we won't be able to start interacting with Vault from the Bastion host yet as the Vault server has not been initialized & unsealed.
Follow the below steps to set this up.
SSH into one of the Vault servers registered with Consul, we can use the below command to accomplish this automatically (we'll use Consul DNS moving forward once Vault is unsealed):
$ ssh -A ec2-user@$(curl http://127.0.0.1:8500/v1/agent/members | jq -M -r \ '[.[] | select(.Name | contains ("vault-cluster-vault")) | .Addr][0]') % Total % Received % Xferd Average Speed Time Time Time Current Dload Upload Total Spent Left Speed 100 2698 0 2698 0 0 621k 0 --:--:-- --:--:-- --:--:-- 658k The authenticity of host '10.139.2.85 (10.139.2.85)' can't be established. ECDSA key fingerprint is fc:fc:17:8a:96:e3:dc:db:5d:e3:18:33:b3:d0:ae:7a. Are you sure you want to continue connecting (yes/no)? yes Warning: Permanently added '10.139.2.85' (ECDSA) to the list of known hosts. [ec2-user@vault-cluster-vault-i-0dcc43087309e7b72 ~]$-
Initialize Vault:
$ vault operator init
Unseal Key 1: V/knpsNkYT9mt/D000UQ8TTdyUcAIZXffuwUlN9/mgGA
Unseal Key 2: U1YIP0kuXVDQmNbsSyRNGAs6q6eurQsHIR/bBfdSQ2xi
Unseal Key 3: FM39o3AM4ohdIJy0T8LfwlXJJBJcouDIKWAPI2/WoU3H
Unseal Key 4: abr3JNbTSvAbE6NP9UTewDgZQ3eSFjGoAhQgx/Kzan7P
Unseal Key 5: vXKiY08FCjUBJz1Fo6TpbqBll7xg776y+VtmlTxSPOPw

Initial Root Token: 7qaONQY0KF35OsAbKSnqYJFj

Vault initialized with 5 key shares and a key threshold of 3. Please securely
distribute the key shares printed above. When the Vault is re-sealed,
restarted, or stopped, you must supply at least 3 of these keys to unseal it
before it can start servicing requests.

Vault does not store the generated master key. Without at least 3 key to
reconstruct the master key, Vault will remain permanently sealed!

It is possible to generate new unseal keys, provided you have a quorum of
existing unseal keys shares. See "vault operator rekey" for more information.
[ec2-user@vault-cluster-vault-i-0dcc43087309e7b72 ~]$
-
Vault starts in a sealed state. Vault is unsealed by providing the unseal keys. By default, Vault uses a technique known as Shamir's secret sharing algorithm to split the master key into 5 shares, any 3 of which are required to reconstruct the master key.
Unseal Vault using the "Unseal Keys" output from the
vault operator initcommand and check the seal status:# vault operator unseal <UNSEAL_KEY_1> # vault operator unseal <UNSEAL_KEY_2> # vault operator unseal <UNSEAL_KEY_3> [ec2-user@vault-cluster-vault-i-0dcc43087309e7b72 ~]$ vault operator unseal V/knpsNkYT9mt/D000UQ8TTdyUcAIZXffuwUlN9/mgGA Key Value --- ----- Seal Type shamir Initialized true Sealed true Total Shares 5 Threshold 3 Unseal Progress 1/3 Unseal Nonce 7da61724-24b4-7f29-e15c-55d63931f00d Version 0.11.3 HA Enabled true [ec2-user@vault-cluster-vault-i-0dcc43087309e7b72 ~]$ [ec2-user@vault-cluster-vault-i-0dcc43087309e7b72 ~]$ vault operator unseal U1YIP0kuXVDQmNbsSyRNGAs6q6eurQsHIR/bBfdSQ2xi Key Value --- ----- Seal Type shamir Initialized true Sealed true Total Shares 5 Threshold 3 Unseal Progress 2/3 Unseal Nonce 7da61724-24b4-7f29-e15c-55d63931f00d Version 0.11.3 HA Enabled true [ec2-user@vault-cluster-vault-i-0dcc43087309e7b72 ~]$ [ec2-user@vault-cluster-vault-i-0dcc43087309e7b72 ~]$ vault operator unseal FM39o3AM4ohdIJy0T8LfwlXJJBJcouDIKWAPI2/WoU3H Key Value --- ----- Seal Type shamir Initialized true Sealed false Total Shares 5 Threshold 3 Version 0.11.3 Cluster Name vault-cluster Cluster ID 24315b0e-eacc-a223-46af-80be7cf26110 HA Enabled true HA Cluster n/a HA Mode standby Active Node Address <none> [ec2-user@vault-cluster-vault-i-0dcc43087309e7b72 ~]$ [ec2-user@vault-cluster-vault-i-0dcc43087309e7b72 ~]$ vault status Key Value --- ----- Seal Type shamir Initialized true Sealed false Total Shares 5 Threshold 3 Version 0.11.3 Cluster Name vault-cluster Cluster ID 24315b0e-eacc-a223-46af-80be7cf26110 HA Enabled true HA Cluster https://10.139.2.85:8201 HA Mode active [ec2-user@vault-cluster-vault-i-0dcc43087309e7b72 ~]$
Once Vault retrieves the encryption key, it is able to decrypt the data in the storage backend, and enters the unsealed state. Once unsealed, Vault loads all of the configured audit devices, auth methods, and secrets engines.
Repeat steps 1.) and 3.) to unseal the other "standby" Vault servers as well to achieve high availability.
-
Logout of the Vault server (ctrl+d) and check Vault's seal status from the Bastion host to verify you can interact with the Vault cluster from the Bastion host Vault CLI.
[ec2-user@vault-cluster-bastion-1-i-005f5eb055bd04392 ~]$ vault status
Key             Value
---             -----
Seal Type       shamir
Initialized     true
Sealed          false
Total Shares    5
Threshold       3
Version         0.11.3
Cluster Name    vault-cluster
Cluster ID      24315b0e-eacc-a223-46af-80be7cf26110
HA Enabled      true
HA Cluster      https://10.139.2.85:8201
HA Mode         active
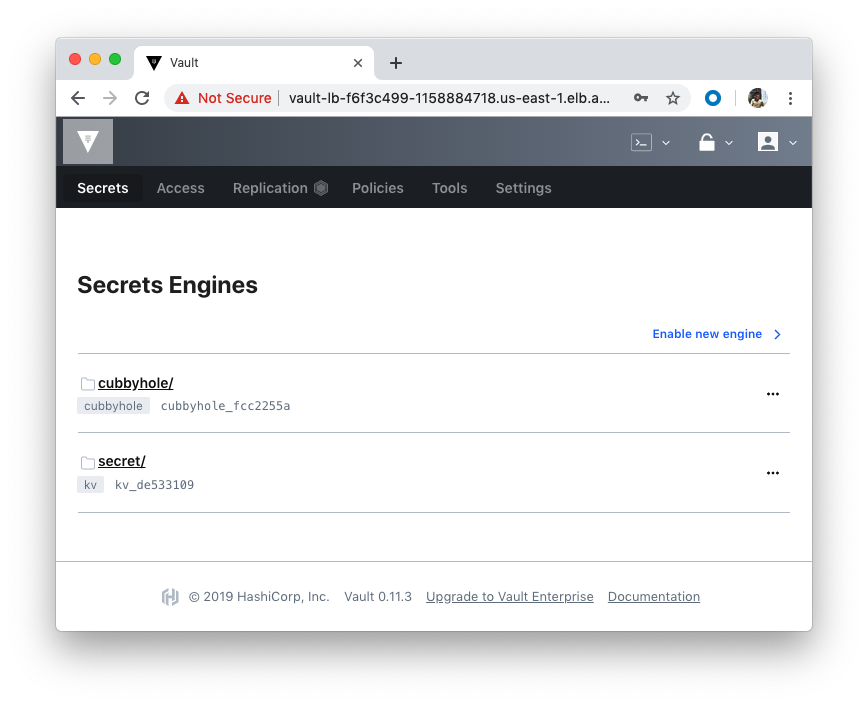
Browse into the Vault via http://vault-lb-f6f3c499-1158884718.us-east-1.elb.amazonaws.com (Public) and sign in with the Initial Root Token that was output
from the vault operator init command:

Click "Sign In":
Still on the Bastion, use the CLI to write and read a generic secret:
[ec2-user@vault-cluster-bastion-1-i-005f5eb055bd04392 ~]$ vault kv put secret/cli foo=bar
Error making API request.

URL: GET http://vault-lb-f6f3c499-1158884718.us-east-1.elb.amazonaws.com:8200/v1/sys/internal/ui/mounts/secret/cli
Code: 500. Errors:

* missing client token

[ec2-user@vault-cluster-bastion-1-i-005f5eb055bd04392 ~]$ echo ${VAULT_ADDR}
http://vault-lb-f6f3c499-1158884718.us-east-1.elb.amazonaws.com:8200

[ec2-user@vault-cluster-bastion-1-i-005f5eb055bd04392 ~]$ echo ${VAULT_TOKEN}

[ec2-user@vault-cluster-bastion-1-i-005f5eb055bd04392 ~]$ export VAULT_TOKEN=7qaONQY0KF35OsAbKSnqYJFj
[ec2-user@vault-cluster-bastion-1-i-005f5eb055bd04392 ~]$ echo ${VAULT_TOKEN}
7qaONQY0KF35OsAbKSnqYJFj
[ec2-user@vault-cluster-bastion-1-i-005f5eb055bd04392 ~]$ vault kv put secret/cli foo=bar
Success! Data written to: secret/cli

[ec2-user@vault-cluster-bastion-1-i-005f5eb055bd04392 ~]$ vault kv get secret/cli
=== Data ===
Key    Value
---    -----
foo    bar
Let's use the HTTP API with Consul DNS to write and read a generic secret with Vault's KV secret engine. Since we're making HTTP API requests to Vault from the Bastion host, the below env var has been set for us.
[ec2-user@vault-cluster-bastion-1-i-005f5eb055bd04392 ~]$ export VAULT_ADDR=http://vault.service.consul:8200

[ec2-user@vault-cluster-bastion-1-i-005f5eb055bd04392 ~]$ curl \
      -H "X-Vault-Token: ${VAULT_TOKEN}" \
      -X POST \
      -d '{"data": {"foo":"bar"}}' \
      ${VAULT_ADDR}/v1/secret/data/api | jq '.' # Write a KV secret
  % Total    % Received % Xferd  Average Speed   Time    Time     Time  Current
                                 Dload  Upload   Total   Spent    Left  Speed
100    23    0     0  100    23      0   1706 --:--:-- --:--:-- --:--:--  1916

[ec2-user@vault-cluster-bastion-1-i-005f5eb055bd04392 ~]$ curl \
      -H "X-Vault-Token: ${VAULT_TOKEN}" \
      ${VAULT_ADDR}/v1/secret/data/api | jq '.' # Read a KV secret
  % Total    % Received % Xferd  Average Speed   Time    Time     Time  Current
                                 Dload  Upload   Total   Spent    Left  Speed
100   186  100   186    0     0  29561      0 --:--:-- --:--:-- --:--:-- 31000
{
  "request_id": "19a64c35-01b0-1b76-88d1-16b6f0bc9ac8",
  "lease_id": "",
  "renewable": false,
  "lease_duration": 2764800,
  "data": {
    "data": {
      "foo": "bar"
    }
  },
  "wrap_info": null,
  "warnings": null,
  "auth": null
}
[ec2-user@vault-cluster-bastion-1-i-005f5eb055bd04392 ~]$
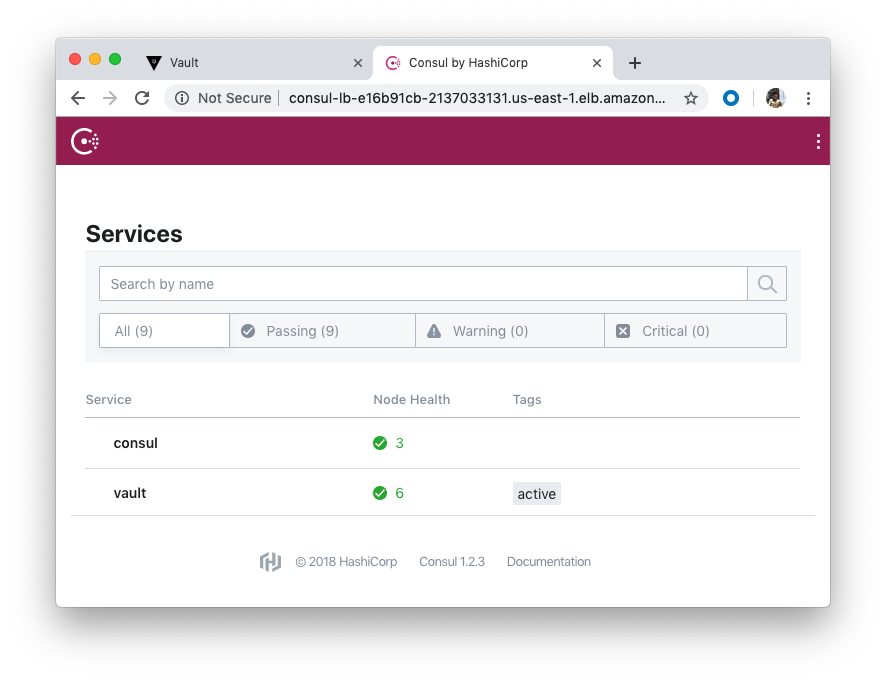
We can also interact with Consul using consul-lb-e16b91cb-2137033131.us-east-1.elb.amazonaws.com (Public):
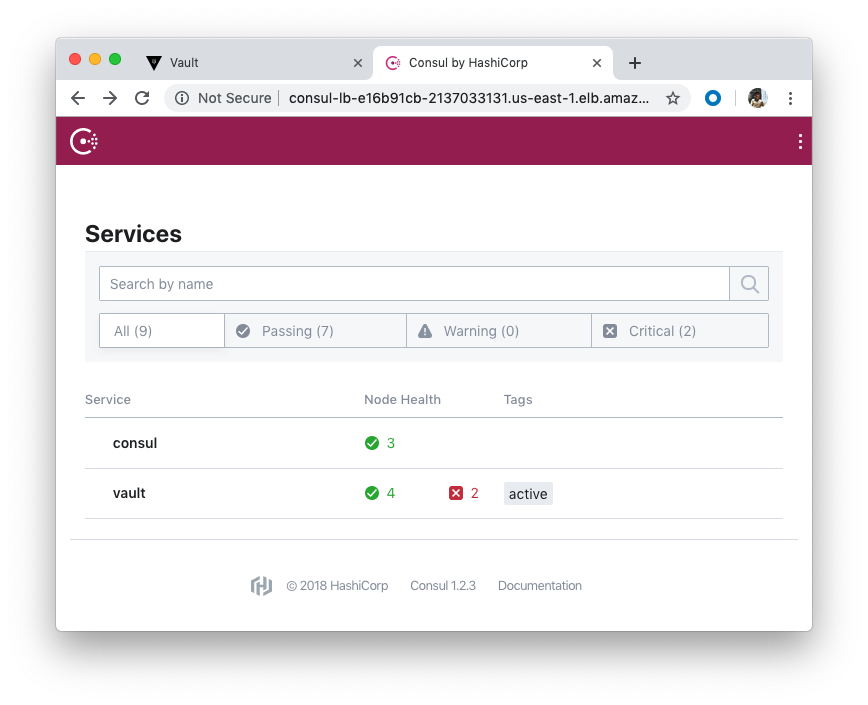
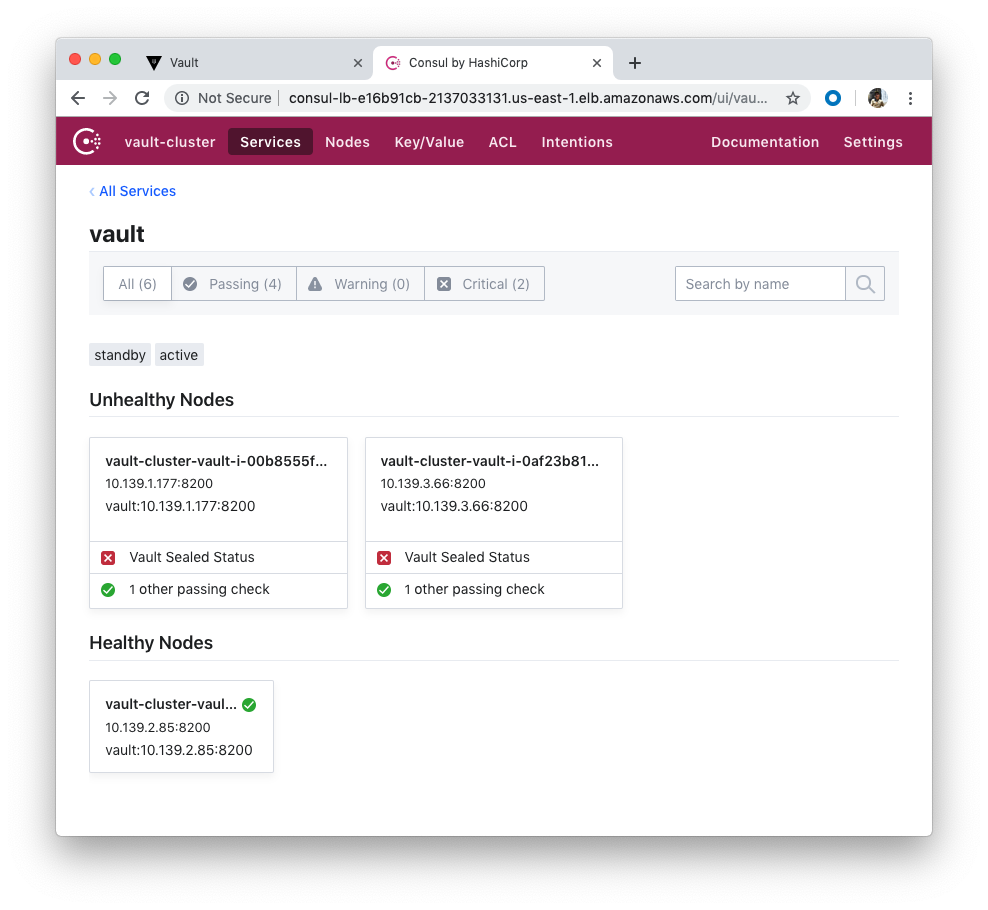
Note that we unsealed only one vault.
Note also that the Consul nodes are in a public subnet with UI & SSH access open from the internet, which we do not want for production.
Use the CLI to retrieve the Consul members, write a key/value, and read that key/value.
[ec2-user@vault-cluster-bastion-1-i-005f5eb055bd04392 ~]$ consul members # Retrieve Consul members
Node                                         Address            Status  Type    Build  Protocol  DC             Segment
vault-cluster-consul-i-0598ca7d1f3052fa0     10.139.3.76:8301   alive   server  1.2.3  2         vault-cluster  <all>
vault-cluster-consul-i-070da8ab1d381e5a1     10.139.2.230:8301  alive   server  1.2.3  2         vault-cluster  <all>
vault-cluster-consul-i-077ea838d52e59b01     10.139.1.121:8301  alive   server  1.2.3  2         vault-cluster  <all>
vault-cluster-bastion-1-i-005f5eb055bd04392  10.139.1.205:8301  alive   client  1.2.3  2         vault-cluster  <default>
vault-cluster-vault-i-00b8555fac7c3317d      10.139.1.177:8301  alive   client  1.2.3  2         vault-cluster  <default>
vault-cluster-vault-i-0af23b81ba5e1f0fe      10.139.3.66:8301   alive   client  1.2.3  2         vault-cluster  <default>
vault-cluster-vault-i-0dcc43087309e7b72      10.139.2.85:8301   alive   client  1.2.3  2         vault-cluster  <default>

[ec2-user@vault-cluster-bastion-1-i-005f5eb055bd04392 ~]$ consul kv put cli bar=baz # Write a key/value
Success! Data written to: cli

[ec2-user@vault-cluster-bastion-1-i-005f5eb055bd04392 ~]$ consul kv get cli # Read a key/value
bar=baz
Use the HTTP API to retrieve the Consul members, write a key/value, and read that key/value.
If we're making HTTP API requests to Consul from the Bastion host:
[ec2-user@vault-cluster-bastion-1-i-005f5eb055bd04392 ~]$ export CONSUL_ADDR=http://127.0.0.1:8500

[ec2-user@vault-cluster-bastion-1-i-005f5eb055bd04392 ~]$ curl \
      -X GET \
      ${CONSUL_ADDR}/v1/agent/members | jq '.' # Retrieve Consul members
  % Total    % Received % Xferd  Average Speed   Time    Time     Time  Current
                                 Dload  Upload   Total   Spent    Left  Speed
100  2698    0  2698    0     0  3654k      0 --:--:-- --:--:-- --:--:-- 2634k
[
  {
    "Name": "vault-cluster-vault-i-0dcc43087309e7b72",
    "Addr": "10.139.2.85",
    "Port": 8301,
    "Tags": {
      "build": "1.2.3:48d287ef",
      "dc": "vault-cluster",
      "id": "f954fd18-0a15-8c1b-3c04-6bb45263ddea",
      "role": "node",
      "segment": "",
      "vsn": "2",
      "vsn_max": "3",
      "vsn_min": "2"
    },
    "Status": 1,
    "ProtocolMin": 1,
    "ProtocolMax": 5,
    "ProtocolCur": 2,
    "DelegateMin": 2,
    "DelegateMax": 5,
    "DelegateCur": 4
  },
  {
    "Name": "vault-cluster-consul-i-077ea838d52e59b01",
    "Addr": "10.139.1.121",
    "Port": 8301,
    "Tags": {
      "build": "1.2.3:48d287ef",
      "dc": "vault-cluster",
      "expect": "3",
      "id": "b5534150-c7c1-cd11-9c4f-07681ff31f6d",
      "port": "8300",
      "raft_vsn": "3",
      "role": "consul",
      "segment": "",
      "vsn": "2",
      "vsn_max": "3",
      "vsn_min": "2",
      "wan_join_port": "8302"
    },
    "Status": 1,
    "ProtocolMin": 1,
    "ProtocolMax": 5,
    "ProtocolCur": 2,
    "DelegateMin": 2,
    "DelegateMax": 5,
    "DelegateCur": 4
  },
  {
    "Name": "vault-cluster-vault-i-00b8555fac7c3317d",
    "Addr": "10.139.1.177",
    "Port": 8301,
    "Tags": {
      "build": "1.2.3:48d287ef",
      "dc": "vault-cluster",
      "id": "f8f98aef-ec21-bbe0-88b1-d90b09d9bbce",
      "role": "node",
      "segment": "",
      "vsn": "2",
      "vsn_max": "3",
      "vsn_min": "2"
    },
    "Status": 1,
    "ProtocolMin": 1,
    "ProtocolMax": 5,
    "ProtocolCur": 2,
    "DelegateMin": 2,
    "DelegateMax": 5,
    "DelegateCur": 4
  },
  {
    "Name": "vault-cluster-consul-i-070da8ab1d381e5a1",
    "Addr": "10.139.2.230",
    "Port": 8301,
    "Tags": {
      "build": "1.2.3:48d287ef",
      "dc": "vault-cluster",
      "expect": "3",
      "id": "812efe9b-c50b-d9a5-3096-99860aa5ba4a",
      "port": "8300",
      "raft_vsn": "3",
      "role": "consul",
      "segment": "",
      "vsn": "2",
      "vsn_max": "3",
      "vsn_min": "2",
      "wan_join_port": "8302"
    },
    "Status": 1,
    "ProtocolMin": 1,
    "ProtocolMax": 5,
    "ProtocolCur": 2,
    "DelegateMin": 2,
    "DelegateMax": 5,
    "DelegateCur": 4
  },
  {
    "Name": "vault-cluster-bastion-1-i-005f5eb055bd04392",
    "Addr": "10.139.1.205",
    "Port": 8301,
    "Tags": {
      "build": "1.2.3:48d287ef",
      "dc": "vault-cluster",
      "id": "07a1bc60-834d-c70a-157a-7a6c0fe97bd3",
      "role": "node",
      "segment": "",
      "vsn": "2",
      "vsn_max": "3",
      "vsn_min": "2"
    },
    "Status": 1,
    "ProtocolMin": 1,
    "ProtocolMax": 5,
    "ProtocolCur": 2,
    "DelegateMin": 2,
    "DelegateMax": 5,
    "DelegateCur": 4
  },
  {
    "Name": "vault-cluster-vault-i-0af23b81ba5e1f0fe",
    "Addr": "10.139.3.66",
    "Port": 8301,
    "Tags": {
      "build": "1.2.3:48d287ef",
      "dc": "vault-cluster",
      "id": "c4fb20c0-22e9-5485-6dcc-70049b803960",
      "role": "node",
      "segment": "",
      "vsn": "2",
      "vsn_max": "3",
      "vsn_min": "2"
    },
    "Status": 1,
    "ProtocolMin": 1,
    "ProtocolMax": 5,
    "ProtocolCur": 2,
    "DelegateMin": 2,
    "DelegateMax": 5,
    "DelegateCur": 4
  },
  {
    "Name": "vault-cluster-consul-i-0598ca7d1f3052fa0",
    "Addr": "10.139.3.76",
    "Port": 8301,
    "Tags": {
      "build": "1.2.3:48d287ef",
      "dc": "vault-cluster",
      "expect": "3",
      "id": "ccb6e4f4-aa4d-cb91-81b3-7af1d5380acd",
      "port": "8300",
      "raft_vsn": "3",
      "role": "consul",
      "segment": "",
      "vsn": "2",
      "vsn_max": "3",
      "vsn_min": "2",
      "wan_join_port": "8302"
    },
    "Status": 1,
    "ProtocolMin": 1,
    "ProtocolMax": 5,
    "ProtocolCur": 2,
    "DelegateMin": 2,
    "DelegateMax": 5,
    "DelegateCur": 4
  }
]

[ec2-user@vault-cluster-bastion-1-i-005f5eb055bd04392 ~]$ curl \
      -X PUT \
      -d 'bar=baz' \
      ${CONSUL_ADDR}/v1/kv/api | jq '.' # Write a KV
  % Total    % Received % Xferd  Average Speed   Time    Time     Time  Current
                                 Dload  Upload   Total   Spent    Left  Speed
100    11  100     4  100     7    631   1105 --:--:-- --:--:-- --:--:--  1166
true

[ec2-user@vault-cluster-bastion-1-i-005f5eb055bd04392 ~]$ curl \
      -X GET \
      ${CONSUL_ADDR}/v1/kv/api | jq '.' # Read a KV
  % Total    % Received % Xferd  Average Speed   Time    Time     Time  Current
                                 Dload  Upload   Total   Spent    Left  Speed
100   100  100   100    0     0  39525      0 --:--:-- --:--:-- --:--:-- 50000
[
  {
    "LockIndex": 0,
    "Key": "api",
    "Flags": 0,
    "Value": "YmFyPWJheg==",
    "CreateIndex": 3042,
    "ModifyIndex": 3042
  }
]
It is important to note that only unsealed servers act as a standby. If a server is still in the sealed state, then it cannot act as a standby as it would be unable to serve any requests should the active server fail.
By spreading traffic across performance standby nodes, clients can scale read-only IOPS horizontally to handle extremely high traffic workloads.
If a request comes into a Performance Standby Node that causes a storage write the request will be forwarded onto the active server. If the request is read-only the request will be serviced locally on the Performance Standby.
Just like traditional HA standbys if the active node is sealed, fails, or loses network connectivity then a performance standby can take over and become the active instance.
As we saw from the previous section, we have two Vaults sealed. Let's unseal the two so that the two Vaults can serve as standby.
On the Bastion, log on to the 2nd Vault:
[ec2-user@vault-cluster-bastion-1-i-005f5eb055bd04392 ~]$ ssh -A ec2-user@$(curl http://127.0.0.1:8500/v1/agent/members | jq -M -r \
       '[.[] | select(.Name | contains ("vault-cluster-vault")) | .Addr][1]')
Then, unseal:
[ec2-user@vault-cluster-vault-i-00b8555fac7c3317d ~]$ vault operator unseal V/knpsNkYT9mt/D000UQ8TTdyUcAIZXffuwUlN9/mgGA
Key                Value
---                -----
Seal Type          shamir
Initialized        true
Sealed             true
Total Shares       5
Threshold          3
Unseal Progress    1/3
Unseal Nonce       143cf709-1afc-3fb6-28eb-f6289411c696
Version            0.11.3
HA Enabled         true
[ec2-user@vault-cluster-vault-i-00b8555fac7c3317d ~]$ vault operator unseal U1YIP0kuXVDQmNbsSyRNGAs6q6eurQsHIR/bBfdSQ2xi
Key                Value
---                -----
Seal Type          shamir
Initialized        true
Sealed             true
Total Shares       5
Threshold          3
Unseal Progress    2/3
Unseal Nonce       143cf709-1afc-3fb6-28eb-f6289411c696
Version            0.11.3
HA Enabled         true
[ec2-user@vault-cluster-vault-i-00b8555fac7c3317d ~]$ vault operator unseal FM39o3AM4ohdIJy0T8LfwlXJJBJcouDIKWAPI2/WoU3H
Key                    Value
---                    -----
Seal Type              shamir
Initialized            true
Sealed                 false
Total Shares           5
Threshold              3
Version                0.11.3
Cluster Name           vault-cluster
Cluster ID             24315b0e-eacc-a223-46af-80be7cf26110
HA Enabled             true
HA Cluster             https://10.139.2.85:8201
HA Mode                standby
Active Node Address    http://10.139.2.85:8200
We can see we have two unsealed Vaults now:
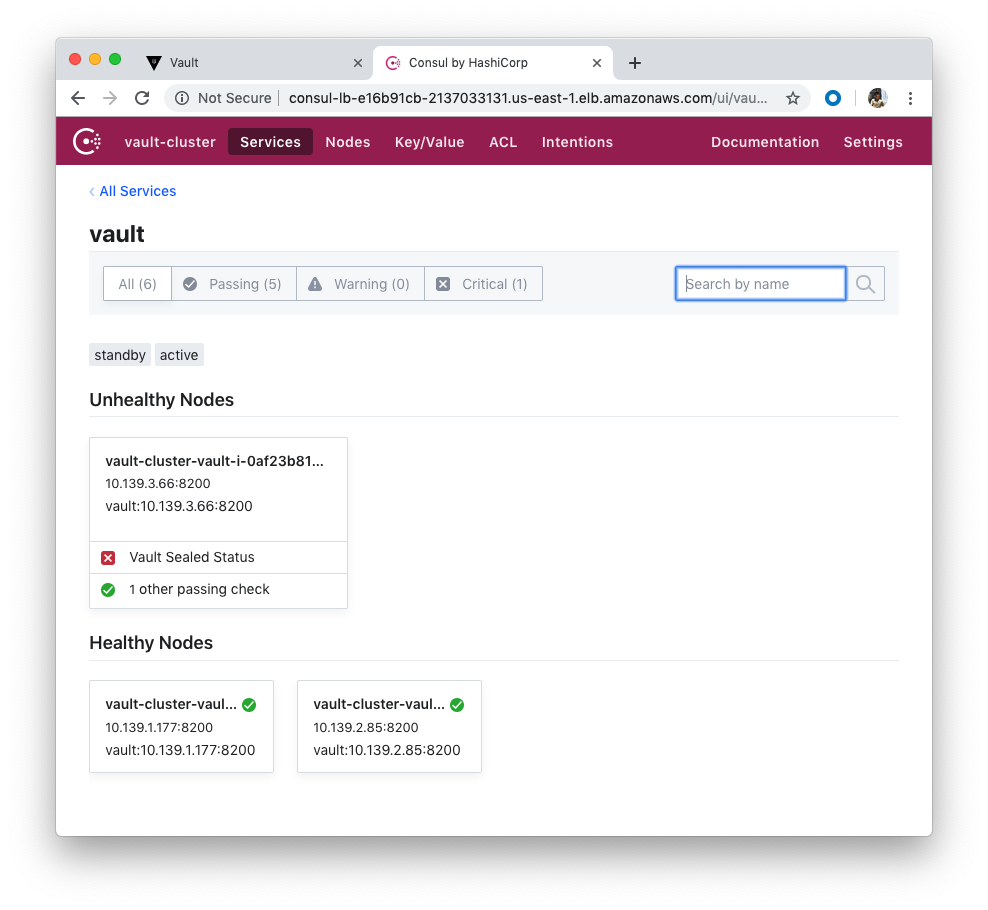
Do the same to the last one. Login to the Vault server and then unseal:
[ec2-user@vault-cluster-vault-i-00b8555fac7c3317d ~]$ ssh -A ec2-user@10.139.3.66
The authenticity of host '10.139.3.66 (10.139.3.66)' can't be established.
ECDSA key fingerprint is a9:5c:20:4b:8b:02:29:0b:f3:cd:41:15:a0:79:40:1a.
Are you sure you want to continue connecting (yes/no)? yes
Warning: Permanently added '10.139.3.66' (ECDSA) to the list of known hosts.
Last login: Fri May 24 20:49:13 2019 from ip-10-139-1-205.ec2.internal

[ec2-user@vault-cluster-vault-i-0af23b81ba5e1f0fe ~]$ vault operator unseal U1YIP0kuXVDQmNbsSyRNGAs6q6eurQsHIR/bBfdSQ2xi
Key                Value
---                -----
Seal Type          shamir
Initialized        true
Sealed             true
Total Shares       5
Threshold          3
Unseal Progress    1/3
Unseal Nonce       418cde46-ae02-ad7c-b696-5cb59e7e4e6e
Version            0.11.3
HA Enabled         true

[ec2-user@vault-cluster-vault-i-0af23b81ba5e1f0fe ~]$ vault operator unseal FM39o3AM4ohdIJy0T8LfwlXJJBJcouDIKWAPI2/WoU3H
Key                Value
---                -----
Seal Type          shamir
Initialized        true
Sealed             true
Total Shares       5
Threshold          3
Unseal Progress    2/3
Unseal Nonce       418cde46-ae02-ad7c-b696-5cb59e7e4e6e
Version            0.11.3
HA Enabled         true

[ec2-user@vault-cluster-vault-i-0af23b81ba5e1f0fe ~]$ vault operator unseal V/knpsNkYT9mt/D000UQ8TTdyUcAIZXffuwUlN9/mgGA
Key                    Value
---                    -----
Seal Type              shamir
Initialized            true
Sealed                 false
Total Shares           5
Threshold              3
Version                0.11.3
Cluster Name           vault-cluster
Cluster ID             24315b0e-eacc-a223-46af-80be7cf26110
HA Enabled             true
HA Cluster             https://10.139.2.85:8201
HA Mode                standby
Active Node Address    http://10.139.2.85:8200
Now all our Vault servers have been unsealed!
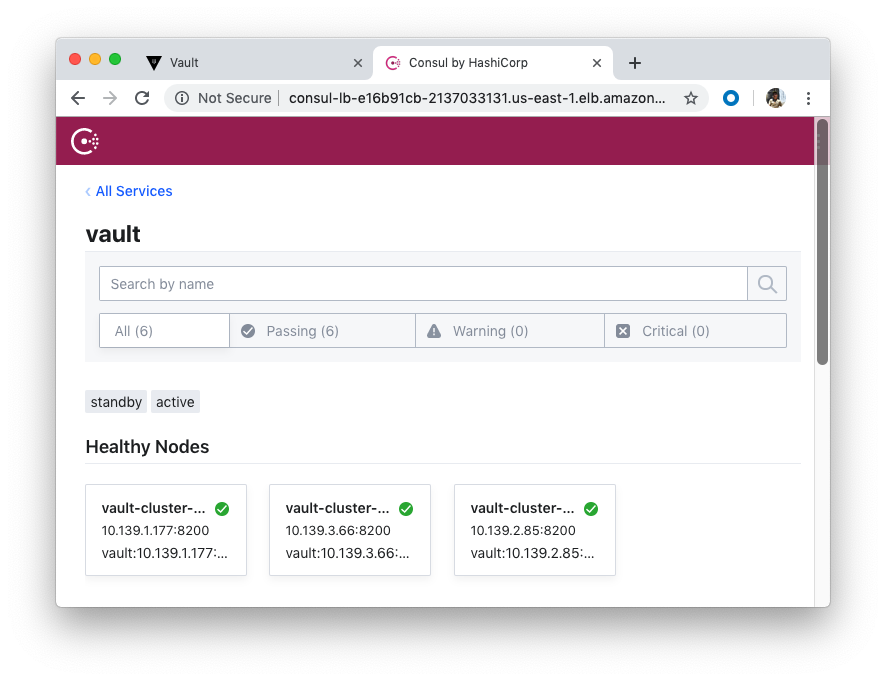
The terraform destroy command is used to destroy the Terraform-managed infrastructure:
$ terraform destroy
module.network_aws.aws_vpc.main: Destruction complete after 1s
module.consul_aws.module.consul_auto_join_instance_role.aws_iam_role.consul: Destruction complete after 1s

Destroy complete! Resources: 105 destroyed.
Terraform
Ph.D. / Golden Gate Ave, San Francisco / Seoul National Univ / Carnegie Mellon / UC Berkeley / DevOps / Deep Learning / Visualization