Docker & Kubernetes
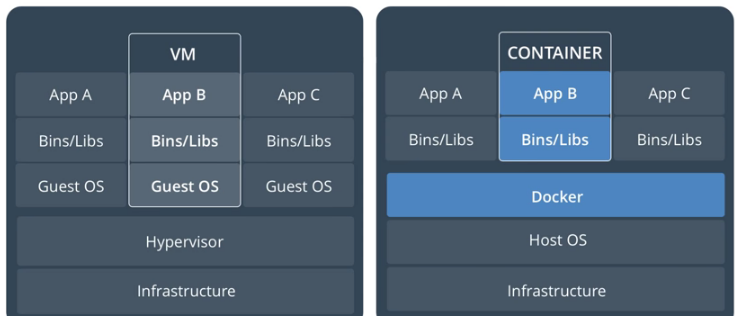
Containers are a way to package software in a format that can be isolated on a shared OS. Unlike VMs, containers do not bundle a full OS, only libraries/bins and settings to make the software to work are needed. This enables the containers to run any environments where Docker is installed.
Dockerfile describes build processes for an image. We can run it to create an image. It contains all the commands to build the image and run our application.

A Dockerfile is available from Einsteinish/docker-nginx-hello-world
To create an image from the Dockerfile, we issue the following command from the folder where the file is located (the "-t" is a flag for tagging the Docker iamge we are creating but it is optional):
$ docker build . [-t dockerbogo/docker-nginx-hello-world]
To see the image is listed:
$ docker image ls
REPOSITORY                            TAG                 IMAGE ID           CREATED             SIZE
dockerbogo/docker-nginx-hello-world   latest              7765b6b1043f       18 minutes ago      18.6 MB
When we build a Docker image, it uses Dockerfile and build context. Basically, the build context contains at least the application code which will be copied over to the image filesystem.
In the previous docker build command, we explicitly uses a Docker file in the current folder(".") and build context which is also in the current working directory. We also taged the image as "dockerbogo/docker-nginx-hello-world" using "-t" flag.
We could have specfied our Dockerfile and the context explicitly assuming we have the Dockerfile and the context (if cloned the repo) in the folder we specified:
$ docker build -t my-image -f ~/docker-nginx-hello-world/Dockerfile ~/docker-nginx-hello-world
Or we can use URL:
$ docker build -t my-image github.com/Einsteinish/docker-nginx-hello-world
This will clone the GitHub repository and use the cloned repository as context. The Dockerfile at the root of the repository is used as Dockerfile.
To push the image to Docker repository, we need to login to the Hub:
$ docker login -u dockerbogo
Password:
Login Succeeded
Then, push it:
$ docker push dockerbogo/docker-nginx-hello-world
We can pull it from the repo like this:
$ docker pull dockerbogo/docker-nginx-hello-world
Using default tag: latest
latest: Pulling from dockerbogo/docker-nginx-hello-world
Digest: sha256:72feacd03595bfffc03376d48ce1a18bbe2ff064ee3637f44cdde81fc40f4531
Status: Image is up to date for dockerbogo/docker-nginx-hello-world:latest
The docker run command first creates a writeable container layer over the specified image, and then starts it using the specified command. That is, docker run is equivalent to the API /containers/create then /containers/(id)/start.
Let's issue the docker run command:
$ docker run -p 8080:80 -d dockerbogo/docker-nginx-hello-world
eb9d15c8517e...

$ docker ps -a
CONTAINER ID IMAGE                                COMMAND                 CREATED         STATUS        PORTS                  NAMES
eb9d15c8517e dockerbogo/docker-nginx-hello-world  "nginx -g 'daemon ..."  11 seconds ago  Up 7 seconds  0.0.0.0:32769->80/tcp  determined_keller
By default, when we create a container, it does not publish any of its ports to the outside world. To make a port available to services outside of Docker, we use the --publish or -p flag. This creates a firewall rule which maps a container port to a port on the Docker host. In our case (-p 8080:80), we mapped TCP port 80 in the container to port 8080 on the Docker host.
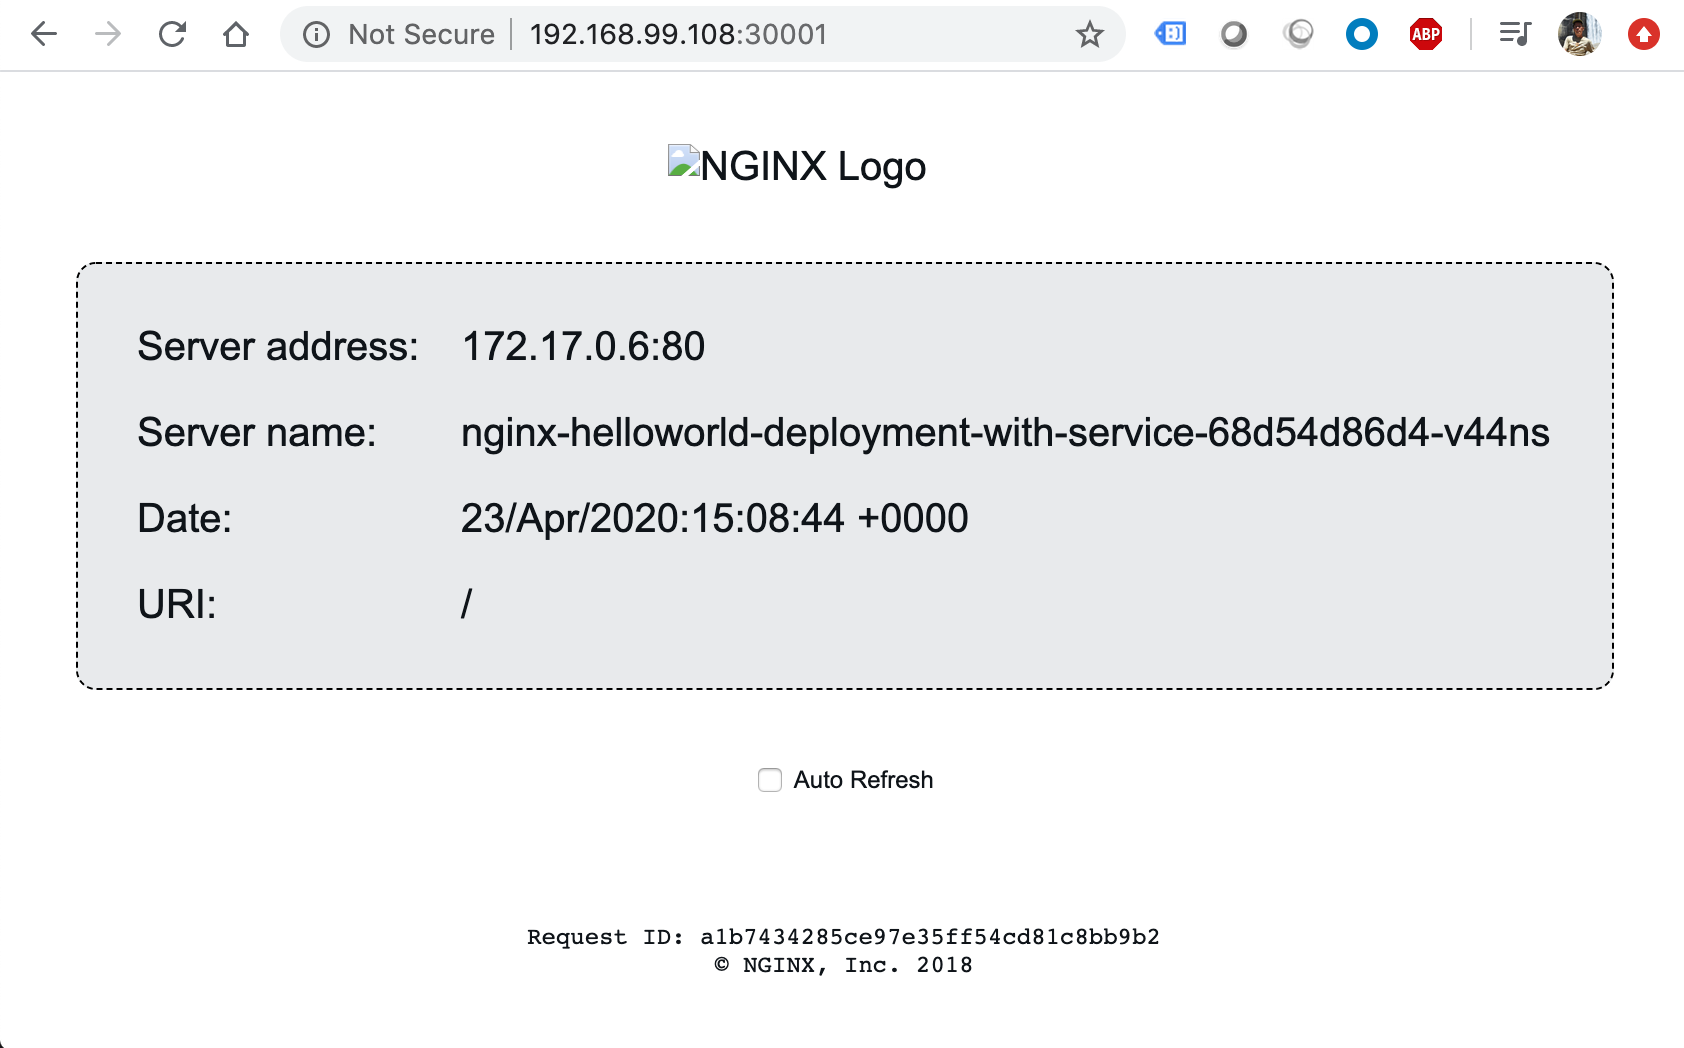
See https://github.com/Einsteinish/docker-nginx-hello-world
Note that we used "-d" for the docker run. That means we're running the container as a background process (detached mode).
We can spin up several instances of the container:
$ docker run -p 8080:80 -d dockerbogo/docker-nginx-hello-world
ecc0bcda8f94510c9f8459482e50011605d7748a321a548e7854b14c42706231

$ docker run -p 8081:80 -d dockerbogo/docker-nginx-hello-world
d094bf302bcdca4218e2685ffabd242e079eb3bd46782e1ad76351065ce62d3e

$ docker run -p 8082:80 -d dockerbogo/docker-nginx-hello-world
dbba59a2a425cc08a9a6b3102a7beb1177f83d0552e9d97f0bd160ee9ea3004f
Here we see the containers have different IDs. We can see we now have multiple instances running on different ports (http://localhost:8080/, http://localhost:8081/, http://localhost:8082/)
$ docker ps
CONTAINER ID  IMAGE                                COMMAND                 CREATED        STATUS        PORTS                 NAMES
dbba59a2a425  dockerbogo/docker-nginx-hello-world  "nginx -g 'daemon ..."  1 minutes ago  Up 1 minutes  0.0.0.0:8082->80/tcp  zealous_elion
d094bf302bcd  dockerbogo/docker-nginx-hello-world  "nginx -g 'daemon ..."  2 minutes ago  Up 2 minutes  0.0.0.0:8081->80/tcp  ecstatic_goodall
ecc0bcda8f94  dockerbogo/docker-nginx-hello-world  "nginx -g 'daemon ..."  3 minutes ago  Up 3 minutes  0.0.0.0:8080->80/tcp  pensive_turing
Let's kill the containers:
$ docker kill dbba59a2a425 d094bf302bcd ecc0bcda8f94
dbba59a2a425
d094bf302bcd
ecc0bcda8f94
Additional commands related to container are:
-
Stop all running containers:
$ docker stop $(docker ps -aq)
-
Remove all containers:
$ docker rm $(docker ps -aq)
While the container format itself is largely settled, the tool to deploy and manage those containers isn't. Here is the list of such tools currently being used for container orchestration.
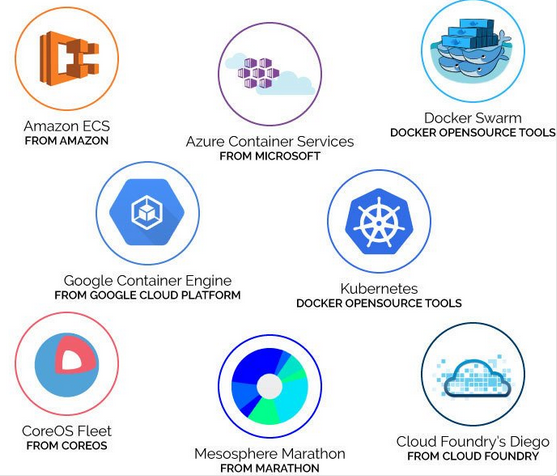
As Chef, Puppet, Ansible and continuous integration and deployment made it easy to standardise testing and deployment, containers allow us to standardise the environment and let us away from the specifics of the underlying operating system and hardware. The container orchestration allows us the freedom not to think about what server will host a particular container or how that container will be started, monitored and killed.
In this tutorial, we'll use Kubernetes on Minikube to install it. However, there are ways to play with Kubernetes without insalling it on our system. Hre are the Kubernetes online labs:
- https://www.katacoda.com/courses/kubernetes/playground
- https://labs.play-with-k8s.com/
- https://training.play-with-kubernetes.com/
Note 1: there are two installation tools:
Note 2: Cloud based Kubernetes services:
- Google Kubernetes Engine (GKE)
- Azure Kubernetes Service
- Amazon EKS
Install kubectl binary using native package management (Install and Set Up kubectl):
$ sudo apt-get update && sudo apt-get install -y apt-transport-https
$ curl -s https://packages.cloud.google.com/apt/doc/apt-key.gpg | sudo apt-key add -
$ sudo touch /etc/apt/sources.list.d/kubernetes.list
$ echo "deb http://apt.kubernetes.io/ kubernetes-xenial main" | sudo tee -a /etc/apt/sources.list.d/kubernetes.list
$ sudo apt-get update
$ sudo apt-get install -y kubectl
kubectl is a Kubernetes command-line tool to deploy and manage applications on Kubernetes. Using kubectl, we can inspect cluster resources; create, delete, and update components; look at our new cluster; and bring up example apps.
Kubectl command ref: https://kubernetes.io/docs/reference/generated/kubectl/kubectl-commands
"Minikube is a tool that makes it easy to run Kubernetes locally. Minikube runs a single-node Kubernetes cluster inside a VM on our laptop (Running Kubernetes Locally via Minikube).
$ curl -Lo minikube https://storage.googleapis.com/minikube/releases/v0.28.2/minikube-linux-amd64 && chmod +x minikube && sudo mv minikube /usr/local/bin/

$ minikube version
minikube version: v0.28.2
The minikube start command can be used to start our cluster. This command creates and configures a virtual machine that runs a single-node Kubernetes cluster.
$ minikube start
Starting local Kubernetes cluster...
Starting VM...
SSH-ing files into VM...
Setting up certs...
Starting cluster components...
Connecting to cluster...
Setting up kubeconfig...
Kubectl is now configured to use the cluster.
This command also configures our kubectl installation to communicate with this cluster.
As we can see from the output below, we do not have any pods nor deployemnts yet:
$ kubectl get pods
No resources found.

$ kubectl get deployments
No resources found.
minikube provides a dashboard as shown below:
$ minikube dashboard
Opening kubernetes dashboard in default browser...
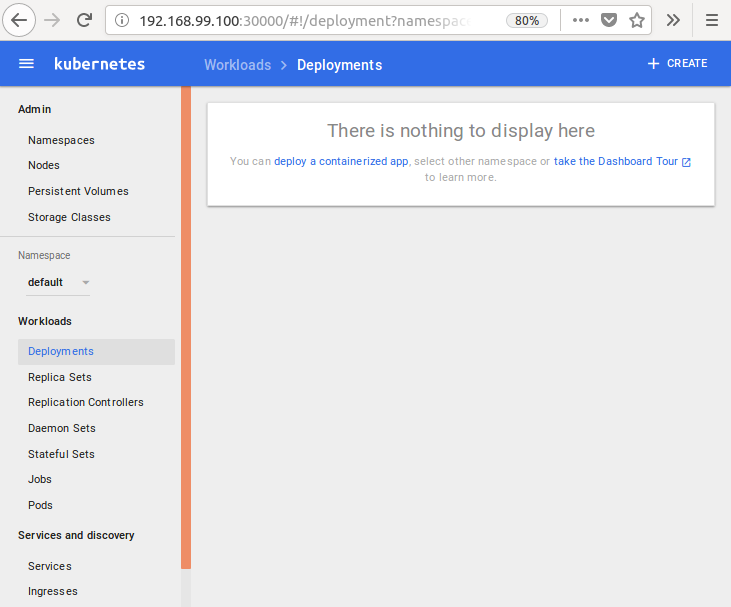
No pods, no deployments, yet.
A group of one or more containers is called a Pod. Containers in a Pod are deployed together, and are started, stopped, and replicated as a group.
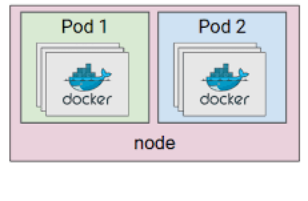
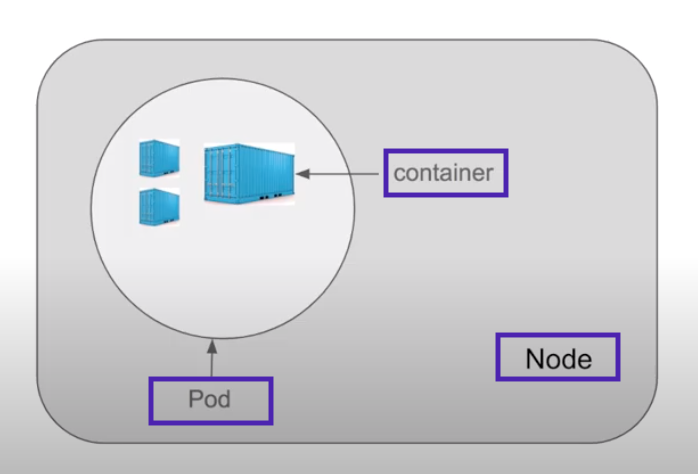
The simplest Pod definition describes the deployment of a single container for an nginx web server. The Pod might be defined like this:
simple-pod.yaml
apiVersion: v1
kind: Pod
metadata:
  name: nginx
spec:
  containers:
  - name: nginx
    image: nginx:1.7.9
    ports:
    - containerPort: 80
"A Pod definition is a declaration of a desired state. Desired state is a very important concept in the Kubernetes model. Many things present a desired state to the system, and Kubernetes ensures that the current state matches the desired state. For example, when you create a Pod and declare that the containers in it to be running. If the containers happen not to be running because of a program failure, Kubernetes continues to (re-)create the Pod in order to drive the pod to the desired state" - Kubernetes 101
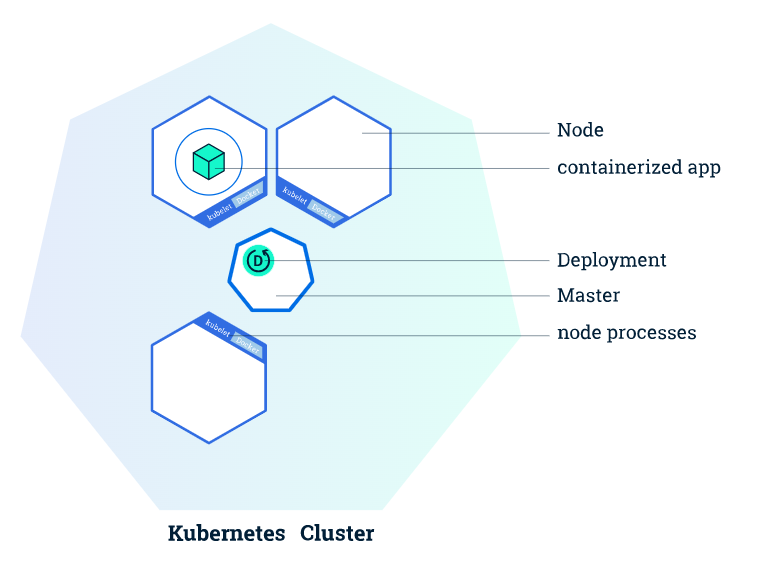
Using kubectl to Create a Deployment
Once we have a running Kubernetes cluster, we can deploy our containerized applications on top of it. To do so, we create a Kubernetes Deployment configuration.
The command syntax looks like this:
$ kubectl create deployment NAME --image=image
Let's create a nginx deployment:
$ kubectl create deployment nginx-deploy --image=nginx
deployment.apps/nginx-deploy created

$ kubectl get pod
NAME                           READY   STATUS    RESTARTS   AGE
nginx-deploy-54944f7c8-7hnqx   1/1     Running   0          79s

$ kubectl get deployment
NAME           READY   UP-TO-DATE   AVAILABLE   AGE
nginx-deploy   1/1     1            1           2m30s

$ kubectl get replicaset
NAME                     DESIRED   CURRENT   READY   AGE
nginx-deploy-54944f7c8   1         1         1       3m17s
The Deployment instructs Kubernetes how to create and update instances of our application. Once we've created a Deployment, the Kubernetes master schedules the application instances included in that Deployment to run on individual Nodes in the cluster.
Note that the command creates a ymal file for us. Let's modify the deployment ("/var/folders/x5/2s9s9_t54nv6mgfzsml6k0f9mmb575/T/kubectl-edit-wkfkk.yaml") so that we can use the most up-to-date nginx version (1.18):
apiVersion: extensions/v1beta1
kind: Deployment
metadata:
  annotations:
    deployment.kubernetes.io/revision: "1"
  creationTimestamp: "2020-04-22T16:51:22Z"
  generation: 1
  labels:
    app: nginx-deploy
  name: nginx-deploy
  namespace: default
  resourceVersion: "746"
  selfLink: /apis/extensions/v1beta1/namespaces/default/deployments/nginx-deploy
  uid: 7f37b173-84b9-11ea-bc83-080027ca988d
spec:
  progressDeadlineSeconds: 600
  replicas: 1
  revisionHistoryLimit: 10
  selector:
    matchLabels:
      app: nginx-deploy
  strategy:
    rollingUpdate:
      maxSurge: 25%
      maxUnavailable: 25%
    type: RollingUpdate
  template:
    metadata:
      creationTimestamp: null
      labels:
        app: nginx-deploy
    spec:
      containers:
      - image: nginx:1.18
        imagePullPolicy: Always
        name: nginx
        resources: {}
        terminationMessagePath: /dev/termination-log
        terminationMessagePolicy: File
    ...
Actually, the yaml file is stored in etcd and we can get it like this:
$ kubectl get deployment -o yaml > nginx-deployment-out.yaml
Notable part of the yaml is the status from which Kubernetes compares it with the deployment specification such as number of replicas:
  status:
    availableReplicas: 1
    conditions:
    - lastTransitionTime: "2020-04-22T22:59:13Z"
      lastUpdateTime: "2020-04-22T22:59:13Z"
      message: Deployment has minimum availability.
      reason: MinimumReplicasAvailable
      status: "True"
      type: Available
    - lastTransitionTime: "2020-04-22T22:59:10Z"
      lastUpdateTime: "2020-04-22T22:59:13Z"
      message: ReplicaSet "nginx-deploy-54944f7c8" has successfully progressed.
      reason: NewReplicaSetAvailable
      status: "True"
      type: Progressing
    observedGeneration: 1
    readyReplicas: 1
    replicas: 1
    updatedReplicas: 1
At this point, we're not interested in the details of the yaml file. We'll deat with it in another section where we'll use "kubectl apply..." instead of "kubectl create..."
$ kubectl edit deployment nginx-deploy
deployment.extensions/nginx-deploy edited

$ kubectl get deployment
NAME           READY   UP-TO-DATE   AVAILABLE   AGE
nginx-deploy   1/1     1            1           4m
We can see old pod is being replaced with the one that has the new nginx image:
$ kubectl get pod
NAME                            READY   STATUS        RESTARTS   AGE
nginx-deploy-54944f7c8-gsw8n    0/1     Terminating   0          5m
nginx-deploy-57457fcb4d-qtm4d   1/1     Running       0          11s

$ kubectl get pod
NAME                            READY   STATUS    RESTARTS   AGE
nginx-deploy-57457fcb4d-qtm4d   1/1     Running   0          92s
We see the old replica set does not have a pod in it any more:
$ kubectl get replicaset
NAME                      DESIRED   CURRENT   READY   AGE
nginx-deploy-54944f7c8    0         0         0       6m14s
nginx-deploy-57457fcb4d   1         1         1       5m20s
Note that we've just edited the deployment configuration and everything's got automatically updated.
Let's create another deployemnt with mongodb:
$ kubectl create deployment mongo-deploy --image=mongo
deployment.apps/mongo-deploy created

$ kubectl get pod
NAME                            READY   STATUS    RESTARTS   AGE
mongo-deploy-58f4cfc4bb-r68zw   1/1     Running   0          32s
nginx-deploy-57457fcb4d-qtm4d   1/1     Running   0          58m

$ kubectl describe pod mongo-deploy-58f4cfc4bb-r68zw
Name:           mongo-deploy-58f4cfc4bb-r68zw
...
Events:
  Type    Reason     Age   From               Message
  ----    ------     ----  ----               -------
  Normal  Scheduled  111s  default-scheduler  Successfully assigned default/mongo-deploy-58f4cfc4bb-r68zw to minikube
  Normal  Pulling    110s  kubelet, minikube  Pulling image "mongo"
  Normal  Pulled     108s  kubelet, minikube  Successfully pulled image "mongo"
  Normal  Created    108s  kubelet, minikube  Created container mongo
  Normal  Started    108s  kubelet, minikube  Started container mongo

$ kubectl logs mongo-deploy-58f4cfc4bb-r68zw
2020-04-22T18:29:53.445+0000 I  CONTROL  [main] Automatically disabling TLS 1.0, to force-enable TLS 1.0 specify --sslDisabledProtocols 'none'
2020-04-22T18:29:53.451+0000 W  ASIO     [main] No TransportLayer configured during NetworkInterface startup
...
Another way of debugging pod is to use kubectl exec:
$ kubectl exec (POD | TYPE/NAME) [-c CONTAINER] [flags] -- COMMAND [args...]
$ kubectl get pod
NAME                            READY   STATUS    RESTARTS   AGE
mongo-deploy-58f4cfc4bb-r68zw   1/1     Running   0          8m48s
nginx-deploy-57457fcb4d-qtm4d   1/1     Running   0          66m

$ kubectl exec -it mongo-deploy-58f4cfc4bb-r68zw -- bin/bash

root@mongo-deploy-58f4cfc4bb-r68zw:/# ls
bin  boot  data  dev  docker-entrypoint-initdb.d  etc  home  js-yaml.js  lib  lib64  media  mnt  opt  proc  root  run  sbin  srv  sys  tmp  usr  var
root@mongo-deploy-58f4cfc4bb-r68zw:/#  exit
$
To delete the pods, we use "kubectl delete deployment..." command:
$  kubectl get pod
NAME                            READY   STATUS    RESTARTS   AGE
mongo-deploy-58f4cfc4bb-r68zw   1/1     Running   0          12m
nginx-deploy-57457fcb4d-qtm4d   1/1     Running   0          70m

$  kubectl get deployment
NAME           READY   UP-TO-DATE   AVAILABLE   AGE
mongo-deploy   1/1     1            1           12m
nginx-deploy   1/1     1            1           71m

$  kubectl delete deployment mongo-deploy
deployment.extensions "mongo-deploy" deleted

$  kubectl delete deployment nginx-deploy
deployment.extensions "nginx-deploy" deleted

$  kubectl get pod
NAME                            READY   STATUS        RESTARTS   AGE
nginx-deploy-57457fcb4d-qtm4d   0/1     Terminating   0          74m

$  kubectl get pod
No resources found in default namespace.

$  kubectl get replicaset
No resources found in default namespace.
The kubectl command-line tool supports several different ways to create and manage Kubernetes objects.
Refs:
We can run an application by creating a Kubernetes Deployment object, and we can describe a Deployment in a YAML file. For example, this YAML file describes a Deployment that runs the "docker-nginx-hello-world" Docker image:
deployment.yaml
---
apiVersion: extensions/v1beta1
kind: Deployment
metadata:
  name: nginx-helloworld-deployment
spec:
  selector:
    matchLabels:
      app: nginx-helloworld
  replicas: 2 # tells deployment to run 2 pods matching the template
  template:
    metadata:
      labels:
        app: nginx-helloworld
    spec:
      containers:
      - name: nginx-helloworld
        image: dockerbogo/docker-nginx-hello-world
        ports:
        - containerPort: 80
- A Deployment named nginx-helloworld-deployment will be created, indicated by the metadata.name field.
- In the configuration, we have two specs: the first one is the deployment spec and the 2nd one (template.spec) is the spec for the pods.
- The Deployment creates two replicated Pods, indicated by the replicas field.
- The selector field defines how the Deployment finds which Pods to manage. In this case, we simply select a label that is defined in the Pod template (app: nginx-helloworld).
- The template field contains additional sub-fields and it's a blueprint for the pod. Note that the template has its own metadata.
- The Pods are labeled app: nginx-helloworld the labels field.
- The Pod template's specification, or template.spec field, indicates that the Pods run one container, nginx-helloworld, which runs the dockerbogo/docker-nginx-hello-world image after pull it down from Docker Hub.
- Create 1 container and name it nginx-helloworld using the name field.
- It will run in on port 80 inside the container.
Let's create a Deployment based on the YAML file:
$ kubectl apply -f ~/docker-nginx-hello-world/deployment.yaml
deployment "nginx-helloworld-deployment" created
Note that the "kubectl apply" command created the deployment because it's the first time. However, if it is there, it just updates it.
To list the pods created by the deployment:
$ kubectl get pods -l app=nginx-helloworld
NAME                                           READY     STATUS    RESTARTS   AGE
nginx-helloworld-deployment-2276269262-c16m2   1/1       Running   0          35m
nginx-helloworld-deployment-2276269262-x9ldj   1/1       Running   0          35m
To display information about a pod:
$ kubectl describe pod nginx-helloworld-deployment-2276269262-c16m2
Name:		nginx-helloworld-deployment-2276269262-c16m2
Namespace:	default
Node:		minikube/192.168.99.100
...
Labels:		app=nginx-helloworld
		pod-template-hash=2276269262
Annotations:	kubernetes.io/created-by={"kind":"SerializedReference","apiVersion":"v1","reference":{"kind":"ReplicaSet","namespace":"default","name":"nginx-helloworld-deployment-2276269262","uid":"1c6afd95-ac10-11e...
Status:		Running
IP:		172.17.0.4
Controllers:	ReplicaSet/nginx-helloworld-deployment-2276269262
Containers:
  nginx-helloworld:
    Container ID:	docker://fcc8283e54cb9e5be7088f72fba9645f089297cf90ed5c63f776db99011f2715
    Image:		dockerbogo/docker-nginx-hello-world
    Image ID:		docker://sha256:7765b6b1043fe3e5a1c2b2757a43083c26b7cf3866899ddfc8d4f7d319fafff0
    Port:		80/TCP
...
Events:
  FirstSeen	LastSeen	Count	From			SubObjectPath				Type		Reason		Message
  ---------	--------	-----	----			-------------				--------	------		-------
  42m		42m		1	default-scheduler						Normal		Scheduled	Successfully assigned nginx-helloworld-deployment-2276269262-c16m2 to minikube
  42m		42m		1	kubelet, minikube	spec.containers{nginx-helloworld}	Normal		Pulling		pulling image "dockerbogo/docker-nginx-hello-world"
  41m		41m		1	kubelet, minikube	spec.containers{nginx-helloworld}	Normal		Pulled		Successfully pulled image "dockerbogo/docker-nginx-hello-world"
  41m		41m		1	kubelet, minikube	spec.containers{nginx-helloworld}	Normal		Created		Created container with id fcc8283e54cb9e5be7088f72fba9645f089297cf90ed5c63f776db99011f2715
  41m		41m		1	kubelet, minikube	spec.containers{nginx-helloworld}	Normal		Started		Started container with id fcc8283e54cb9e5be7088f72fba9645f089297cf90ed5c63f776db99011f2715
We can see it from dashboard (via "minikube dashboard" command):
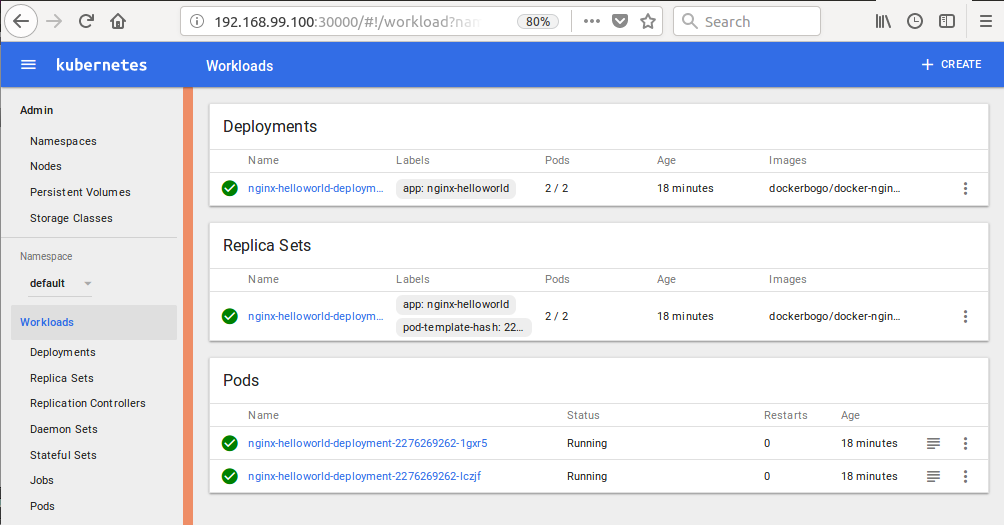
If we delete one of the two pods (suppose 1 pods crashed), Kubernetes will automatically create one for us since our pods are not in line with the declared desired state:

We can check Kubernetes in action (one is in "Terminating" state and a new one is in "ContainerCreating" state:
$ kubectl get pods
NAME                                           READY     STATUS              RESTARTS   AGE
nginx-helloworld-deployment-2276269262-khkp7   1/1       Terminating         0          6m
nginx-helloworld-deployment-2276269262-lczjf   1/1       Running             0          30m
nginx-helloworld-deployment-2276269262-svgzr   0/1       ContainerCreating   0          3s

$ kubectl get pods
NAME                                           READY     STATUS    RESTARTS   AGE
nginx-helloworld-deployment-2276269262-lczjf   1/1       Running   0          30m
nginx-helloworld-deployment-2276269262-svgzr   1/1       Running   0          11s
To delete the deployment by name:
$ kubectl delete deployment nginx-helloworld-deployment
deployment "nginx-helloworld-deployment" deleted
Let's add a Service to the deployment (deployment-with-service.yaml).
---
kind: Service
apiVersion: v1
metadata:
  name: nginx-helloworld-service
spec:
  selector:
    app: nginx-helloworld
  ports:
    - protocol: "TCP"
      # Port accessible inside cluster
      port: 8081
      # Port to forward to inside the pod
      targetPort: 80
      # Port accessible outside cluster
      nodePort: 30001
  type: LoadBalancer

---
apiVersion: extensions/v1beta1
kind: Deployment
metadata:
  name: nginx-helloworld-deployment-with-service
spec:
  selector:
    matchLabels:
      app: nginx-helloworld
  replicas: 2 # tells deployment to run 2 pods matching the template
  template:
    metadata:
      labels:
        app: nginx-helloworld
    spec:
      containers:
      - name: nginx-helloworld
        image: dockerbogo/docker-nginx-hello-world
        ports:
        - containerPort: 80
In Kubernetes, a Service defines a set of Pods and a policy by which to access a micro-service. The set of Pods targeted by a Service is (usually) determined by a Label Selector.
The specification will create a new Service object named "nginx-helloworld-service" which targets TCP port 80 on any Pod with the "app=nginx-helloworld" label. This Service will also be assigned an IP address (sometimes called the "cluster IP"), which is used by the service proxies. The Service's selector will be evaluated continuously and the results will be POSTed to an Endpoints object also named "nginx-helloworld-service".
Note that a Service can map an incoming port to any targetPort. By default the targetPort will be set to the same value as the port field. Perhaps more interesting is that targetPort can be a string, referring to the name of a port in the backend Pods. The actual port number assigned to that name can be different in each backend Pod. This offers a lot of flexibility for deploying and evolving our Services. For example, we can change the port number that pods expose in the next version of our backend software, without breaking clients.
The port:8081 exposed to only inside the cluster. So, if we are running a couple of pods, those pods can communicate each other via port:8081. But outside the cluster, we won't be able to access the application using port:8081. The nodePort:3002 is the one that allows us to access the app from outside of the cluster. It will eventually hit the targetPort:80 of the pods with name "nginx-helloworld". The same applies to the case within the cluster. If one of the pods in the cluster uses port:8081, it will hit the targetPort:80.
Also, note the type: LoadBalancer. It will load balancing between our two pods.
Time to create a new Deployment and a Service:
$ kubectl create -f ~/docker-nginx-hello-world/deployment-with-service.yaml
service "nginx-helloworld-service" created
deployment "nginx-helloworld-deployment-with-service" created
Let's get the ip-address of the Kubernetes cluster that's running:
$ minikube ip
192.168.99.100
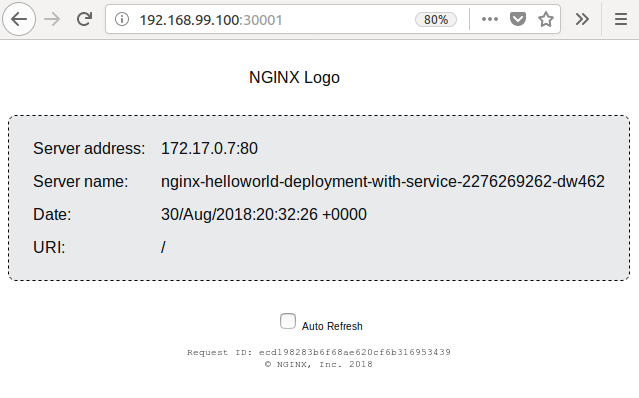
Type in "192.168.99.100:30001" into a browser:
The Service on minikube dashboard:

Docker & K8s
- Docker install on Amazon Linux AMI
- Docker install on EC2 Ubuntu 14.04
- Docker container vs Virtual Machine
- Docker install on Ubuntu 14.04
- Docker Hello World Application
- Nginx image - share/copy files, Dockerfile
- Working with Docker images : brief introduction
- Docker image and container via docker commands (search, pull, run, ps, restart, attach, and rm)
- More on docker run command (docker run -it, docker run --rm, etc.)
- Docker Networks - Bridge Driver Network
- Docker Persistent Storage
- File sharing between host and container (docker run -d -p -v)
- Linking containers and volume for datastore
- Dockerfile - Build Docker images automatically I - FROM, MAINTAINER, and build context
- Dockerfile - Build Docker images automatically II - revisiting FROM, MAINTAINER, build context, and caching
- Dockerfile - Build Docker images automatically III - RUN
- Dockerfile - Build Docker images automatically IV - CMD
- Dockerfile - Build Docker images automatically V - WORKDIR, ENV, ADD, and ENTRYPOINT
- Docker - Apache Tomcat
- Docker - NodeJS
- Docker - NodeJS with hostname
- Docker Compose - NodeJS with MongoDB
- Docker - Prometheus and Grafana with Docker-compose
- Docker - StatsD/Graphite/Grafana
- Docker - Deploying a Java EE JBoss/WildFly Application on AWS Elastic Beanstalk Using Docker Containers
- Docker : NodeJS with GCP Kubernetes Engine
- Docker : Jenkins Multibranch Pipeline with Jenkinsfile and Github
- Docker : Jenkins Master and Slave
- Docker - ELK : ElasticSearch, Logstash, and Kibana
- Docker - ELK 7.6 : Elasticsearch on Centos 7
- Docker - ELK 7.6 : Filebeat on Centos 7
- Docker - ELK 7.6 : Logstash on Centos 7
- Docker - ELK 7.6 : Kibana on Centos 7
- Docker - ELK 7.6 : Elastic Stack with Docker Compose
- Docker - Deploy Elastic Cloud on Kubernetes (ECK) via Elasticsearch operator on minikube
- Docker - Deploy Elastic Stack via Helm on minikube
- Docker Compose - A gentle introduction with WordPress
- Docker Compose - MySQL
- MEAN Stack app on Docker containers : micro services
- MEAN Stack app on Docker containers : micro services via docker-compose
- Docker Compose - Hashicorp's Vault and Consul Part A (install vault, unsealing, static secrets, and policies)
- Docker Compose - Hashicorp's Vault and Consul Part B (EaaS, dynamic secrets, leases, and revocation)
- Docker Compose - Hashicorp's Vault and Consul Part C (Consul)
- Docker Compose with two containers - Flask REST API service container and an Apache server container
- Docker compose : Nginx reverse proxy with multiple containers
- Docker & Kubernetes : Envoy - Getting started
- Docker & Kubernetes : Envoy - Front Proxy
- Docker & Kubernetes : Ambassador - Envoy API Gateway on Kubernetes
- Docker Packer
- Docker Cheat Sheet
- Docker Q & A #1
- Kubernetes Q & A - Part I
- Kubernetes Q & A - Part II
- Docker - Run a React app in a docker
- Docker - Run a React app in a docker II (snapshot app with nginx)
- Docker - NodeJS and MySQL app with React in a docker
- Docker - Step by Step NodeJS and MySQL app with React - I
- Installing LAMP via puppet on Docker
- Docker install via Puppet
- Nginx Docker install via Ansible
- Apache Hadoop CDH 5.8 Install with QuickStarts Docker
- Docker - Deploying Flask app to ECS
- Docker Compose - Deploying WordPress to AWS
- Docker - WordPress Deploy to ECS with Docker-Compose (ECS-CLI EC2 type)
- Docker - WordPress Deploy to ECS with Docker-Compose (ECS-CLI Fargate type)
- Docker - ECS Fargate
- Docker - AWS ECS service discovery with Flask and Redis
- Docker & Kubernetes : minikube
- Docker & Kubernetes 2 : minikube Django with Postgres - persistent volume
- Docker & Kubernetes 3 : minikube Django with Redis and Celery
- Docker & Kubernetes 4 : Django with RDS via AWS Kops
- Docker & Kubernetes : Kops on AWS
- Docker & Kubernetes : Ingress controller on AWS with Kops
- Docker & Kubernetes : HashiCorp's Vault and Consul on minikube
- Docker & Kubernetes : HashiCorp's Vault and Consul - Auto-unseal using Transit Secrets Engine
- Docker & Kubernetes : Persistent Volumes & Persistent Volumes Claims - hostPath and annotations
- Docker & Kubernetes : Persistent Volumes - Dynamic volume provisioning
- Docker & Kubernetes : DaemonSet
- Docker & Kubernetes : Secrets
- Docker & Kubernetes : kubectl command
- Docker & Kubernetes : Assign a Kubernetes Pod to a particular node in a Kubernetes cluster
- Docker & Kubernetes : Configure a Pod to Use a ConfigMap
- AWS : EKS (Elastic Container Service for Kubernetes)
- Docker & Kubernetes : Run a React app in a minikube
- Docker & Kubernetes : Minikube install on AWS EC2
- Docker & Kubernetes : Cassandra with a StatefulSet
- Docker & Kubernetes : Terraform and AWS EKS
- Docker & Kubernetes : Pods and Service definitions
- Docker & Kubernetes : Service IP and the Service Type
- Docker & Kubernetes : Kubernetes DNS with Pods and Services
- Docker & Kubernetes : Headless service and discovering pods
- Docker & Kubernetes : Scaling and Updating application
- Docker & Kubernetes : Horizontal pod autoscaler on minikubes
- Docker & Kubernetes : From a monolithic app to micro services on GCP Kubernetes
- Docker & Kubernetes : Rolling updates
- Docker & Kubernetes : Deployments to GKE (Rolling update, Canary and Blue-green deployments)
- Docker & Kubernetes : Slack Chat Bot with NodeJS on GCP Kubernetes
- Docker & Kubernetes : Continuous Delivery with Jenkins Multibranch Pipeline for Dev, Canary, and Production Environments on GCP Kubernetes
- Docker & Kubernetes : NodePort vs LoadBalancer vs Ingress
- Docker & Kubernetes : MongoDB / MongoExpress on Minikube
- Docker & Kubernetes : Load Testing with Locust on GCP Kubernetes
- Docker & Kubernetes : MongoDB with StatefulSets on GCP Kubernetes Engine
- Docker & Kubernetes : Nginx Ingress Controller on Minikube
- Docker & Kubernetes : Setting up Ingress with NGINX Controller on Minikube (Mac)
- Docker & Kubernetes : Nginx Ingress Controller for Dashboard service on Minikube
- Docker & Kubernetes : Nginx Ingress Controller on GCP Kubernetes
- Docker & Kubernetes : Kubernetes Ingress with AWS ALB Ingress Controller in EKS
- Docker & Kubernetes : Setting up a private cluster on GCP Kubernetes
- Docker & Kubernetes : Kubernetes Namespaces (default, kube-public, kube-system) and switching namespaces (kubens)
- Docker & Kubernetes : StatefulSets on minikube
- Docker & Kubernetes : RBAC
- Docker & Kubernetes Service Account, RBAC, and IAM
- Docker & Kubernetes - Kubernetes Service Account, RBAC, IAM with EKS ALB, Part 1
- Docker & Kubernetes : Helm Chart
- Docker & Kubernetes : My first Helm deploy
- Docker & Kubernetes : Readiness and Liveness Probes
- Docker & Kubernetes : Helm chart repository with Github pages
- Docker & Kubernetes : Deploying WordPress and MariaDB with Ingress to Minikube using Helm Chart
- Docker & Kubernetes : Deploying WordPress and MariaDB to AWS using Helm 2 Chart
- Docker & Kubernetes : Deploying WordPress and MariaDB to AWS using Helm 3 Chart
- Docker & Kubernetes : Helm Chart for Node/Express and MySQL with Ingress
- Docker & Kubernetes : Deploy Prometheus and Grafana using Helm and Prometheus Operator - Monitoring Kubernetes node resources out of the box
- Docker & Kubernetes : Deploy Prometheus and Grafana using kube-prometheus-stack Helm Chart
- Docker & Kubernetes : Istio (service mesh) sidecar proxy on GCP Kubernetes
- Docker & Kubernetes : Istio on EKS
- Docker & Kubernetes : Istio on Minikube with AWS EC2 for Bookinfo Application
- Docker & Kubernetes : Deploying .NET Core app to Kubernetes Engine and configuring its traffic managed by Istio (Part I)
- Docker & Kubernetes : Deploying .NET Core app to Kubernetes Engine and configuring its traffic managed by Istio (Part II - Prometheus, Grafana, pin a service, split traffic, and inject faults)
- Docker & Kubernetes : Helm Package Manager with MySQL on GCP Kubernetes Engine
- Docker & Kubernetes : Deploying Memcached on Kubernetes Engine
- Docker & Kubernetes : EKS Control Plane (API server) Metrics with Prometheus
- Docker & Kubernetes : Spinnaker on EKS with Halyard
- Docker & Kubernetes : Continuous Delivery Pipelines with Spinnaker and Kubernetes Engine
- Docker & Kubernetes : Multi-node Local Kubernetes cluster : Kubeadm-dind (docker-in-docker)
- Docker & Kubernetes : Multi-node Local Kubernetes cluster : Kubeadm-kind (k8s-in-docker)
- Docker & Kubernetes : nodeSelector, nodeAffinity, taints/tolerations, pod affinity and anti-affinity - Assigning Pods to Nodes
- Docker & Kubernetes : Jenkins-X on EKS
- Docker & Kubernetes : ArgoCD App of Apps with Heml on Kubernetes
- Docker & Kubernetes : ArgoCD on Kubernetes cluster
- Docker & Kubernetes : GitOps with ArgoCD for Continuous Delivery to Kubernetes clusters (minikube) - guestbook
Ph.D. / Golden Gate Ave, San Francisco / Seoul National Univ / Carnegie Mellon / UC Berkeley / DevOps / Deep Learning / Visualization