Build Configuration for GitHub Java application with Maven

Jenkins
Build jobs are at the heart of the Jenkins build process.
We can think of a Jenkins build job as a particular task or step in our build process. This may involve simply compiling our source code and running our unit tests. Or we might want a build job to do other related tasks, such as running our integration tests, measuring code coverage or code quality metrics, generating technical documentation, or even deploying our application to a web server.
A real project usually requires many separate but related build jobs.
Our application is a Java module, built using Maven, that implements the core business logic of the Game of Life.
Let's see how we can automate this build in Jenkins.
Jenkins supports several different types of build jobs. The two most commonly-used are the freestyle builds and the Maven builds.
- The freestyle projects allow us to configure just about any sort of build job: they are highly flexible and very configurable.
- The Maven builds understand the Maven project structure, and can use this to let us set up Maven build jobs with less effort and a few extra features. There are also plugins that provide support for other types of build jobs.
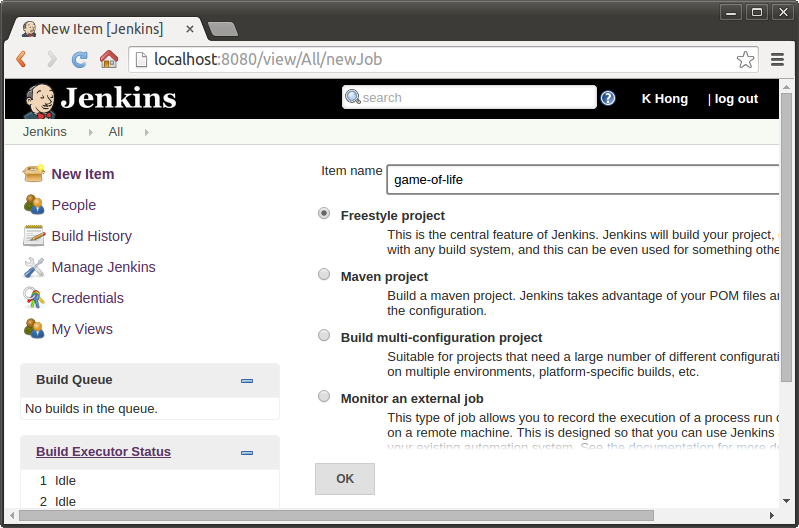
Even though our project uses Maven, we are going to use a freestyle build job. That's because we just want to keep things simple and general to start with.
So choose "Build a freestyle software project":

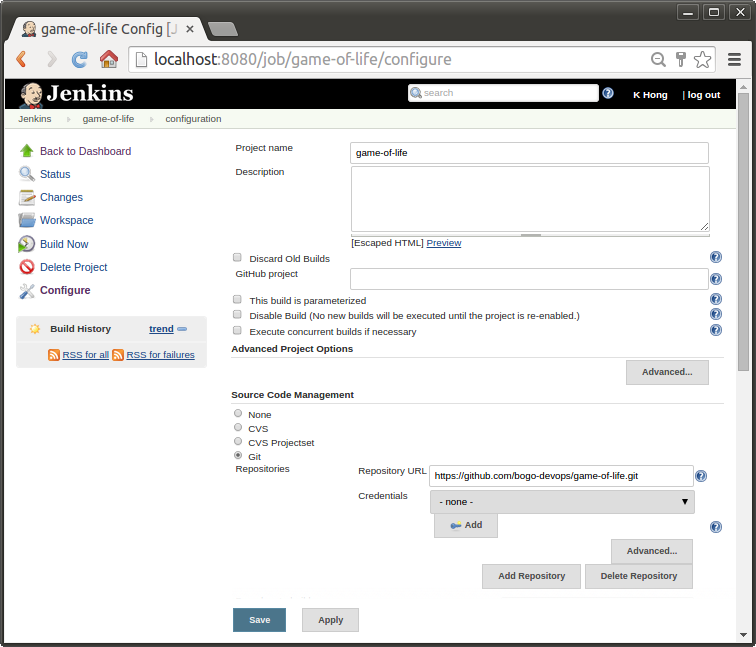
Once we click on OK, Jenkins will display the project configuration screen:
Jenkins works by checking out the source code of our project and building it in its own workspace. So, the next thing we need to do is to tell Jenkins where it can find the source code for our project.
For this project, we will be getting the source code from the GitHub repository we set up earlier in Git/GitHub plugins, SSH keys configuration, and Fork/Clone.

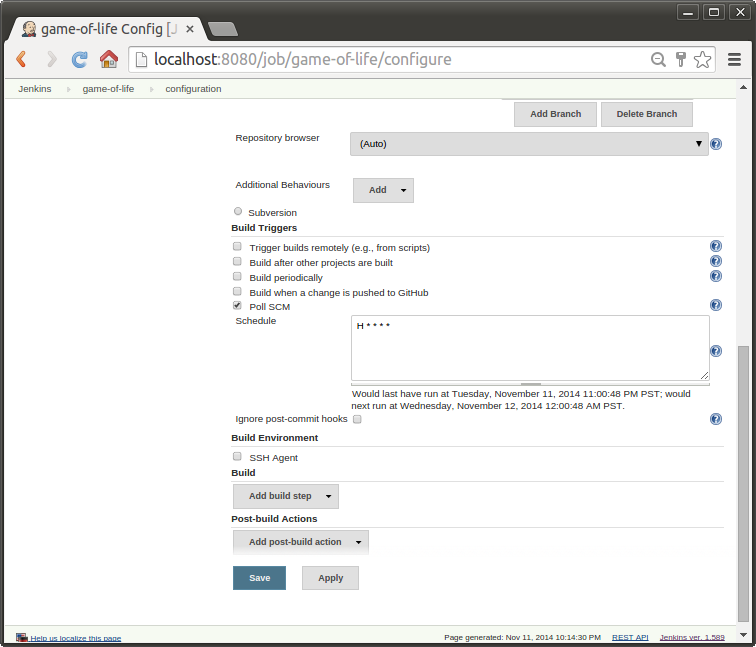
Once we have told Jenkins where to find the source code for our application, we need to tell it how often it should check for updates. We want Jenkins to monitor the repository and start a build whenever any changes have been committed. This is a common way to set up a build job in a Continuous Integration context, as it provides fast feedback if the build fails.
Other approaches include building on regular intervals (for example, once a day), requiring a user to kick of the build manually, or even triggering a build remotely using a "post-commit" hook in our SCM.
We may want to pick the Poll SCM option and enter H * * * * in the Schedule box ("every hour")

The next step is to configure the actual build itself.
In a freestyle build job, we can break down our build job into a number of build steps. This makes it easier to organize builds in clean, separate stages.
For example, a build might run a suite of functional tests in one step, and then tag the build in a second step if all of the functional tests succeed.
In technical terms, a build step might involve invoking an Ant task or a Maven target, or running a shell script. There are also Jenkins plugins that let us use additional types of build steps: Gant, Grails, Gradle, Rake, Ruby, MSBuild and many other build tools are all supported.
For now, we just want to run a simple Maven build. Scroll down to the Build section and click on the "Add build step" and choose "Invoke top-level Maven targets". Then enter "clean package" in the Goals field.

This setup will delete any previous build artifacts, compile our code, run our unit tests, and generate a JAR file.
In other words, mvn clean package will remove the target folder, compile our code and also package it. For example, if our pom says the project is a jar, it will create a jar for us when we package it and put it in the target directory (by default).
Note that mvn clean install will compile and package, but it will also put the package in our local repository.
By default, this build job will fail if the code does not compile or if any of the unit tests fail. That's the most fundamental thing that we'd expect of any build server. But Jenkins also does a great job of helping us display our test results and test result trends.
The standard for test reporting in Java is an XML format used by JUnit.
Jenkins understands this format, so if our build produces JUnit XML test results, Jenkins can generate nice graphical test reports and statistics on test results over time, and also let us view the details of any test failures.
Jenkins also keeps track of how long our tests take to run, both globally, and per test-this can come in handy if we need to track down performance issues.
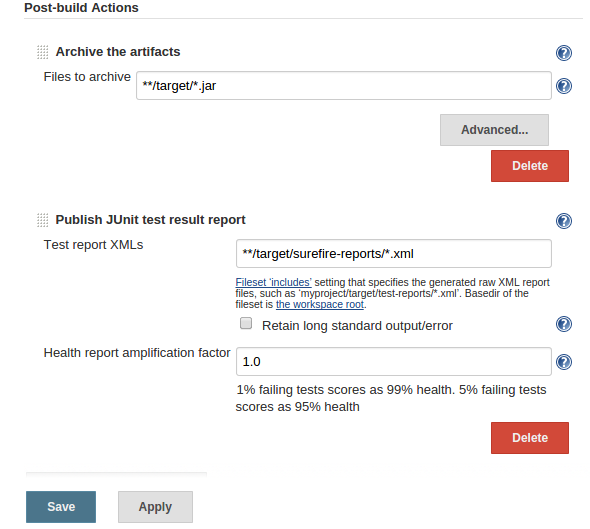
Go to the Post-build Actions section and check "Publish JUnit test result report" checkbox.
When Maven runs unit tests in a project, it automatically generates the XML test reports in a directory called surefire-reports in the target directory.
So enter "**/target/surefire-reports/*.xml" in the "Test report XMLs" field. The two asterisks at the start of the path ("**") are a best practice to make the configuration a bit more robust: they allow Jenkins to find the target directory no matter how we have configured Jenkins to check out the source code.
Another thing we often want to do is to archive our build results.
Jenkins can store a copy of the binary artifacts generated by our build, allowing us to download the binaries produced by a build directly from the build results page. It will also post the latest binary artifacts on the project home page, which is a convenient way to distribute the latest and greatest version of our application. We can activate this option by ticking the "Archive the artifacts" checkbox and indicating which binary artifacts we want Jenkins to archive.
We want to configure Jenkins to store all of the JAR files generated by this build job.

Now we're done. Click on the 'Save' button at the bottom of the screen.
Our build job should now be ready to run.
Jenkins
Ph.D. / Golden Gate Ave, San Francisco / Seoul National Univ / Carnegie Mellon / UC Berkeley / DevOps / Deep Learning / Visualization