Docker & Kubernetes 4 : Django with RDS via AWS Kops
Continued from the previous Kubernetes minikube (Docker & Kubernetes 3 : minikube Django with Redis and Celery), we'll use Django AWS RDS to be an external Postgres data store.
Up until now, we put Postgres database into another pod in the cluster, where storage has been managed using the PersistentVolume. However in production, it's better to use a database such as AWS RDS which gives us features like high availability/redundancy, scaling, backup/snapshot, and security patches.
We'll use Kubernetes Operations (kops) (check Manage Kubernetes Clusters on AWS Using Kops and Installing Kubernetes on AWS with kops) tool to deploy/manage our application, high availability Kubernetes clusters from the command line.
We'll be creating a Kubernetes cluster using kops:
$ kops create cluster ...
kubectl version info:
$ kubectl version
Client Version: version.Info{Major:"1", Minor:"11", GitVersion:"v1.11.3", GitCommit:"a4529464e4629c21224b3d52edfe0ea91b072862", GitTreeState:"clean", BuildDate:"2018-09-10T11:44:36Z", GoVersion:"go1.11", Compiler:"gc", Platform:"darwin/amd64"}
Server Version: version.Info{Major:"1", Minor:"10", GitVersion:"v1.10.0", GitCommit:"fc32d2f3698e36b93322a3465f63a14e9f0eaead", GitTreeState:"clean", BuildDate:"2018-03-26T16:44:10Z", GoVersion:"go1.9.3", Compiler:"gc", Platform:"linux/amd64"}
The difference between kops and kubectl is that kubectl interacts with applications or services deployed in our cluster, while kops interacts with entire clusters at a time.
We do not need to download the Kubernetes binary distribution for creating a cluster using kops. However, we do need to download the kops CLI.
On MacOS:
$ brew update && brew install kops

$ kops version
Version 1.10.0
The kops CLI is a lot like kubectl. We can use it for installing, operating, and deleting Kubernetes clusters.
The IAM user to create the Kubernetes cluster must have the following permissions:
- AmazonEC2FullAccess
- AmazonRoute53FullAccess
- AmazonS3FullAccess
- IAMFullAccess
- AmazonVPCFullAccess
A top-level domain or a subdomain is required to create the k8s cluster because kops uses DNS for discovery, both within the cluster and from clients. This domain allows the worker nodes to discover the master and the master to discover all the etcd servers. This is also needed for kubectl to be able to talk directly with the master.
This post uses a cruxlynx.com domain registered with AWS:
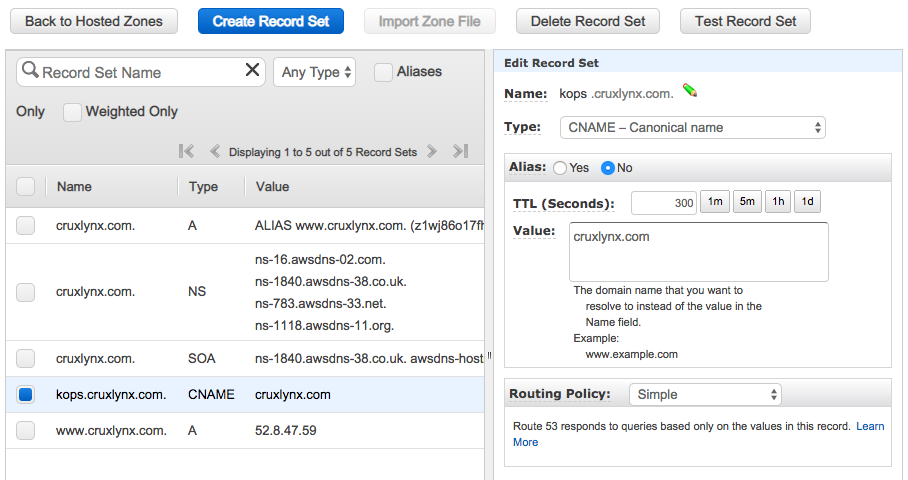
$ aws route53 list-resource-record-sets --hosted-zone-id Z1WJ86O17FH8O
{
    "ResourceRecordSets": [
        {
            "Name": "cruxlynx.com.",
            "Type": "A",
            "AliasTarget": {
                "HostedZoneId": "Z1WJ86O17FH8O",
                "DNSName": "www.cruxlynx.com.",
                "EvaluateTargetHealth": false
            }
        },
        {
            "Name": "cruxlynx.com.",
            "Type": "NS",
            "TTL": 172800,
            "ResourceRecords": [
                {
                    "Value": "ns-16.awsdns-02.com."
                },
                {
                    "Value": "ns-1840.awsdns-38.co.uk."
                },
                {
                    "Value": "ns-783.awsdns-33.net."
                },
                {
                    "Value": "ns-1118.awsdns-11.org."
                }
            ]
        },
        {
            "Name": "cruxlynx.com.",
            "Type": "SOA",
            "TTL": 900,
            "ResourceRecords": [
                {
                    "Value": "ns-1840.awsdns-38.co.uk. awsdns-hostmaster.amazon.com. 1 7200 900 1209600 86400"
                }
            ]
        },
        {
            "Name": "kops.cruxlynx.com.",
            "Type": "CNAME",
            "TTL": 300,
            "ResourceRecords": [
                {
                    "Value": "cruxlynx.com"
                }
            ]
        },
        {
            "Name": "www.cruxlynx.com.",
            "Type": "A",
            "TTL": 300,
            "ResourceRecords": [
                {
                    "Value": "52.8.47.59"
                }
            ]
        }
    ]
}
$ dig NS kops.cruxlynx.com

; <<>> DiG 9.9.7-P3 <<>> NS kops.cruxlynx.com
;; global options: +cmd
;; Got answer:
;; ->>HEADER<<- opcode: QUERY, status: NOERROR, id: 52539
;; flags: qr rd ra; QUERY: 1, ANSWER: 5, AUTHORITY: 0, ADDITIONAL: 1

;; OPT PSEUDOSECTION:
; EDNS: version: 0, flags:; udp: 4096
;; QUESTION SECTION:
;kops.cruxlynx.com.		IN	NS

;; ANSWER SECTION:
kops.cruxlynx.com.	300	IN	CNAME	cruxlynx.com.
cruxlynx.com.		172800	IN	NS	ns-783.awsdns-33.net.
cruxlynx.com.		172800	IN	NS	ns-1840.awsdns-38.co.uk.
cruxlynx.com.		172800	IN	NS	ns-1118.awsdns-11.org.
cruxlynx.com.		172800	IN	NS	ns-16.awsdns-02.com.

;; Query time: 141 msec
;; SERVER: 192.168.1.254#53(192.168.1.254)
;; WHEN: Fri Nov 23 11:31:07 PST 2018
;; MSG SIZE  rcvd: 196
We need to store the DNS name as an environmental variable so that we can use it when we create Kubernetes cluster.
$ export ROUTE53_KOPS_DNS=<subdomain>.<domain>.com
$ export ROUTE53_KOPS_DNS=kops.cruxlynx.com
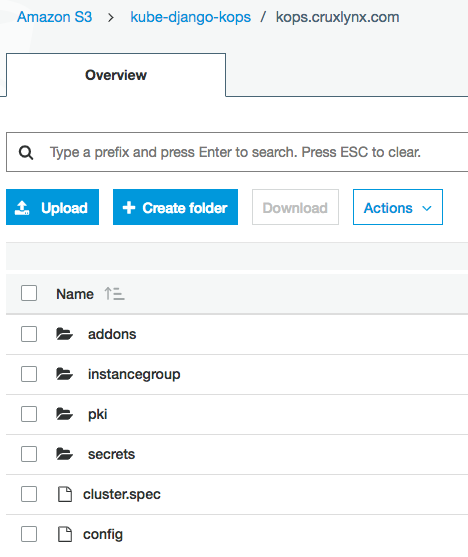
kops lets us manage our clusters by keeping track of the clusters that we have created, along with their configuration, the keys they are using etc. This information is stored in an S3 bucket and the permissions for S3 are used to control access to the dedicated s3 bucket.
We need to let kops know the the bucket name, this is done by updating the KOPS_STATE_STORE variable to point to the bucket name:
$ export AWS_REGION=us-east-1

$ export BUCKET_NAME=kube-django-kops
$ aws s3api create-bucket \
> --bucket ${BUCKET_NAME} \
> --region ${AWS_REGION}
{
    "Location": "/kube-django-kops"
}

$ export KOPS_STATE_STORE=s3://${BUCKET_NAME}
Let's set our shell variables for security group:
$ export SECURITY_GROUP_NAME=sg_kube_django

$ aws ec2 create-security-group \
--description ${SECURITY_GROUP_NAME} \
--group-name ${SECURITY_GROUP_NAME} \
--region ${AWS_REGION}
{
    "GroupId": "sg-06ee0f6fe19d244e1"
}
The "GroupId" variable will be used when creating the database instance, It's then stored as an environmental variable:
$ export SECURITY_GROUP_ID=sg-06ee0f6fe19d244e1
Add the appropriate permissions to the security group:
$ aws ec2 authorize-security-group-ingress \
--group-id ${SECURITY_GROUP_ID} \
--protocol tcp \
--port 5432 \
--cidr 0.0.0.0/0 \
--region ${AWS_REGION}
$ export RDS_DATABASE_NAME=kube-django
$ export RDS_TEMP_CREDENTIALS=kube_django
To create the RDS Postgres:
$ aws rds create-db-instance \
--db-instance-identifier ${RDS_DATABASE_NAME} \
--db-name ${RDS_TEMP_CREDENTIALS} \
--vpc-security-group-ids ${SECURITY_GROUP_ID} \
--allocated-storage 10 \
--db-instance-class db.t2.micro \
--engine postgres \
--master-username ${RDS_TEMP_CREDENTIALS} \
--master-user-password ${RDS_TEMP_CREDENTIALS} \
--region ${AWS_REGION}

Once the Postgres instance behind RDS has been created (it may take a while), we can get the endpoint:
$ aws rds describe-db-instances \
--db-instance-identifier ${RDS_DATABASE_NAME} \
--region ${AWS_REGION}
{
    "DBInstances": [
        {
            "DBInstanceIdentifier": "kube-django-kops",
            "DBInstanceClass": "db.t2.micro",
            "Engine": "postgres",
            "DBInstanceStatus": "available",
            "MasterUsername": "kube_django_kops",
            "DBName": "kube_django_kops",
            "Endpoint": {
                "Address": "kube-django-kops.cw005b9fmtrd.us-east-1.rds.amazonaws.co",
                "Port": 5432,
                "HostedZoneId": "Z2R2ITUGPM61AM"
            },
...
In this post, we're not going to utilize the PersistentVolume subsystem (without Postgres deployment controller). So, we need to create a service definition that uses the AWS RDS endpoint we created in the previous section.
deploy/rds/service.yaml:
kind: Service
apiVersion: v1
metadata:
  name: postgres-service
spec:
  type: ExternalName
  externalName: kube-django-kops.cw005b9fmtrd.us-east-1.rds.amazonaws.co
Not that we set spec: externalName with the value of the Endpoint address. Because we're not using any pod for Postgres, we do not specifying the spec: selector and spec: ports fields.
While we can use "kubectl create secret" for more secure approach, in this post, we'll use Base64 encoded string for the username and password generated by the following command:
$ echo -n ${RDS_TEMP_CREDENTIALS} | base64
a3ViZV9kamFuZ29fa29wcw==
deploy/rds/secrets.yaml:
apiVersion: v1
kind: Secret
metadata:
  name: postgres-credentials
type: Opaque
data:
  user: a3ViZV9kamFuZ29fa29wcw==
  password: a3ViZV9kamFuZ29fa29wcw==
Refs:
https://kubernetes.io/docs/concepts/services-networking/service/.
Kubernetes Ingress 101: NodePort, Load Balancers, and Ingress Controllers.
Picture source: Kinvolk Tech Talks: Introduction to Kubernetes Networking with Bryan Boreham.
In Kubernetes, there are three general approaches (service types) to expose our application.
We've been using the NodePort type for all the services that require public access. Kubernetes arrange things with the NodePort and it's on every node in our cluster (Kubernetes cluster, by default, supports NodePort). So, if we hit a node that the service is not running, it will bounce across to our nodes. Internally, it's done via iptables.
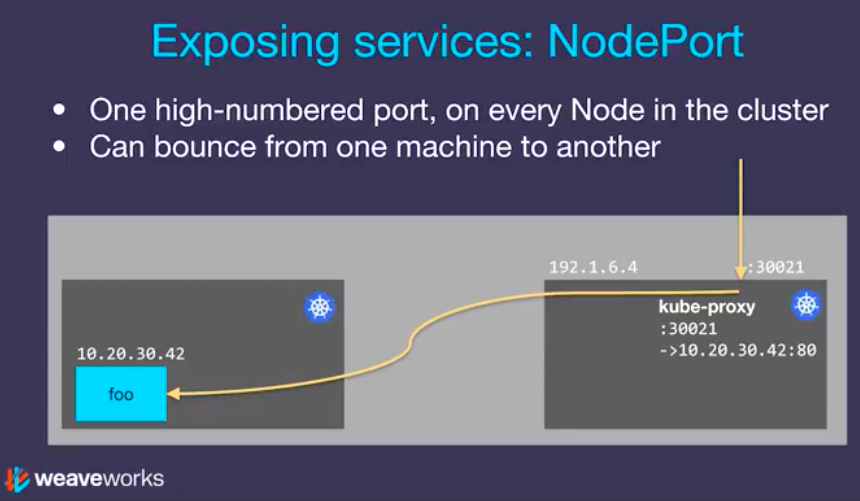
The NodePort can be used as a building block for higher-level ingress models (e.g., load balancers) and it is handy for development purposes, however, NodePorts are not designed to be directly used for production.
In this Django post, we'll use Load Balancer service type (deploy/django/service.yaml):
kind: Service
apiVersion: v1
metadata:
  name: django-service
spec:
  selector:
    pod: django
  ports:
  - protocol: TCP
    port: 80
    targetPort: 8000
  type: LoadBalancer
Internally, it uses NodePort to bounce across to the machine that the service is running on. Note that this is on Layer 4 (Ingress is on Layer 7). Also note that the exact implementation of a LoadBalancer is dependent on the cloud provider. So, unlike the NodePort service type, not all cloud providers support the LoadBalancer service type.
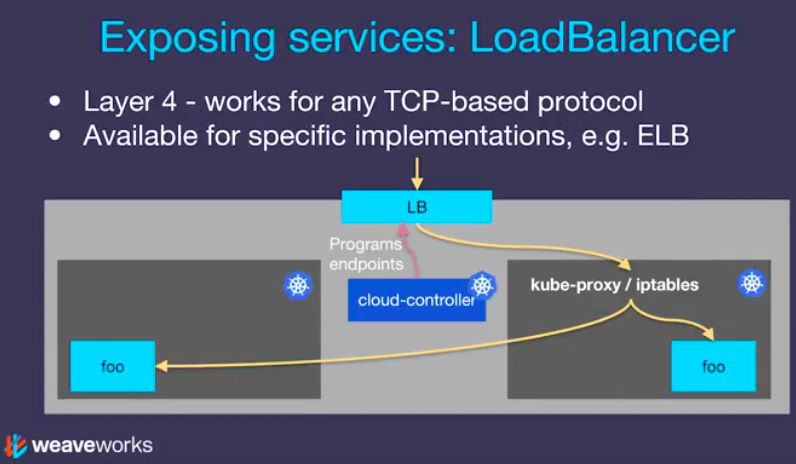
Ingress works on layer 7 (http/https only) and Ingress can provide load balancing, SSL termination and name-based virtual hosting (host based or URL based HTTP routing).
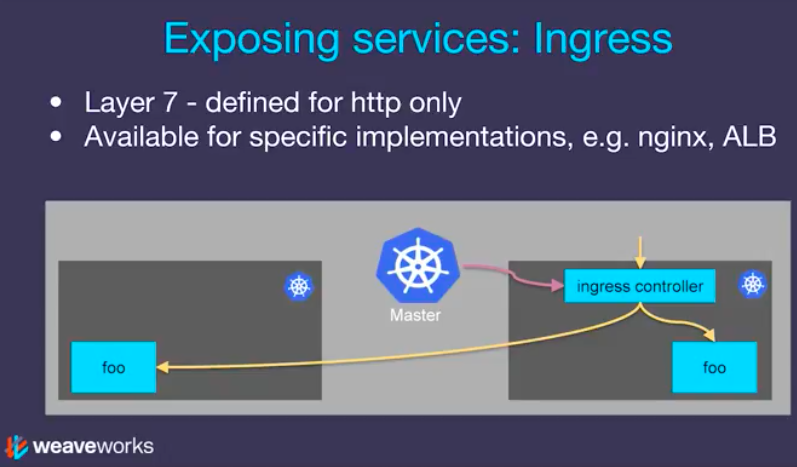
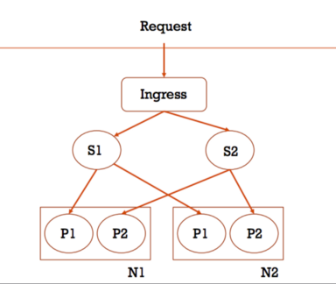
Picture from Getting Started with Kubernetes Ingress-Nginx on Minikube (S=Service, P=Pod, N=Node)
Want to play with Ingress controller? Then, check this post: Docker & Kubernetes : Nginx Ingress Controller.
We'll use the Kops CLI to create a highly available cluster, with multiple master nodes spread across multiple Availability Zones. Workers can be spread across multiple zones as well. The following tasks will be done when we create the Kubernetes cluster using kops.
- Provisioning EC2 instances
- Setting up AWS resources such as networks, Auto Scaling groups, IAM users, and security groups
- Installing Kubernetes
The kops create cluster is the command to create cloud based resources which include vpc, subnets, compute instances etc.
$ kops create cluster \
--name ${ROUTE53_KOPS_DNS} \
--ssh-public-key=~/.ssh/id_rsa.pub \
--zones us-east-1a,us-east-1b,us-east-1c \
--state ${KOPS_STATE_STORE} \
--node-size t2.micro \
--master-size t2.micro \
--node-count 2 \
--yes
I1124 09:42:30.579910   53711 create_cluster.go:1351] Using SSH public key: /Users/kihyuckhong/.ssh/id_rsa.pub
I1124 09:42:32.330249   53711 create_cluster.go:480] Inferred --cloud=aws from zone "us-east-1a"
I1124 09:42:32.877706   53711 subnets.go:184] Assigned CIDR 172.20.32.0/19 to subnet us-east-1a
I1124 09:42:32.877738   53711 subnets.go:184] Assigned CIDR 172.20.64.0/19 to subnet us-east-1b
I1124 09:42:32.877748   53711 subnets.go:184] Assigned CIDR 172.20.96.0/19 to subnet us-east-1c
I1124 09:42:38.543734   53711 executor.go:103] Tasks: 0 done / 77 total; 31 can run
I1124 09:42:40.002459   53711 vfs_castore.go:735] Issuing new certificate: "apiserver-aggregator-ca"
I1124 09:42:40.580053   53711 vfs_castore.go:735] Issuing new certificate: "ca"
I1124 09:42:44.281137   53711 executor.go:103] Tasks: 31 done / 77 total; 26 can run
I1124 09:42:45.568372   53711 vfs_castore.go:735] Issuing new certificate: "kubelet"
I1124 09:42:45.948143   53711 vfs_castore.go:735] Issuing new certificate: "kubelet-api"
I1124 09:42:46.057779   53711 vfs_castore.go:735] Issuing new certificate: "master"
I1124 09:42:46.058648   53711 vfs_castore.go:735] Issuing new certificate: "apiserver-proxy-client"
I1124 09:42:46.087110   53711 vfs_castore.go:735] Issuing new certificate: "kube-proxy"
I1124 09:42:46.380229   53711 vfs_castore.go:735] Issuing new certificate: "apiserver-aggregator"
I1124 09:42:46.683520   53711 vfs_castore.go:735] Issuing new certificate: "kubecfg"
I1124 09:42:46.708233   53711 vfs_castore.go:735] Issuing new certificate: "kops"
I1124 09:42:46.879727   53711 vfs_castore.go:735] Issuing new certificate: "kube-scheduler"
I1124 09:42:47.431739   53711 vfs_castore.go:735] Issuing new certificate: "kube-controller-manager"
I1124 09:42:50.281056   53711 executor.go:103] Tasks: 57 done / 77 total; 18 can run
I1124 09:42:51.714688   53711 launchconfiguration.go:380] waiting for IAM instance profile "masters.kops.cruxlynx.com" to be ready
I1124 09:43:03.455488   53711 executor.go:103] Tasks: 75 done / 77 total; 2 can run
I1124 09:43:05.055571   53711 executor.go:103] Tasks: 77 done / 77 total; 0 can run
I1124 09:43:05.056565   53711 dns.go:153] Pre-creating DNS records
I1124 09:43:06.140463   53711 update_cluster.go:290] Exporting kubecfg for cluster
kops has set your kubectl context to kops.cruxlynx.com

Cluster is starting.  It should be ready in a few minutes.

Suggestions:
 * validate cluster: kops validate cluster
 * list nodes: kubectl get nodes --show-labels
 * ssh to the master: ssh -i ~/.ssh/id_rsa admin@api.kops.cruxlynx.com
 * the admin user is specific to Debian. If not using Debian please use the appropriate user based on your OS.
 * read about installing addons at: https://github.com/kubernetes/kops/blob/master/docs/addons.md.
The arguments:
--name ${ROUTE53_KOPS_DNS}argument defines the name of our cluster it has to be the domain that was created in Route53 e.g. <subdomain>.<example>.com (in our case, kops.cruxlynx.com).--ssh-public-key=~/.ssh/<ssh_key>.pubis an optional field and if not provided defaults to ~/.ssh/id_rsa.pub. It's used to allow ssh access to the compute instances.--zonesdefines which zone to run the cluster in (minimum 2 zones).--node-sizeand--master-sizeindicates what compute instance types should be created, if not provided defaults to m2.medium.--node-countindicates the number of compute instances to be created, if not provided defaults to 2.--stateis the location of the state storage which should be the s3 bucket.--yesmeans that the cluster should be created immediately, if not provided it will only show a preview of what steps will be executed.


To validate the cluster:
$ kops validate cluster
Using cluster from kubectl context: kops.cruxlynx.com

Validating cluster kops.cruxlynx.com

INSTANCE GROUPS
NAME			ROLE	MACHINETYPE	MIN	MAX	SUBNETS
master-us-east-1a	Master	t2.micro	1	1	us-east-1a
nodes			Node	t2.micro	2	2	us-east-1a,us-east-1b,us-east-1c

NODE STATUS
NAME				ROLE	READY
ip-172-20-116-32.ec2.internal	node	True
ip-172-20-37-79.ec2.internal	master	True
ip-172-20-85-162.ec2.internal	node	True

Your cluster kops.cruxlynx.com is ready
To confirm that the cluster was created, we can try to list the nodes:
$ kubectl get nodes --show-labels
NAME                            STATUS   ROLES    AGE   VERSION   LABELS
ip-172-20-116-32.ec2.internal   Ready    node     2m    v1.10.6   beta.kubernetes.io/arch=amd64,beta.kubernetes.io/instance-type=t2.micro,beta.kubernetes.io/os=linux,failure-domain.beta.kubernetes.io/region=us-east-1,failure-domain.beta.kubernetes.io/zone=us-east-1c,kops.k8s.io/instancegroup=nodes,kubernetes.io/hostname=ip-172-20-116-32.ec2.internal,kubernetes.io/role=node,node-role.kubernetes.io/node=
ip-172-20-37-79.ec2.internal    Ready    master   3m    v1.10.6   beta.kubernetes.io/arch=amd64,beta.kubernetes.io/instance-type=t2.micro,beta.kubernetes.io/os=linux,failure-domain.beta.kubernetes.io/region=us-east-1,failure-domain.beta.kubernetes.io/zone=us-east-1a,kops.k8s.io/instancegroup=master-us-east-1a,kubernetes.io/hostname=ip-172-20-37-79.ec2.internal,kubernetes.io/role=master,node-role.kubernetes.io/master=
ip-172-20-85-162.ec2.internal   Ready    node     1m    v1.10.6   beta.kubernetes.io/arch=amd64,beta.kubernetes.io/instance-type=t2.micro,beta.kubernetes.io/os=linux,failure-domain.beta.kubernetes.io/region=us-east-1,failure-domain.beta.kubernetes.io/zone=us-east-1b,kops.k8s.io/instancegroup=nodes,kubernetes.io/hostname=ip-172-20-85-162.ec2.internal,kubernetes.io/role=node,node-role.kubernetes.io/node=
This shows that 3 compute instances were created which contains 1 master and 2 nodes all running Kubernetes version 1.10.6.
To ssh to the master:
$ ssh -i ~/.ssh/id_rsa admin@api.kops.cruxlynx.com
The authenticity of host 'api.kops.cruxlynx.com (34.201.0.67)' can't be established.
ECDSA key fingerprint is SHA256:WwUmK5a1q0EGWJddfI32FjZNZR7S/BEG9K9lSie5DPI.
Are you sure you want to continue connecting (yes/no)? yes
Warning: Permanently added 'api.kops.cruxlynx.com,34.201.0.67' (ECDSA) to the list of known hosts.

The programs included with the Debian GNU/Linux system are free software;
the exact distribution terms for each program are described in the
individual files in /usr/share/doc/*/copyright.

Debian GNU/Linux comes with ABSOLUTELY NO WARRANTY, to the extent
permitted by applicable law.
admin@ip-172-20-37-79:~$
To confirm the context that kubectl will be using when performing actions to the cluster. Note that the output should be the DNS name that was given to the cluster:
$ kubectl config current-context
kops.cruxlynx.com
$ kubectl cluster-info
Kubernetes master is running at https://api.kops.cruxlynx.com
KubeDNS is running at https://api.kops.cruxlynx.com/api/v1/namespaces/kube-system/services/kube-dns:dns/proxy

To further debug and diagnose cluster problems, use 'kubectl cluster-info dump'.
Though we can reuse the image that was built in the previous post, here we can build a new image:
$ docker build -t dockerbogo/django_minikube:4.0.2 .
Then, login and push it to DockerHub:
$ docker login -u dockerbogo
Password:
Login Succeeded

$ docker push dockerbogo/django_minikube:4.0.2
The push refers to repository [docker.io/dockerbogo/django_minikube]
c653794f6fe7: Layer already exists
9bff439720ab: Layer already exists
55c2454919f4: Layer already exists
4f3035d4284a: Layer already exists
db067458dfa6: Layer already exists
ccec44bf5310: Layer already exists
a1ae7010d9f9: Layer already exists
03a6b6877a9b: Layer already exists
ef68f6734aa4: Layer already exists
4.0.2: digest: sha256:a5d7921bb3d785eb5354beab1bcce6fb5270a66c0b147e3246fbe22b5467eabe size: 2204
To deploy the application (Source code in GitHub) to the cluster, we need to run the following commands:
$ cd deploy

$ kubectl apply -f rds/
secret/postgres-credentials created
service/postgres-service created

$ kubectl apply -f redis/
deployment.apps/redis created
service/redis-service created

$ kubectl apply -f django/
deployment.apps/django created
job.batch/django-migrations created
service/django-service created

$ kubectl apply -f celery/
deployment.apps/celery-beat created
deployment.apps/celery-worker created
Note that instead of deploying with postgres/ folder for the PersistentVolume subsystem, in this post, we're deploying the manifests files in the rds/ folder for RDS Postgres.
$ kubectl get pods
NAME                             READY   STATUS      RESTARTS   AGE
celery-beat-8744dc464-d6f68      1/1     Running     0          49s
celery-worker-7fd8664c7c-pfc29   1/1     Running     0          48s
django-bc98fbb7f-4zp2t           1/1     Running     0          1m
django-migrations-mbxtc          0/1     Completed   0          1m
redis-dc494cb76-r65ch            1/1     Running     0          1m
$ kubectl get svc
NAME               TYPE           CLUSTER-IP      EXTERNAL-IP                                                               PORT(S)        AGE
django-service     LoadBalancer   100.64.43.63    af4f8e311f01e11e8b8fb0291d935778-1034012415.us-east-1.elb.amazonaws.com   80:31398/TCP   2m
kubernetes         ClusterIP      100.64.0.1      <none>                                                                    443/TCP        1h
postgres-service   ExternalName   <none>          kube-django-kops.cw005b9fmtrd.us-east-1.rds.amazonaws.com                 <none>         3m
redis-service      ClusterIP      100.65.12.204   <none>                                                                    6379/TCP       2m
The Kubernetes dashboard is not deployed by default when deploying a cluster on AWS with kops. But to make it sure we can check if it's there:
$ kubectl get pods --all-namespaces | grep dashboard
If it is missing, we can install the latest stable release.
To deploy the general purpose, web-based UI dashboard for Kubernetes, we need to execute the following command:
$ kubectl apply -f https://raw.githubusercontent.com/kubernetes/dashboard/master/src/deploy/recommended/kubernetes-dashboard.yaml
secret/kubernetes-dashboard-certs created
serviceaccount/kubernetes-dashboard created
role.rbac.authorization.k8s.io/kubernetes-dashboard-minimal created
rolebinding.rbac.authorization.k8s.io/kubernetes-dashboard-minimal created
deployment.apps/kubernetes-dashboard created
service/kubernetes-dashboard created
To expose the dashboard in a browser from local, we may want to create a secure channel to the Kubernetes cluster, this can be done by:
$ kubectl proxy
Starting to serve on 127.0.0.1:8001
The dashboard can now be accessed from:
http://localhost:8001/api/v1/namespaces/kube-system/services/https:kubernetes-dashboard:/proxy/
As we can see from the picture below, we may want to type in a proper token:
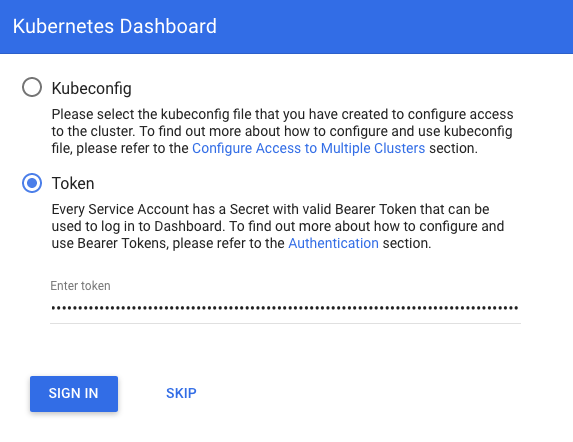
The token can be obtained from Access control. There are many Service Accounts created in Kubernetes by default. All with different access permissions. In order to find any token, that can be used to log in we'll use kubectl. To check existing secrets in kube-system namespace:
$ kubectl -n kube-system get secret
NAME                                             TYPE                                  DATA   AGE
attachdetach-controller-token-5lqd7              kubernetes.io/service-account-token   3      7h
aws-cloud-provider-token-xql27                   kubernetes.io/service-account-token   3      7h
certificate-controller-token-c868c               kubernetes.io/service-account-token   3      7h
clusterrole-aggregation-controller-token-bfm8p   kubernetes.io/service-account-token   3      7h
cronjob-controller-token-dcglr                   kubernetes.io/service-account-token   3      7h
daemon-set-controller-token-9w4cj                kubernetes.io/service-account-token   3      7h
default-token-w468j                              kubernetes.io/service-account-token   3      7h
deployment-controller-token-624hw                kubernetes.io/service-account-token   3      7h
disruption-controller-token-8v5j2                kubernetes.io/service-account-token   3      7h
dns-controller-token-pvvwv                       kubernetes.io/service-account-token   3      7h
endpoint-controller-token-xxcrm                  kubernetes.io/service-account-token   3      7h
generic-garbage-collector-token-z8xl8            kubernetes.io/service-account-token   3      7h
horizontal-pod-autoscaler-token-q6gpl            kubernetes.io/service-account-token   3      7h
job-controller-token-w2xbv                       kubernetes.io/service-account-token   3      7h
kube-dns-autoscaler-token-tj7mx                  kubernetes.io/service-account-token   3      7h
kube-dns-token-sxxvw                             kubernetes.io/service-account-token   3      7h
kube-proxy-token-5tfg9                           kubernetes.io/service-account-token   3      7h
kubernetes-dashboard-certs                       Opaque                                0      2h
kubernetes-dashboard-key-holder                  Opaque                                2      2h
kubernetes-dashboard-token-zzkcb                 kubernetes.io/service-account-token   3      2h
namespace-controller-token-5c8f2                 kubernetes.io/service-account-token   3      7h
node-controller-token-lcr5v                      kubernetes.io/service-account-token   3      7h
persistent-volume-binder-token-hvvpw             kubernetes.io/service-account-token   3      7h
pod-garbage-collector-token-qjbqn                kubernetes.io/service-account-token   3      7h
pv-protection-controller-token-xsfrh             kubernetes.io/service-account-token   3      7h
pvc-protection-controller-token-vshlm            kubernetes.io/service-account-token   3      7h
replicaset-controller-token-m2tpr                kubernetes.io/service-account-token   3      7h
replication-controller-token-57dwv               kubernetes.io/service-account-token   3      7h
resourcequota-controller-token-95ksz             kubernetes.io/service-account-token   3      7h
route-controller-token-bk6w5                     kubernetes.io/service-account-token   3      7h
service-account-controller-token-mx65h           kubernetes.io/service-account-token   3      7h
service-controller-token-f47hq                   kubernetes.io/service-account-token   3      7h
statefulset-controller-token-75ffl               kubernetes.io/service-account-token   3      7h
ttl-controller-token-lpk5w                       kubernetes.io/service-account-token   3      7h
All secrets with type 'kubernetes.io/service-account-token' will allow to log in. But note that they have different privileges.
$ kubectl -n kube-system describe secret replicaset-controller-token-m2tpr
Name:         replicaset-controller-token-m2tpr
Namespace:    kube-system
Labels:       <none>
Annotations:  kubernetes.io/service-account.name: replicaset-controller
              kubernetes.io/service-account.uid: c93c656a-ef79-11e8-8f27-02cb80d9b62e

Type:  kubernetes.io/service-account-token

Data
====
token:      eyJhbGciOiJSUzI1NiIsImtpZCI6IiJ9.eyJpc3MiOiJrdWJlcm5ldGVzL3NlcnZpY2VhY2NvdW50Iiwia3ViZXJuZXRlcy5pby9zZXJ2aWNlYWNjb3VudC9uYW1lc3BhY2UiOiJrdWJlLXN5c3RlbSIsImt1YmVybmV0ZXMuaW8vc2VydmljZWFjY291bnQvc2VjcmV0Lm5hbWUiOiJyZXBsaWNhc2V0LWNvbnRyb2xsZXItdG9rZW4tbTJ0cHIiLCJrdWJlcm5ldGVzLmlvL3NlcnZpY2VhY2NvdW50L3NlcnZpY2UtYWNjb3VudC5uYW1lIjoicmVwbGljYXNldC1jb250cm9sbGVyIiwia3ViZXJuZXRlcy5pby9zZXJ2aWNlYWNjb3VudC9zZXJ2aWNlLWFjY291bnQudWlkIjoiYzkzYzY1NmEtZWY3OS0xMWU4LThmMjctMDJjYjgwZDliNjJlIiwic3ViIjoic3lzdGVtOnNlcnZpY2VhY2NvdW50Omt1YmUtc3lzdGVtOnJlcGxpY2FzZXQtY29udHJvbGxlciJ9.Aophlb6CWEo_Ksx_YXBcjFnI9WK0hdeEyC64UdWva172_jiwKwLoci3WitJQzHd_Yc7gtSRb9Klm1TyTwvGNfZur2_4B0YuaDiO3o-rqcAPghQux9f1FGKJtxozNRdO14lBTbLskSd6oa2cknYkxkFAnIr5IlhyQ482P0W5E-TI8leN487fAFRcEAMzvj1wRdcwU8_mclmgGbuwAdkc706FIyv12ip_jwvaJ8GcpAUzca-DQmMTG8IPbyH5UXEfeqmyCsHUrVvQUGqWjsbl0TzpfaW58k9Fc6F6PzwzBxx9yBQ2g0OvLXsWnCpHvIf3u5zZoXa2CjGpbkBheDF1UzA
ca.crt:     1042 bytes
namespace:  11 bytes
Here is the Kubernetes Dashboard logged in with limited access (role based) token:
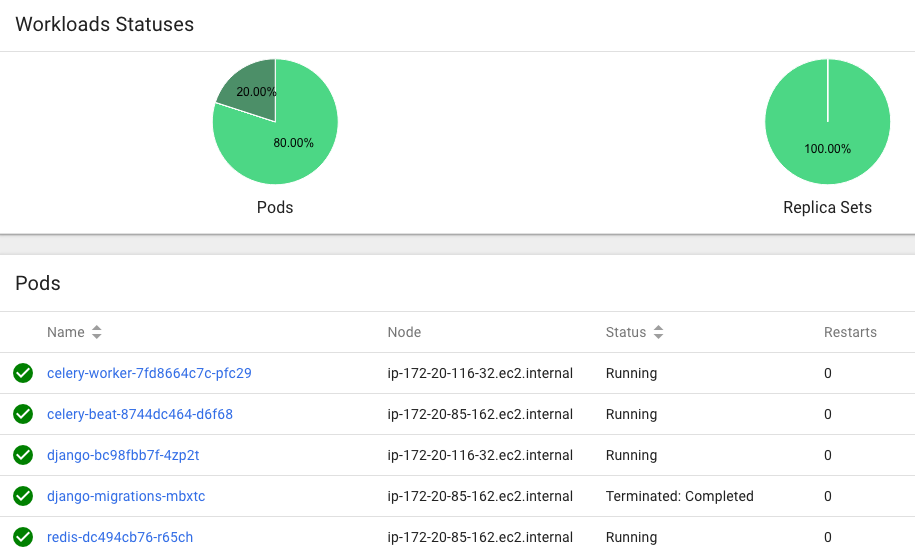
With the token we used in the previous section, we do not have an access to services. So, we may want to use the following service token from the output we got from "kubectl -n kube-system get secret" command:
$ kubectl -n kube-system describe secret service-controller-token-f47hq
Logout and login with the new token:
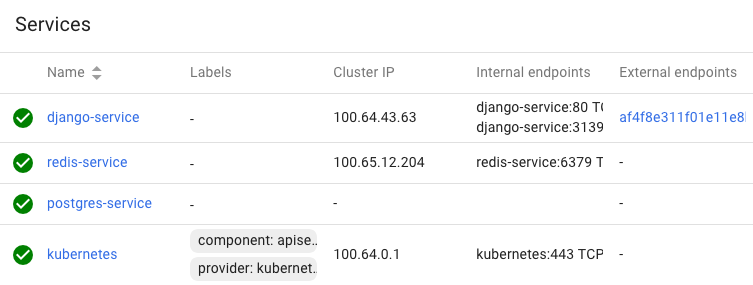
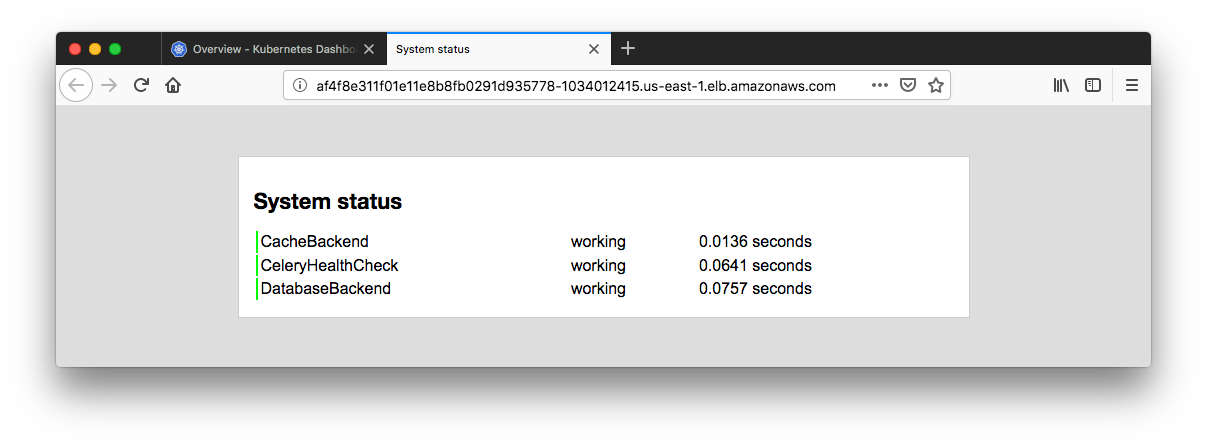
We need to retrieve the Load balancer endpoint which is in the row of the django-service. Just click it.
We can grant full admin privileges to Dashboard's Service Account by creating ClusterRoleBinding (kubernetes/dashboard-Access control). Copy the YAML file below based on chosen installation method and save as, i.e. dashboard-admin.yaml.
Note that granting admin privileges to Dashboard's Service Account might be a security risk.
dashboard-admin.yaml:
apiVersion: rbac.authorization.k8s.io/v1beta1
kind: ClusterRoleBinding
metadata:
  name: kubernetes-dashboard
  labels:
    k8s-app: kubernetes-dashboard
roleRef:
  apiGroup: rbac.authorization.k8s.io
  kind: ClusterRole
  name: cluster-admin
subjects:
- kind: ServiceAccount
  name: kubernetes-dashboard
  namespace: kube-system
Let's use kubectl create -f dashboard-admin.yaml to deploy it. Then, we don't need to fill in token/config credential to the auth and we can use Skip option on login page to access Dashboard.
$ cd deploy

$ kubectl create -f dashboard-admin.yaml
clusterrolebinding.rbac.authorization.k8s.io/kubernetes-dashboard created
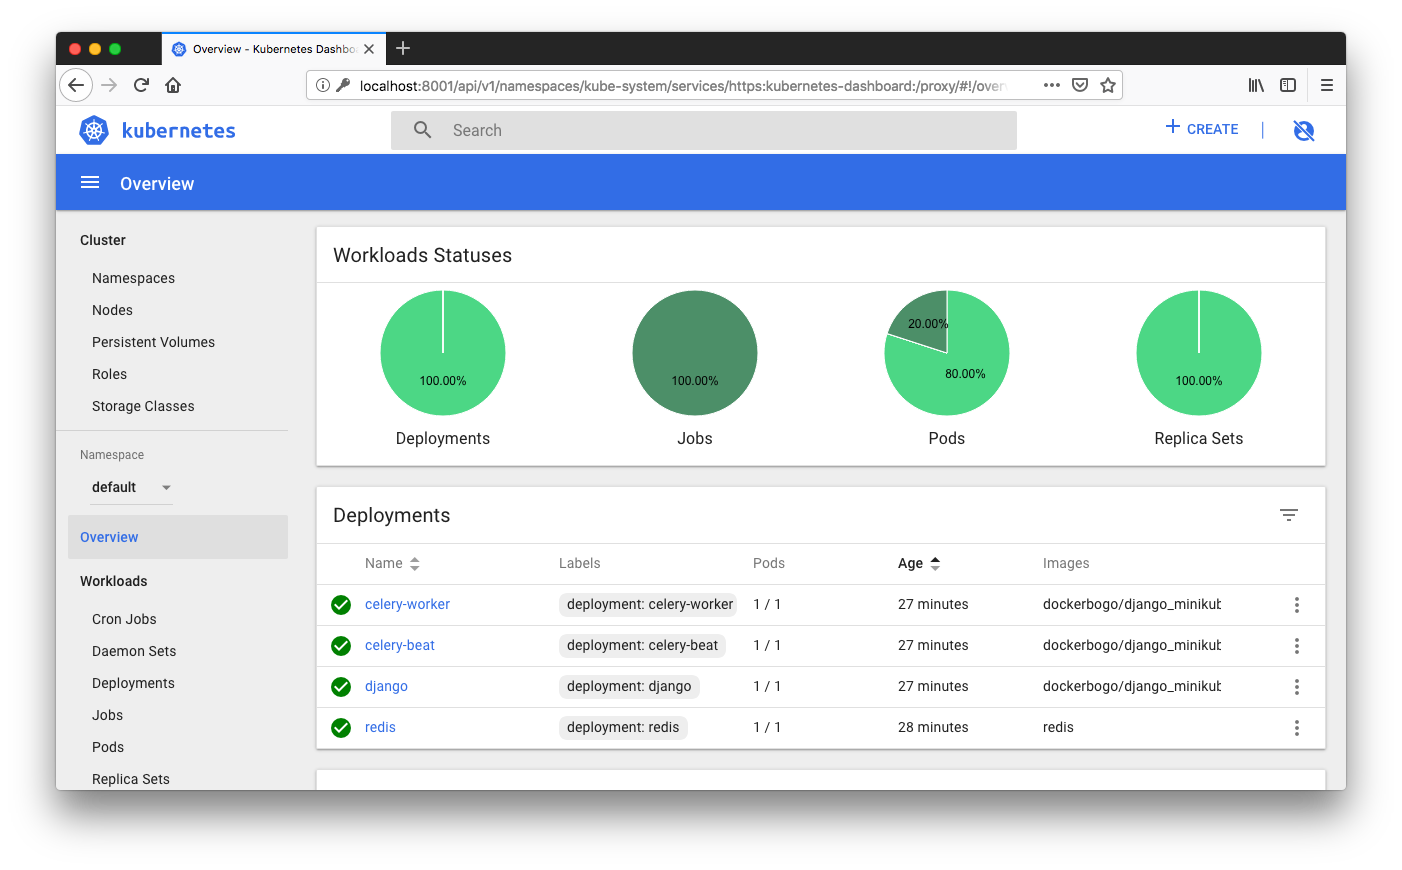
To delete the cluster with all the AWS resources that were created by the kops:
$ kops delete cluster \
--state ${KOPS_STATE_STORE} \
--name ${ROUTE53_KOPS_DNS} \
--yes
...
Deleted kubectl config for kops.cruxlynx.com

Deleted cluster: "kops.cruxlynx.com"
The rds instance can also be deleted:
$ aws rds delete-db-instance \
--skip-final-snapshot \
--db-instance-identifier ${RDS_DATABASE_NAME} \
--region ${AWS_REGION}

- Kubernetes II - kops on AWS
- Manage Kubernetes Clusters on AWS Using Kops
- Installing Kubernetes on AWS with kops
- Kubernetes, Local to Production with Django: 5— Deploy to AWS using Kops with RDS Postgres
- https://kubernetes.io/docs/concepts/services-networking/service/
- Kubernetes Ingress 101: NodePort, Load Balancers, and Ingress Controllers
- kubernetes/kops
Docker & K8s
- Docker install on Amazon Linux AMI
- Docker install on EC2 Ubuntu 14.04
- Docker container vs Virtual Machine
- Docker install on Ubuntu 14.04
- Docker Hello World Application
- Nginx image - share/copy files, Dockerfile
- Working with Docker images : brief introduction
- Docker image and container via docker commands (search, pull, run, ps, restart, attach, and rm)
- More on docker run command (docker run -it, docker run --rm, etc.)
- Docker Networks - Bridge Driver Network
- Docker Persistent Storage
- File sharing between host and container (docker run -d -p -v)
- Linking containers and volume for datastore
- Dockerfile - Build Docker images automatically I - FROM, MAINTAINER, and build context
- Dockerfile - Build Docker images automatically II - revisiting FROM, MAINTAINER, build context, and caching
- Dockerfile - Build Docker images automatically III - RUN
- Dockerfile - Build Docker images automatically IV - CMD
- Dockerfile - Build Docker images automatically V - WORKDIR, ENV, ADD, and ENTRYPOINT
- Docker - Apache Tomcat
- Docker - NodeJS
- Docker - NodeJS with hostname
- Docker Compose - NodeJS with MongoDB
- Docker - Prometheus and Grafana with Docker-compose
- Docker - StatsD/Graphite/Grafana
- Docker - Deploying a Java EE JBoss/WildFly Application on AWS Elastic Beanstalk Using Docker Containers
- Docker : NodeJS with GCP Kubernetes Engine
- Docker : Jenkins Multibranch Pipeline with Jenkinsfile and Github
- Docker : Jenkins Master and Slave
- Docker - ELK : ElasticSearch, Logstash, and Kibana
- Docker - ELK 7.6 : Elasticsearch on Centos 7
- Docker - ELK 7.6 : Filebeat on Centos 7
- Docker - ELK 7.6 : Logstash on Centos 7
- Docker - ELK 7.6 : Kibana on Centos 7
- Docker - ELK 7.6 : Elastic Stack with Docker Compose
- Docker - Deploy Elastic Cloud on Kubernetes (ECK) via Elasticsearch operator on minikube
- Docker - Deploy Elastic Stack via Helm on minikube
- Docker Compose - A gentle introduction with WordPress
- Docker Compose - MySQL
- MEAN Stack app on Docker containers : micro services
- MEAN Stack app on Docker containers : micro services via docker-compose
- Docker Compose - Hashicorp's Vault and Consul Part A (install vault, unsealing, static secrets, and policies)
- Docker Compose - Hashicorp's Vault and Consul Part B (EaaS, dynamic secrets, leases, and revocation)
- Docker Compose - Hashicorp's Vault and Consul Part C (Consul)
- Docker Compose with two containers - Flask REST API service container and an Apache server container
- Docker compose : Nginx reverse proxy with multiple containers
- Docker & Kubernetes : Envoy - Getting started
- Docker & Kubernetes : Envoy - Front Proxy
- Docker & Kubernetes : Ambassador - Envoy API Gateway on Kubernetes
- Docker Packer
- Docker Cheat Sheet
- Docker Q & A #1
- Kubernetes Q & A - Part I
- Kubernetes Q & A - Part II
- Docker - Run a React app in a docker
- Docker - Run a React app in a docker II (snapshot app with nginx)
- Docker - NodeJS and MySQL app with React in a docker
- Docker - Step by Step NodeJS and MySQL app with React - I
- Installing LAMP via puppet on Docker
- Docker install via Puppet
- Nginx Docker install via Ansible
- Apache Hadoop CDH 5.8 Install with QuickStarts Docker
- Docker - Deploying Flask app to ECS
- Docker Compose - Deploying WordPress to AWS
- Docker - WordPress Deploy to ECS with Docker-Compose (ECS-CLI EC2 type)
- Docker - WordPress Deploy to ECS with Docker-Compose (ECS-CLI Fargate type)
- Docker - ECS Fargate
- Docker - AWS ECS service discovery with Flask and Redis
- Docker & Kubernetes : minikube
- Docker & Kubernetes 2 : minikube Django with Postgres - persistent volume
- Docker & Kubernetes 3 : minikube Django with Redis and Celery
- Docker & Kubernetes 4 : Django with RDS via AWS Kops
- Docker & Kubernetes : Kops on AWS
- Docker & Kubernetes : Ingress controller on AWS with Kops
- Docker & Kubernetes : HashiCorp's Vault and Consul on minikube
- Docker & Kubernetes : HashiCorp's Vault and Consul - Auto-unseal using Transit Secrets Engine
- Docker & Kubernetes : Persistent Volumes & Persistent Volumes Claims - hostPath and annotations
- Docker & Kubernetes : Persistent Volumes - Dynamic volume provisioning
- Docker & Kubernetes : DaemonSet
- Docker & Kubernetes : Secrets
- Docker & Kubernetes : kubectl command
- Docker & Kubernetes : Assign a Kubernetes Pod to a particular node in a Kubernetes cluster
- Docker & Kubernetes : Configure a Pod to Use a ConfigMap
- AWS : EKS (Elastic Container Service for Kubernetes)
- Docker & Kubernetes : Run a React app in a minikube
- Docker & Kubernetes : Minikube install on AWS EC2
- Docker & Kubernetes : Cassandra with a StatefulSet
- Docker & Kubernetes : Terraform and AWS EKS
- Docker & Kubernetes : Pods and Service definitions
- Docker & Kubernetes : Service IP and the Service Type
- Docker & Kubernetes : Kubernetes DNS with Pods and Services
- Docker & Kubernetes : Headless service and discovering pods
- Docker & Kubernetes : Scaling and Updating application
- Docker & Kubernetes : Horizontal pod autoscaler on minikubes
- Docker & Kubernetes : From a monolithic app to micro services on GCP Kubernetes
- Docker & Kubernetes : Rolling updates
- Docker & Kubernetes : Deployments to GKE (Rolling update, Canary and Blue-green deployments)
- Docker & Kubernetes : Slack Chat Bot with NodeJS on GCP Kubernetes
- Docker & Kubernetes : Continuous Delivery with Jenkins Multibranch Pipeline for Dev, Canary, and Production Environments on GCP Kubernetes
- Docker & Kubernetes : NodePort vs LoadBalancer vs Ingress
- Docker & Kubernetes : MongoDB / MongoExpress on Minikube
- Docker & Kubernetes : Load Testing with Locust on GCP Kubernetes
- Docker & Kubernetes : MongoDB with StatefulSets on GCP Kubernetes Engine
- Docker & Kubernetes : Nginx Ingress Controller on Minikube
- Docker & Kubernetes : Setting up Ingress with NGINX Controller on Minikube (Mac)
- Docker & Kubernetes : Nginx Ingress Controller for Dashboard service on Minikube
- Docker & Kubernetes : Nginx Ingress Controller on GCP Kubernetes
- Docker & Kubernetes : Kubernetes Ingress with AWS ALB Ingress Controller in EKS
- Docker & Kubernetes : Setting up a private cluster on GCP Kubernetes
- Docker & Kubernetes : Kubernetes Namespaces (default, kube-public, kube-system) and switching namespaces (kubens)
- Docker & Kubernetes : StatefulSets on minikube
- Docker & Kubernetes : RBAC
- Docker & Kubernetes Service Account, RBAC, and IAM
- Docker & Kubernetes - Kubernetes Service Account, RBAC, IAM with EKS ALB, Part 1
- Docker & Kubernetes : Helm Chart
- Docker & Kubernetes : My first Helm deploy
- Docker & Kubernetes : Readiness and Liveness Probes
- Docker & Kubernetes : Helm chart repository with Github pages
- Docker & Kubernetes : Deploying WordPress and MariaDB with Ingress to Minikube using Helm Chart
- Docker & Kubernetes : Deploying WordPress and MariaDB to AWS using Helm 2 Chart
- Docker & Kubernetes : Deploying WordPress and MariaDB to AWS using Helm 3 Chart
- Docker & Kubernetes : Helm Chart for Node/Express and MySQL with Ingress
- Docker & Kubernetes : Deploy Prometheus and Grafana using Helm and Prometheus Operator - Monitoring Kubernetes node resources out of the box
- Docker & Kubernetes : Deploy Prometheus and Grafana using kube-prometheus-stack Helm Chart
- Docker & Kubernetes : Istio (service mesh) sidecar proxy on GCP Kubernetes
- Docker & Kubernetes : Istio on EKS
- Docker & Kubernetes : Istio on Minikube with AWS EC2 for Bookinfo Application
- Docker & Kubernetes : Deploying .NET Core app to Kubernetes Engine and configuring its traffic managed by Istio (Part I)
- Docker & Kubernetes : Deploying .NET Core app to Kubernetes Engine and configuring its traffic managed by Istio (Part II - Prometheus, Grafana, pin a service, split traffic, and inject faults)
- Docker & Kubernetes : Helm Package Manager with MySQL on GCP Kubernetes Engine
- Docker & Kubernetes : Deploying Memcached on Kubernetes Engine
- Docker & Kubernetes : EKS Control Plane (API server) Metrics with Prometheus
- Docker & Kubernetes : Spinnaker on EKS with Halyard
- Docker & Kubernetes : Continuous Delivery Pipelines with Spinnaker and Kubernetes Engine
- Docker & Kubernetes : Multi-node Local Kubernetes cluster : Kubeadm-dind (docker-in-docker)
- Docker & Kubernetes : Multi-node Local Kubernetes cluster : Kubeadm-kind (k8s-in-docker)
- Docker & Kubernetes : nodeSelector, nodeAffinity, taints/tolerations, pod affinity and anti-affinity - Assigning Pods to Nodes
- Docker & Kubernetes : Jenkins-X on EKS
- Docker & Kubernetes : ArgoCD App of Apps with Heml on Kubernetes
- Docker & Kubernetes : ArgoCD on Kubernetes cluster
- Docker & Kubernetes : GitOps with ArgoCD for Continuous Delivery to Kubernetes clusters (minikube) - guestbook
Ph.D. / Golden Gate Ave, San Francisco / Seoul National Univ / Carnegie Mellon / UC Berkeley / DevOps / Deep Learning / Visualization