Chef install on Ubuntu 14.04 : workstation

Chef
Chef is an open source tool and framework that provides system administrators and developers with a foundation of APIs and libraries.
Chef allows us to write programs effectively so that we can generate configuration directly on the machines we need to manage. Then, we keep these programs in version control, and use them to gain control of the complex systems.
In the subsequent chapters, we'll setup Chef Workstation with our laptop, the Chef Server will be Opscode Hosted Chef, and the first node we create will be a VirtualBox that is managed by Vagrant.
To manage our infrastructure as code, we need to store that code in some source code repository. In this tutorial, we're going to use git, a distributed version control system. The git repository will be publicly hosted on GitHub, and we want to create a repository, chef-repo as its name.
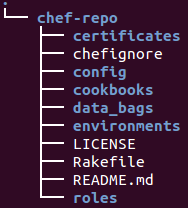
Before we can write any cookbooks, we need to set up our initial Git repository on our development box. Opscode provides an empty Chef repository to get us started. Now we want to set up our own Chef repository with Git using Opscode's skeleton.
We'll download a tarball containing Opscode's skeleton repository and then we'll initialize our chef-repo and connect it to the repository on GitHub. After that, we're going to add all the files from the tarball to our repository and commit them, which makes Git track our files and the changes we make later. As a final step, we'll push our repository to GitHub.
- Download Opscode's skeleton Chef repository as a tarball:
k@laptop:~$ wget http://github.com/opscode/chef-repo/tarball/master
- Extract the downloaded tarball:
k@laptop:~$ tar xzf master
- Rename the directory:
k@laptop:~$ mv opscode-chef-repo* chef-repo
- Change into the created Chef repository:
k@laptop:~$ cd chef-repo
- Initialize a fresh Git repository:
k@laptop:~/chef-repo$ git init .
Initialized empty Git repository in /home/k/chef-repo/.git/
- Connect your local repository to your remote repository on GitHub:
k@laptop:~/chef-repo$ git remote add origin https://github.com/bogo-devops/chef-repo.git
- Add and commit Opscode's default directory structure:
k@laptop:~/chef-repo$ git add .
k@laptop:~/chef-repo$ git commit -m "initial commit"
[master (root-commit) c09f74b] initial commit
 11 files changed, 545 insertions(+)
 create mode 100644 .gitignore
 create mode 100644 LICENSE
 create mode 100644 README.md
 create mode 100644 Rakefile
 create mode 100644 certificates/README.md
 create mode 100644 chefignore
 create mode 100644 config/rake.rb
 create mode 100644 cookbooks/README.md
 create mode 100644 data_bags/README.md
 create mode 100644 environments/README.md
 create mode 100644 roles/README.md
- Push the initialized repository to GitHub:
k@laptop:~/chef-repo$ git push -u origin master
Username for 'https://github.com': bogo-devops
Password for 'https://bogo-devops@github.com':
...
To https://github.com/bogo-devops/chef-repo.git
   1768abe..e42cdac  master -> master
Branch master set up to track remote branch master from origin.
If we want to use Chef, we need to install it on our local workstation first. Then, we develop our configurations locally and use Chef to distribute them to our Chef Server.
Opscode provides a package, which does not have any external prerequisites. This fully packaged Chef is called the Omnibus Installer.
The Omnibus Installer will download Ruby and all the required Ruby gems into /opt/chef/embedded. Also, the Chef command-line tools will be available in our shell by adding the /opt/chef/embedded/bin directory to our .bash_profile.
- In our local shell, run the following command:
@laptop:~/chef-repo$ curl -L https://www.opscode.com/chef/install.sh | sudo bash
...
Setting up chef (11.16.4-1) ...
Thank you for installing Chef!
- Add the newly installed Ruby to the path:
k@laptop:~/chef-repo$ >> ~/.bash_profile && source ~/.bash_profile
It ownloads and executes a simple shell script that calculates the exact version of the native OS package required, downloads the package, installs it, and adds the vendored location of the Chef commands to our path.
We can check if the install was successful, for example, chef-solo etc.: :
ubuntu@Chef-Solo:~$ sudo chef-solo -v
Chef: 11.16.4
Having installed Chef, we now have the following new commands available on our system:
- chef-apply
- chef-shell
- chef-solo
- chef-client
- ohai
- knife
The chef-repo is the location in which the following data objects are stored:
- Cookbooks (including recipes, versions, cookbook attributes, resources, providers, libraries, and templates)
- Roles
- Data bags
- Environments
- Configuration files (for clients, workstations, and servers)

Ph.D. / Golden Gate Ave, San Francisco / Seoul National Univ / Carnegie Mellon / UC Berkeley / DevOps / Deep Learning / Visualization