Kubernetes I - Running Kubernetes Locally via Minikube
Minikube starts a single node (or multiple node with minikube 1.10.1 or higher) kubernetes cluster locally for purposes of development and testing.
For Multiple node cluster on local, please check Docker & Kubernetes: Multi-node Local Kubernetes cluster : kubeadm-dind or Docker & Kubernetes: Multi-node Local Kubernetes cluster : Kubeadm-kind .
Minikube packages and configures a Linux VM, Docker and all Kubernetes components, optimized for local development. Minikube supports Kubernetes features such as:
- DNS
- NodePorts
- ConfigMaps and Secrets
- Dashboards
In this tutorial, we'll use either KVM (Kernel-based Virtual Machine) or VirtualBox as a VM driver on a Ubuntu 16.04 LTS host.

Note that the default VM driver is VirtualBox.
Kubernetes offers the following features as an Orchestration Tool:
- High Availability (HA) - no downtime
- Scalability - high performance
- Disaster Recovery (DR) - backup and restore
- Nodes
Hosts that run Kubernetes applications. - Containers
Units of packaging.
A container runtime should be installed into each node in the cluster so that Pods can run there.
Docker runs on nodes, and Kubernetes runs clusters of nodes. To run containers in pods, Kubernetes uses runtimes. Since Kubernetes is simply a orchestration platform, it requires a container runtime to do the work of managing the actual running containers being orchestrated via Kubernetes. In other words, Kubernetes does not actually handle the process of running containers on a machine. Instead, it relies on another piece of software called a container runtime.
The container runtime runs containers on a host, and Kubernetes tells the container runtime on each host what to do.

Picture credit - Diving Deeper Into Runtimes: Kubernetes, CRI, and Shims
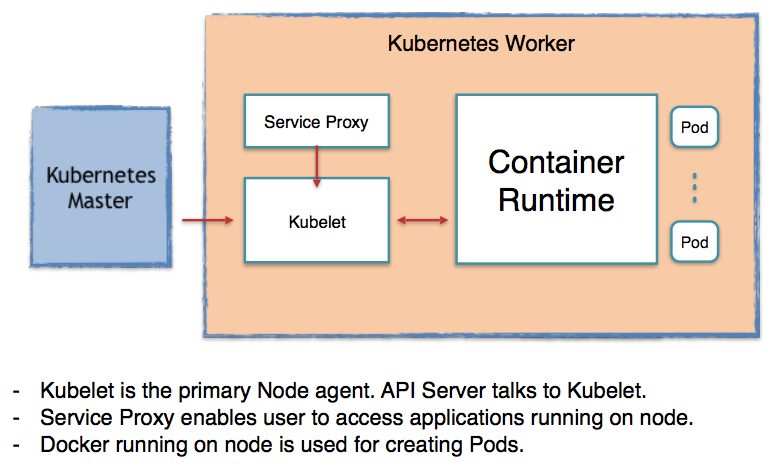
Picture credit - How Container Runtimes matter in Kubernetes?
Here are common container runtimes with Kubernetes, on Linux:
(Note) Docker is NOT actually a container runtime!
It's actually a collection of tools that sits on top of a container runtime called containerd.Docker does not run containers directly. It simply creates a more human-accessible and feature-rich interface on top of a separate, underlying container runtime. When it is used as a container runtime for Kubernetes, Docker is just a middle-man between Kubernetes and containerd.
-from Kubernetes is deprecating Docker: what you need to know
- Pods
The smallest unit of deployment that can be scheduled and managed.
A Pod is the basic building block in Kubernetes. Instead of deploying containers individually, we always deploy and operate on a pod of containers.
Its a logical collection of containers that belong to an application. In other words, the Pod is an abstration of container.
A pod consists of one or more containers but usually one container per pod.
We could have two containers (one for applation and the other for helper container as a type of a sidecar).
Each pod in Kubernetes is assigned a unique (within the cluster) IP address, which allows applications to use ports without the risk of conflict.
A pod can define a volume, such as a local disk directory or a network disk, and expose it to the containers in the pod.
Pods can be manually managed through the Kubernetes API, or their management can be delegated to a controller.
Backend pods might be grouped into a service, with requests from the frontend pods load-balanced among them.
A service can also be exposed outside a cluster (frontend pods). - Replication Controller
Ensures availability and scalability. It handles replication and scaling by running a specified number of copies of a pod across the cluster. It also handles creating replacement pods if the underlying node fails. - Labels
Identification Key-value pairs for API object such as pods and nodes. - Selectors
Like labels, selectors are the primary grouping mechanism in Kubernetes, and are used to determine the components to which an operation applies. So, "label selectors" are queries against labels that resolve to matching objects. - Services
Collection of pods that work together, and exposed as an endpoint.
A service (collection of pods) is defined by a label selector.
Kubernetes provides service discovery and request routing by assigning a stable IP address and DNS name to the service, and load balances traffic in a round-robin manner to network connections of that IP address among the pods matching the selector.
Note that the pods are ephemeral but the service has different lifecycle and not connected to the lifecycle of the pods. This means the IP of the service and the endpoint stay when the pods died. In that way, we can have consistency of our app even for a newly create pod ( with a new IP) because it has a label for its service.
$ curl -Lo minikube https://storage.googleapis.com/minikube/releases/v0.18.0/minikube-linux-amd64 && chmod +x minikube && sudo mv minikube /usr/local/bin/
kubectl is a requirement for using minikube. So, we need to download and install the kubectl client binary to run commands against the cluster.
To install kubectl, please run the following:
$ curl -Lo kubectl https://storage.googleapis.com/kubernetes-release/release/v1.6.0/bin/linux/amd64/kubectl && chmod +x kubectl && sudo mv kubectl /usr/local/bin/
To use minikube with VirtualBox, we can just issue minikube start command. However, if we opt to use kvm, we need to specify the driver: minikube start --vm-driver=kvm.
Minikube uses Docker Machine to manage the Kubernetes VM so it benefits from the driver plugin architecture that Docker Machine uses to provide a consistent way to manage various VM providers.
Minikube embeds VirtualBox and VMware Fusion drivers so there are no additional steps to use them. However, other drivers require an extra binary to be present in the host PATH.( - from Driver plugin installation)
$ sudo curl -L https://github.com/dhiltgen/docker-machine-kvm/releases/download/v0.7.0/docker-machine-driver-kvm -o /usr/local/bin/docker-machine-driver-kvm
$ sudo chmod +x /usr/local/bin/docker-machine-driver-kvm
Install libvirt and qemu-kvm:
# Debian/Ubuntu
$ sudo apt install libvirt-bin qemu-kvm
# Fedora/CentOS/RHEL
$ sudo yum install libvirt-daemon-kvm kvm
Add yourself to the libvirtd group:
$ sudo usermod -a -G libvirtd $(whoami)
Update our current session for the group change to take effect:
$ newgrp libvirtd
To install minikube:
$ curl -Lo minikube https://storage.googleapis.com/minikube/releases/v0.18.0/minikube-linux-amd64 && chmod +x minikube && sudo mv minikube /usr/local/bin/
We can run minikube command using either kvm or VirtualBox.
To start a cluster, run minikube with kvm driver:
$ minikube start --vm-driver=kvm
Starting local Kubernetes cluster...
Starting VM...
Downloading Minikube ISO
 89.51 MB / 89.51 MB [==============================================] 100.00% 0s
SSH-ing files into VM...
Setting up certs...
Starting cluster components...
Connecting to cluster...
Setting up kubeconfig...
Kubectl is now configured to use the cluster.
With a VirtualVox VM driver, we can simply issue minikube start command without specifying a driver:
$ minikube start
Starting local Kubernetes cluster...
Starting VM...
SSH-ing files into VM...
Setting up certs...
Starting cluster components...
Connecting to cluster...
Setting up kubeconfig...
Kubectl is now configured to use the cluster.
Run the following command to see the included kube-system pods:
$ kubectl get pods --all-namespaces
NAMESPACE     NAME                          READY     STATUS    RESTARTS   AGE
kube-system   kube-addon-manager-minikube   1/1       Running   0          9h
kube-system   kube-dns-v20-kqlbc            3/3       Running   0          9h
kube-system   kubernetes-dashboard-52wwl    1/1       Running   0          9h
To shut the cluster down, type "minikube stop":
$ minikube stop
Stopping local Kubernetes cluster...
Machine stopped.
We may get the following error when we try to start it again:
$ minikube start --vm-driver=kvm
Starting local Kubernetes cluster...
Starting VM...
E0409 09:36:09.737093   19497 start.go:116] Error starting host: Temporary Error: Error configuring auth on host: Too many retries waiting for SSH to be available.  Last error: Maximum number of retries (60) exceeded.

 Retrying.
Then, the following command may resolve the issue:
$ minikube delete
Deleting local Kubernetes cluster...
Machine deleted.
Now we can start:
$ minikube start --vm-driver=kvm
Starting local Kubernetes cluster...
Starting VM...
SSH-ing files into VM...
Setting up certs...
Starting cluster components...
Connecting to cluster...
Setting up kubeconfig...
Kubectl is now configured to use the cluster.
We can get list the nodes in our cluster by running:
$ kubectl get nodes
NAME       STATUS    AGE       VERSION
minikube   Ready     24m       v1.6.0
Minikube contains a built-in Docker daemon for running containers. We can use minikube's built in Docker daemon with:
$ docker ps
CONTAINER ID        IMAGE                                      COMMAND                  CREATED             STATUS              PORTS               NAMES
d271e008a309        93a43bfb39bf                               "/exechealthz '--c..."   26 minutes ago      Up 26 minutes                           k8s_healthz_kube-dns-v20-7hn9d_kube-system_557327c7-1d44-11e7-9049-5254001b4720_0
1d6710f4e2e4        3ec65756a89b                               "/usr/sbin/dnsmasq..."   26 minutes ago      Up 26 minutes                           k8s_dnsmasq_kube-dns-v20-7hn9d_kube-system_557327c7-1d44-11e7-9049-5254001b4720_0
0291e09a264f        26cf1ed9b144                               "/kube-dns --domai..."   26 minutes ago      Up 26 minutes                           k8s_kubedns_kube-dns-v20-7hn9d_kube-system_557327c7-1d44-11e7-9049-5254001b4720_0
57ad697d2dec        416701f962f2                               "/dashboard --port..."   26 minutes ago      Up 26 minutes                           k8s_kubernetes-dashboard_kubernetes-dashboard-zbnj4_kube-system_54b5857e-1d44-11e7-9049-5254001b4720_0
c2504223e7ea        gcr.io/google_containers/pause-amd64:3.0   "/pause"                 27 minutes ago      Up 27 minutes                           k8s_POD_kube-dns-v20-7hn9d_kube-system_557327c7-1d44-11e7-9049-5254001b4720_0
903e6044ae1a        gcr.io/google_containers/pause-amd64:3.0   "/pause"                 27 minutes ago      Up 27 minutes                           k8s_POD_kubernetes-dashboard-zbnj4_kube-system_54b5857e-1d44-11e7-9049-5254001b4720_0
f848bb9dc40e        9da55e306d47                               "/opt/kube-addons.sh"    27 minutes ago      Up 27 minutes                           k8s_kube-addon-manager_kube-addon-manager-minikube_kube-system_4fb35b6f38517771d5bfb1cffb784d97_0
80b467aee7e7        gcr.io/google_containers/pause-amd64:3.0   "/pause"                 28 minutes ago      Up 28 minutes                           k8s_POD_kube-addon-manager-minikube_kube-system_4fb35b6f38517771d5bfb1cffb784d97_0
This command sets up the Docker environment variables so a Docker client can communicate with the minikube Docker daemon.
Dashboard is a web-based Kubernetes user interface. We can use Dashboard to deploy containerized applications to a Kubernetes cluster, troubleshoot our containerized application, and manage the cluster itself along with its attendant resources.
To open the Kubernetes dashboard:
$ minikube dashboard
Opening kubernetes dashboard in default browser...
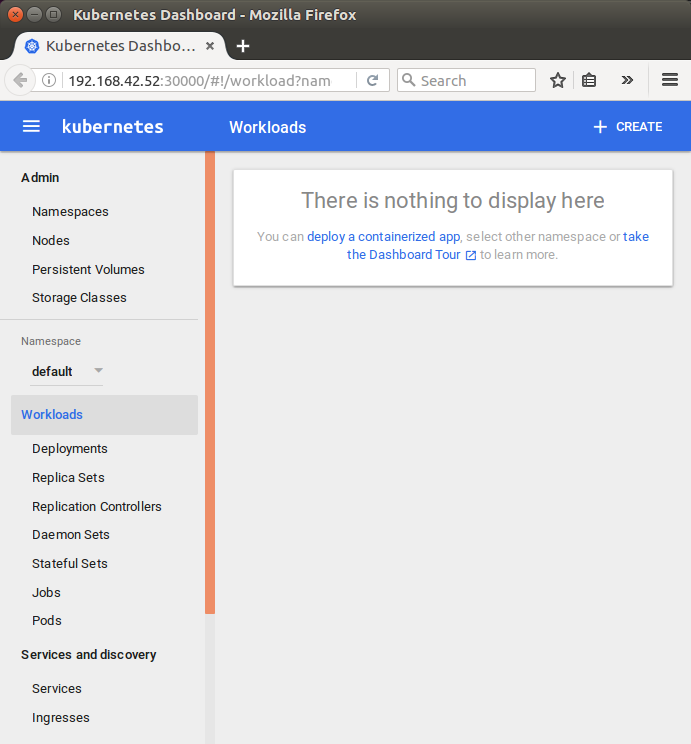
Now, to learn more about minikube, we'll follow Hello Minikube.
In this section, we'll start to turn a simple Hello World Node.js app into an application running on Kubernetes. The tutorial shows us how to take code that we have developed on our machine, turn it into a Docker container image and then run that image on Minikube which provides a simple way of running Kubernetes on our local machine.
The context is what determines which cluster kubectl is interacting with. We can see all our available contexts in the ~/.kube/config file:
$ cat ~/.kube/config
apiVersion: v1
clusters:
- cluster:
    certificate-authority: /home/k/.minikube/ca.crt
    server: https://192.168.42.52:8443
  name: minikube
contexts:
- context:
    cluster: minikube
    user: minikube
  name: minikube
current-context: minikube
kind: Config
preferences: {}
users:
- name: minikube
  user:
    client-certificate: /home/k/.minikube/apiserver.crt
    client-key: /home/k/.minikube/apiserver.key
We already have set the minikube in the context!
Verify that kubectl is configured to communicate with our cluster:
$ kubectl cluster-info
Kubernetes master is running at https://192.168.42.52:8443
KubeDNS is running at https://192.168.42.52:8443/api/v1/proxy/namespaces/kube-system/services/kube-dns
kubernetes-dashboard is running at https://192.168.42.52:8443/api/v1/proxy/namespaces/kube-system/services/kubernetes-dashboard
If we need to set minikube context, we can do as the following:
$ kubectl config use-context minikube
Here is our Node.js application (~/hellonode/server.js):
var http = require('http');

var handleRequest = function(request, response) {
  console.log('Received request for URL: ' + request.url);
  response.writeHead(200);
  response.end('Hello World!');
};
var www = http.createServer(handleRequest);
www.listen(8080);
Run the application:
$ node server.js
WE should be able to see our "Hello World!" message at http://localhost:8080/:
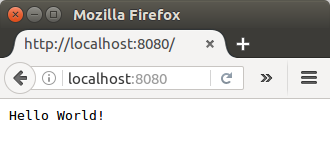
Stop the running Node.js server by pressing Ctrl-C.
The next step is to package our application in a Docker container.
Create a file ~/hellonode/Dockerfile which describes the image that we want to build. We can build a Docker container image by extending an existing image. The image in this tutorial extends an existing Node.js image:
FROM node:6.9.2
EXPOSE 8080
COPY server.js .
CMD node server.js
We atart the Docker image from the official Node.js LTS image found in the Docker registry, exposes port 8080, copies our server.js file to the image and start the Node.js server.
Since this tutorial uses Minikube, instead of pushing our Docker image to a registry, we can simply build the image using the same Docker host as the Minikube VM, so that the images are automatically present. In other words, to point the docker client towards minikube's docker environment, we need to make sure we are using the Minikube Docker daemon:
$ eval $(minikube docker-env)
Later, when we no longer wish to use the Minikube host, we can undo this change by running:
$ eval $(minikube docker-env -u)
Build our Docker image, using the Minikube Docker daemon:
$ docker build -t hello-node:v1 .
Sending build context to Docker daemon 3.072 kB
Step 1 : FROM node:6.9.2
6.9.2: Pulling from library/node
...
Status: Downloaded newer image for node:6.9.2
 ---> faaadb4aaf9b
Step 2 : EXPOSE 8080
 ---> Running in 75cc819cd093
 ---> 1aa3ebc0eccb
Removing intermediate container 75cc819cd093
Step 3 : COPY server.js .
 ---> ae76d82e6ca1
Removing intermediate container d4d2dbebc39d
Step 4 : CMD node server.js
 ---> Running in 68d1c8b13a9d
 ---> 86d37aaa4cba
Removing intermediate container 68d1c8b13a9d
Successfully built 86d37aaa4cba
Now the Minikube VM can run the image we built.
A Kubernetes Pod is a group of one or more Containers, tied together for the purposes of administration and networking. The Pod in this tutorial has only one Container. A Kubernetes Deployment checks on the health of our Pod and restarts the Pod's Container if it terminates. Deployments are the recommended way to manage the creation and scaling of Pods.
Use the kubectl run command to create a Deployment that manages a Pod. The Pod runs a Container based on our hello-node:v1 Docker image:
$ kubectl run hello-node --image=hello-node:v1 --port=8080
deployment "hello-node" created
To view the Deployment:
$ kubectl get deployments
NAME         DESIRED   CURRENT   UP-TO-DATE   AVAILABLE   AGE
hello-node   1         1         1            1           12s
To view the Pod:
$ kubectl get pods
NAME                          READY     STATUS    RESTARTS   AGE
hello-node-1644695913-l4gkl   1/1       Running   0          3m
To view cluster events:
$ kubectl get events
LASTSEEN   FIRSTSEEN   COUNT     NAME                          KIND         SUBOBJECT                     TYPE      REASON              SOURCE                  MESSAGE
5m         5m          1         hello-node-1644695913-l4gkl   Pod                                        Normal    Scheduled           default-scheduler       Successfully assigned hello-node-1644695913-l4gkl to minikube
5m         5m          1         hello-node-1644695913-l4gkl   Pod          spec.containers{hello-node}   Normal    Pulled              kubelet, minikube       Container image "hello-node:v1" already present on machine
5m         5m          1         hello-node-1644695913-l4gkl   Pod          spec.containers{hello-node}   Normal    Created             kubelet, minikube       Created container with id 73623d7b9a6b331b104398f97893d402c2e5dab4d9fab02a6c5d978c8c3e6a01
5m         5m          1         hello-node-1644695913-l4gkl   Pod          spec.containers{hello-node}   Normal    Started             kubelet, minikube       Started container with id 73623d7b9a6b331b104398f97893d402c2e5dab4d9fab02a6c5d978c8c3e6a01
5m         5m          1         hello-node-1644695913         ReplicaSet                                 Normal    SuccessfulCreate    replicaset-controller   Created pod: hello-node-1644695913-l4gkl
5m         5m          1         hello-node                    Deployment                                 Normal    ScalingReplicaSet   deployment-controller   Scaled up replica set hello-node-1644695913 to 1
To view the kubectl configuration:
$ kubectl config view
apiVersion: v1
clusters:
- cluster:
    certificate-authority: /home/k/.minikube/ca.crt
    server: https://192.168.42.52:8443
  name: minikube
contexts:
- context:
    cluster: minikube
    user: minikube
  name: minikube
current-context: minikube
kind: Config
preferences: {}
users:
- name: minikube
  user:
    client-certificate: /home/k/.minikube/apiserver.crt
    client-key: /home/k/.minikube/apiserver.key
We can see them from our dashboard:
$ minikube dashboard
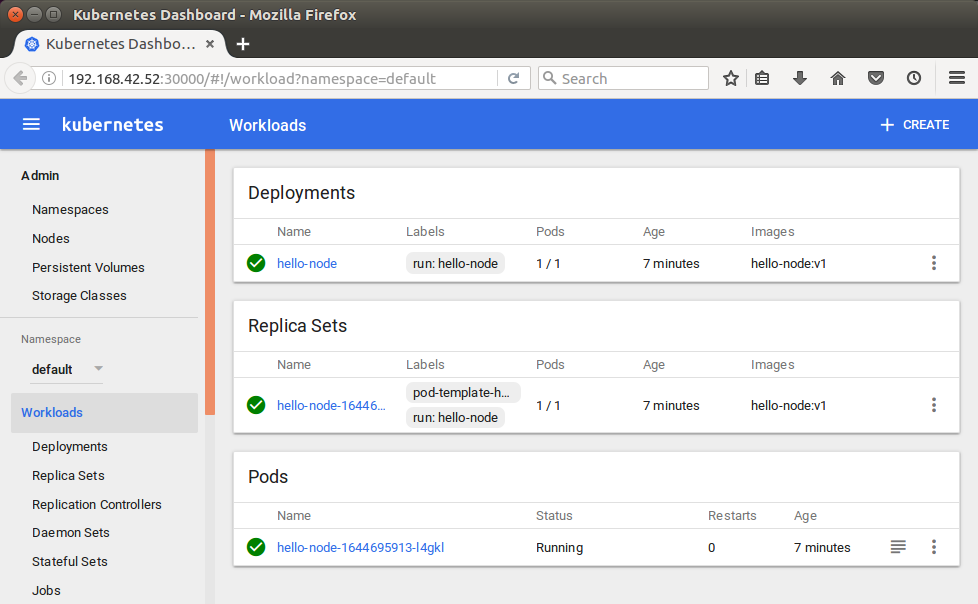
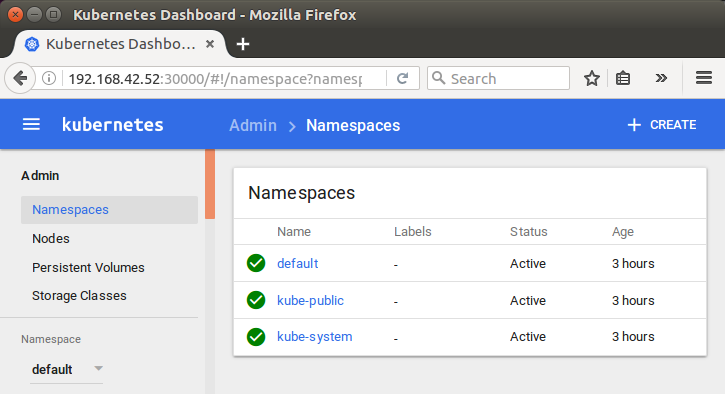
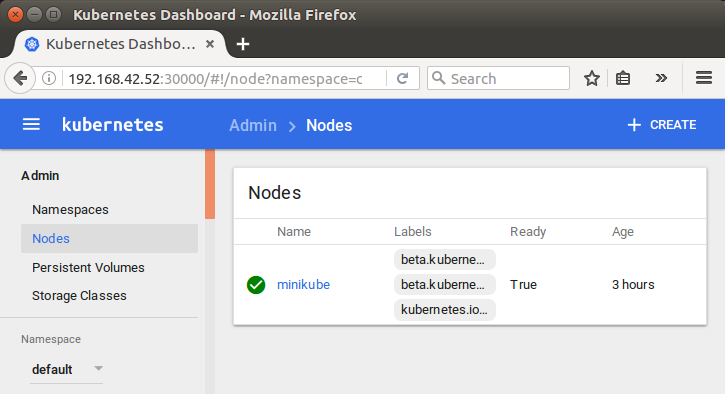
By default, the Pod is only accessible by its internal IP address within the Kubernetes cluster. To make the hello-node Container accessible from outside the Kubernetes virtual network, we have to expose the Pod as a Kubernetes Service.
From our development machine, we can expose the Pod to the public internet using the kubectl expose command:
$ kubectl expose deployment hello-node --type=LoadBalancer
service "hello-node" exposed
The --type=LoadBalancer flag indicates that we want to expose our Service outside of the cluster. On cloud providers that support load balancers, an external IP address would be provisioned to access the Service.
To view the Service we just created:
$ kubectl get services
NAME         CLUSTER-IP   EXTERNAL-IP   PORT(S)          AGE
hello-node   10.0.0.130   <pending>     8080:32022/TCP   38s
kubernetes   10.0.0.1     <none>        443/TCP          3h
On Minikube, the LoadBalancer type makes the Service accessible through the minikube service command:
$ minikube service hello-node
Opening kubernetes service default/hello-node in default browser...
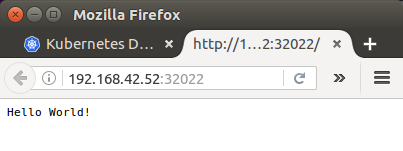
This automatically opens up a browser window using a local IP address that serves our app and shows the "Hello World" message:
Assuming we've sent requests to our new web service using the browser or curl, we should now be able to see some logs:
$ kubectl logs <POD-NAME>
$ kubectl get pods
NAME                          READY     STATUS    RESTARTS   AGE
hello-node-1644695913-l4gkl   1/1       Running   0          49m
The actual command:
$ kubectl logs hello-node-1644695913-l4gkl
Received request for URL: /
Received request for URL: /favicon.ico
Received request for URL: /favicon.ico
Let's update our app by editing server.js file to return a new message:
response.end('Hello Kubenetes!');
Build a new version of our image:
$ docker build -t hello-node:v2 .
Sending build context to Docker daemon 3.072 kB
Step 1/4 : FROM node:6.9.2
6.9.2: Pulling from library/node
...
Successfully built 70c47e205ce1
Then, update the image of our Deployment:
$ kubectl set image deployment/hello-node hello-node=hello-node:v2
deployment "hello-node" image updated
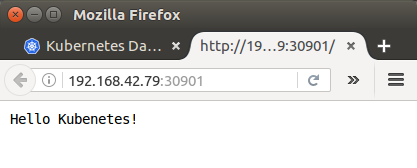
Run the app again to view the new message:
$ minikube service hello-node
Now we can clean up the resources we created in our cluster:
$ kubectl delete service hello-node
service "hello-node" deleted

$ kubectl delete deployment hello-node
deployment "hello-node" deleted
Optionally, stop Minikube:
$ minikube stop
Docker & K8s
- Docker install on Amazon Linux AMI
- Docker install on EC2 Ubuntu 14.04
- Docker container vs Virtual Machine
- Docker install on Ubuntu 14.04
- Docker Hello World Application
- Nginx image - share/copy files, Dockerfile
- Working with Docker images : brief introduction
- Docker image and container via docker commands (search, pull, run, ps, restart, attach, and rm)
- More on docker run command (docker run -it, docker run --rm, etc.)
- Docker Networks - Bridge Driver Network
- Docker Persistent Storage
- File sharing between host and container (docker run -d -p -v)
- Linking containers and volume for datastore
- Dockerfile - Build Docker images automatically I - FROM, MAINTAINER, and build context
- Dockerfile - Build Docker images automatically II - revisiting FROM, MAINTAINER, build context, and caching
- Dockerfile - Build Docker images automatically III - RUN
- Dockerfile - Build Docker images automatically IV - CMD
- Dockerfile - Build Docker images automatically V - WORKDIR, ENV, ADD, and ENTRYPOINT
- Docker - Apache Tomcat
- Docker - NodeJS
- Docker - NodeJS with hostname
- Docker Compose - NodeJS with MongoDB
- Docker - Prometheus and Grafana with Docker-compose
- Docker - StatsD/Graphite/Grafana
- Docker - Deploying a Java EE JBoss/WildFly Application on AWS Elastic Beanstalk Using Docker Containers
- Docker : NodeJS with GCP Kubernetes Engine
- Docker : Jenkins Multibranch Pipeline with Jenkinsfile and Github
- Docker : Jenkins Master and Slave
- Docker - ELK : ElasticSearch, Logstash, and Kibana
- Docker - ELK 7.6 : Elasticsearch on Centos 7
- Docker - ELK 7.6 : Filebeat on Centos 7
- Docker - ELK 7.6 : Logstash on Centos 7
- Docker - ELK 7.6 : Kibana on Centos 7
- Docker - ELK 7.6 : Elastic Stack with Docker Compose
- Docker - Deploy Elastic Cloud on Kubernetes (ECK) via Elasticsearch operator on minikube
- Docker - Deploy Elastic Stack via Helm on minikube
- Docker Compose - A gentle introduction with WordPress
- Docker Compose - MySQL
- MEAN Stack app on Docker containers : micro services
- MEAN Stack app on Docker containers : micro services via docker-compose
- Docker Compose - Hashicorp's Vault and Consul Part A (install vault, unsealing, static secrets, and policies)
- Docker Compose - Hashicorp's Vault and Consul Part B (EaaS, dynamic secrets, leases, and revocation)
- Docker Compose - Hashicorp's Vault and Consul Part C (Consul)
- Docker Compose with two containers - Flask REST API service container and an Apache server container
- Docker compose : Nginx reverse proxy with multiple containers
- Docker & Kubernetes : Envoy - Getting started
- Docker & Kubernetes : Envoy - Front Proxy
- Docker & Kubernetes : Ambassador - Envoy API Gateway on Kubernetes
- Docker Packer
- Docker Cheat Sheet
- Docker Q & A #1
- Kubernetes Q & A - Part I
- Kubernetes Q & A - Part II
- Docker - Run a React app in a docker
- Docker - Run a React app in a docker II (snapshot app with nginx)
- Docker - NodeJS and MySQL app with React in a docker
- Docker - Step by Step NodeJS and MySQL app with React - I
- Installing LAMP via puppet on Docker
- Docker install via Puppet
- Nginx Docker install via Ansible
- Apache Hadoop CDH 5.8 Install with QuickStarts Docker
- Docker - Deploying Flask app to ECS
- Docker Compose - Deploying WordPress to AWS
- Docker - WordPress Deploy to ECS with Docker-Compose (ECS-CLI EC2 type)
- Docker - WordPress Deploy to ECS with Docker-Compose (ECS-CLI Fargate type)
- Docker - ECS Fargate
- Docker - AWS ECS service discovery with Flask and Redis
- Docker & Kubernetes : minikube
- Docker & Kubernetes 2 : minikube Django with Postgres - persistent volume
- Docker & Kubernetes 3 : minikube Django with Redis and Celery
- Docker & Kubernetes 4 : Django with RDS via AWS Kops
- Docker & Kubernetes : Kops on AWS
- Docker & Kubernetes : Ingress controller on AWS with Kops
- Docker & Kubernetes : HashiCorp's Vault and Consul on minikube
- Docker & Kubernetes : HashiCorp's Vault and Consul - Auto-unseal using Transit Secrets Engine
- Docker & Kubernetes : Persistent Volumes & Persistent Volumes Claims - hostPath and annotations
- Docker & Kubernetes : Persistent Volumes - Dynamic volume provisioning
- Docker & Kubernetes : DaemonSet
- Docker & Kubernetes : Secrets
- Docker & Kubernetes : kubectl command
- Docker & Kubernetes : Assign a Kubernetes Pod to a particular node in a Kubernetes cluster
- Docker & Kubernetes : Configure a Pod to Use a ConfigMap
- AWS : EKS (Elastic Container Service for Kubernetes)
- Docker & Kubernetes : Run a React app in a minikube
- Docker & Kubernetes : Minikube install on AWS EC2
- Docker & Kubernetes : Cassandra with a StatefulSet
- Docker & Kubernetes : Terraform and AWS EKS
- Docker & Kubernetes : Pods and Service definitions
- Docker & Kubernetes : Service IP and the Service Type
- Docker & Kubernetes : Kubernetes DNS with Pods and Services
- Docker & Kubernetes : Headless service and discovering pods
- Docker & Kubernetes : Scaling and Updating application
- Docker & Kubernetes : Horizontal pod autoscaler on minikubes
- Docker & Kubernetes : From a monolithic app to micro services on GCP Kubernetes
- Docker & Kubernetes : Rolling updates
- Docker & Kubernetes : Deployments to GKE (Rolling update, Canary and Blue-green deployments)
- Docker & Kubernetes : Slack Chat Bot with NodeJS on GCP Kubernetes
- Docker & Kubernetes : Continuous Delivery with Jenkins Multibranch Pipeline for Dev, Canary, and Production Environments on GCP Kubernetes
- Docker & Kubernetes : NodePort vs LoadBalancer vs Ingress
- Docker & Kubernetes : MongoDB / MongoExpress on Minikube
- Docker & Kubernetes : Load Testing with Locust on GCP Kubernetes
- Docker & Kubernetes : MongoDB with StatefulSets on GCP Kubernetes Engine
- Docker & Kubernetes : Nginx Ingress Controller on Minikube
- Docker & Kubernetes : Setting up Ingress with NGINX Controller on Minikube (Mac)
- Docker & Kubernetes : Nginx Ingress Controller for Dashboard service on Minikube
- Docker & Kubernetes : Nginx Ingress Controller on GCP Kubernetes
- Docker & Kubernetes : Kubernetes Ingress with AWS ALB Ingress Controller in EKS
- Docker & Kubernetes : Setting up a private cluster on GCP Kubernetes
- Docker & Kubernetes : Kubernetes Namespaces (default, kube-public, kube-system) and switching namespaces (kubens)
- Docker & Kubernetes : StatefulSets on minikube
- Docker & Kubernetes : RBAC
- Docker & Kubernetes Service Account, RBAC, and IAM
- Docker & Kubernetes - Kubernetes Service Account, RBAC, IAM with EKS ALB, Part 1
- Docker & Kubernetes : Helm Chart
- Docker & Kubernetes : My first Helm deploy
- Docker & Kubernetes : Readiness and Liveness Probes
- Docker & Kubernetes : Helm chart repository with Github pages
- Docker & Kubernetes : Deploying WordPress and MariaDB with Ingress to Minikube using Helm Chart
- Docker & Kubernetes : Deploying WordPress and MariaDB to AWS using Helm 2 Chart
- Docker & Kubernetes : Deploying WordPress and MariaDB to AWS using Helm 3 Chart
- Docker & Kubernetes : Helm Chart for Node/Express and MySQL with Ingress
- Docker & Kubernetes : Deploy Prometheus and Grafana using Helm and Prometheus Operator - Monitoring Kubernetes node resources out of the box
- Docker & Kubernetes : Deploy Prometheus and Grafana using kube-prometheus-stack Helm Chart
- Docker & Kubernetes : Istio (service mesh) sidecar proxy on GCP Kubernetes
- Docker & Kubernetes : Istio on EKS
- Docker & Kubernetes : Istio on Minikube with AWS EC2 for Bookinfo Application
- Docker & Kubernetes : Deploying .NET Core app to Kubernetes Engine and configuring its traffic managed by Istio (Part I)
- Docker & Kubernetes : Deploying .NET Core app to Kubernetes Engine and configuring its traffic managed by Istio (Part II - Prometheus, Grafana, pin a service, split traffic, and inject faults)
- Docker & Kubernetes : Helm Package Manager with MySQL on GCP Kubernetes Engine
- Docker & Kubernetes : Deploying Memcached on Kubernetes Engine
- Docker & Kubernetes : EKS Control Plane (API server) Metrics with Prometheus
- Docker & Kubernetes : Spinnaker on EKS with Halyard
- Docker & Kubernetes : Continuous Delivery Pipelines with Spinnaker and Kubernetes Engine
- Docker & Kubernetes : Multi-node Local Kubernetes cluster : Kubeadm-dind (docker-in-docker)
- Docker & Kubernetes : Multi-node Local Kubernetes cluster : Kubeadm-kind (k8s-in-docker)
- Docker & Kubernetes : nodeSelector, nodeAffinity, taints/tolerations, pod affinity and anti-affinity - Assigning Pods to Nodes
- Docker & Kubernetes : Jenkins-X on EKS
- Docker & Kubernetes : ArgoCD App of Apps with Heml on Kubernetes
- Docker & Kubernetes : ArgoCD on Kubernetes cluster
- Docker & Kubernetes : GitOps with ArgoCD for Continuous Delivery to Kubernetes clusters (minikube) - guestbook
Ph.D. / Golden Gate Ave, San Francisco / Seoul National Univ / Carnegie Mellon / UC Berkeley / DevOps / Deep Learning / Visualization