CloudFormation - templates, change sets, and CLI - 2020
CloudFormation simplifies provisioning and managing resources. We just create templates for the services and applications we want to build. CloudFormation uses those templates to provision the services and applications, called stacks. We can easily update and replicate the stacks as needed. We can combine and connect different types of resources to create a stack.
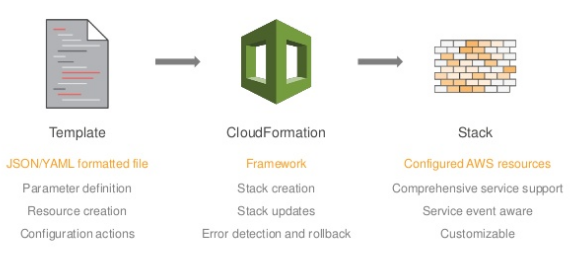
Source : AWS Infrastructure as Code - September 2016 Webinar Series
Using CloudFormation to deploy and manage services has a number of nice benefits over more traditional methods (AWS CLI, scripting, etc.).
- Infrastructure-as-Code
A template can be used repeatedly to create identical copies of the same stack (or to use as a foundation to start a new stack). Templates are simple YAML- or JSON-formatted text files that can be placed under our normal source control mechanisms, stored in private or public locations such as Amazon S3, and exchanged via email. With CloudFormation, we can see exactly which AWS resources make up a stack. we retain full control and have the ability to modify any of the AWS resources created as part of a stack.
- Self-documenting
Fed up with outdated documentation on our infrastructure or environments? Still keep manual documentation of IP ranges, security group rules, etc.?
With CloudFormation, our template becomes our documentation. Want to see exactly what we have deployed? Just look at our template. If we keep it in source control, then we can also look back at exactly which changes were made and by whom. - Intelligent updating & rollback
CloudFormation not only handles the initial deployment of our infrastructure and environments, but it can also manage the whole lifecycle, including future updates. During updates, we have fine-grained control and visibility over how changes are applied, using functionality such as change sets, rolling update policies and stack policies.
Nearly every AWS service and resource we can create in AWS can be modeled in CloudFormation.
CloudFormation has two parts: templates and stacks. A template is a JavaScript Object Notation (JSON) text file that defines what AWS resources are required to run the application.
Here is a simple template in json to create an EC2 instance:
{
    "Resources": {
        "MyEC2Instance": {
            "Type": "AWS::EC2::Instance",
            "Properties": {
                "ImageId" : "ami-80861296",
                "InstanceType" : "t2.small",
                "KeyName" : "einsteinish",
                "BlockDeviceMappings" : [
                  {
                    "DeviceName" : "/dev/sdm",
                    "Ebs" : {
                      "VolumeType" : "standard",
                      "DeleteOnTermination" : "true",
                      "VolumeSize" : "8"
                    }
                  }
                ]
            }
        }
    }
}
The sample template shows the "Resources" section. Though the "Resources" section is the real meat of the template, usually there are other sections as well:
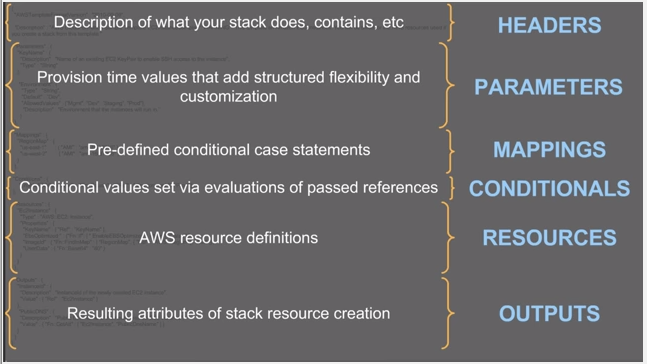
Source : AWS Infrastructure as Code - September 2016 Webinar Series
A stack is a collection of AWS resources that you can manage as a single unit. In other words, you can create, update, or delete a collection of resources by creating, updating, or deleting stacks. All the resources in a stack are defined by the stack's AWS CloudFormation template. A stack, for instance, can include all the resources required to run a web application, such as a web server, a database, and networking rules. If you no longer require that web application, you can simply delete the stack, and all of its related resources are deleted.
AWS CloudFormation ensures all stack resources are created or deleted as appropriate. Because AWS CloudFormation treats the stack resources as a single unit, they must all be created or deleted successfully for the stack to be created or deleted. If a resource cannot be created, AWS CloudFormation rolls the stack back and automatically deletes any resources that were created. If a resource cannot be deleted, any remaining resources are retained until the stack can be successfully deleted.
-from Working with Stacks
The following example shows a JSON-formatted template fragment:
{
  "AWSTemplateFormatVersion" : "version date",

  "Description" : "JSON string",

  "Metadata" : {
    template metadata
  },

  "Parameters" : {
    set of parameters
  },

  "Mappings" : {
    set of mappings
  },

  "Conditions" : {
    set of conditions
  },

  "Transform" : {
    set of transforms
  },

  "Resources" : {
    set of resources
  },

  "Outputs" : {
    set of outputs
  }
}
Templates include several major sections. The Resources section is the only required section. Some sections in a template can be in any order. However, as we build our template, it might be helpful to use the logical ordering of the following list, as values in one section might refer to values from a previous section. The list gives a brief overview of each section:
- Format Version (optional)
Specifies the AWS CloudFormation template version that the template conforms to. The template format version is not the same as the API or WSDL version. The template format version can change independently of the API and WSDL versions.
- Description (optional)
A text string that describes the template. This section must always follow the template format version section.
- Metadata (optional)
Objects that provide additional information about the template.
- Parameters (optional)
Specifies values that we can pass in to our template at runtime (when we create or update a stack). We can refer to parameters in the
ResourcesandOutputssections of the template. - Mappings (optional)
A mapping of keys and associated values that we can use to specify conditional parameter values, similar to a lookup table. We can match a key to a corresponding value by using the Fn::FindInMap intrinsic function in the
ResourcesandOutputssection:{ ... "Mappings" : { "RegionMap" : { "us-east-1" : { "32" : "ami-6411e20d", "64" : "ami-7a11e213" }, "us-west-1" : { "32" : "ami-c9c7978c", "64" : "ami-cfc7978a" }, "eu-west-1" : { "32" : "ami-37c2f643", "64" : "ami-31c2f645" }, "ap-southeast-1" : { "32" : "ami-66f28c34", "64" : "ami-60f28c32" }, "ap-northeast-1" : { "32" : "ami-9c03a89d", "64" : "ami-a003a8a1" } } }, "Resources" : { "myEC2Instance" : { "Type" : "AWS::EC2::Instance", "Properties" : { "ImageId" : { "Fn::FindInMap" : [ "RegionMap", { "Ref" : "AWS::Region" }, "32"]}, "InstanceType" : "m1.small" } } } }
The intrinsic function Fn::FindInMap returns the value corresponding to keys in a two-level map that is declared in the Mappings section:
{ "Fn::FindInMap" : [ "MapName", "TopLevelKey", "SecondLevelKey"] }
The example above shows how to use Fn::FindInMap for a template with a Mappings section that contains a single map (RegionMap), that associates AMIs with AWS regions:
- The map has 5 top-level keys that correspond to various AWS regions.
- Each top-level key is assigned a list with two second level keys, "32" and "64", that correspond to the AMI's architecture.
- Each of the second-level keys is assigned an appropriate AMI name.
The example template contains an AWS::EC2::Instance resource whose ImageId property is set by the FindInMap function.
MapName is set to the map of interest, "RegionMap" in this example. TopLevelKey is set to the region where the stack is created, which is determined by using the "AWS::Region" pseudo parameter. SecondLevelKey is set to the desired architecture, "32" for this example.
FindInMap returns the AMI assigned to FindInMap. For a 32-bit instance in us-east-1, FindInMap would return "ami-6411e20d".
Note that we used Ref in "Ref" : "AWS::Region". It returns a logical ID of the resource (here, "AWS::Region") which is a value that's predefined for each resource. We also used the Ref in "Ref": "VPC" which returns "VpcId".
Other return values are:
- Ref on AWS::EC2 will return the InstanceId
- Ref on AWS::EC2::EIP will return the IP address
- Ref on AWS::EC2::Subnet will return the Subnet ID
- Ref on AWS::S3::Bucket will return the Name of the bucket
- Ref on AWS::IAM::User will return the User Name
Note also that we're using Fn::GetAtt to get a return value for a specified attribute of a resource as in:
    "Outputs": {
        "WebsiteURL": {
            "Value": {
                "Fn::Join": [
                    "",
                    [
                        "http://",
                        {
                            "Fn::GetAtt": [
                                "WebServer",
                                "PublicDnsName"
                            ]
                        },
                        "/wordpress"
                    ]
                ]
            },
            "Description": "WordPress Website"
        }
    }
It returns the public DNS name of the instance that we specified: something like : ec2-10-20-30-40.compute-1.amazonaws.com and the format should look like this:
{ "Fn::GetAtt" : [ "logicalNameOfResource", "attributeName" ] } - Conditions (optional)
Defines conditions that control whether certain resources are created or whether certain resource properties are assigned a value during stack creation or update. For example, we could conditionally create a resource that depends on whether the stack is for a production or test environment.
- Transform (optional)
For serverless applications (also referred to as Lambda-based applications), specifies the version of the AWS Serverless Application Model (AWS SAM) to use. When we specify a transform, we can use AWS SAM syntax to declare resources in our template. The model defines the syntax that we can use and how it is processed.
We can also use the
AWS::Includetransform to work with template snippets that are stored separately from the main AWS CloudFormation template. We store our snippet files in an Amazon S3 bucket and then reuse the functions across multiple templates. - Resources (required)
Specifies the stack resources and their properties, such as an Amazon Elastic Compute Cloud instance or an Amazon Simple Storage Service bucket. We can refer to resources in the
ResourcesandOutputssections of the template. - Outputs (optional)
Describes the values that are returned whenever we view our stack's properties. For example, we can declare an output for an S3 bucket name and then call the
aws cloudformation describe-stacksAWS CLI command to view the name.
Check Template Anatomy
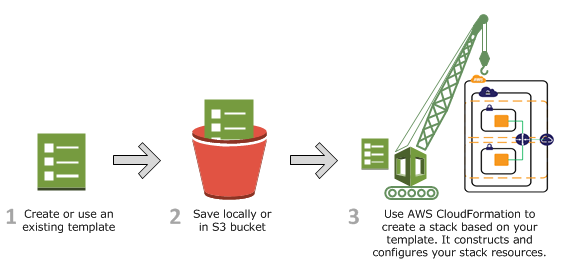
With AWS CloudFormation we don't need to individually create and configure AWS resources. By using AWS CloudFormation, we easily manage a collection of resources as a single unit.
With a right template, we can deploy at once all the AWS resources we need for an application.
Since CloudFormation helps us model and set up our Amazon Web Services resources, we can spend less time managing resources and more time focusing on our applications that run in AWS.
We just create a template that describes all the AWS resources that we want such as Amazon EC2 instances or Amazon RDS DB instances. The AWS CloudFormation takes care of provisioning and configuring those resources for us.
CloudFormation takes case of ASGs, an ELBs, and RDS database instances, so we can just create or modify an existing AWS CloudFormation template which describes all of our resources and their properties.
When we use that template to create an AWS CloudFormation stack, AWS CloudFormation provisions all resources.
After the stack has been successfully created, our AWS resources are up and running. We can delete the stack just as easily, which deletes all the resources in the stack.
In this tutorial, we'll create a WordPress blog as a stack, monitors the stack creation process, examines the resources on the stack, and then deletes the stack.
We'll follow the directions given in Get Started.
Here is the template URL we want to use: WordPress sample template.
A template is a JavaScript Object Notation (JSON) text file that contains the configuration information about the AWS resources we want to create in the stack.
In this particular sample template, it includes six top-level sections.
The Resources section contains the definitions of the AWS resources we want to create with the template. Each resource is listed separately and specifies the properties that are necessary for creating that particular resource.
Before we create a stack from a template, we must ensure that all dependent resources that the template requires are available.
A template can use or refer to both existing AWS resources and resources declared in the template itself.
The AWS CloudFormation takes care of checking references to resources in the template and also checks references to existing resources to ensure that they exist in the region where we are creating the stack. If the template refers to a dependent resource that does not exist, stack creation fails.
If we supply a valid key pair name, the stack creates successfully, otherwise, the stack will be rolled back.
- From AWS CloudFormation console, click Create New Stack.
- In the Stack section, enter a stack name in the Name field (in our case, "MyWordPress").
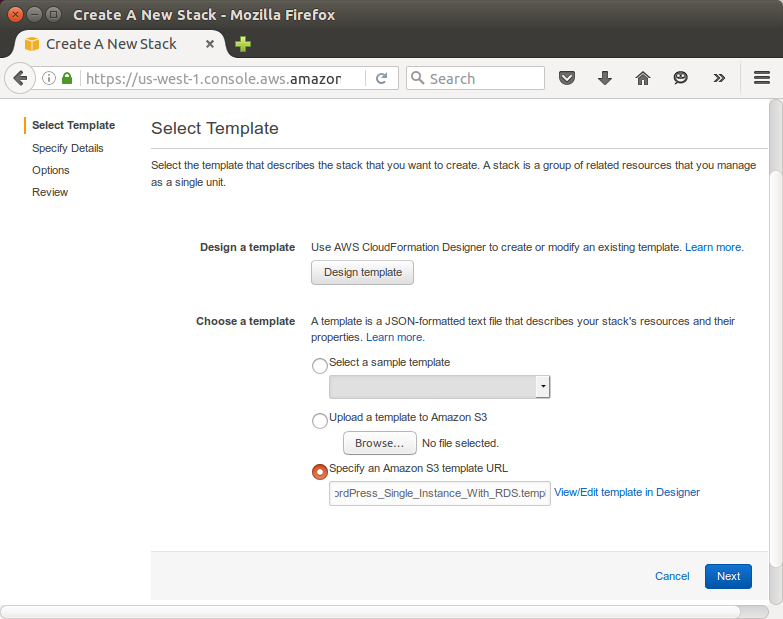
- In the Template section, select Specify an Amazon S3 Template URL to type or paste the URL for the sample WordPress template, and then click Next:
- In the KeyName field, enter the name of a valid Amazon EC2 key pair in the same region we are creating the stack.
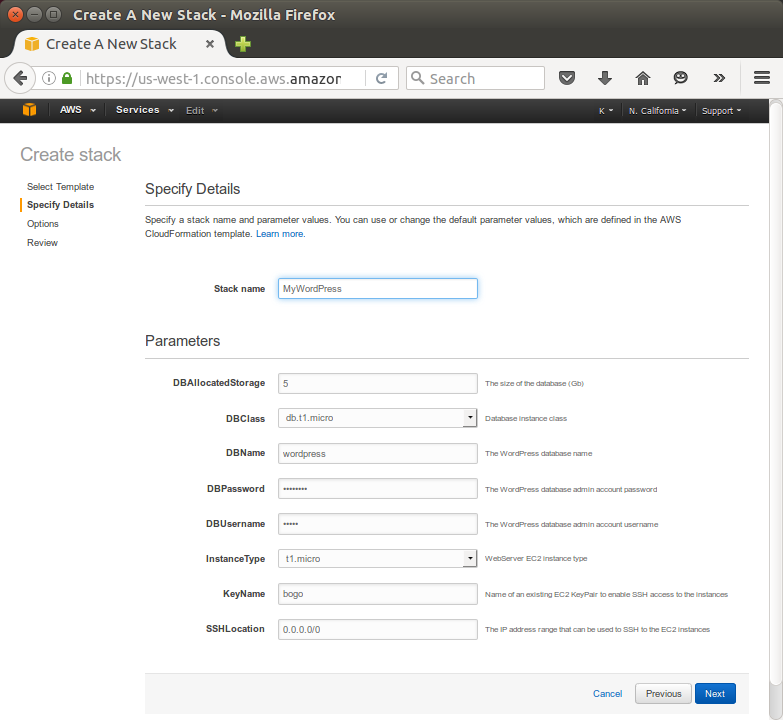
After we complete the Create Stack wizard, AWS CloudFormation begins creating the resources that are specified in the template. Our new stack, MyWordPress, appears in the list at the top portion of the CloudFormation console.
Its status should be CREATE_IN_PROGRESS. We can see detailed status for a stack by viewing its events.
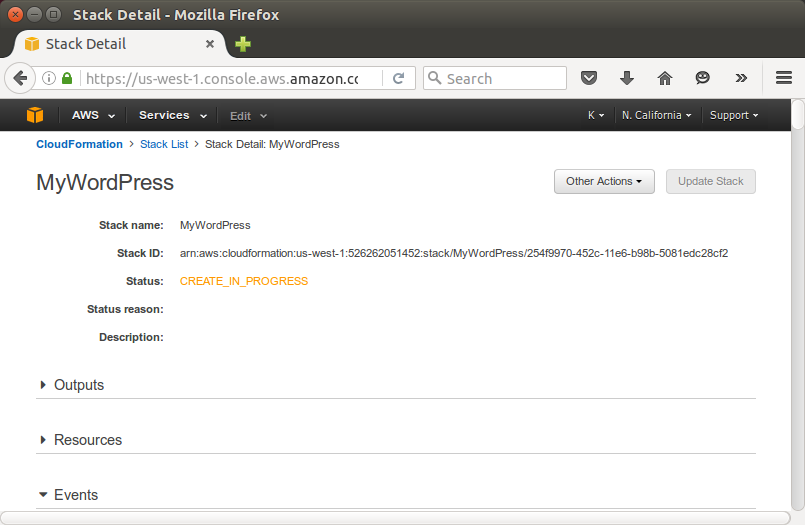
When the stack MyWordPress has a status of CREATE_COMPLETE, AWS CloudFormation has finished creating the stack, and we can start using its resources.
The sample WordPress stack creates a WordPress website. We can continue with the WordPress setup by running the WordPress installation script.
On the Outputs tab, in the WebsiteURL row, click the link in the Value column.

The WebsiteURL output value is the URL of the installation script for the WordPress website that we created with the stack.
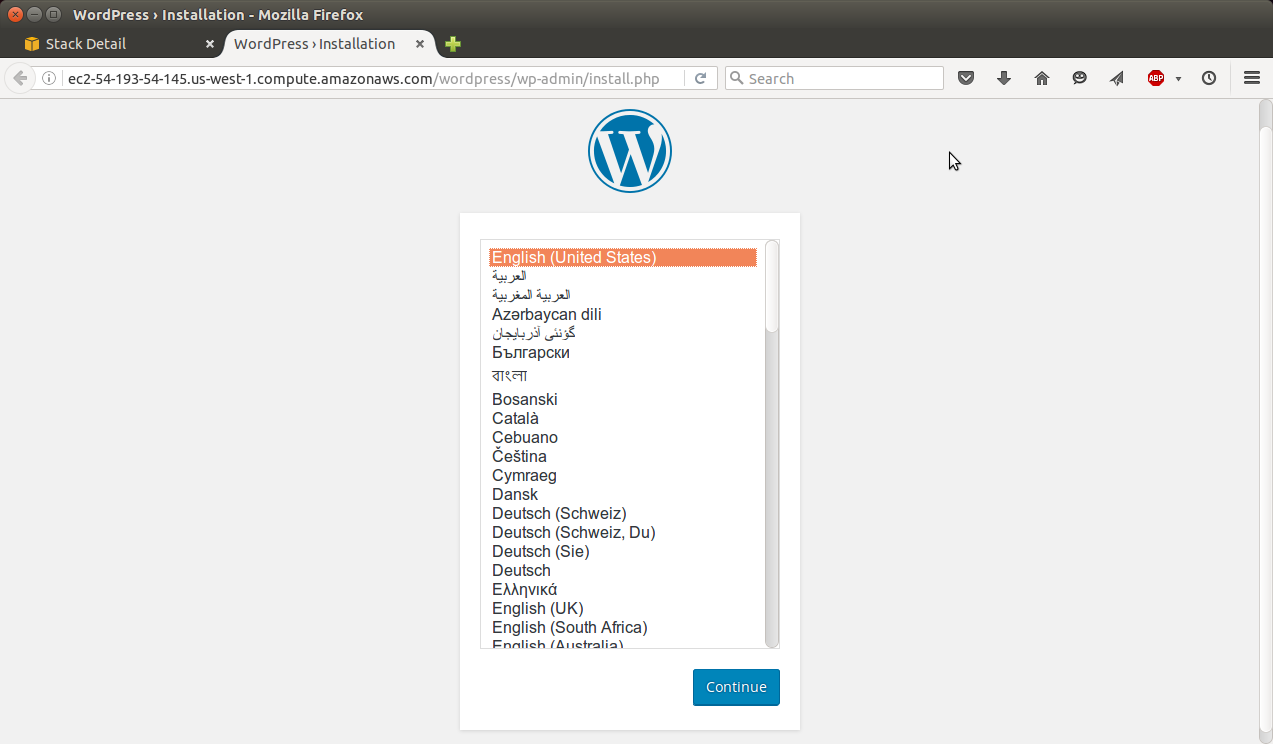
On the web page for the WordPress installation, follow the on-screen instructions to complete the WordPress installation.
We have completed the AWS CloudFormation getting started tasks.
To delete the stack and its resources:
- From the AWS CloudFormation console, select the MyWordPress stack.
- Click Delete Stack.
- In the confirmation message that appears, click Yes, Delete.
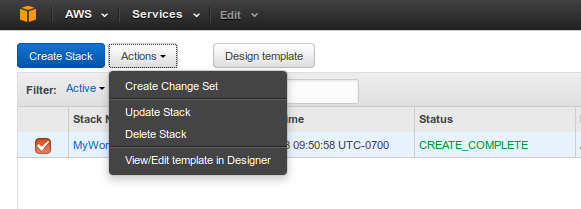
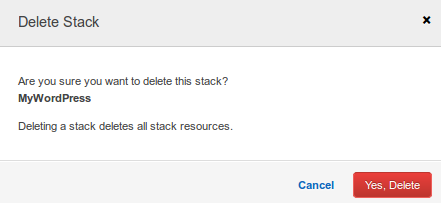
The status for MyWordPress changes to DELETE_IN_PROGRESS.
In the same way we monitored the creation of the stack, we can monitor its deletion by using the Event tab.
When AWS CloudFormation completes the deletion of the stack, it removes the stack from the list.
When we need to update a stack, understanding how our changes will affect running resources before we implement them can help us update stacks with confidence.
Change Sets allow us to preview how proposed changes to a stack might impact our running resources.
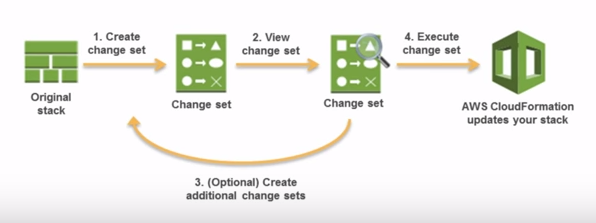
Source : Updating Stacks Using Change Sets
We can create and manage change sets using the AWS CloudFormation console, AWS CLI, or AWS CloudFormation API.
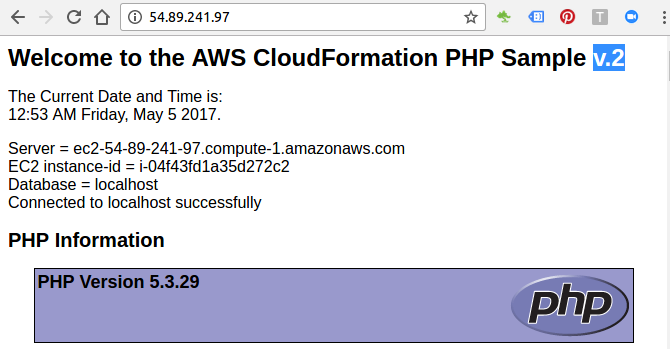
In this example (using the sample in LAMP stack basic), we will make simple changes to the title by adding version number:
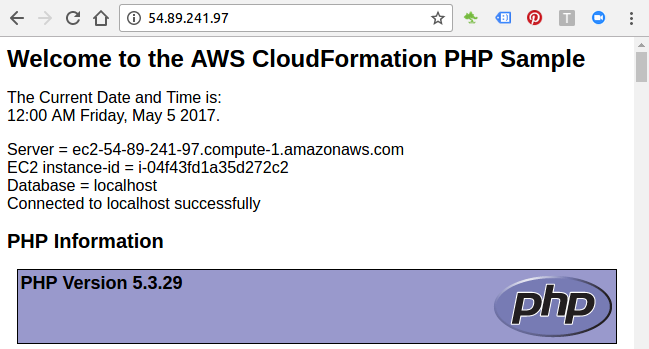
- Create a change set by submitting changes for the stack that we want to update. We can submit a modified stack template or modified input parameter values. AWS CloudFormation compares our stack with the changes that we submitted to generate the change set; it doesn't make changes to our stack at this point.
- View the change set to see which stack settings and resources will change. For example, we can see which resources AWS CloudFormation will add, modify, or delete.
- Execute the change set that contains the changes that we want to apply to our stack. AWS CloudFormation updates our stack with those changes.


Our new page with an updated title looks like this:
We can check our template file for syntax errors using aws cloudformation validate-template command:
$ aws cloudformation validate-template --template-url https://s3.amazonaws.com/my-cloudformation-1/ec2-instance-with-sg.template
AWS CloudFormation Sample Template EC2InstanceWithSecurityGroupSample: Create an Amazon EC2 instance running the Amazon Linux AMI. The AMI is chosen based on the region in which the stack is run. This example creates an EC2 security group for the instance to give you SSH access. **WARNING** This template creates an Amazon EC2 instance. You will be billed for the AWS resources used if you create a stack from this template.
PARAMETERS		Name of an existing EC2 KeyPair to enable SSH access to the instance	False	KeyName
PARAMETERS	0.0.0.0/0	The IP address range that can be used to SSH to the EC2 instances	False	SSHLocation
PARAMETERS	t2.small	WebServer EC2 instance type	False	InstanceType
To create a stack we run the aws cloudformation create-stack command. We must provide the stack name, the location of a valid template, and any input parameters. Parameters are separated with a space and the key names are case sensitive. If we mistype a parameter key name when we run aws cloudformation create-stack, AWS CloudFormation doesn't create the stack and reports that the template doesn't contain that parameter.
$ aws cloudformation create-stack --stack-name myteststack \
--template-url https://s3.amazonaws.com/my-cloudformation-1/ec2-instance-with-sg.template \
--parameters  ParameterKey=KeyName,ParameterValue=einsteinish
arn:aws:cloudformation:us-east-1:526262051452:stack/myteststack/89192290-2e1b-11e7-893d-50a686e4bb1e
Note that the parameters in "ParameterKey=KeyName" should match the one in the template file. In our case:
  "Parameters" : {
    "KeyName": {
      "Description" : "Name of an existing EC2 KeyPair to enable SSH access to the instance",
      "Type": "AWS::EC2::KeyPair::KeyName",
      "ConstraintDescription" : "must be the name of an existing EC2 KeyPair."
    },
    ...
In the command, we specified "S3 url", however, we can use local template file (--template-body file://):
$ aws cloudformation create-stack --stack-name myteststack2 \
--template-body file:///home/k/TEST/CloudFormation/ec2-instance-with-sg.template \
--parameters  ParameterKey=KeyName,ParameterValue=einsteinish
arn:aws:cloudformation:us-east-1:526262051452:stack/myteststack2/cbc84e30-2e21-11e7-8841-500c28637435
If we specify a local template file, AWS CloudFormation uploads it to an Amazon S3 bucket in our AWS account. AWS CloudFormation creates a unique bucket for each region in which you upload a template file. The buckets are accessible to anyone with Amazon S3 permissions in our AWS account. If an AWS CloudFormation-created bucket already exists, the template is added to that bucket.
By default, aws cloudformation describe-stacks returns parameter values:
$ aws cloudformation describe-stacks
To delete a stack:
$ aws cloudformation delete-stack --stack-name my-ec2-stack
To update a stack:
$ aws cloudformation update-stack --stack-name \
my-ec2-stack --template-body file:///home/k/AWS/CloudFormation/SimpleEC2-4.json
We may want to create a change-set and update our stack with it. Let's create it:
$ aws cloudformation create-change-set --stack-name my-ec2-stack \
--template-body file:///home/k/AWS/CloudFormation/SimpleEC2-4.json \
--change-set-name my-ec2-change-set
To update our stack, we need to execute the change-set via execute-change-set:
$ aws cloudformation execute-change-set --change-set-name \
my-ec2-change-set --stack-name my-ec2-stack
Note that when calling the ExecuteChangeSet operation, StackName must be specified if ChangeSetName is not specified as an ARN.
AWS (Amazon Web Services)
- AWS : EKS (Elastic Container Service for Kubernetes)
- AWS : Creating a snapshot (cloning an image)
- AWS : Attaching Amazon EBS volume to an instance
- AWS : Adding swap space to an attached volume via mkswap and swapon
- AWS : Creating an EC2 instance and attaching Amazon EBS volume to the instance using Python boto module with User data
- AWS : Creating an instance to a new region by copying an AMI
- AWS : S3 (Simple Storage Service) 1
- AWS : S3 (Simple Storage Service) 2 - Creating and Deleting a Bucket
- AWS : S3 (Simple Storage Service) 3 - Bucket Versioning
- AWS : S3 (Simple Storage Service) 4 - Uploading a large file
- AWS : S3 (Simple Storage Service) 5 - Uploading folders/files recursively
- AWS : S3 (Simple Storage Service) 6 - Bucket Policy for File/Folder View/Download
- AWS : S3 (Simple Storage Service) 7 - How to Copy or Move Objects from one region to another
- AWS : S3 (Simple Storage Service) 8 - Archiving S3 Data to Glacier
- AWS : Creating a CloudFront distribution with an Amazon S3 origin
- AWS : Creating VPC with CloudFormation
- AWS : WAF (Web Application Firewall) with preconfigured CloudFormation template and Web ACL for CloudFront distribution
- AWS : CloudWatch & Logs with Lambda Function / S3
- AWS : Lambda Serverless Computing with EC2, CloudWatch Alarm, SNS
- AWS : Lambda and SNS - cross account
- AWS : CLI (Command Line Interface)
- AWS : CLI (ECS with ALB & autoscaling)
- AWS : ECS with cloudformation and json task definition
- AWS Application Load Balancer (ALB) and ECS with Flask app
- AWS : Load Balancing with HAProxy (High Availability Proxy)
- AWS : VirtualBox on EC2
- AWS : NTP setup on EC2
- AWS: jq with AWS
- AWS & OpenSSL : Creating / Installing a Server SSL Certificate
- AWS : OpenVPN Access Server 2 Install
- AWS : VPC (Virtual Private Cloud) 1 - netmask, subnets, default gateway, and CIDR
- AWS : VPC (Virtual Private Cloud) 2 - VPC Wizard
- AWS : VPC (Virtual Private Cloud) 3 - VPC Wizard with NAT
- DevOps / Sys Admin Q & A (VI) - AWS VPC setup (public/private subnets with NAT)
- AWS - OpenVPN Protocols : PPTP, L2TP/IPsec, and OpenVPN
- AWS : Autoscaling group (ASG)
- AWS : Setting up Autoscaling Alarms and Notifications via CLI and Cloudformation
- AWS : Adding a SSH User Account on Linux Instance
- AWS : Windows Servers - Remote Desktop Connections using RDP
- AWS : Scheduled stopping and starting an instance - python & cron
- AWS : Detecting stopped instance and sending an alert email using Mandrill smtp
- AWS : Elastic Beanstalk with NodeJS
- AWS : Elastic Beanstalk Inplace/Rolling Blue/Green Deploy
- AWS : Identity and Access Management (IAM) Roles for Amazon EC2
- AWS : Identity and Access Management (IAM) Policies, sts AssumeRole, and delegate access across AWS accounts
- AWS : Identity and Access Management (IAM) sts assume role via aws cli2
- AWS : Creating IAM Roles and associating them with EC2 Instances in CloudFormation
- AWS Identity and Access Management (IAM) Roles, SSO(Single Sign On), SAML(Security Assertion Markup Language), IdP(identity provider), STS(Security Token Service), and ADFS(Active Directory Federation Services)
- AWS : Amazon Route 53
- AWS : Amazon Route 53 - DNS (Domain Name Server) setup
- AWS : Amazon Route 53 - subdomain setup and virtual host on Nginx
- AWS Amazon Route 53 : Private Hosted Zone
- AWS : SNS (Simple Notification Service) example with ELB and CloudWatch
- AWS : Lambda with AWS CloudTrail
- AWS : SQS (Simple Queue Service) with NodeJS and AWS SDK
- AWS : Redshift data warehouse
- AWS : CloudFormation
- AWS : CloudFormation Bootstrap UserData/Metadata
- AWS : CloudFormation - Creating an ASG with rolling update
- AWS : Cloudformation Cross-stack reference
- AWS : OpsWorks
- AWS : Network Load Balancer (NLB) with Autoscaling group (ASG)
- AWS CodeDeploy : Deploy an Application from GitHub
- AWS EC2 Container Service (ECS)
- AWS EC2 Container Service (ECS) II
- AWS Hello World Lambda Function
- AWS Lambda Function Q & A
- AWS Node.js Lambda Function & API Gateway
- AWS API Gateway endpoint invoking Lambda function
- AWS API Gateway invoking Lambda function with Terraform
- AWS API Gateway invoking Lambda function with Terraform - Lambda Container
- Amazon Kinesis Streams
- AWS: Kinesis Data Firehose with Lambda and ElasticSearch
- Amazon DynamoDB
- Amazon DynamoDB with Lambda and CloudWatch
- Loading DynamoDB stream to AWS Elasticsearch service with Lambda
- Amazon ML (Machine Learning)
- Simple Systems Manager (SSM)
- AWS : RDS Connecting to a DB Instance Running the SQL Server Database Engine
- AWS : RDS Importing and Exporting SQL Server Data
- AWS : RDS PostgreSQL & pgAdmin III
- AWS : RDS PostgreSQL 2 - Creating/Deleting a Table
- AWS : MySQL Replication : Master-slave
- AWS : MySQL backup & restore
- AWS RDS : Cross-Region Read Replicas for MySQL and Snapshots for PostgreSQL
- AWS : Restoring Postgres on EC2 instance from S3 backup
- AWS : Q & A
- AWS : Security
- AWS : Security groups vs. network ACLs
- AWS : Scaling-Up
- AWS : Networking
- AWS : Single Sign-on (SSO) with Okta
- AWS : JIT (Just-in-Time) with Okta
Ph.D. / Golden Gate Ave, San Francisco / Seoul National Univ / Carnegie Mellon / UC Berkeley / DevOps / Deep Learning / Visualization