Docker : Step by Step NodeJS and MySQL app with React - I


In this post, we'll learn how to create Node.js Rest APIs with an Express web server. We'll also configure MySQL database & Sequelize, create a Sequelize Model, write a controller and define routes for handling all CRUD operations. The MySQL server will be deployed via Docker container.
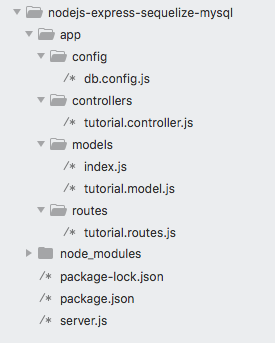
The code is available git: nodejs-express-sequelize-mysql-docker
The app consists of a client using React.js frontend, Node.js is used as a backend server with Express for REST APIs and MySQL db.
The React client sends HTTP Requests and retrieves HTTP Responses using Axios, consume data on the components. React Router is used for navigating to pages. The Node.js Express exports REST APIs and interacts with MySQL Database.

Picture source: Building Data Science Web Application with React, NodeJS, and MySQL
Note that the Frontend with React will be implemented in another post. So, in this post, we'll test the REST CRUD APIs using Postman by making requests (POST, GET, PUT, DELETE).
Let's build Rest Apis that can create, retrieve, update, delete and find Tutorials by title.
First, we start with an Express web server and add configuration for MySQL database, create Tutorial model with Sequelize, write the controller. Then we define routes for handling all CRUD operations (including custom finder).
Finally, we'll test the Rest Apis using Postman.
First, we need to create our project folder:
$ mkdir nodejs-express-sequelize-mysql
$ cd nodejs-express-sequelize-mysql
To create a package.json file, in the root directory of your Node.js module, run npm init:
$ npm init
This utility will walk you through creating a package.json file.
It only covers the most common items, and tries to guess sensible defaults.

See `npm help init` for definitive documentation on these fields
and exactly what they do.

Use `npm install <pkg>` afterwards to install a package and
save it as a dependency in the package.json file.

Press ^C at any time to quit.
package name: (nodejs-express-sequelize-mysql)
version: (1.0.0)
description: Node.js Rest Apis with Express, Sequelize & MySQL.
entry point: (index.js) server.js
test command:
git repository:
keywords: nodejs, express, sequelize, mysql, rest, api
author: k hong
license: (ISC)
About to write to nodejs-express-sequelize-mysql/package.json:

{
  "name": "nodejs-express-sequelize-mysql",
  "version": "1.0.0",
  "description": "Node.js Rest Apis with Express, Sequelize & MySQL.",
  "main": "server.js",
  "scripts": {
    "test": "echo \"Error: no test specified\" && exit 1"
  },
  "keywords": [
    "nodejs",
    "express",
    "sequelize",
    "mysql",
    "rest",
    "api"
  ],
  "author": "k hong",
  "license": "ISC"
}


Is this OK? (yes)
To install necessary modules: express, sequelize, mysql2 and body-parser, run the following command:
$ npm install express sequelize mysql2 body-parser cors --save
The package.json file looks like this:
{
  "name": "nodejs-express-sequelize-mysql",
  "version": "1.0.0",
  "description": "Node.js Rest Apis with Express, Sequelize & MySQL.",
  "main": "server.js",
  "scripts": {
    "test": "echo \"Error: no test specified\" && exit 1"
  },
  "keywords": [
    "nodejs",
    "express",
    "sequelize",
    "mysql",
    "rest",
    "api"
  ],
  "author": "k hong",
  "license": "ISC",
  "dependencies": {
    "body-parser": "^1.19.0",
    "cors": "^2.8.5",
    "express": "^4.17.1",
    "mysql2": "^2.1.0",
    "sequelize": "^6.3.3"
  }
}
In the project folder, let's create a new server.js file:
const express = require("express");
const bodyParser = require("body-parser");
const cors = require("cors");

const app = express();

var corsOptions = {
  origin: "http://localhost:8081"
};

app.use(cors(corsOptions));

// parse requests of content-type - application/json
app.use(bodyParser.json());

// parse requests of content-type - application/x-www-form-urlencoded
app.use(bodyParser.urlencoded({ extended: true }));

// simple route
app.get("/", (req, res) => {
  res.json({ message: "Welcome to bogo node application." });
});

// set port, listen for requests
const PORT = process.env.PORT || 8080;
app.listen(PORT, () => {
  console.log(`Server is running on port ${PORT}.`);
});
In the code:
- import express, body-parser and cors modules:
- Express is for building the Rest apis
- body-parser helps to parse the request and create the req.body object
- cors provides Express middleware to enable CORS with various options
- create an Express app, then add body-parser and cors middlewares using app.use() method. Notice that we set origin: http://localhost:8081
- define a GET route which is simple for test
- listen on port 8080 for incoming requests
Run the app with node server.js:
$ node server.js
Server is running on port 8080.
Now, we will see:

Let's create a configuration file app/config/db.config.js:
module.exports = {
  HOST: "localhost",
  USER: "root",
  PASSWORD: "123456",
  DB: "testdb",
  dialect: "mysql",
  pool: {
    max: 5,
    min: 0,
    acquire: 30000,
    idle: 10000
  }
};
The first five parameters are for MySQL connection. pool is optional, it will be used for Sequelize connection pool configuration:
- max: maximum number of connection in pool
- min: minimum number of connection in pool
- idle: maximum time, in milliseconds, that a connection can be idle before being released
- acquire: maximum time, in milliseconds, that pool will try to get connection before throwing error
Now, let's initialize Sequelize in app/models/index.js:
const dbConfig = require("../config/db.config.js");

const Sequelize = require("sequelize");
const sequelize = new Sequelize(dbConfig.DB, dbConfig.USER, dbConfig.PASSWORD, {
  host: dbConfig.HOST,
  dialect: dbConfig.dialect,
  operatorsAliases: false,

  pool: {
    max: dbConfig.pool.max,
    min: dbConfig.pool.min,
    acquire: dbConfig.pool.acquire,
    idle: dbConfig.pool.idle
  }
});

const db = {};

db.Sequelize = Sequelize;
db.sequelize = sequelize;

db.tutorials = require("./tutorial.model.js")(sequelize, Sequelize);

module.exports = db;
We need call sync() method in server.js:
const express = require("express");
const bodyParser = require("body-parser");
const cors = require("cors");

const app = express();

var corsOptions = {
  origin: "http://localhost:8081"
};

app.use(cors(corsOptions));

// parse requests of content-type - application/json
app.use(bodyParser.json());

// parse requests of content-type - application/x-www-form-urlencoded
app.use(bodyParser.urlencoded({ extended: true }));

// call sysc()
const db = require("./app/models");
db.sequelize.sync();

// simple route
app.get("/", (req, res) => {
  res.json({ message: "Welcome to bogo node application." });
});

// set port, listen for requests
const PORT = process.env.PORT || 8080;
app.listen(PORT, () => {
  console.log(`Server is running on port ${PORT}.`);
});
Now, we may want to define the sequelize model, app/models/tutorial.model.js:
module.exports = (sequelize, Sequelize) => {
  const Tutorial = sequelize.define("tutorial", {
    title: {
      type: Sequelize.STRING
    },
    description: {
      type: Sequelize.STRING
    },
    published: {
      type: Sequelize.BOOLEAN
    }
  });

  return Tutorial;
};
This sequelize model represents tutorials table in MySQL database. These columns will be generated automatically: id, title, description, published, createdAt, updatedAt.
After initializing Sequelize, we don't need to write CRUD functions, Sequelize supports all of them:
- create a new Tutorial: create(object)
- find a Tutorial by id: findByPk(id)
- get all Tutorials: findAll()
- update a Tutorial by id: update(data, where: { id: id })
- remove a Tutorial: destroy(where: { id: id })
- remove all Tutorials: destroy(where: {})
- find all Tutorials by title: findAll({ where: { title: ... } })
These functions will be used in our Controller.
Let's create app/controllers/tutorial.controller.js with these CRUD functions:
const db = require("../models");
const Tutorial = db.tutorials;
const Op = db.Sequelize.Op;

// Create and Save a new Tutorial
exports.create = (req, res) => {
  // Validate request
  if (!req.body.title) {
    res.status(400).send({
      message: "Content can not be empty."
    });
    return;
  }

  // Create a Tutorial
  const tutorial = {
    title: req.body.title,
    description: req.body.description,
    published: req.body.published ? req.body.published : false
  };

  // Save Tutorial in the database
  Tutorial.create(tutorial)
    .then(data => {
      res.send(data);
    })
    .catch(err => {
      res.status(500).send({
        message:
          err.message || "Some error occurred while creating the Tutorial."
      });
    });
};

// Retrieve all Tutorials from the database.
exports.findAll = (req, res) => {
  const title = req.query.title;
  var condition = title ? { title: { [Op.like]: `%${title}%` } } : null;

  Tutorial.findAll({ where: condition })
    .then(data => {
      res.send(data);
    })
    .catch(err => {
      res.status(500).send({
        message:
          err.message || "Some error occurred while retrieving tutorials."
      });
    });
};

// Find a single Tutorial with an id
exports.findOne = (req, res) => {
  const id = req.params.id;

  Tutorial.findByPk(id)
    .then(data => {
      res.send(data);
    })
    .catch(err => {
      res.status(500).send({
        message: "Error retrieving Tutorial with id=" + id
      });
    });
};

// Update a Tutorial by the id in the request
exports.update = (req, res) => {
  const id = req.params.id;

  Tutorial.update(req.body, {
    where: { id: id }
  })
    .then(num => {
      if (num == 1) {
        res.send({
          message: "Tutorial was updated successfully."
        });
      } else {
        res.send({
          message: `Cannot update Tutorial with id=${id}. Maybe Tutorial was not found or req.body is empty!`
        });
      }
    })
    .catch(err => {
      res.status(500).send({
        message: "Error updating Tutorial with id=" + id
      });
    });
};

// Delete a Tutorial with the specified id in the request
exports.delete = (req, res) => {
  const id = req.params.id;

  Tutorial.destroy({
    where: { id: id }
  })
    .then(num => {
      if (num == 1) {
        res.send({
          message: "Tutorial was deleted successfully!"
        });
      } else {
        res.send({
          message: `Cannot delete Tutorial with id=${id}. Maybe Tutorial was not found!`
        });
      }
    })
    .catch(err => {
      res.status(500).send({
        message: "Could not delete Tutorial with id=" + id
      });
    });
};

// Delete all Tutorials from the database.
exports.deleteAll = (req, res) => {
  Tutorial.destroy({
    where: {},
    truncate: false
  })
    .then(nums => {
      res.send({ message: `${nums} Tutorials were deleted successfully!` });
    })
    .catch(err => {
      res.status(500).send({
        message:
          err.message || "Some error occurred while removing all tutorials."
      });
    });
};

// find all published Tutorial
exports.findAllPublished = (req, res) => {
  Tutorial.findAll({ where: { published: true } })
    .then(data => {
      res.send(data);
    })
    .catch(err => {
      res.status(500).send({
        message:
          err.message || "Some error occurred while retrieving tutorials."
      });
    });
};
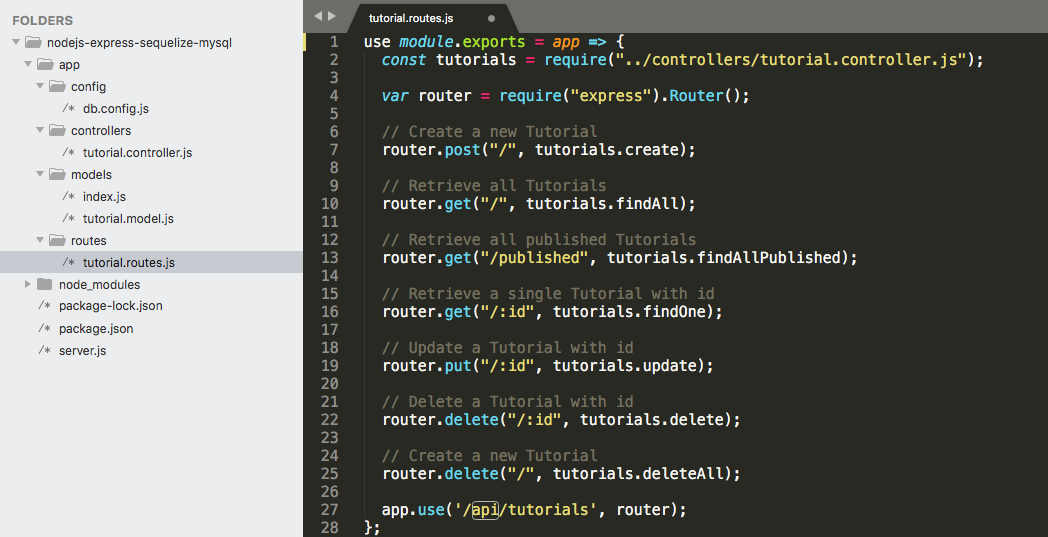
When a client sends request for an endpoint using HTTP request, we need to determine how the server will reponse by setting up the routes:
- /api/tutorials: GET, POST, DELETE
- /api/tutorials/:id: GET, PUT, DELETE
- /api/tutorials/published: GET
Here is the route file, app/routes/turorial.routes.js:
module.exports = app => {
  const tutorials = require("../controllers/tutorial.controller.js");

  var router = require("express").Router();

  // Create a new Tutorial
  router.post("/", tutorials.create);

  // Retrieve all Tutorials
  router.get("/", tutorials.findAll);

  // Retrieve all published Tutorials
  router.get("/published", tutorials.findAllPublished);

  // Retrieve a single Tutorial with id
  router.get("/:id", tutorials.findOne);

  // Update a Tutorial with id
  router.put("/:id", tutorials.update);

  // Delete a Tutorial with id
  router.delete("/:id", tutorials.delete);

  // Create a new Tutorial
  router.delete("/", tutorials.deleteAll);

  app.use('/api/tutorials', router);
};
So, we need to include the routes in server.js:
const express = require("express");
const bodyParser = require("body-parser");
const cors = require("cors");

const app = express();

var corsOptions = {
  origin: "http://localhost:8081"
};

app.use(cors(corsOptions));

// parse requests of content-type - application/json
app.use(bodyParser.json());

// parse requests of content-type - application/x-www-form-urlencoded
app.use(bodyParser.urlencoded({ extended: true }));

// call sysc()
const db = require("./app/models");
db.sequelize.sync();

// simple route
app.get("/", (req, res) => {
  res.json({ message: "Welcome to bogo node application." });
});

// tutorial routes
require("./app/routes/tutorial.routes.js")(app);

// set port, listen for requests
const PORT = process.env.PORT || 8080;
app.listen(PORT, () => {
  console.log(`Server is running on port ${PORT}.`);
});
Download the server image before creating our Docker container to insures our local image is up to date. To download the MySQL Community Edition image, run this command:
$ docker pull mysql/mysql-server:latest
Once we have the image, move on to deploying a new MySQL container with:
$ docker run -p3306:3306 --name=mysql1 -d mysql/mysql-server:5.7
The container appears in the list of running containers when we run the docker ps command:
$ docker ps
CONTAINER ID        IMAGE                       COMMAND                  CREATED             STATUS                            PORTS                 NAMES
1e3f99d8fb80        mysql/mysql-server:5.7   "/entrypoint.sh mysq…"   6 seconds ago       Up 4 seconds (health: starting)   3306/tcp, 33060/tcp   mysql1
docker logs mysql1's output is going to contain the random password generated for the root user:
$ docker logs mysql1 2>&1 | grep GENERATED
[Entrypoint] GENERATED ROOT PASSWORD: -odOg(aMAMydAfC@g2aL]uPk@vv
Once the server is ready, WE can run the mysql client within the MySQL Server container WE just started and connect it to the MySQL Server.
Use the docker exec -it command to start a mysql client inside the Docker container we have started, like this:
$ docker exec -it mysql1 mysql -uroot -p
Enter password:
...
mysql>
After connected a mysql client to the server, we must reset the server root password by issuing this statement:
$ mysql> ALTER USER 'root'@'localhost' IDENTIFIED BY '123456';
Once the password is reset, the server is ready for use.
A number of MySQL products are included in the Docker container we created with the MySQL Server Docker image:
- MySQL Server
- mysql client
- mysqldump
Or we can set the pass in the docker run command:
$ docker run -p3306:3306 --name mysql1 -e MYSQL_ROOT_PASSWORD=123456 -d mysql:5.7

$ docker exec -it mysql1 mysql -uroot -p
Enter password:
...
mysql>
Note: users should look like this:
mysql> SELECT host, user FROM mysql.user;
+-----------+---------------+
| host      | user          |
+-----------+---------------+
| %         | root          |
| localhost | mysql.session |
| localhost | mysql.sys     |
| localhost | root          |
+-----------+---------------+
4 rows in set (0.00 sec)
where the '%' indicates from all IPs for the "root" user.
Create a db, 'testdb':
mysql> show databases;
+--------------------+
| Database           |
+--------------------+
| information_schema |
| mysql              |
| performance_schema |
| sys                |
+--------------------+
4 rows in set (0.00 sec)

mysql> create database testdb;
Query OK, 1 row affected (0.01 sec)

mysql> show databases;
+--------------------+
| Database           |
+--------------------+
| information_schema |
| mysql              |
| performance_schema |
| sys                |
| testdb             |
+--------------------+
5 rows in set (0.00 sec)

mysql>
Now, run the server:
$ node server.js
(node:24084) [SEQUELIZE0004] DeprecationWarning: A boolean value was passed to options.operatorsAliases. This is a no-op with v5 and should be removed.
(Use `node --trace-deprecation ...` to show where the warning was created)
Server is running on port 8080.
Executing (default): CREATE TABLE IF NOT EXISTS `tutorials`
(`id` INTEGER NOT NULL auto_increment ,
`title` VARCHAR(255), `description` VARCHAR(255), `published` TINYINT(1), `createdAt`
DATETIME NOT NULL, `updatedAt` DATETIME NOT NULL, PRIMARY KEY (`id`)) ENGINE=InnoDB;
Executing (default): SHOW INDEX FROM `tutorials`
Go back to mysql and see if the table has been created:
mysql> use testdb
Reading table information for completion of table and column names
You can turn off this feature to get a quicker startup with -A

Database changed
mysql> show tables;
+------------------+
| Tables_in_testdb |
+------------------+
| tutorials        |
+------------------+
1 row in set (0.00 sec)

mysql>
We'll test the following Rest APIs using Postman:
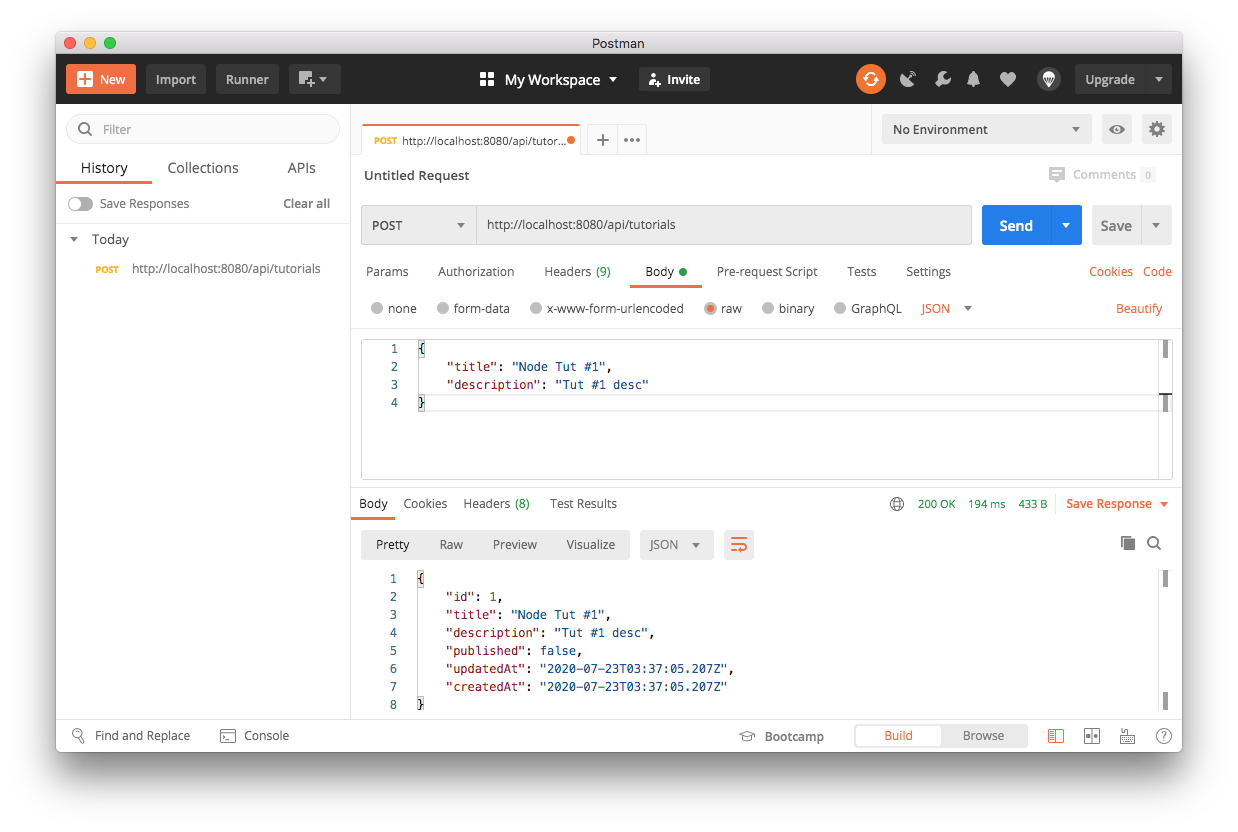
First, create the Tutorials #1 title from the Postman by sending a 'POST' request with an appropriate Header, Content-Type: application/json.
Create more titles and then we will see the following by sending a 'GET' request:
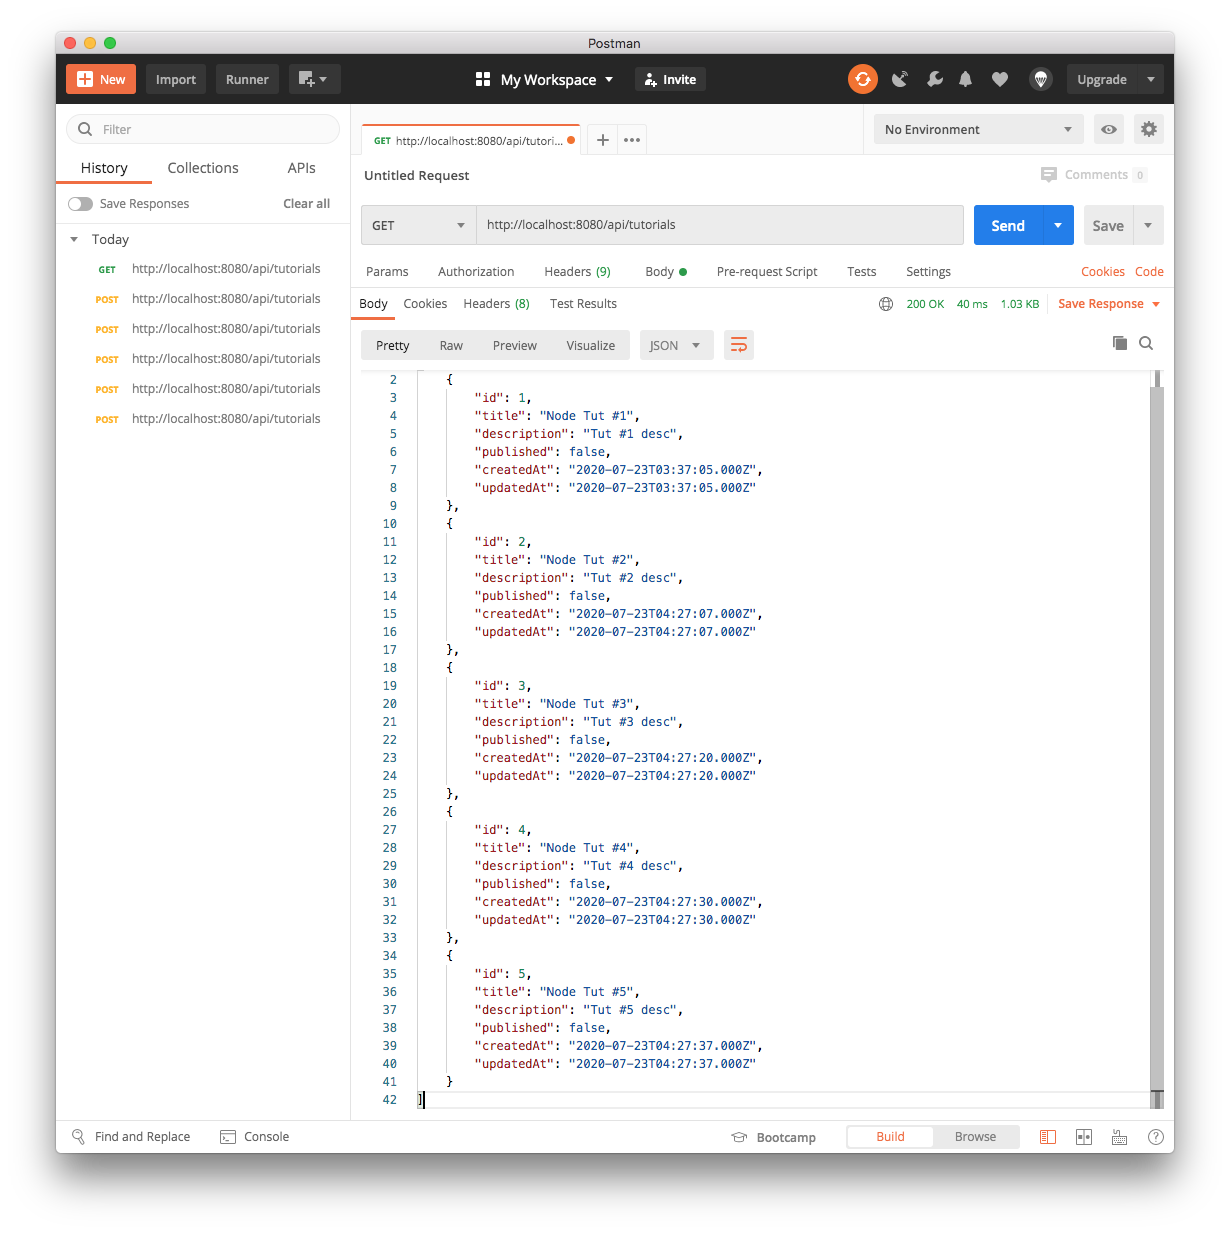
We can check if the tutorials have been created from MySQL table as well:
mysql> select * from tutorials;
Empty set (0.00 sec)

mysql> select * from tutorials;
+----+-------------+-------------+-----------+---------------------+---------------------+
| id | title       | description | published | createdAt           | updatedAt           |
+----+-------------+-------------+-----------+---------------------+---------------------+
|  1 | Node Tut #1 | Tut #1 desc |         0 | 2020-07-23 03:37:05 | 2020-07-23 03:37:05 |
|  2 | Node Tut #2 | Tut #2 desc |         0 | 2020-07-23 04:27:07 | 2020-07-23 04:27:07 |
|  3 | Node Tut #3 | Tut #3 desc |         0 | 2020-07-23 04:27:20 | 2020-07-23 04:27:20 |
|  4 | Node Tut #4 | Tut #4 desc |         0 | 2020-07-23 04:27:30 | 2020-07-23 04:27:30 |
|  5 | Node Tut #5 | Tut #5 desc |         0 | 2020-07-23 04:27:37 | 2020-07-23 04:27:37 |
+----+-------------+-------------+-----------+---------------------+---------------------+
5 rows in set (0.00 sec)
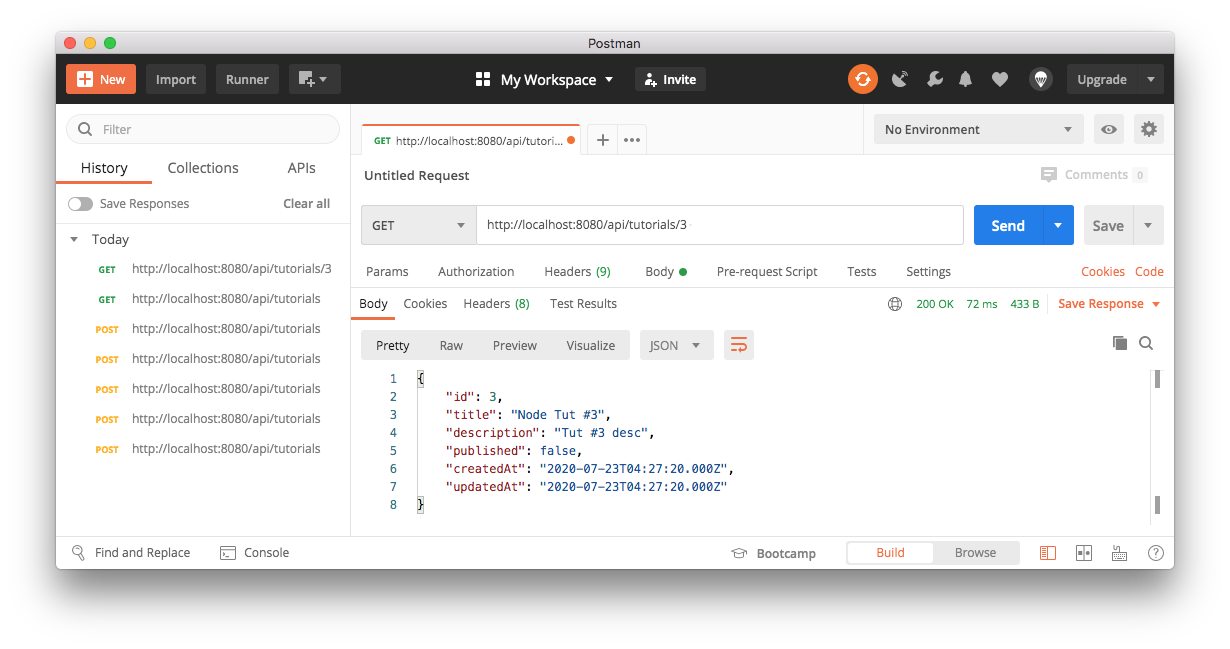
Now, let's retrieve a single Tutorial by id using GET /tutorials/:id
Update one of the tut using PUT /tutorials/:id
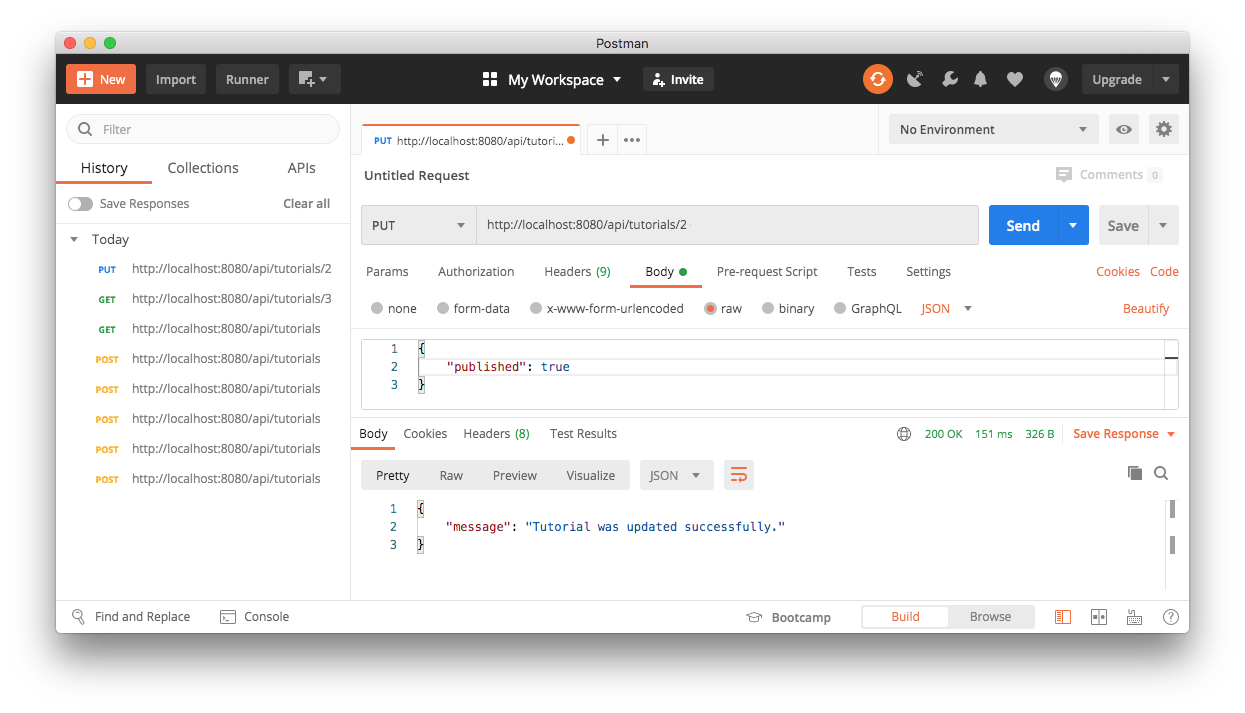
We can check if the 2nd tut has been published:
mysql> select * from tutorials;
+----+-------------+-------------+-----------+---------------------+---------------------+
| id | title       | description | published | createdAt           | updatedAt           |
+----+-------------+-------------+-----------+---------------------+---------------------+
|  1 | Node Tut #1 | Tut #1 desc |         0 | 2020-07-23 03:37:05 | 2020-07-23 03:37:05 |
|  2 | Node Tut #2 | Tut #2 desc |         1 | 2020-07-23 04:27:07 | 2020-07-23 04:46:10 |
|  3 | Node Tut #3 | Tut #3 desc |         0 | 2020-07-23 04:27:20 | 2020-07-23 04:27:20 |
|  4 | Node Tut #4 | Tut #4 desc |         0 | 2020-07-23 04:27:30 | 2020-07-23 04:27:30 |
|  5 | Node Tut #5 | Tut #5 desc |         0 | 2020-07-23 04:27:37 | 2020-07-23 04:27:37 |
+----+-------------+-------------+-----------+---------------------+---------------------+
5 rows in set (0.00 sec)

mysql>
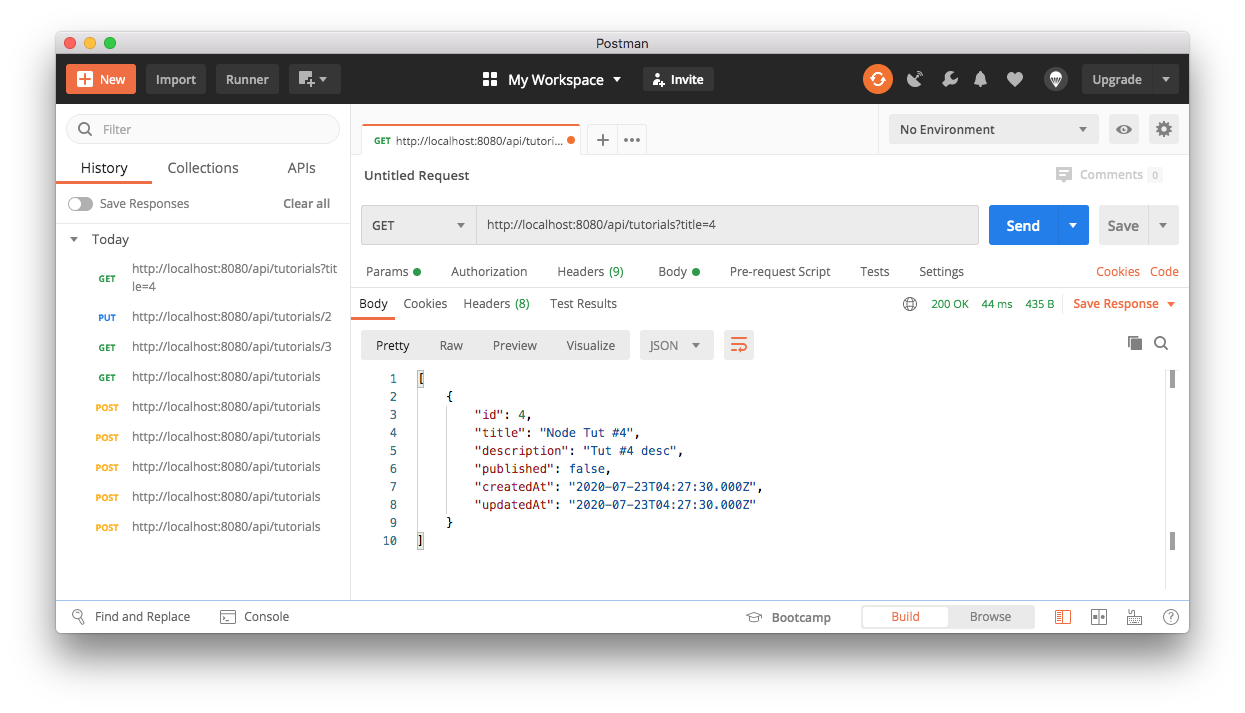
Find all tutorials whose title contains "4": GET /tutorials?title=4
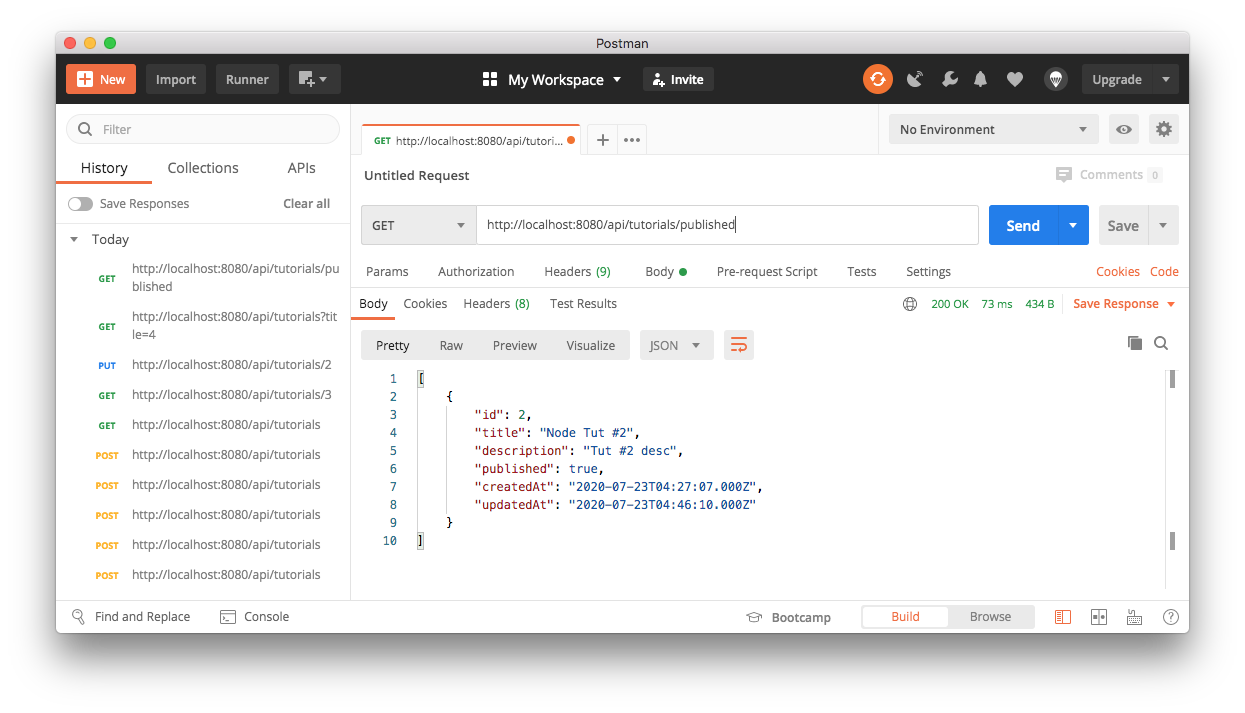
Find all published tutorials using GET /tutorials/published
Delete a Tutorial using DELETE /tutorials/:id, for example, id=4
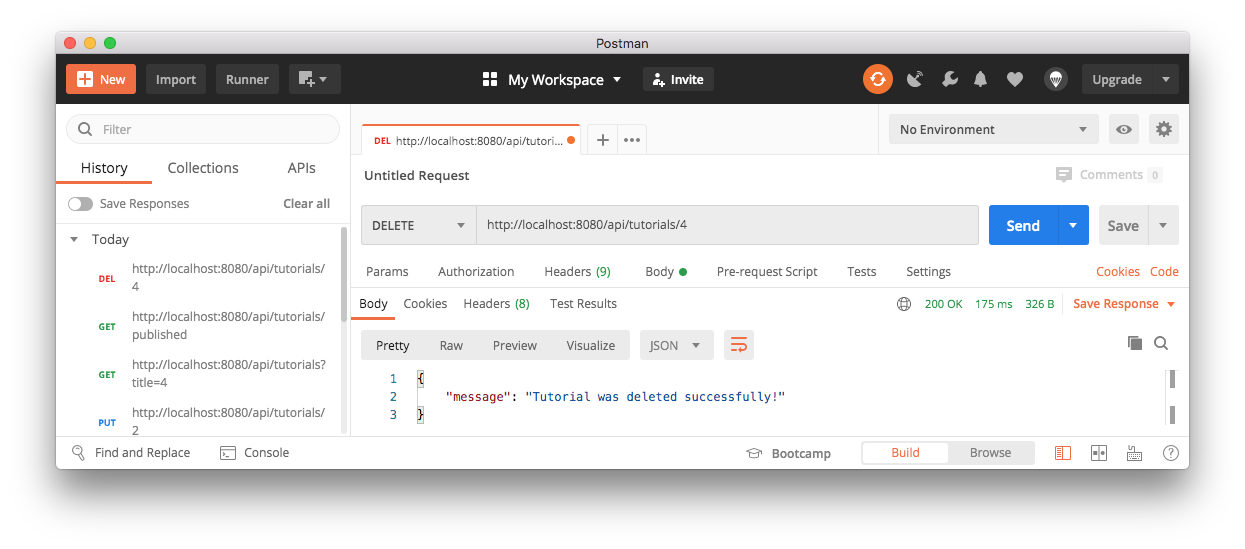
We can see the tutorial with id=4 was removed from tutorials table:
mysql> select * from tutorials;
+----+-------------+-------------+-----------+---------------------+---------------------+
| id | title       | description | published | createdAt           | updatedAt           |
+----+-------------+-------------+-----------+---------------------+---------------------+
|  1 | Node Tut #1 | Tut #1 desc |         0 | 2020-07-23 03:37:05 | 2020-07-23 03:37:05 |
|  2 | Node Tut #2 | Tut #2 desc |         1 | 2020-07-23 04:27:07 | 2020-07-23 04:46:10 |
|  3 | Node Tut #3 | Tut #3 desc |         0 | 2020-07-23 04:27:20 | 2020-07-23 04:27:20 |
|  5 | Node Tut #5 | Tut #5 desc |         0 | 2020-07-23 04:27:37 | 2020-07-23 04:27:37 |
+----+-------------+-------------+-----------+---------------------+---------------------+
4 rows in set (0.00 sec)
Delete all tutorials using DELETE /tutorials
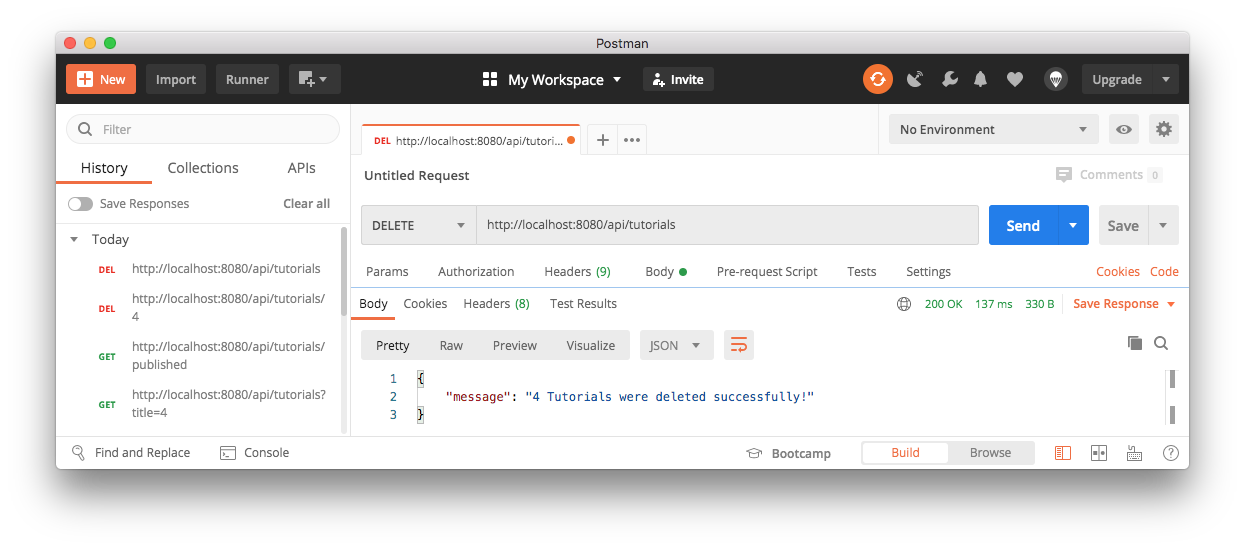
mysql> select * from tutorials;
Empty set (0.00 sec)
- NReact + Node.js + Express + MySQL example: Build a CRUD App
- Node.js Rest APIs example with Express, Sequelize & MySQL
Docker & K8s
- Docker install on Amazon Linux AMI
- Docker install on EC2 Ubuntu 14.04
- Docker container vs Virtual Machine
- Docker install on Ubuntu 14.04
- Docker Hello World Application
- Nginx image - share/copy files, Dockerfile
- Working with Docker images : brief introduction
- Docker image and container via docker commands (search, pull, run, ps, restart, attach, and rm)
- More on docker run command (docker run -it, docker run --rm, etc.)
- Docker Networks - Bridge Driver Network
- Docker Persistent Storage
- File sharing between host and container (docker run -d -p -v)
- Linking containers and volume for datastore
- Dockerfile - Build Docker images automatically I - FROM, MAINTAINER, and build context
- Dockerfile - Build Docker images automatically II - revisiting FROM, MAINTAINER, build context, and caching
- Dockerfile - Build Docker images automatically III - RUN
- Dockerfile - Build Docker images automatically IV - CMD
- Dockerfile - Build Docker images automatically V - WORKDIR, ENV, ADD, and ENTRYPOINT
- Docker - Apache Tomcat
- Docker - NodeJS
- Docker - NodeJS with hostname
- Docker Compose - NodeJS with MongoDB
- Docker - Prometheus and Grafana with Docker-compose
- Docker - StatsD/Graphite/Grafana
- Docker - Deploying a Java EE JBoss/WildFly Application on AWS Elastic Beanstalk Using Docker Containers
- Docker : NodeJS with GCP Kubernetes Engine
- Docker : Jenkins Multibranch Pipeline with Jenkinsfile and Github
- Docker : Jenkins Master and Slave
- Docker - ELK : ElasticSearch, Logstash, and Kibana
- Docker - ELK 7.6 : Elasticsearch on Centos 7
- Docker - ELK 7.6 : Filebeat on Centos 7
- Docker - ELK 7.6 : Logstash on Centos 7
- Docker - ELK 7.6 : Kibana on Centos 7
- Docker - ELK 7.6 : Elastic Stack with Docker Compose
- Docker - Deploy Elastic Cloud on Kubernetes (ECK) via Elasticsearch operator on minikube
- Docker - Deploy Elastic Stack via Helm on minikube
- Docker Compose - A gentle introduction with WordPress
- Docker Compose - MySQL
- MEAN Stack app on Docker containers : micro services
- MEAN Stack app on Docker containers : micro services via docker-compose
- Docker Compose - Hashicorp's Vault and Consul Part A (install vault, unsealing, static secrets, and policies)
- Docker Compose - Hashicorp's Vault and Consul Part B (EaaS, dynamic secrets, leases, and revocation)
- Docker Compose - Hashicorp's Vault and Consul Part C (Consul)
- Docker Compose with two containers - Flask REST API service container and an Apache server container
- Docker compose : Nginx reverse proxy with multiple containers
- Docker & Kubernetes : Envoy - Getting started
- Docker & Kubernetes : Envoy - Front Proxy
- Docker & Kubernetes : Ambassador - Envoy API Gateway on Kubernetes
- Docker Packer
- Docker Cheat Sheet
- Docker Q & A #1
- Kubernetes Q & A - Part I
- Kubernetes Q & A - Part II
- Docker - Run a React app in a docker
- Docker - Run a React app in a docker II (snapshot app with nginx)
- Docker - NodeJS and MySQL app with React in a docker
- Docker - Step by Step NodeJS and MySQL app with React - I
- Installing LAMP via puppet on Docker
- Docker install via Puppet
- Nginx Docker install via Ansible
- Apache Hadoop CDH 5.8 Install with QuickStarts Docker
- Docker - Deploying Flask app to ECS
- Docker Compose - Deploying WordPress to AWS
- Docker - WordPress Deploy to ECS with Docker-Compose (ECS-CLI EC2 type)
- Docker - WordPress Deploy to ECS with Docker-Compose (ECS-CLI Fargate type)
- Docker - ECS Fargate
- Docker - AWS ECS service discovery with Flask and Redis
- Docker & Kubernetes : minikube
- Docker & Kubernetes 2 : minikube Django with Postgres - persistent volume
- Docker & Kubernetes 3 : minikube Django with Redis and Celery
- Docker & Kubernetes 4 : Django with RDS via AWS Kops
- Docker & Kubernetes : Kops on AWS
- Docker & Kubernetes : Ingress controller on AWS with Kops
- Docker & Kubernetes : HashiCorp's Vault and Consul on minikube
- Docker & Kubernetes : HashiCorp's Vault and Consul - Auto-unseal using Transit Secrets Engine
- Docker & Kubernetes : Persistent Volumes & Persistent Volumes Claims - hostPath and annotations
- Docker & Kubernetes : Persistent Volumes - Dynamic volume provisioning
- Docker & Kubernetes : DaemonSet
- Docker & Kubernetes : Secrets
- Docker & Kubernetes : kubectl command
- Docker & Kubernetes : Assign a Kubernetes Pod to a particular node in a Kubernetes cluster
- Docker & Kubernetes : Configure a Pod to Use a ConfigMap
- AWS : EKS (Elastic Container Service for Kubernetes)
- Docker & Kubernetes : Run a React app in a minikube
- Docker & Kubernetes : Minikube install on AWS EC2
- Docker & Kubernetes : Cassandra with a StatefulSet
- Docker & Kubernetes : Terraform and AWS EKS
- Docker & Kubernetes : Pods and Service definitions
- Docker & Kubernetes : Service IP and the Service Type
- Docker & Kubernetes : Kubernetes DNS with Pods and Services
- Docker & Kubernetes : Headless service and discovering pods
- Docker & Kubernetes : Scaling and Updating application
- Docker & Kubernetes : Horizontal pod autoscaler on minikubes
- Docker & Kubernetes : From a monolithic app to micro services on GCP Kubernetes
- Docker & Kubernetes : Rolling updates
- Docker & Kubernetes : Deployments to GKE (Rolling update, Canary and Blue-green deployments)
- Docker & Kubernetes : Slack Chat Bot with NodeJS on GCP Kubernetes
- Docker & Kubernetes : Continuous Delivery with Jenkins Multibranch Pipeline for Dev, Canary, and Production Environments on GCP Kubernetes
- Docker & Kubernetes : NodePort vs LoadBalancer vs Ingress
- Docker & Kubernetes : MongoDB / MongoExpress on Minikube
- Docker & Kubernetes : Load Testing with Locust on GCP Kubernetes
- Docker & Kubernetes : MongoDB with StatefulSets on GCP Kubernetes Engine
- Docker & Kubernetes : Nginx Ingress Controller on Minikube
- Docker & Kubernetes : Setting up Ingress with NGINX Controller on Minikube (Mac)
- Docker & Kubernetes : Nginx Ingress Controller for Dashboard service on Minikube
- Docker & Kubernetes : Nginx Ingress Controller on GCP Kubernetes
- Docker & Kubernetes : Kubernetes Ingress with AWS ALB Ingress Controller in EKS
- Docker & Kubernetes : Setting up a private cluster on GCP Kubernetes
- Docker & Kubernetes : Kubernetes Namespaces (default, kube-public, kube-system) and switching namespaces (kubens)
- Docker & Kubernetes : StatefulSets on minikube
- Docker & Kubernetes : RBAC
- Docker & Kubernetes Service Account, RBAC, and IAM
- Docker & Kubernetes - Kubernetes Service Account, RBAC, IAM with EKS ALB, Part 1
- Docker & Kubernetes : Helm Chart
- Docker & Kubernetes : My first Helm deploy
- Docker & Kubernetes : Readiness and Liveness Probes
- Docker & Kubernetes : Helm chart repository with Github pages
- Docker & Kubernetes : Deploying WordPress and MariaDB with Ingress to Minikube using Helm Chart
- Docker & Kubernetes : Deploying WordPress and MariaDB to AWS using Helm 2 Chart
- Docker & Kubernetes : Deploying WordPress and MariaDB to AWS using Helm 3 Chart
- Docker & Kubernetes : Helm Chart for Node/Express and MySQL with Ingress
- Docker & Kubernetes : Deploy Prometheus and Grafana using Helm and Prometheus Operator - Monitoring Kubernetes node resources out of the box
- Docker & Kubernetes : Deploy Prometheus and Grafana using kube-prometheus-stack Helm Chart
- Docker & Kubernetes : Istio (service mesh) sidecar proxy on GCP Kubernetes
- Docker & Kubernetes : Istio on EKS
- Docker & Kubernetes : Istio on Minikube with AWS EC2 for Bookinfo Application
- Docker & Kubernetes : Deploying .NET Core app to Kubernetes Engine and configuring its traffic managed by Istio (Part I)
- Docker & Kubernetes : Deploying .NET Core app to Kubernetes Engine and configuring its traffic managed by Istio (Part II - Prometheus, Grafana, pin a service, split traffic, and inject faults)
- Docker & Kubernetes : Helm Package Manager with MySQL on GCP Kubernetes Engine
- Docker & Kubernetes : Deploying Memcached on Kubernetes Engine
- Docker & Kubernetes : EKS Control Plane (API server) Metrics with Prometheus
- Docker & Kubernetes : Spinnaker on EKS with Halyard
- Docker & Kubernetes : Continuous Delivery Pipelines with Spinnaker and Kubernetes Engine
- Docker & Kubernetes : Multi-node Local Kubernetes cluster : Kubeadm-dind (docker-in-docker)
- Docker & Kubernetes : Multi-node Local Kubernetes cluster : Kubeadm-kind (k8s-in-docker)
- Docker & Kubernetes : nodeSelector, nodeAffinity, taints/tolerations, pod affinity and anti-affinity - Assigning Pods to Nodes
- Docker & Kubernetes : Jenkins-X on EKS
- Docker & Kubernetes : ArgoCD App of Apps with Heml on Kubernetes
- Docker & Kubernetes : ArgoCD on Kubernetes cluster
- Docker & Kubernetes : GitOps with ArgoCD for Continuous Delivery to Kubernetes clusters (minikube) - guestbook
Ph.D. / Golden Gate Ave, San Francisco / Seoul National Univ / Carnegie Mellon / UC Berkeley / DevOps / Deep Learning / Visualization