Docker & Kubernetes : Spinnaker on EKS with Halyard
In this post, we'll do manifest based Spinnaker deploy to EKS via Halyard.
Spinnaker is an open-source, multi-cloud continuous delivery platform that helps us release software changes with high velocity and confidence.
Spinnaker provides two core sets of features:
- application management
- application deployment
This post is based on https://www.spinnaker.io/setup/install/
Halyard will be used to install and manage a Spinnaker deployment. In fact, all production grade Spinnaker deployments require Halyard in order to properly configure and maintain Spinnaker.
Spinnaker is actually a composite application of individual microservices (more than 10 services). We can see the complexity from https://www.spinnaker.io/reference/architecture/. Halyard will help to handle the dependencies of the Spinnaker. Though it's possible to install Spinnaker without Halyard, it's not recommended.
This installation guide is based on https://www.spinnaker.io/setup/install/halyard/.
To install it on macOS, let's get the latest version of Halyard:
$ curl -O https://raw.githubusercontent.com/spinnaker/halyard/master/install/macos/InstallHalyard.sh
To install it:
$ sudo bash InstallHalyard.sh
Check the install:
$ hal -v
1.18.0-20190325172326
To update:
$ sudo update-halyard
...
1.18.0-20190325172326
To purge a deployment done via Halyard:
$ hal deploy clean
+ Get current deployment
  Success
- Clean Deployment of Spinnaker
  Failure
Problems in Global:
! ERROR You must pick a version of Spinnaker to deploy.

- Failed to remove Spinnaker.
It failed because we don't have any deployment at this time.
If we want to uninstall Halyard, then use the following command:
$ sudo ~/.hal/uninstall.sh
This new Kubernetes provider is centered on delivering and promoting Kubernetes manifests to different Kubernetes environments. These manifests are delivered to Spinnaker using artifacts and applied to the target cluster using kubectl in the background.
A provider is just an interface to one of many virtual resources Spinnaker will utilize. AWS, Azure, Docker, and many more are all considered providers, and are managed by Spinnaker via accounts.
In this section, we'll register credentials for EKS. Those credentials are known as accounts in Spinnaker, and Spinnaker deploys our applications via those accounts.
Let's add an account and make sure that the provider is enabled.
$ MY_K8_ACCOUNT="my-spinnaker-to-eks-k8s"

$ hal config provider kubernetes enable
  Success
+ Edit the kubernetes provider
  Success
Problems in default.provider.kubernetes:
- WARNING Provider kubernetes is enabled, but no accounts have been
  configured.

+ Successfully enabled kubernetes

$ hal config provider kubernetes account add ${MY_K8_ACCOUNT} --provider-version v2 --context $(kubectl config current-context)
+ Get current deployment
  Success
+ Add the my-spinnaker-to-eks-k8s account
  Success
+ Successfully added account my-spinnaker-to-eks-k8s for provider
  kubernetes.

$ hal config features edit --artifacts true
+ Get current deployment
  Success
+ Get features
  Success
+ Edit features
  Success
+ Successfully updated features.
At this point, the config file in ~/.hal/config looks like this:
currentDeployment: default
deploymentConfigurations:
- name: default
  version: ''
  providers:
    appengine:
      enabled: false
      accounts: []
...
    kubernetes:
      enabled: true
      accounts:
      - name: my-spinnaker-to-eks-k8s
        requiredGroupMembership: []
        providerVersion: V2
        ...
        kubeconfigFile: /Users/kihyuckhong/.kube/config
        oauthScopes: []
        oAuthScopes: []
        onlySpinnakerManaged: false
      primaryAccount: my-spinnaker-to-eks-k8s
  ...
  features:
    auth: false
    fiat: false
    chaos: false
    entityTags: false
    jobs: false
    artifacts: true
As we already know, there are two types of nodes in Kubernetes:
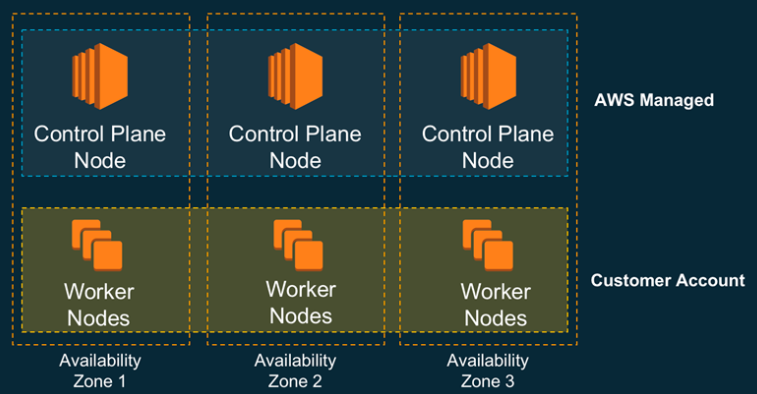
source: Amazon EKS – Now Generally Available
EKS master control plane is managed by AWS and we do not have any control over it. One our side, we hand over Roles to the master, and then it assumes the role. It's the same mechanism as the cross account access (Delegate Access Across AWS Accounts Using IAM Roles).
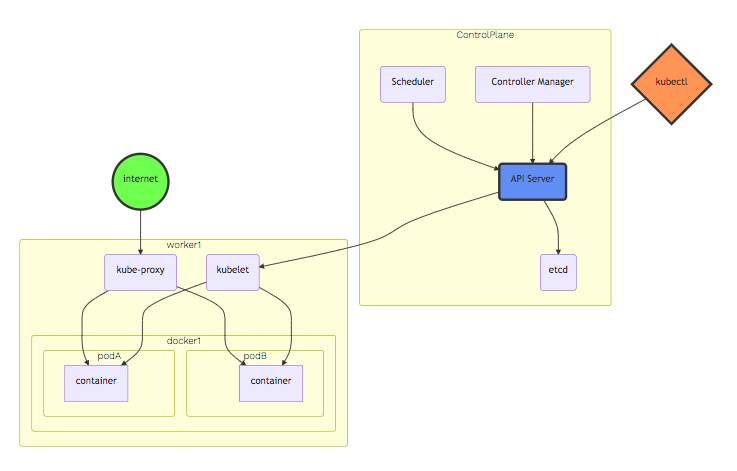
source: Amazon EKS Workshop
- A Master-node type, which makes up the Control Plane, acts as the "brains" of the cluster.
- A Worker-node type, which makes up the Data Plane, runs the actual container images (via pods.)
The following picture shows what happens when we create EKS Cluster:
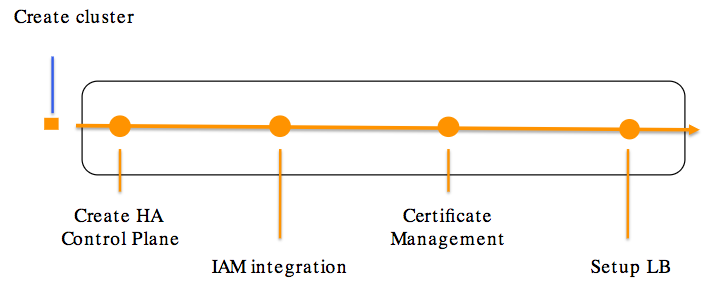
source: Amazon EKS Workshop
The instructions in this section, assume that we have AWS CLI installed, configured, and have access to each of the managed account and managing account (AWS Account, in which Spinnaker is running).
There are two types of Accounts in the Spinnaker AWS provider; however, the distinction is not made in how they are configured using Halyard, but instead how they are configured in AWS.
- Managing accounts: There is always exactly one managing account, this account is what Spinnaker authenticates as, and if necessary, assumes roles in the managed accounts.
- Managed accounts: Every account that you want to modify resources in is a managed account. These will be configured to grant AssumeRole access to the managed account. This includes the managing account!
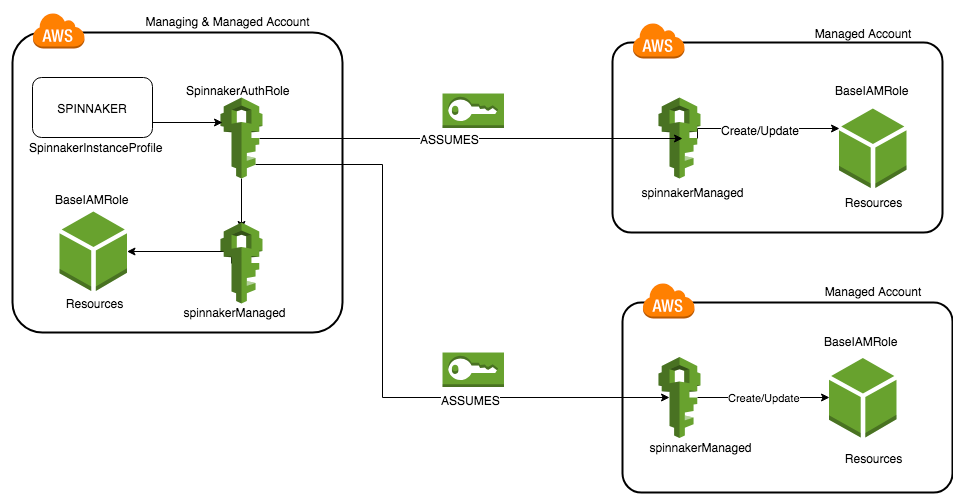
source: Amazon Web Services
In the managing account, we will create the "spinnaker-managing-infrastructure-setup" stack via CloudFormation using cloudformation deploy command. This will create a two-subnet VPC, IAM roles, instance profiles, and a Security Group for EKS control-plane communications and an EKS cluster.
$ curl -O https://d3079gxvs8ayeg.cloudfront.net/templates/managing.yaml

$ aws cloudformation deploy --stack-name spinnaker-managing-infrastructure-setup --template-file managing.yaml \
--parameter-overrides UseAccessKeyForAuthentication=false EksClusterName=my-spinnaker-cluster --capabilities CAPABILITY_NAMED_IAM
Waiting for changeset to be created..
Waiting for stack create/update to complete
The stack creation is successful. Now we need to store the output information about the vpc and the cluster as shell variables. The step above takes 10+ minutes to complete.
As we can see from the pictures below, our EKS cluster has been created.

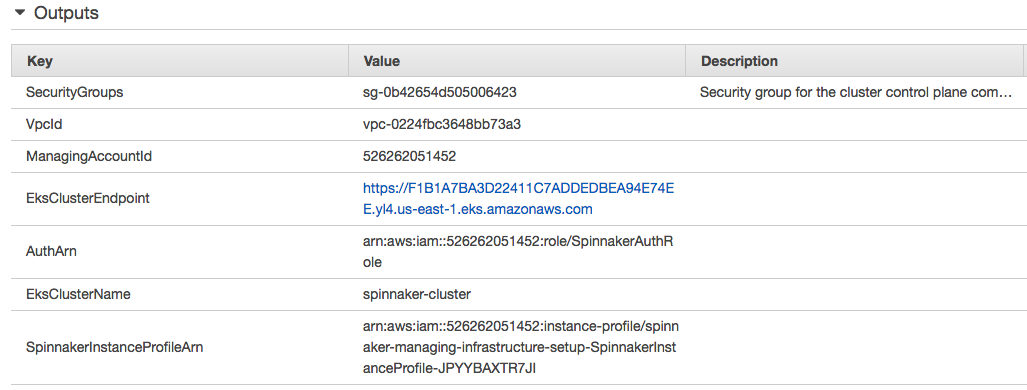
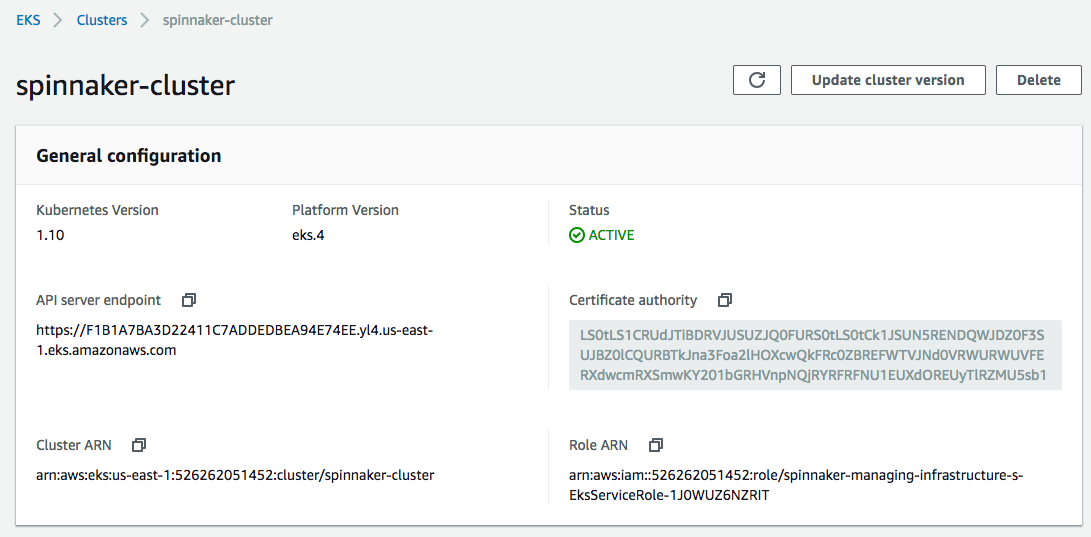
Once complete issue the following commands, which will use the AWS CLI to assign some environment variables values from the "spinnaker-managing-infrastructure-setup" stack we just created. We'll be using these values throughout the remainder of this post.
$ VPC_ID=$(aws cloudformation describe-stacks --stack-name spinnaker-managing-infrastructure-setup --query 'Stacks[0].Outputs[?OutputKey==`VpcId`].OutputValue' --output text)

$ CONTROL_PLANE_SG=$(aws cloudformation describe-stacks --stack-name spinnaker-managing-infrastructure-setup --query 'Stacks[0].Outputs[?OutputKey==`SecurityGroups`].OutputValue' --output text)

$ AUTH_ARN=$(aws cloudformation describe-stacks --stack-name spinnaker-managing-infrastructure-setup --query 'Stacks[0].Outputs[?OutputKey==`AuthArn`].OutputValue' --output text)

$ SUBNETS=$(aws cloudformation describe-stacks --stack-name spinnaker-managing-infrastructure-setup --query 'Stacks[0].Outputs[?OutputKey==`SubnetIds`].OutputValue' --output text)

$ MANAGING_ACCOUNT_ID=$(aws cloudformation describe-stacks --stack-name spinnaker-managing-infrastructure-setup --query 'Stacks[0].Outputs[?OutputKey==`ManagingAccountId`].OutputValue' --output text)

$ EKS_CLUSTER_ENDPOINT=$(aws cloudformation describe-stacks --stack-name spinnaker-managing-infrastructure-setup --query 'Stacks[0].Outputs[?OutputKey==`EksClusterEndpoint`].OutputValue' --output text)

$ EKS_CLUSTER_NAME=$(aws cloudformation describe-stacks --stack-name spinnaker-managing-infrastructure-setup --query 'Stacks[0].Outputs[?OutputKey==`EksClusterName`].OutputValue' --output text)

$ EKS_CLUSTER_CA_DATA=$(aws cloudformation describe-stacks --stack-name spinnaker-managing-infrastructure-setup --query 'Stacks[0].Outputs[?OutputKey==`EksClusterCA`].OutputValue' --output text)

$ SPINNAKER_INSTANCE_PROFILE_ARN=$(aws cloudformation describe-stacks --stack-name spinnaker-managing-infrastructure-setup --query 'Stacks[0].Outputs[?OutputKey==`SpinnakerInstanceProfileArn`].OutputValue' --output text)
We may want to export those variables. Otherwise they only temporarily exist in the console in which we issued those commands.
Here is the role just created, SpinnakerAuthRole:
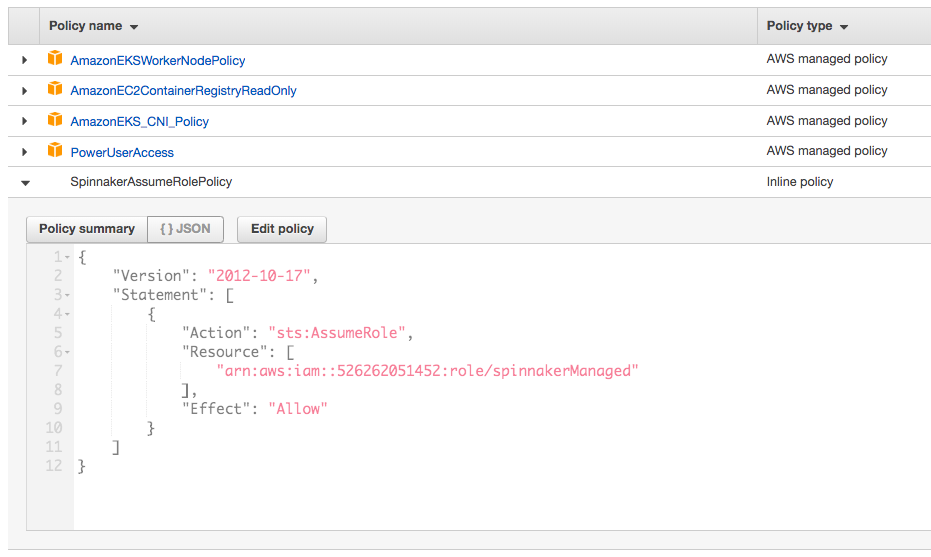
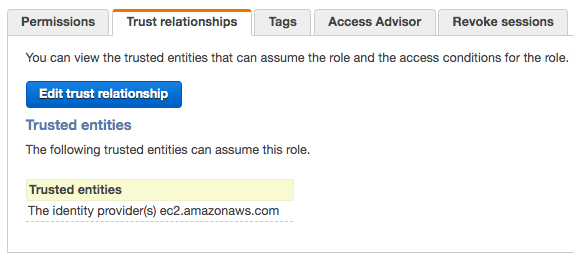
"Spinnaker supports adding multiple AWS accounts with some users reaching 100s of accounts in production. Spinnaker uses AWS assume roles to create resources in the target account and then passes the role to a target instance profile if it’s creating an instance resource.".
"In AWS, Spinnaker relies on IAM policies to access temporary keys into configured accounts by assuming a role. This allows an administrator to limit and audit the actions that Spinnaker is taking in configured accounts."
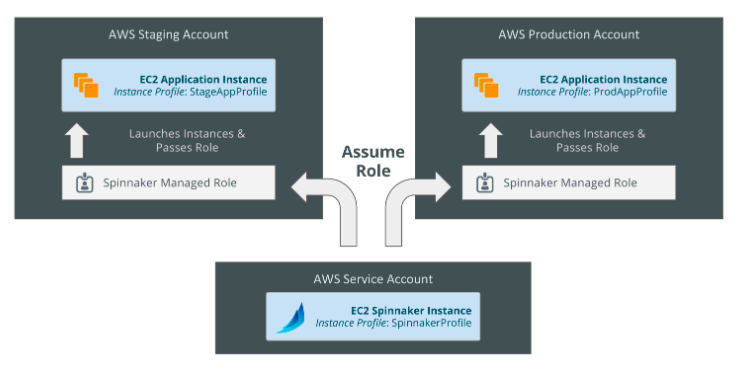
source: Spinnaker's Account Model
In the previous section, we created a SpinnakerInstanceProfile when we created EKS cluster.
In each of managed accounts, we need to create a IAM role that can be assumed by Spinnaker (this needs to be executed in managing account as well).:
$ curl -O https://d3079gxvs8ayeg.cloudfront.net/templates/managed.yaml
The template will create the spinnakerManaged "AWS::IAM::Role" that Spinnaker can use.
The manifest managed.yaml looks like this:
AWSTemplateFormatVersion: '2010-09-09'
Description: Setup AWS CloudProvider for Spinnaker
Parameters:
  AuthArn:
    Description: ARN which Spinnaker is using.
    It should be the ARN either of the IAM user or the EC2 Instance Role,
    which is used by Spinnaker in Managing Account
    Type: String
  ManagingAccountId:
    Description: AWS Account number, in which Spinnaker is running
    Type: String

Resources:

  SpinnakerManagedRole:
    Type: AWS::IAM::Role
    Properties:
      RoleName: spinnakerManaged
      AssumeRolePolicyDocument:
        Statement:
          - Action:
              - sts:AssumeRole
            Effect: Allow
            Principal:
              AWS: !Ref AuthArn
        Version: '2012-10-17'
      ManagedPolicyArns:
        - arn:aws:iam::aws:policy/PowerUserAccess
  SpinnakerManagedPolicy:
      Type: AWS::IAM::Policy
      Properties:
        Roles:
          - !Ref SpinnakerManagedRole
        PolicyDocument:
          Version: '2012-10-17'
          Statement:
            - Action: iam:PassRole
              Effect: Allow
              Resource: "*" # You should restrict this only to certain set of roles, if required
        PolicyName: SpinnakerPassRole
Note that we need to restrict the roles when we do "iam:PassRole". But in this post, we'll leave as it is.
Let's create the stack to create a IAM role that can be assumed by Spinnaker.
Now enter the following command to create the "spinnaker-managed-infrastructure-setup" stack in CloudFormation. Be sure to specify the values for "ManagingAccountId" and "AuthArn" values from our previous stack run:
$ aws cloudformation deploy --stack-name spinnaker-managed-infrastructure-setup --template-file managed.yaml \
--parameter-overrides AuthArn=$AUTH_ARN ManagingAccountId=$MANAGING_ACCOUNT_ID --capabilities CAPABILITY_NAMED_IAM
Waiting for changeset to be created..
Waiting for stack create/update to complete
Successfully created/updated stack - spinnaker-managed-infrastructure-setup

When we execute a kubectl command it makes a REST call to Kubernetes's API server and sends the token generated by heptio-authenticator-aws in the Authentication header.
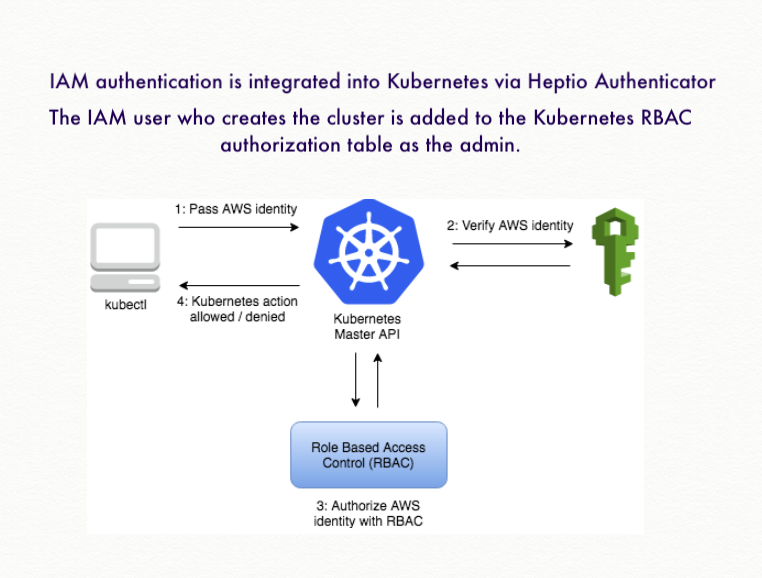
On the server side Kubernetes passes the token to a webhook to the aws-iam-authenticator process running on EKS host.
Install and configure kubectl and aws-iam-authenticator on the workstation/instance where we are running Halyard from.
Also, when an Amazon EKS cluster is created, the IAM entity (user or role) that creates the cluster is added to the Kubernetes RBAC authorization table as the administrator. Initially, only that IAM user can make calls to the Kubernetes API server using kubectl:
$ aws eks --region us-east-1 update-kubeconfig --name $EKS_CLUSTER_NAME
This will create/update ~/.kube/config file:
$ cat ~/.kube/config
apiVersion: v1
clusters:
- cluster:
    certificate-authority-data: LS0tLS1CRUdJTiB...
    server: https://F1B1A7BA3D22411C7ADDEDBEA94E74EE.yl4.us-east-1.eks.amazonaws.com
  name: arn:aws:eks:us-east-1:526262051452:cluster/my-spinnaker-cluster
contexts:
- context:
    cluster: arn:aws:eks:us-east-1:526262051452:cluster/my-spinnaker-cluster
    user: arn:aws:eks:us-east-1:526262051452:cluster/my-spinnaker-cluster
  name: arn:aws:eks:us-east-1:526262051452:cluster/my-spinnaker-cluster
current-context: arn:aws:eks:us-east-1:526262051452:cluster/my-spinnaker-cluster
kind: Config
preferences: {}
users:
- name: arn:aws:eks:us-east-1:526262051452:cluster/my-spinnaker-cluster
  user:
    exec:
      apiVersion: client.authentication.k8s.io/v1alpha1
      args:
      - token
      - -i
      - my-spinnaker-cluster
      command: aws-iam-authenticator
      env:
      - name: AWS_PROFILE
        value: eks
Basically, it did the following to our kubeconfig file, replaced <endpoint-url>, <base64-encoded-ca-cert> and <cluster-name> with values of $EKS_CLUSTER_ENDPOINT, $EKS_CLUSTER_CA_DATA and $EKS_CLUSTER_NAME as shown above.
$ aws sts get-caller-identity
{
    "Account": "526262051452",
    "UserId": "A...4",
    "Arn": "arn:aws:iam::5...2:user/k8s"
}

$ kubectl get svc
NAME         TYPE        CLUSTER-IP   EXTERNAL-IP   PORT(S)   AGE
kubernetes   ClusterIP   172.20.0.1   <none>        443/TCP   53m
Now we'll launch some AWS EC2 instances which will be our worker nodes for our Kubernetes cluster to manage.
The default template creates an auto-balancing collection of up to 3 worker nodes (instances). Additionally, the deployment command we'll be using below specifies t2.large instance types. But t2.medium seems to be working fine.
With the following commands, we'll launch worker nodes with EKS optimized AMIs:
$ curl -O https://d3079gxvs8ayeg.cloudfront.net/templates/amazon-eks-nodegroup.yaml
To create the worker nodes:
$ aws cloudformation deploy --stack-name spinnaker-eks-nodes --template-file amazon-eks-nodegroup.yaml \
--parameter-overrides NodeInstanceProfile=$SPINNAKER_INSTANCE_PROFILE_ARN \
NodeInstanceType=t2.large ClusterName=$EKS_CLUSTER_NAME NodeGroupName=my-spinnaker-cluster-nodes ClusterControlPlaneSecurityGroup=$CONTROL_PLANE_SG \
Subnets=$SUBNETS VpcId=$VPC_ID --capabilities CAPABILITY_NAMED_IAM
This will create the following resources:
  NodeSecurityGroup:
    Type: AWS::EC2::SecurityGroup

  NodeSecurityGroupIngress:
    Type: AWS::EC2::SecurityGroupIngress

  NodeSecurityGroupFromControlPlaneIngress:
    Type: AWS::EC2::SecurityGroupIngress

  ControlPlaneEgressToNodeSecurityGroup:
    Type: AWS::EC2::SecurityGroupEgress

  ClusterControlPlaneSecurityGroupIngress:
    Type: AWS::EC2::SecurityGroupIngress

  NodeGroup:
    Type: AWS::AutoScaling::AutoScalingGroup

  NodeLaunchConfig:
    Type: AWS::AutoScaling::LaunchConfiguration

Node Security Group:

Later, we'll open additional ports for inbound from anywhere (0.0.0.0/0) to expose some of the services (NodePort/LoadBalancer) to the outside.
In this section, we'll connect our newly-launched EC2 worker instances with the Spinnaker cluster.
We need to create a new configmap file, aws-auth-cm.yaml, as shown below.
Replace <spinnaker-role-arn> with the value of $AUTH_ARN:
apiVersion: v1
kind: ConfigMap
metadata:
  name: aws-auth
  namespace: kube-system
data:
  mapRoles: |
    - rolearn: <spinnaker-role-arn>
      username: system:node:{{EC2PrivateDNSName}}
      groups:
        - system:bootstrappers
        - system:nodes
To join the worker nodes with the EKS cluster, apply the role mapping by issuing the kubectl apply command:
$ kubectl get nodes
No resources found.

$ kubectl apply -f aws-auth-cm.yaml
configmap/aws-auth created

$ kubectl get nodes
NAME                            STATUS    ROLES     AGE       VERSION
ip-10-100-10-35.ec2.internal   Ready   <none>    18s       v1.10.3
ip-10-100-11-60.ec2.internal   Ready   <none>    15s       v1.10.3
ip-10-100-11-86.ec2.internal   Ready   <none>    16s       v1.10.3

$ kubectl config get-contexts
CURRENT   NAME                                                       CLUSTER                                                    AUTHINFO                                                          NAMESPACE
*         arn:aws:eks:us-east-1:5...2:cluster/my-spinnaker-cluster   arn:aws:eks:us-east-1:5...2:cluster/my-spinnaker-cluster   arn:aws:eks:us-east-1:5...2:cluster/my-spinnaker-cluster

$ kubens
default
kube-public
kube-system
Once all nodes have a Ready STATUS we're all set to deploy Spinnaker.
With distributed installation, Halyard deploys each of Spinnaker's microservices separately.
Spinnaker is deployed to a remote cloud, with each microservice deployed independently. Halyard creates a smaller, headless Spinnaker to update our Spinnaker and its microservices, ensuring zero-downtime updates.
Run the following command, using the $ACCOUNT name we created when we configured the provider:
$ echo $MY_K8_ACCOUNT
my-spinnaker-to-eks-k8s

$ hal config deploy edit --type distributed --account-name $MY_K8_ACCOUNT
+ Get current deployment
  Success
+ Get the deployment environment
  Success
+ Edit the deployment environment
  Success
+ Successfully updated your deployment environment.
We need to ensure Halyard deploys Spinnaker in a distributed fashion among our Kubernetes cluster. Without this step, the default configuration is to deploy Spinnaker onto the local machine. Check ~/.hal/config:
  deploymentEnvironment:
    size: SMALL
    type: Distributed
    accountName: my-spinnaker-to-eks-k8s
    updateVersions: true
    consul:
      enabled: false
    vault:
      enabled: false
    customSizing: {}
    sidecars: {}
    initContainers: {}
    hostAliases: {}
    nodeSelectors: {}
    gitConfig:
      upstreamUser: spinnaker
    haServices:
      clouddriver:
        enabled: false
        disableClouddriverRoDeck: false
      echo:
        enabled: false
Spinnaker requires an external storage provider for persisting our Application settings and configured Pipelines.
minio
Actually, my "minio" pod is keep failing and stays in Pending status. So, I chose to use S3 instead (see the later part of this section for S3 persistent storage setup).
For the Helm including install and tiller, please check Using Helm with Amazon EKS. Actually, I needed tiller on my MacOS to set up Minio:
$ kubectl create namespace tiller
namespace/tiller created

$ kubectl get ns
NAME          STATUS    AGE
default       Active    1h
kube-public   Active    1h
kube-system   Active    1h
spinnaker     Active    4m
tiller        Active    1m
Then, in another terminal (tiller server terminal):
$ export TILLER_NAMESPACE=tiller

$ tiller -listen=localhost:44134 -storage=secret -logtostderr
Then, back in the helm client terminal window, set the HELM_HOST environment variable to :44134, initialize the helm client, and then verify that helm is communicating with the tiller server properly:
$ export HELM_HOST=:44134

$ helm init --client-only
$HELM_HOME has been configured at /Users/kihyuckhong/.helm.
Not installing Tiller due to 'client-only' flag having been set
Happy Helming!

$ helm repo update
Hang tight while we grab the latest from your chart repositories...
...Skip local chart repository
...Successfully got an update from the "datawire" chart repository
...Successfully got an update from the "jenkins-x" chart repository
...Successfully got an update from the "stable" chart repository
Update Complete. ⎈ Happy Helming!⎈
Let's use Helm to install a simple instance of Minio:
$ helm install --namespace spinnaker --name minio \
--set accessKey=$MINIO_ACCESS_KEY --set secretKey=$MINIO_SECRET_KEY \
stable/minio
MINIO_SECRET_KEY stable/minio
NAME:   minio
LAST DEPLOYED: Thu Apr  4 21:50:37 2019
NAMESPACE: spinnaker
STATUS: DEPLOYED

RESOURCES:
==> v1/Pod(related)
NAME                    READY  STATUS   RESTARTS  AGE
minio-68bb78db6b-l4tc4  0/1    Pending  0         2s

==> v1/Secret
NAME   TYPE    DATA  AGE
minio  Opaque  2     3s

==> v1/ConfigMap
NAME   DATA  AGE
minio  1     2s

==> v1/PersistentVolumeClaim
NAME   STATUS   VOLUME  CAPACITY  ACCESS MODES  STORAGECLASS  AGE
minio  Pending  2s

==> v1/Service
NAME   TYPE       CLUSTER-IP     EXTERNAL-IP  PORT(S)   AGE
minio  ClusterIP  172.20.246.67  <none>       9000/TCP  2s

==> v1beta2/Deployment
NAME   DESIRED  CURRENT  UP-TO-DATE  AVAILABLE  AGE
minio  1        1        1           0          2s


NOTES:

Minio can be accessed via port 9000 on the following DNS name from within your cluster:
minio.spinnaker.svc.cluster.local

To access Minio from localhost, run the below commands:

  1. export POD_NAME=$(kubectl get pods --namespace spinnaker -l "release=minio" -o jsonpath="{.items[0].metadata.name}")

  2. kubectl port-forward $POD_NAME 9000 --namespace spinnaker

Read more about port forwarding here: http://kubernetes.io/docs/user-guide/kubectl/kubectl_port-forward/

You can now access Minio server on http://localhost:9000. Follow the below steps to connect to Minio server with mc client:

  1. Download the Minio mc client - https://docs.minio.io/docs/minio-client-quickstart-guide

  2. mc config host add minio-local http://localhost:9000 minio_access_key minio_secret_key S3v4

  3. mc ls minio-local

Alternately, you can use your browser or the Minio SDK to access the server - https://docs.minio.io/categories/17
Not in our case, but if we ever need to delete the "minio", we can use the following command:
$ helm delete --purge minio
release "minio" deleted
According to the Spinnaker docs, Minio does not support versioning objects. So let's disable versioning under Halyard configuration. Run these commands:
$ mkdir ~/.hal/default/profiles && \
  touch ~/.hal/default/profiles/front50-local.yml
Add the following to the front50-local.yml file:
spinnaker.s3.versioning: false
Now run the following command to configure the storage provider:
$ echo $MINIO_SECRET_KEY | \
     hal config storage s3 edit --endpoint http://minio:9000 \
         --access-key-id $MINIO_ACCESS_KEY \
         --secret-access-key
+ Get current deployment
  Success
+ Get persistent store
  Success
+ Edit persistent store
  Success
+ Successfully edited persistent store "s3".
Finally, let's enable the S3 storage provider:
$ hal config storage edit --type s3
+ Get current deployment
  Success
+ Get persistent storage settings
  Success
+ Edit persistent storage settings
  Success
+ Successfully edited persistent storage.
The outcome in ~/.hal/config:
  persistentStorage:
    persistentStoreType: s3
    azs: {}
    gcs:
      rootFolder: front50
    redis: {}
    s3:
      bucket: k8s-bogo-eks
      rootFolder: front50
      region: us-west-1
      endpoint: http://minio:9000
      accessKeyId: m...y
      secretAccessKey: m...y
    oracle: {}
However, for some reason, the "minio" pod stays in "Pending" status because it has unbound PersistentVolumeClaims:
$ kubectl get pods -o wide -n spinnaker
NAME                                READY     STATUS    RESTARTS   AGE       IP              NODE
minio-68bb78db6b-l4tc4              0/1       Pending   0          33m       <none>          <none>
S3
So, we want to go for S3 instead:
$ echo $AWS_SECRET_ACCESS_KEY | \
hal config storage s3 edit \
    --access-key-id $AWS_ACCESS_KEY_ID \
    --secret-access-key \
    --region us-west-1 --bucket k8s-bogo-eks-2
+ Get current deployment
  Success
+ Get persistent store
  Success
+ Edit persistent store
  Success
+ Successfully edited persistent store "s3".
Again, set the storage source to S3:
$ hal config storage edit --type s3
+ Get current deployment
  Success
+ Get persistent storage settings
  Success
- No changes supplied.
Here is the updated ~/.hal/config:
  persistentStorage:
    persistentStoreType: s3
    azs: {}
    gcs:
      rootFolder: front50
    redis: {}
    s3:
      bucket: k8s-bogo-eks-2
      rootFolder: front50
      region: us-west-1
      accessKeyId: A...F
      secretAccessKey: o...R
    oracle: {}
Note the region "us-west-1". Actually, what we wanted is "us-east-1" but it didn't work.
Now that we've enabled a Cloud Providers, picked a Deployment Environment, and configured Persistent Storage, we're ready to pick a version of Spinnaker, deploy it, and connect to it.
We need to select a specific version of Spinnaker and configure Halyard so it knows which version to deploy. We can view the available versions.
$ hal version list
+ Get current deployment
  Success
+ Get Spinnaker version
  Success
+ Get released versions
  Success
+ You are on version "", and the following are available:
 - 1.11.12 (Cobra Kai):
   Changelog: https://gist.github.com/spinnaker-release/12abde4a1f722164b50a2c77fb898cc0
   Published: Fri Mar 01 09:46:38 PST 2019
   (Requires Halyard >= 1.11)
 - 1.12.9 (Unbreakable):
   Changelog: https://gist.github.com/spinnaker-release/73fa0d0112cb49c8e58bf463a6cb5e3a
   Published: Mon Apr 01 06:48:25 PDT 2019
   (Requires Halyard >= 1.11)
 - 1.13.2 (BirdBox):
   Changelog: https://gist.github.com/spinnaker-release/fa0ac36aaf1a7daaa4320241beaf435d
   Published: Tue Apr 02 11:46:21 PDT 2019
   (Requires Halyard >= 1.17)
Let's pick the latest version number from the list and update Halyard:
$ hal config version edit --version 1.13.2
+ Get current deployment
  Success
+ Edit Spinnaker version
  Success
+ Spinnaker has been configured to update/install version "1.13.2".
  Deploy this version of Spinnaker with `hal deploy apply`.
The "deployment environment" in ~/.hal/config:
  deploymentEnvironment:
    size: SMALL
    type: Distributed
    accountName: my-spinnaker-to-eks-k8s
    updateVersions: true
    consul:
      enabled: false
    vault:
      enabled: false
    location: spinnaker
    customSizing: {}
    sidecars: {}
    initContainers: {}
    hostAliases: {}
    nodeSelectors: {}
    gitConfig:
      upstreamUser: spinnaker
    haServices:
      clouddriver:
        enabled: false
        disableClouddriverRoDeck: false
      echo:
        enabled: false
Now, it's time to deploy Spinnaker via hal deploy apply using all the configuration settings we've previously applied.
Initially, I failed to deploy Spinnaker, and here is one of the outputs (during this post, I got couple of different kinds errors related to hal not picking up changes made in config which is in ~/.hal/config):
$ hal deploy apply
+ Get current deployment
  Success
+ Prep deployment
  Success
Problems in default.security:
- WARNING Your UI or API domain does not have override base URLs
  set even though your Spinnaker deployment is a Distributed deployment on a
  remote cloud provider. As a result, you will need to open SSH tunnels against
  that deployment to access Spinnaker.
? We recommend that you instead configure an authentication
  mechanism (OAuth2, SAML2, or x509) to make it easier to access Spinnaker
  securely, and then register the intended Domain and IP addresses that your
  publicly facing services will be using.

+ Preparation complete... deploying Spinnaker
+ Get current deployment
  Success
- Apply deployment
  Failure
- Deploy spin-redis
  Failure
- Deploy spin-clouddriver
  Failure
- Deploy spin-front50
  Failure
- Deploy spin-orca
  Failure
- Deploy spin-deck
  Failure
- Deploy spin-echo
  Failure
- Deploy spin-gate
  Failure
- Deploy spin-rosco
  Failure
Problems in Global:
! ERROR Failed check for Namespace/spinnaker in null
error: the server doesn't have a resource type "Namespace"


- Failed to deploy Spinnaker.
So, there are some ways two fix the Spinnaker deploying issues:
-
Spent some time on the issue, found we need to restart the hal as describe in the https://www.spinnaker.io/setup/install/environment/#distributed-installation. I skipped the step earlier:
...you might need to update the $PATH to ensure Halyard can find it, and if Halyard was already running you might need to restart it to pick up the new $PATH:...
$ hal shutdown
Halyard Daemon Response: Shutting down, bye...
-
Most of the cases of failing in pods deploy, this will work.
$ hal deploy clean
This command cannot be undone. Do you want to continue? (y/N) y
+ Get current deployment
  Success
+ Clean Deployment of Spinnaker
  Success
+ Successfully removed Spinnaker.
Finally, here is the output for a successful Spinnaker deploy:
$ hal deploy apply
+ Get current deployment
  Success
+ Prep deployment
  Success
Problems in default.security:
- WARNING Your UI or API domain does not have override base URLs
  set even though your Spinnaker deployment is a Distributed deployment on a
  remote cloud provider. As a result, you will need to open SSH tunnels against
  that deployment to access Spinnaker.
? We recommend that you instead configure an authentication
  mechanism (OAuth2, SAML2, or x509) to make it easier to access Spinnaker
  securely, and then register the intended Domain and IP addresses that your
  publicly facing services will be using.

+ Preparation complete... deploying Spinnaker
+ Get current deployment
  Success
+ Apply deployment
  Success
+ Deploy spin-redis
  Success
+ Deploy spin-clouddriver
  Success
+ Deploy spin-front50
  Success
+ Deploy spin-orca
  Success
+ Deploy spin-deck
  Success
+ Deploy spin-echo
  Success
+ Deploy spin-gate
  Success
+ Deploy spin-rosco
  Success
+ Run `hal deploy connect` to connect to Spinnaker.
Spinnaker is composed of a number of independent microservices, and here are the descriptions for the services that are deployed:
-
Deck is the UI for interactive and visualizing the state of cloud resources. It is written entirely in Angular and depends on Gate to interact with the cloud providers.
-
Gate is the API gateway. All communication between the UI and the back-end services happen through Gate. We can find a list of the endpoints available through Swagger:
http://${GATE_HOST}:8084/swagger-ui.html -
Orca is responsible for the orchestration of pipelines, stages and tasks within Spinnaker. Pipelines are composed of stages and stages are composed of tasks.
-
Clouddriver is a core component of Spinnaker which facilitates the interactions between a given cloud provider such as AWS, GCP or Kubernetes. There is a common interface that is used so that additional cloud providers can be added.
-
Front50 is the persistent datastore for Spinnaker applications, pipelines, configuration, projects, and notifications.
-
Rosco is the bakery. It produces immutable VM images (or image templates) for various cloud providers.
It is used to produce machine images (for example GCE images, AWS AMIs, Azure VM images). It currently wraps packer, but will be expanded to support additional mechanisms for producing images.
-
Echo is Spinnaker’s eventing bus.
It supports sending notifications (e.g. Slack, email, Hipchat, SMS), and acts on incoming webhooks from services like Github.
- Igor (not deployed in this post) is a wrapper API which communicates with Jenkins. It is responsible for kicking-off jobs and reporting the state of running or completing jobs.
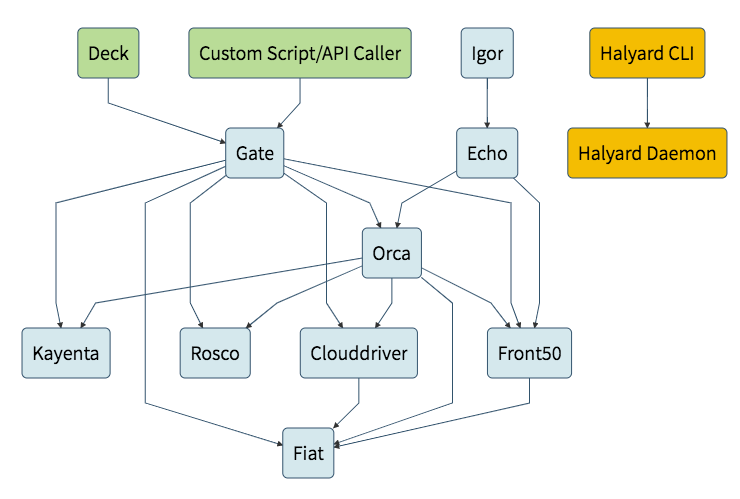
For more about the services including the ones not deployed here: check https://www.spinnaker.io/reference/architecture/
$ kubectl get svc --all-namespaces
NAMESPACE     NAME               TYPE        CLUSTER-IP       EXTERNAL-IP   PORT(S)         AGE
default       kubernetes         ClusterIP   172.20.0.1       <none>        443/TCP         1h
kube-system   kube-dns           ClusterIP   172.20.0.10      <none>        53/UDP,53/TCP   1h
spinnaker     spin-clouddriver   ClusterIP   172.20.186.192   <none>        7002/TCP        3m
spinnaker     spin-deck          ClusterIP   172.20.170.164   <none>        9000/TCP        3m
spinnaker     spin-echo          ClusterIP   172.20.108.184   <none>        8089/TCP        3m
spinnaker     spin-front50       ClusterIP   172.20.131.20    <none>        8080/TCP        3m
spinnaker     spin-gate          ClusterIP   172.20.5.141     <none>        8084/TCP        3m
spinnaker     spin-orca          ClusterIP   172.20.32.174    <none>        8083/TCP        3m
spinnaker     spin-redis         ClusterIP   172.20.198.249   <none>        6379/TCP        3m
spinnaker     spin-rosco         ClusterIP   172.20.55.101    <none>        8087/TCP        3m

$ kubectl get pods -n spinnaker -o wide
NAME                                READY     STATUS    RESTARTS   AGE       IP              NODE
spin-clouddriver-8497f9b4ff-lkdrk   1/1       Running   0          2m        10.100.10.93    ip-10-100-10-24.ec2.internal
spin-deck-5c9d4fddd4-jcr6h          1/1       Running   0          2m        10.100.11.148   ip-10-100-11-174.ec2.internal
spin-echo-867884bb84-p275f          1/1       Running   0          2m        10.100.10.48    ip-10-100-10-24.ec2.internal
spin-front50-fd9c8f948-7cxnz        1/1       Running   0          2m        10.100.10.249   ip-10-100-10-22.ec2.internal
spin-gate-568dd8f68d-tr85n          1/1       Running   0          2m        10.100.11.223   ip-10-100-11-174.ec2.internal
spin-orca-7c7f69fc6d-7lw4z          1/1       Running   0          2m        10.100.10.103   ip-10-100-10-22.ec2.internal
spin-redis-6789d6dbf-p992v          1/1       Running   0          2m        10.100.10.107   ip-10-100-10-22.ec2.internal
spin-rosco-9dbb6c4d4-dnvs2          1/1       Running   0          2m        10.100.11.105   ip-10-100-11-174.ec2.internal
Issue the hal deploy connect command to provide port forwarding on our local machine to the Kubernetes cluster running Spinnaker, then open http://localhost:9000 to make sure everything is up and running.
$ hal deploy connect
+ Get current deployment
  Success
+ Connect to Spinnaker deployment.
  Success
Forwarding from 127.0.0.1:8084 -> 8084
Forwarding from [::1]:8084 -> 8084
Forwarding from 127.0.0.1:9000 -> 9000
Forwarding from [::1]:9000 -> 9000
This command automatically forwards ports 9000 (Deck UI) and 8084 (Gate API service).
Navigate to http://localhost:9000:
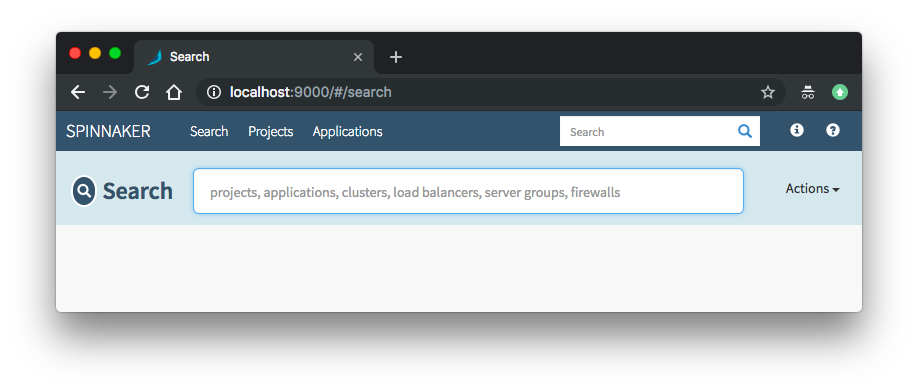
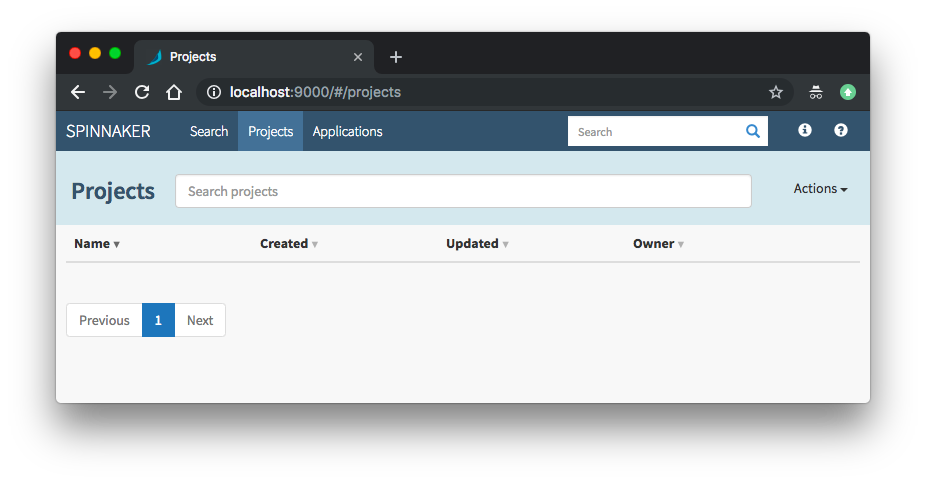
We need to expose the Spinnaker UI (spin-deck) and Gateway (spin-gate) services in order to interact with the Spinnaker dashboard and start creating pipelines from outside.
When we deployed Spinnaker using Halyard, a number of Kubernetes services get created in the "spinnaker" namespace. These services are by default exposed within the cluster (type is "ClusterIP").
Let's change the service type of the services UI and API services of Spinnaker to "NodePort" to make them available to end users outside the Kubernetes cluster.
spin-deck service:
$ kubectl edit svc spin-deck -n spinnaker
...
spec:
  clusterIP: 172.20.31.231
  externalTrafficPolicy: Cluster
  ports:
  - nodePort: 30900
    port: 9000
    protocol: TCP
    targetPort: 9000
  selector:
    app: spin
    cluster: spin-deck
  sessionAffinity: None
  type: NodePort
status:
...
Now, edit the Gate service to bind a node port. This means every node in our Kubernetes cluster will forward traffic from that node port to our Spinnaker spin-gate service:
$ kubectl edit svc spin-gate -n spinnaker
...
spec:
  clusterIP: 172.20.45.205
  ports:
  - port: 8084
    protocol: TCP
    targetPort: 8084
    nodePort: 30808
  selector:
    app: spin
    cluster: spin-gate
  sessionAffinity: None
  type: NodePort
status:
...
Because we'll be using port 30900 and 30808, UI(Deck) and API(Gate), respectively, we need to updated Security group for our worker nodes. Login to the AWS console and find the nodes, editing its security group by adding one more inbound rule:
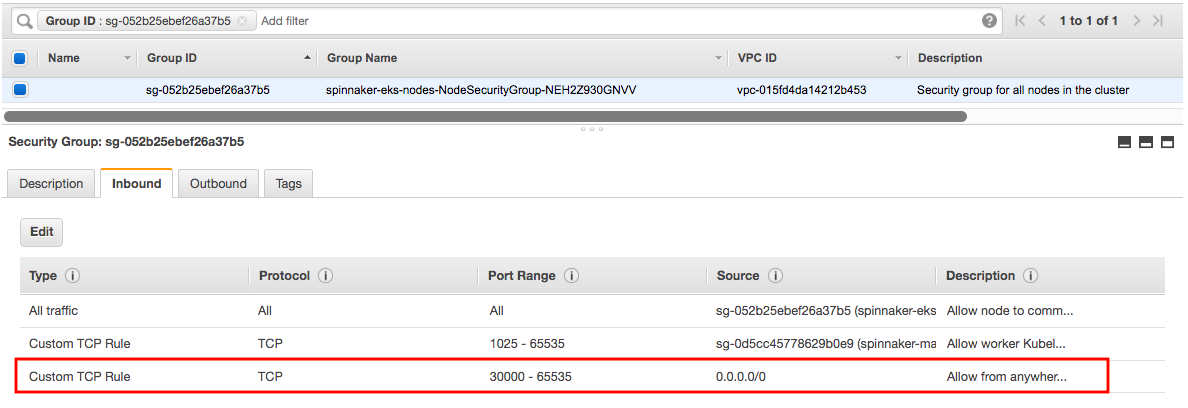
Now pick any node in the cluster and save its IP as $SPIN_HOST which will be used to access Spinnaker in an environment variable $SPIN_HOST.
Using Halyard, configure the UI and API services to receive incoming requests. We need both of the following:
$ hal config security ui edit \
    --override-base-url "http://$SPIN_HOST:30900"

$ hal config security api edit \
    --override-base-url "http://$SPIN_HOST:30808"
Redeploy Spinnaker to pickup the configuration changes:
$ hal deploy apply
spin-deck via NodePort service:
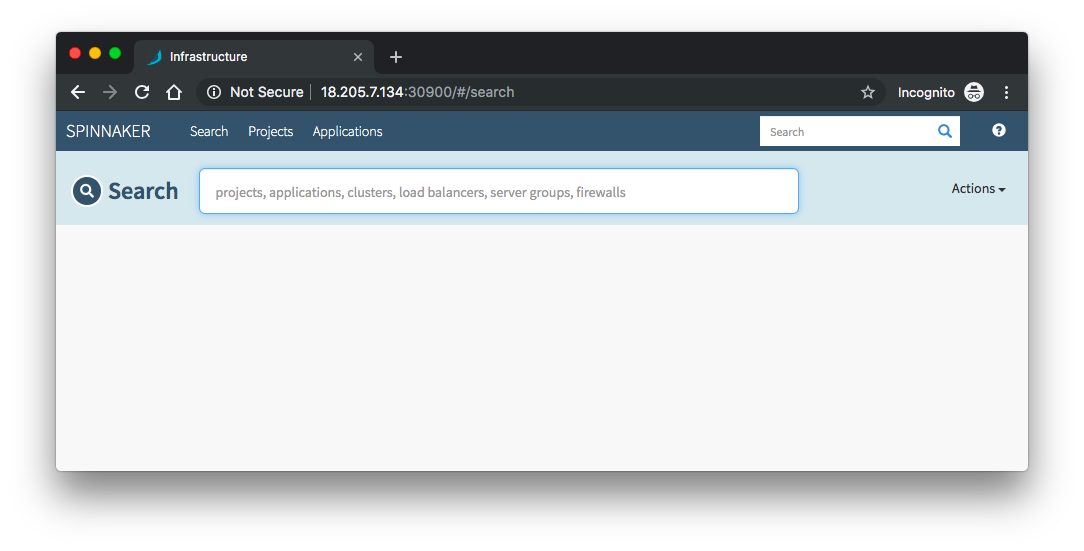
We need to expose the Spinnaker UI and Gateway services in order to interact with the Spinnaker dashboard and start creating pipelines.
When we deployed Spinnaker using Halyard, a number of Kubernetes services get created in the spinnaker namespace. These services are by default exposed within the cluster (type is ClusterIP):
...
spinnaker     spin-deck          ClusterIP   172.20.174.152   <none>        9000/TCP        6m
spinnaker     spin-gate          ClusterIP   172.20.131.252   <none>        8084/TCP        6m
...
While there are many ways to expose Spinnaker, we'll start by creating LoadBalancer Services which will expose the API (Gate) and the UI (Deck) via a Load Balancer in our cloud provider. We'll do this by running the commands below and creating the spin-gate-public and spin-deck-public Services.
Note that we've using "spinnaker" as a NAMESPACE which is the Kubernetes namespace where our Spinnaker install is located. Halyard defaults to spinnaker unless explicitly overridden.
$ export NAMESPACE=spinnaker

$ kubectl -n ${NAMESPACE} expose service spin-gate --type LoadBalancer \
  --port 80 \
  --target-port 8084 \
  --name spin-gate-public
service/spin-gate-public exposed

$ kubectl -n ${NAMESPACE} expose service spin-deck --type LoadBalancer \
  --port 80 \
  --target-port 9000 \
  --name spin-deck-public
service/spin-deck-public exposed
Once these Services have been created, we'll need to update our Spinnaker deployment so that the UI understands where the API is located.
To do this, we'll use Halyard to override the base URL for both the API and the UI and then redeploy Spinnaker.
# use the newly created LBs
$ export API_URL=$(kubectl -n $NAMESPACE get svc spin-gate-public -o jsonpath='{.status.loadBalancer.ingress[0].hostname}')

$ export UI_URL=$(kubectl -n $NAMESPACE get svc spin-deck-public -o jsonpath='{.status.loadBalancer.ingress[0].hostname}')
We can check the URL from services:
$ kubectl get svc -n spinnaker
NAME               TYPE           CLUSTER-IP       EXTERNAL-IP                                                               PORT(S)        AGE
spin-clouddriver   ClusterIP      172.20.23.54     <none>                                                                    7002/TCP       22m
spin-deck          ClusterIP      172.20.174.152   <none>                                                                    9000/TCP       22m
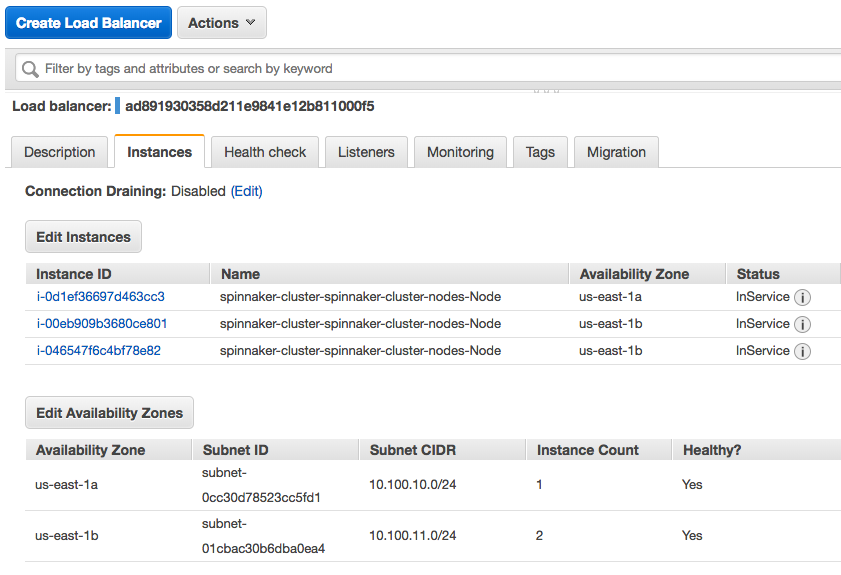
spin-deck-public   LoadBalancer   172.20.219.144   ad891930358d211e9841e12b811000f5-1358664794.us-east-1.elb.amazonaws.com   80:32664/TCP   9m
spin-echo          ClusterIP      172.20.44.242    <none>                                                                    8089/TCP       22m
spin-front50       ClusterIP      172.20.56.234    <none>                                                                    8080/TCP       22m
spin-gate          ClusterIP      172.20.131.252   <none>                                                                    8084/TCP       22m
spin-gate-public   LoadBalancer   172.20.179.40    a8b318ae058d311e9841e12b811000f5-1884802740.us-east-1.elb.amazonaws.com   80:31345/TCP   11m
spin-orca          ClusterIP      172.20.86.145    <none>                                                                    8083/TCP       22m
spin-redis         ClusterIP      172.20.221.236   <none>                                                                    6379/TCP       22m
spin-rosco         ClusterIP      172.20.167.9     <none>                                                                    8087/TCP       22m
spin-deck-public:
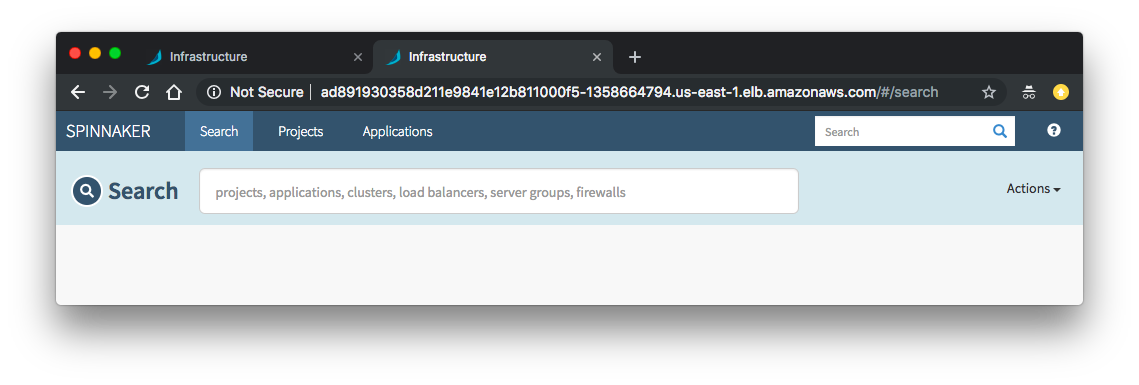
Here is the console screen shot for the load balancer:
To cleanup Spinnaker deployments:
$ hal deploy clean
This command cannot be undone. Do you want to continue? (y/N) y
+ Get current deployment
  Success
+ Clean Deployment of Spinnaker
  Success
+ Successfully removed Spinnaker.

$ kubectl delete ns spinnaker --grace-period=0
Clean up worker nodes, role/policies, and EKS cluster:
$ aws cloudformation delete-stack --stack-name spinnaker-eks-nodes

$ aws cloudformation delete-stack --stack-name spinnaker-managed-infrastructure-setup

$ aws cloudformation delete-stack --stack-name spinnaker-managing-infrastructure-setup
Docker & K8s
- Docker install on Amazon Linux AMI
- Docker install on EC2 Ubuntu 14.04
- Docker container vs Virtual Machine
- Docker install on Ubuntu 14.04
- Docker Hello World Application
- Nginx image - share/copy files, Dockerfile
- Working with Docker images : brief introduction
- Docker image and container via docker commands (search, pull, run, ps, restart, attach, and rm)
- More on docker run command (docker run -it, docker run --rm, etc.)
- Docker Networks - Bridge Driver Network
- Docker Persistent Storage
- File sharing between host and container (docker run -d -p -v)
- Linking containers and volume for datastore
- Dockerfile - Build Docker images automatically I - FROM, MAINTAINER, and build context
- Dockerfile - Build Docker images automatically II - revisiting FROM, MAINTAINER, build context, and caching
- Dockerfile - Build Docker images automatically III - RUN
- Dockerfile - Build Docker images automatically IV - CMD
- Dockerfile - Build Docker images automatically V - WORKDIR, ENV, ADD, and ENTRYPOINT
- Docker - Apache Tomcat
- Docker - NodeJS
- Docker - NodeJS with hostname
- Docker Compose - NodeJS with MongoDB
- Docker - Prometheus and Grafana with Docker-compose
- Docker - StatsD/Graphite/Grafana
- Docker - Deploying a Java EE JBoss/WildFly Application on AWS Elastic Beanstalk Using Docker Containers
- Docker : NodeJS with GCP Kubernetes Engine
- Docker : Jenkins Multibranch Pipeline with Jenkinsfile and Github
- Docker : Jenkins Master and Slave
- Docker - ELK : ElasticSearch, Logstash, and Kibana
- Docker - ELK 7.6 : Elasticsearch on Centos 7
- Docker - ELK 7.6 : Filebeat on Centos 7
- Docker - ELK 7.6 : Logstash on Centos 7
- Docker - ELK 7.6 : Kibana on Centos 7
- Docker - ELK 7.6 : Elastic Stack with Docker Compose
- Docker - Deploy Elastic Cloud on Kubernetes (ECK) via Elasticsearch operator on minikube
- Docker - Deploy Elastic Stack via Helm on minikube
- Docker Compose - A gentle introduction with WordPress
- Docker Compose - MySQL
- MEAN Stack app on Docker containers : micro services
- MEAN Stack app on Docker containers : micro services via docker-compose
- Docker Compose - Hashicorp's Vault and Consul Part A (install vault, unsealing, static secrets, and policies)
- Docker Compose - Hashicorp's Vault and Consul Part B (EaaS, dynamic secrets, leases, and revocation)
- Docker Compose - Hashicorp's Vault and Consul Part C (Consul)
- Docker Compose with two containers - Flask REST API service container and an Apache server container
- Docker compose : Nginx reverse proxy with multiple containers
- Docker & Kubernetes : Envoy - Getting started
- Docker & Kubernetes : Envoy - Front Proxy
- Docker & Kubernetes : Ambassador - Envoy API Gateway on Kubernetes
- Docker Packer
- Docker Cheat Sheet
- Docker Q & A #1
- Kubernetes Q & A - Part I
- Kubernetes Q & A - Part II
- Docker - Run a React app in a docker
- Docker - Run a React app in a docker II (snapshot app with nginx)
- Docker - NodeJS and MySQL app with React in a docker
- Docker - Step by Step NodeJS and MySQL app with React - I
- Installing LAMP via puppet on Docker
- Docker install via Puppet
- Nginx Docker install via Ansible
- Apache Hadoop CDH 5.8 Install with QuickStarts Docker
- Docker - Deploying Flask app to ECS
- Docker Compose - Deploying WordPress to AWS
- Docker - WordPress Deploy to ECS with Docker-Compose (ECS-CLI EC2 type)
- Docker - WordPress Deploy to ECS with Docker-Compose (ECS-CLI Fargate type)
- Docker - ECS Fargate
- Docker - AWS ECS service discovery with Flask and Redis
- Docker & Kubernetes : minikube
- Docker & Kubernetes 2 : minikube Django with Postgres - persistent volume
- Docker & Kubernetes 3 : minikube Django with Redis and Celery
- Docker & Kubernetes 4 : Django with RDS via AWS Kops
- Docker & Kubernetes : Kops on AWS
- Docker & Kubernetes : Ingress controller on AWS with Kops
- Docker & Kubernetes : HashiCorp's Vault and Consul on minikube
- Docker & Kubernetes : HashiCorp's Vault and Consul - Auto-unseal using Transit Secrets Engine
- Docker & Kubernetes : Persistent Volumes & Persistent Volumes Claims - hostPath and annotations
- Docker & Kubernetes : Persistent Volumes - Dynamic volume provisioning
- Docker & Kubernetes : DaemonSet
- Docker & Kubernetes : Secrets
- Docker & Kubernetes : kubectl command
- Docker & Kubernetes : Assign a Kubernetes Pod to a particular node in a Kubernetes cluster
- Docker & Kubernetes : Configure a Pod to Use a ConfigMap
- AWS : EKS (Elastic Container Service for Kubernetes)
- Docker & Kubernetes : Run a React app in a minikube
- Docker & Kubernetes : Minikube install on AWS EC2
- Docker & Kubernetes : Cassandra with a StatefulSet
- Docker & Kubernetes : Terraform and AWS EKS
- Docker & Kubernetes : Pods and Service definitions
- Docker & Kubernetes : Service IP and the Service Type
- Docker & Kubernetes : Kubernetes DNS with Pods and Services
- Docker & Kubernetes : Headless service and discovering pods
- Docker & Kubernetes : Scaling and Updating application
- Docker & Kubernetes : Horizontal pod autoscaler on minikubes
- Docker & Kubernetes : From a monolithic app to micro services on GCP Kubernetes
- Docker & Kubernetes : Rolling updates
- Docker & Kubernetes : Deployments to GKE (Rolling update, Canary and Blue-green deployments)
- Docker & Kubernetes : Slack Chat Bot with NodeJS on GCP Kubernetes
- Docker & Kubernetes : Continuous Delivery with Jenkins Multibranch Pipeline for Dev, Canary, and Production Environments on GCP Kubernetes
- Docker & Kubernetes : NodePort vs LoadBalancer vs Ingress
- Docker & Kubernetes : MongoDB / MongoExpress on Minikube
- Docker & Kubernetes : Load Testing with Locust on GCP Kubernetes
- Docker & Kubernetes : MongoDB with StatefulSets on GCP Kubernetes Engine
- Docker & Kubernetes : Nginx Ingress Controller on Minikube
- Docker & Kubernetes : Setting up Ingress with NGINX Controller on Minikube (Mac)
- Docker & Kubernetes : Nginx Ingress Controller for Dashboard service on Minikube
- Docker & Kubernetes : Nginx Ingress Controller on GCP Kubernetes
- Docker & Kubernetes : Kubernetes Ingress with AWS ALB Ingress Controller in EKS
- Docker & Kubernetes : Setting up a private cluster on GCP Kubernetes
- Docker & Kubernetes : Kubernetes Namespaces (default, kube-public, kube-system) and switching namespaces (kubens)
- Docker & Kubernetes : StatefulSets on minikube
- Docker & Kubernetes : RBAC
- Docker & Kubernetes Service Account, RBAC, and IAM
- Docker & Kubernetes - Kubernetes Service Account, RBAC, IAM with EKS ALB, Part 1
- Docker & Kubernetes : Helm Chart
- Docker & Kubernetes : My first Helm deploy
- Docker & Kubernetes : Readiness and Liveness Probes
- Docker & Kubernetes : Helm chart repository with Github pages
- Docker & Kubernetes : Deploying WordPress and MariaDB with Ingress to Minikube using Helm Chart
- Docker & Kubernetes : Deploying WordPress and MariaDB to AWS using Helm 2 Chart
- Docker & Kubernetes : Deploying WordPress and MariaDB to AWS using Helm 3 Chart
- Docker & Kubernetes : Helm Chart for Node/Express and MySQL with Ingress
- Docker & Kubernetes : Deploy Prometheus and Grafana using Helm and Prometheus Operator - Monitoring Kubernetes node resources out of the box
- Docker & Kubernetes : Deploy Prometheus and Grafana using kube-prometheus-stack Helm Chart
- Docker & Kubernetes : Istio (service mesh) sidecar proxy on GCP Kubernetes
- Docker & Kubernetes : Istio on EKS
- Docker & Kubernetes : Istio on Minikube with AWS EC2 for Bookinfo Application
- Docker & Kubernetes : Deploying .NET Core app to Kubernetes Engine and configuring its traffic managed by Istio (Part I)
- Docker & Kubernetes : Deploying .NET Core app to Kubernetes Engine and configuring its traffic managed by Istio (Part II - Prometheus, Grafana, pin a service, split traffic, and inject faults)
- Docker & Kubernetes : Helm Package Manager with MySQL on GCP Kubernetes Engine
- Docker & Kubernetes : Deploying Memcached on Kubernetes Engine
- Docker & Kubernetes : EKS Control Plane (API server) Metrics with Prometheus
- Docker & Kubernetes : Spinnaker on EKS with Halyard
- Docker & Kubernetes : Continuous Delivery Pipelines with Spinnaker and Kubernetes Engine
- Docker & Kubernetes : Multi-node Local Kubernetes cluster : Kubeadm-dind (docker-in-docker)
- Docker & Kubernetes : Multi-node Local Kubernetes cluster : Kubeadm-kind (k8s-in-docker)
- Docker & Kubernetes : nodeSelector, nodeAffinity, taints/tolerations, pod affinity and anti-affinity - Assigning Pods to Nodes
- Docker & Kubernetes : Jenkins-X on EKS
- Docker & Kubernetes : ArgoCD App of Apps with Heml on Kubernetes
- Docker & Kubernetes : ArgoCD on Kubernetes cluster
- Docker & Kubernetes : GitOps with ArgoCD for Continuous Delivery to Kubernetes clusters (minikube) - guestbook
Ph.D. / Golden Gate Ave, San Francisco / Seoul National Univ / Carnegie Mellon / UC Berkeley / DevOps / Deep Learning / Visualization