Creating VirtualBoxes using Vagrant
Vagrant allows us to on-demand spin off VirtualBoxes or to run a load balancer and test fail over stuff. We can spin off a Vagrant box and configure it and try to do deployments to that virtual machine.
Vagrant's primary usage is to create and configure virtual development environments. We can see it as a wrapper around virtualization software such as VirtualBox, VMware and around configuration management software such as Chef, Salt or Puppet.
So, let's go and get into how to use Vagrant to spin off virtual Linux machine.
- Virtualbox / Box
An application to run "Virtual machines (VM)" on our laptop/desktop. It's a VM pre-configured with software. It is used as the starting unit of any configuration. - Vagrant
An application that automates the setup of VMs. In short, Vagrant is an automated VM builder. - Host
Our laptop/desktop that runs Virtualbox and Vagrant. - Guest / Guest VM / Insance
A virtual machine running within the host.
We use Vagrantfile to configure Vagrant:
- Mark the root directory of our project. A lot of the configuration of Vagrant is relative to this root directory.
- Describe the kind of machine and resources we need to run our project, as well as what software to install and how we want to access it.
- vagrant init command will create this Vagrantfile.
vagrant init command is a built-in command and it initialize a directory for usage with Vagrant.
$ mkdir my_vagrant
$ cd my_vagrant/
$ vagrant init
A `Vagrantfile` has been placed in this directory. You are now
ready to `vagrant up` your first virtual environment! Please read
the comments in the Vagrantfile as well as documentation on
`vagrantup.com` for more information on using Vagrant.
This will place a Vagrantfile in our current directory.
$ ls
Vagrantfile
We can also run vagrant init in a pre-existing directory to set up Vagrant for an existing project.
To see the list of vagrant box:
$ vagrant box list
There are no installed boxes! Use `vagrant box add` to add some.
Instead of building a virtual machine from scratch, Vagrant uses a base image to quickly clone a virtual machine. These base images are known as boxes in Vagrant, and specifying the box to use for our Vagrant environment is always the first step after creating a new Vagrantfile.
Boxes are added to Vagrant with vagrant box add. This stores the box under a specific name so that multiple Vagrant environments can re-use it.
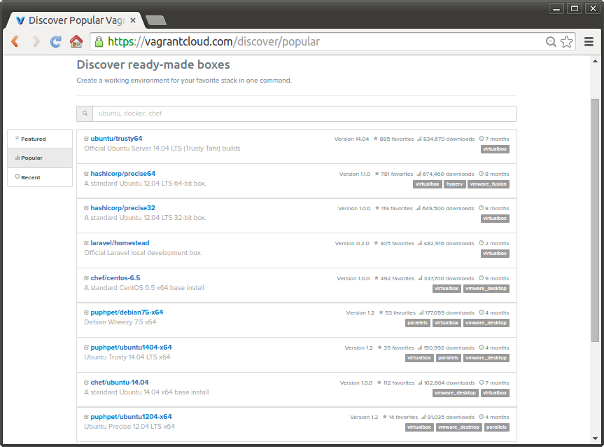
Select a Vagrant Box from https://vagrantcloud.com.
We're going to pick some boxes that we want to install. Go to "Popular":

To add it to our list of boxes.
$ vagrant box add ubuntu/trusty64
==> box: Loading metadata for box 'ubuntu/trusty64'
    box: URL: https://atlas.hashicorp.com/ubuntu/trusty64
==> box: Adding box 'ubuntu/trusty64' (v20170202.0.0) for provider: virtualbox
    box: Downloading: https://atlas.hashicorp.com/ubuntu/boxes/trusty64/versions/20170202.0.0/providers/virtualbox.box
==> box: Successfully added box 'ubuntu/trusty64' (v20170202.0.0) for 'virtualbox'!
It just downloads the image but not install anything on our system.
Note that we downloaded the box named 'ubuntu/trusty64' from HashiCorp's Atlas box catalog, a place where we can find and host boxes.
Note also that boxes are namespaced. Boxes are broken down into two parts - the username and the box name - separated by a slash. In the example above, the username is "ubuntu", and the box is "trusty64".
We can check what boxes we have:
$ vagrant box list
ubuntu/trusty64 (virtualbox, 20170202.0.0)
We may want to know that boxes are globally stored for the current user.
Actually, we don't have to add box using vagrant box add command. As will be described in next section, if we specify which one to use in Vagrantfile, Vagrant will download it.
Now, we can spin off as many 'ubuntu/trusty64' boxes as we want as long as our machine can handle it.
Added boxes can be re-used by multiple projects. Each project uses a box as an initial image to clone from, and never modifies the actual base image. This means that if we have two projects both using the 'ubuntu/trusty64' box we just added, adding files in one guest machine will have no effect on the other machine.
Now that the box has been added to Vagrant, we need to configure our project to use it as a base. Open the Vagrantfile and change the contents to the following:
Vagrant.configure(2) do |config|
  config.vm.box = "ubuntu/trusty64"
end
The "ubuntu/trusty64" in this case must match the name we used to add the box above. This is how Vagrant knows what box to use. If the box wasn't added before, Vagrant will automatically download and add the box when it is run.
It is time to boot our first Vagrant environment. Run the following:
k@laptop:~/my_vagrant$ vagrant up
Bringing machine 'default' up with 'virtualbox' provider...
==> default: Importing base box 'ubuntu/trusty64'...
==> default: Matching MAC address for NAT networking...
==> default: Checking if box 'ubuntu/trusty64' is up to date...
==> default: Setting the name of the VM: my_vagrant_default_1486540487227_74029
==> default: Clearing any previously set forwarded ports...
==> default: Clearing any previously set network interfaces...
==> default: Preparing network interfaces based on configuration...
    default: Adapter 1: nat
==> default: Forwarding ports...
    default: 22 (guest) => 2222 (host) (adapter 1)
==> default: Booting VM...
==> default: Waiting for machine to boot. This may take a few minutes...
    default: SSH address: 127.0.0.1:2222
    default: SSH username: vagrant
    default: SSH auth method: private key
    default: Warning: Remote connection disconnect. Retrying...
    default: Warning: Remote connection disconnect. Retrying...
    default: Warning: Remote connection disconnect. Retrying...
    default: Warning: Remote connection disconnect. Retrying...
    default:
    default: Vagrant insecure key detected. Vagrant will automatically replace
    default: this with a newly generated keypair for better security.
    default:
    default: Inserting generated public key within guest...
    default: Removing insecure key from the guest if it's present...
    default: Key inserted! Disconnecting and reconnecting using new SSH key...
==> default: Machine booted and ready!
==> default: Checking for guest additions in VM...
    default: The guest additions on this VM do not match the installed version of
    default: VirtualBox! In most cases this is fine, but in rare cases it can
    default: prevent things such as shared folders from working properly. If you see
    default: shared folder errors, please make sure the guest additions within the
    default: virtual machine match the version of VirtualBox you have installed on
    default: your host and reload your VM.
    default:
    default: Guest Additions Version: 4.3.36
    default: VirtualBox Version: 5.0
==> default: Mounting shared folders...
    default: /vagrant => /home/k/TEST/my_vagrant
k@laptop:~/my_vagrant$
Now we have a virtual machine running Ubuntu. We spun off a 'ubuntu/trusty64' box. We won't actually see anything though, since Vagrant runs the virtual machine without a UI. To check if our virtual machine is running, we can SSH into the machine as demonstrated in a later section.
Actually, I had issues with the vagrant up command, and got the following:
default: Warning: Connection timeout. Retrying...
To see more info, we should enable GUI:
config.vm.provider "virtualbox" do |vb|
    vb.gui = true
end
Before we do vagrant up again, we need to clean up any remnants from the failed attempt. Issue vagrant halt command (see next section):
$ vagrant halt
==> default: Attempting graceful shutdown of VM...
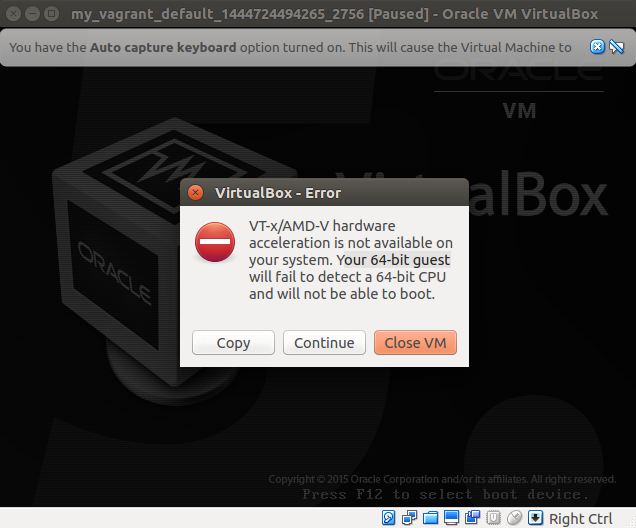
Now, we can see from VBox gui why it was hanging, and failed booting:

So, we need to enable virtualization in BIOS (F10 key when Ubuntu boots).
After the BIOS setting, I was able to run vagrant (vagrant up) as shown above.
vagrant halt command shuts down the running machine Vagrant is managing.
Vagrant will first attempt to gracefully shut down the machine by running the guest OS shutdown mechanism. If this fails, or if the --force flag is specified, Vagrant will effectively just shut off power to the machine.
When the vagrant up command finished, we have a virtual machine running Ubuntu. However, we actually don't see anything, since Vagrant runs the virtual machine without a UI.
To check if our virtual machine is running, we can SSH into the machine:
$ vagrant ssh
Welcome to Ubuntu 14.04.5 LTS (GNU/Linux 3.13.0-108-generic x86_64)

 * Documentation:  https://help.ubuntu.com/

 System information disabled due to load higher than 1.0

  Get cloud support with Ubuntu Advantage Cloud Guest:
    http://www.ubuntu.com/business/services/cloud

0 packages can be updated.
0 updates are security updates.

New release '16.04.1 LTS' available.
Run 'do-release-upgrade' to upgrade to it.


vagrant@vagrant-ubuntu-trusty-64:~$
This vagrant ssh command will drop us into a full-fledged SSH session.
Note: We should be careful about rm -rf /, since Vagrant shares a directory at /vagrant with the directory on the host containing our Vagrantfile, and this can delete all those files.
What we've done?
With just one line of configuration and one command in our terminal, we brought up a fully functional, SSH accessible virtual machine. The SSH session can be terminated with CTRL+D:
$ logout
Connection to 127.0.0.1 closed.
One more thing, clean up resources!
When we are done fiddling around with the machine, run vagrant destroy back on our host machine, and Vagrant will terminate the use of any resources by the virtual machine.
$ vagrant destroy
    default: Are you sure you want to destroy the 'default' VM? [y/N] y
==> default: Forcing shutdown of VM...
==> default: Destroying VM and associated drives...
In previous section, we learned how to access Vagrant vm using "vagrant ssh" command. However, sometimes we may want to ssh into Vagrant instance as we do ssh into other machines:
$ ssh vagrant@ip-address
To do that, we need to setup two things:
- Copy ~/.ssh/id_rsa.pub of our local machine ~/.ssh/authorized_keys to of Vagrant vm.
- Assign a new ip to our Vagrant instance. Add the following line to Vagrantfile file:
config.vm.network :private_network, ip: "192.168.68.7"
Now we can ssh to Vagrant box as usual:
$ ssh vagrant@192.168.68.7
...

  System load:  0.0               Processes:           76
  Usage of /:   2.9% of 39.34GB   Users logged in:     1
  Memory usage: 25%               IP address for eth0: 10.0.2.15
  Swap usage:   0%                IP address for eth1: 192.168.68.7
...
vagrant@vagrant-ubuntu-trusty-64:~$
We can either uninstall the Vagrant binary, the user data, or both:
- Removing Vagrant program:
Removing the Vagrant program will remove the vagrant binary and all dependencies from our machine. After uninstalling the program, we can always reinstall again using standard methods.
Remove the /opt/vagrant directory and the /usr/bin/vagrant file - Removing user data:
Removing the user data will remove all boxes, plugins, and any stored state that may be used by Vagrant. Removing the user data effectively makes Vagrant think it is once again a fresh install.
On every platform, remove the ~/.vagrant.d directory to delete the user data.
- List running machines (returns name and UUID):
VBoxManage list runningvms
- Stop running VMs by "hibernating" them (recommended to avoid data loss):
VBoxManage controlvm <name|uuid> savestate
- Poweroff running VMs (not recommended because we may lose data in the guest):
VBoxManage controlvm <name|uuid> poweroff
- Use ACPI in an ACPI-aware guest OS (preferable to poweroff for graceful shutdown of guests):
VBoxManage controlvm <name|uuid> acpipowerbutton
-
Example:
k@laptop:~/my_vagrant$ VBoxManage list runningvms
"my_vagrant_default_1417676312044_99144" {e94d4542-9693-42f4-ae9f-8fdd2c1588a7}

k@laptop:~/my_vagrant$ VBoxManage controlvm my_vagrant_default_1417676312044_99144 savestate
0%...10%...20%...30%...40%...50%...60%...70%...80%...90%...100%

k@laptop:~/my_vagrant$ VBoxManage controlvm e94d4542-9693-42f4-ae9f-8fdd2c1588a7 poweroff
0%...10%...20%...30%...40%...50%...60%...70%...80%...90%...100%

k@laptop:~/my_vagrant$ VBoxManage controlvm e94d4542-9693-42f4-ae9f-8fdd2c1588a7 acpipowerbutton
Here are a few Vagrant commands:
- vagrant up: Boots a virtual machine.
- vagrant provision: Force the provisioners to be run again a virtual machine. Useful for updating the configuration of existing virtual machines.
- vagrant halt: Shutdown a virtual machine.
- vagrant suspend: Sleep a virtual machine.
- vagrant destroy: Delete a virtual machine from our system.
Ph.D. / Golden Gate Ave, San Francisco / Seoul National Univ / Carnegie Mellon / UC Berkeley / DevOps / Deep Learning / Visualization