AWS Application Load Balancer (ALB) and ECS with Flask app
In this tutorial, we'll briefly look at the difference between classic ELB and Application Load Balancer (ALB). Then, we'll use the ALB with two flask apps in ECS cluster.
As a side note, actually AWS ELB is running on EC2 instance and it's put into subnet as shown below:
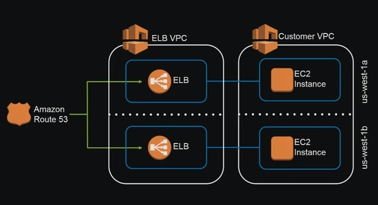
picture source: AWS re:Invent 2016: Elastic Load Balancing Deep Dive and Best Practices (NET403)
We'll create two Dockerfiles for the two apps and upload (push) the images to ECR using AWS cli commands.
The ALB gets request on port 80 and depending on the path (uri), it will redirect the request to the proper app: "/" to home and "/blog" to our blog app.
In other words, the ALB makes routing decisions at the application layer (HTTP/HTTPS), does path-based routing, and can route requests to the ports (5000 or 8081) on each container instances in our VPC.
We'll set two targets for the two apps so that the ALB listens on different targets.
Once the apps have been successfully deployed, we'll also see how to update the apps.
Before we start using Elastic Load Balancing, we must configure one or more listeners for our load balancer. A listener is a process that checks for connection requests. It is configured with a protocol and a port for front-end (client to load balancer) connections, and a protocol and a port for back-end (load balancer to back-end instance) connections. - from Listeners for Load Balancer.
| Layer 4 (Network) | Layer 7 (Applications) |
|---|---|
| TCP/SSL | HTTP/HTTPS |
| Incoming client connect is directly bound to server connection. No connection pooling between load balancer and server | Connection terminated at the load balancer and pooled to the server. |
| No header modification. | Headers may be modified. |
| Proxy Protocol prepends source and destination IP and ports to request. | X-Forwarded-For header contains client IP address. |
| Round robin algorithm used for request routing. | Least outstanding requests algorithm used for request routing. |
| - | Sticky session (though not recommended) support available. Recommends using distributed caching. |
To host N applications, needs N number of dns and ELBs
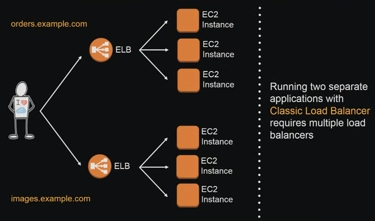
|
Path-based routing.
Content-based routing allows requests be routed to different applications he hide a single load balancer.
This means than the application load balancer allows for multiple applications to be hosted behind a single load balancer.
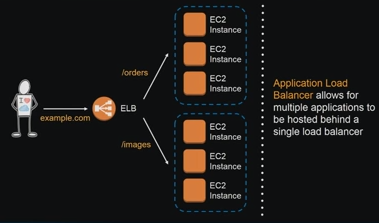
|
| - | Native support for microservices and container-based architectures. |
| - | Instances can be registered with multiple ports,
allowing for requests to be routed to multiple containers on a single instance. ECS will automatically register tasks with the load balancer using a dynamic port mapping. |
| - | Support for Websocket (full-duplex communications channels overs a single TCP connections) & HTTP/2 (improved page load times). Note: no additional configuration is required to enable the Websocket or HTTP/2. Improved performances for real-time and streaming applications |
| - | Provides several new resource types including target groups, targets and rules.
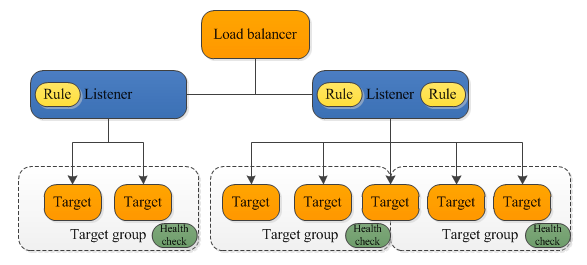
Picture from What Is an Application Load Balancer? |
| For TCP/SSL or EC2-Classic, use Classic Load Balancer. | For all other use-cases, use Application Load Balancer. |
Note that the Classic Load Balancer has been supporting layer 7 features but partially. Here is the summary of the differences between Classic and Application Load Balancer:
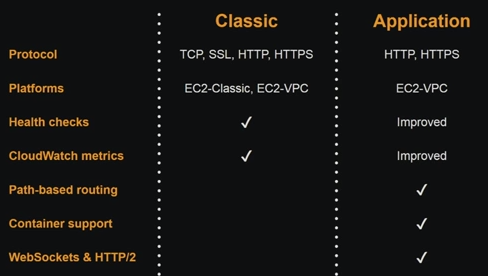
picture source: AWS re:Invent 2016: Elastic Load Balancing Deep Dive and Best Practices (NET403)
Health checks allow for traffic to be shifted away from failed instances.
- Support for TCP and HTTP health checks.
- Can customize the frequency and failure thresholds.
- Must return a 2xx response.
- Consider the depth and accuracy of health checks.
Ref: AWS re:Invent 2014 | (SDD423) Elastic Load Balancing Deep Dive and Best Practices & AWS re:Invent 2016: Elastic Load Balancing Deep Dive and Best Practices (NET403).
The Application Load Balancer (ALB) is a new way of AWS load balancing introduced around August, 2016. It has more options compared to the Classic LB. While the Classic works on layer 4, ALB works on layer 7 which is an application layer.
At Layer 7, the ELB has the ability to inspect application-level content, not just IP address and TCP port. This lets it route traffic based on more complex rules than with the Classic Load Balancer.
As an example, an ELB at a given IP will receive a request from the client on port 443 (HTTPS). The Application Load Balancer will process the request, not only by receiving port, but also by looking at the destination URL.
Here is a good document from SumoLogic : AWS Elastic Load Balancer: The Classic Load Balancer vs. the Application Load Balancer
Here are the files we need:
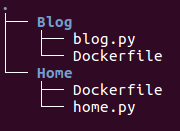
As we can see, our blog container will run a basic flask app which listens on port 8081 and the application will be reached by using "/blog" path:
# blog.py
from flask import Flask
from flask import render_template
app = Flask(__name__)

@app.route('/blog')
def blog():
    return "My Blog"


if __name__ == '__main__':
    app.run(threaded=True,host='0.0.0.0',port=8081)
We'll use the following Dockerfile and create an image:
FROM centos

MAINTAINER kihyuck.hong@gmail.com

RUN rpm -Uvh https://dl.fedoraproject.org/pub/epel/epel-release-latest-7.noarch.rpm \
      && yum update -y \
      && yum install -y python-pip \
      && pip install flask

COPY . /src

EXPOSE 8081

CMD cd /src && python blog.py
Also we'll have webpage container (Home/home.py) as well, and the Dockerfile (Home/Dockerfile):
Our home page app:
# home.py
from flask import Flask
app = Flask(__name__)

@app.route("/")
def hello():
    return "Home page"

if __name__ == '__main__':
    app.run(threaded=True,host='0.0.0.0',port=5000)
The Dockerfile for home:
FROM centos

MAINTAINER kihyuck.hong@gmail.com

RUN rpm -Uvh https://dl.fedoraproject.org/pub/epel/epel-release-latest-7.noarch.rpm \
      && yum update -y \
      && yum install -y python-pip \
      && pip install flask

COPY . /src

EXPOSE 5000

CMD cd /src && python home.py
Note that only differences in the two Apps will be the port number (5000, 8001) and the path ("/", "/blog").
Let's build the images in each sub-directory:
$ docker build -t bogo-blog-image .
$ docker build -t bogo-home-image .
Check images:
$ docker images
REPOSITORY          TAG                 IMAGE ID            CREATED             SIZE
bogo-home-image     latest              2ef91235893e        5 minutes ago       388 MB
bogo-blog-image     latest              3b5381266ac5        5 minutes ago       388 MB
Creating a repository:
$ aws ecr create-repository --repository-name ecs-alb-with-flask/home
Let's push the images. We get help from push commands that AWS console shows us. First, we retrieve docker login output by using the command below. This will show a long command that will help us login to the registry:
$ aws ecr get-login --region us-east-1
Then run the docker login command:
$ docker login -u AWS -p eyJ...wY9 -e none https://526262051452.dkr.ecr.us-east-1.amazonaws.com

Login Succeeded
Tag our image using docker tag command:
$ docker tag bogo-home-image:latest 526262051452.dkr.ecr.us-east-1.amazonaws.com/ecs-alb-with-flask/home:latest
Finally, push the image to AWS ECS Registry:
$ docker push 526262051452.dkr.ecr.us-east-1.amazonaws.com/ecs-alb-with-flask/home:latest
The push refers to a repository [526262051452.dkr.ecr.us-east-1.amazonaws.com/ecs-alb-with-flask/home]
465d9c01c0cd: Pushed
59f1d057efbe: Pushed
b51149973e6a: Pushed
latest: digest: sha256:f03172e984c1200bec4a43b1a02261b754aa9c45de917a3937106a785861925e size: 948
Do the same with the "blog" image:
$ aws ecr create-repository --repository-name ecs-alb-with-flask/blog
REPOSITORY	1495936158.0	526262051452	arn:aws:ecr:us-east-1:526262051452:repository/ecs-alb-with-flask/blog	ecs-alb-with-flask/blog	526262051452.dkr.ecr.us-east-1.amazonaws.com/ecs-alb-with-flask/blog

$ docker tag bogo-blog-image:latest 526262051452.dkr.ecr.us-east-1.amazonaws.com/ecs-alb-with-flask/blog:latest

$ docker push 526262051452.dkr.ecr.us-east-1.amazonaws.com/ecs-alb-with-flask/blog:latest
The push refers to a repository [526262051452.dkr.ecr.us-east-1.amazonaws.com/ecs-alb-with-flask/blog]
ff3ab5357318: Pushed
59f1d057efbe: Pushed
b51149973e6a: Pushed
latest: digest: sha256:4849d32ea37ae655e68c178786ea986a758d177ce53f261afdcbcc2594f37ae5 size: 948
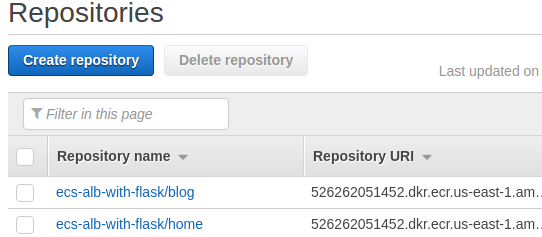
Now let's create our tasks and services. In ECS console, click "Create task definition" and proceed.
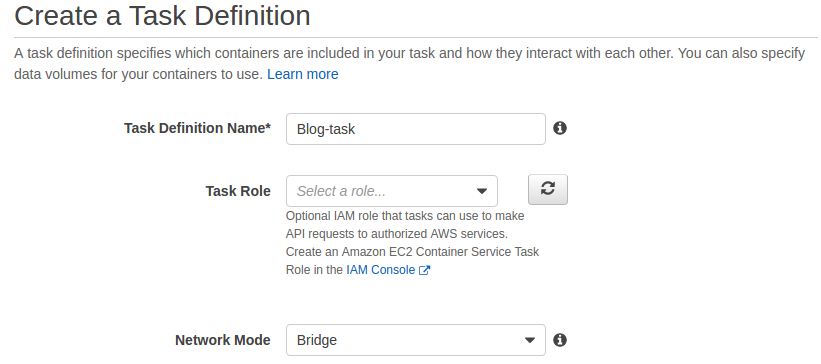
Then, click "Add container":
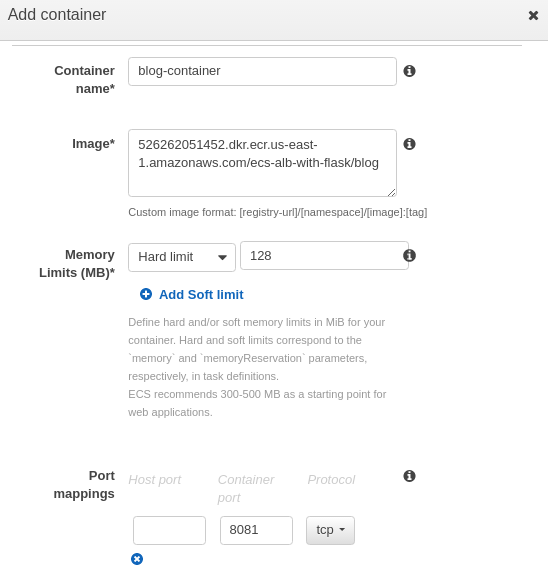
Click "Add", and then click "Create".
Let's work on another task, "Web-Home-Task":
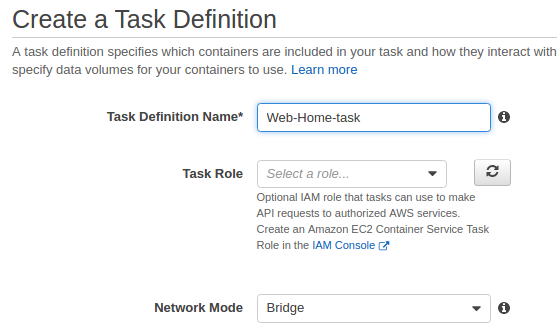
Then, click "Add container":
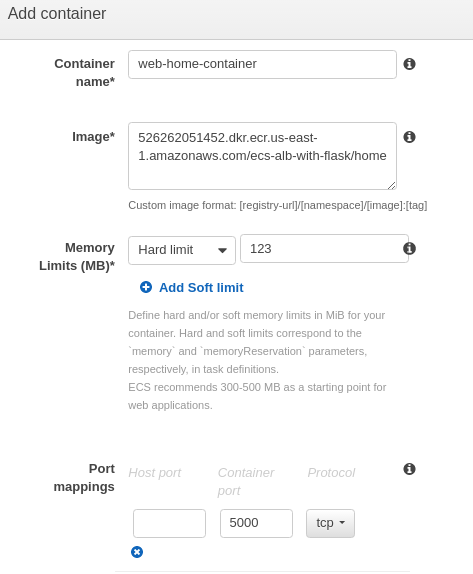
Click "Add", and then click "Create".
Now we've created two tasks:

Before creating our services, we need to create an ALB. Choose "Application Load Balancer":
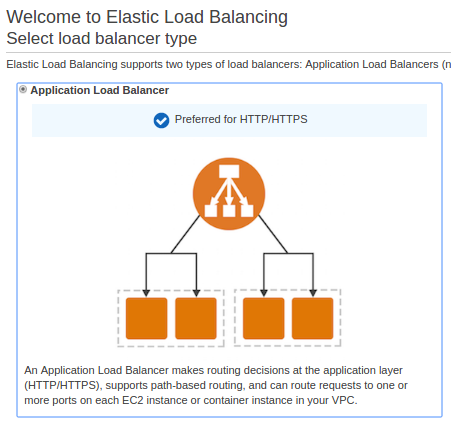
Name it as "MyFirstALB":
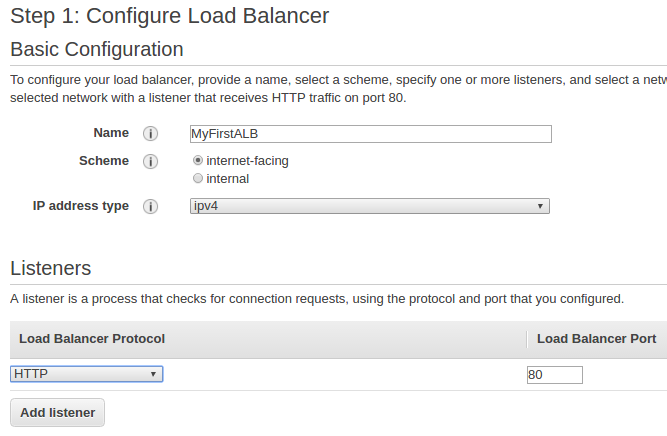
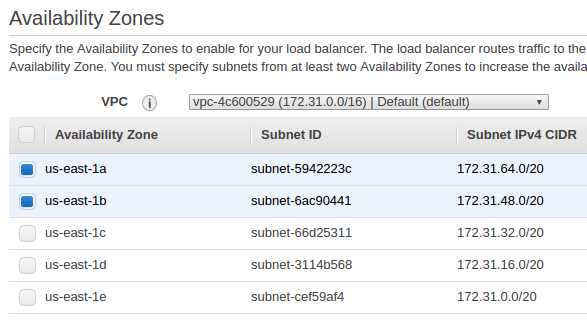
Choose available subnets:
After selecting Security Group, let's configure the routings for the ALB. We need to add a new targeting group. We use the port number as 5000 and the path as "/". Our load balancer routes requests to the targets in this target group using the protocol and port that we specify, and performs health checks on the targets using these health check settings. Note that each target group can be associated with only one load balancer.
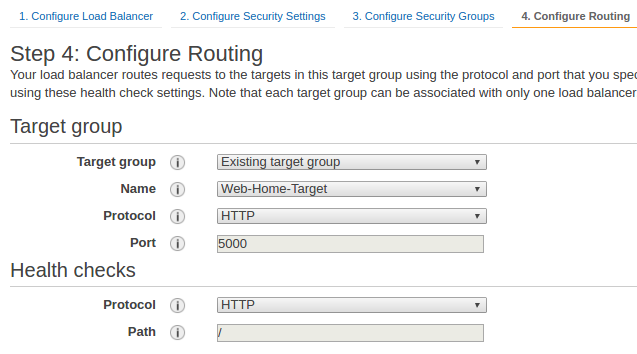
Since ECS will register targets, we don't need to register instances manually. After that, we can review and finish creating our ALB.
Here is our current target group:
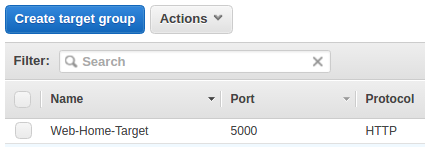
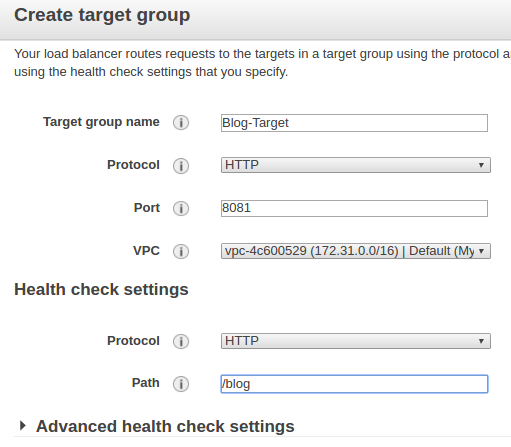
Our next step is creating a new target group for "blog" and adding a rule for it. Here we select 8001 as port number and "/blog" as the path.
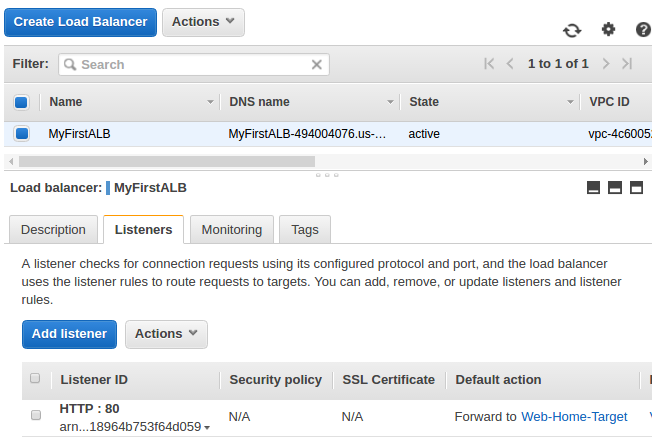
Then we select "MyFirstALB" and edit the rules:
We need to add another rule and enter "/blog" as path pattern and "Blog-Target" as target group name.
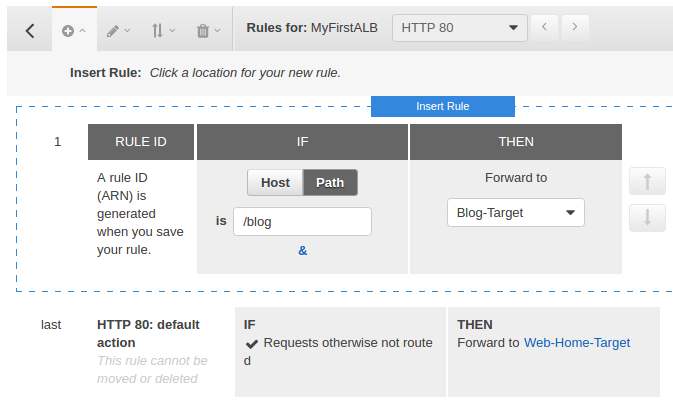
Note that we configured the "Web-Home-Target" as default.
Here are our two target groups:

We can now jump to the ECS console and configure our cluster and services.
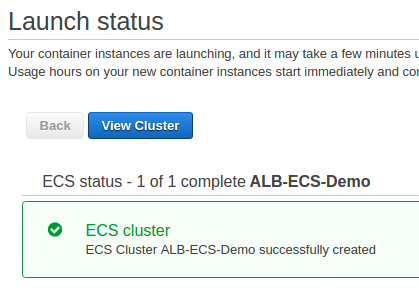
Let's create an empty ECS cluster ("ALB-ECS-Cluster"):
Assuming we have already had an auto scaling group and a launch configuration. We can copy it and change the user-data so it can register instances with our ECS Cluster:
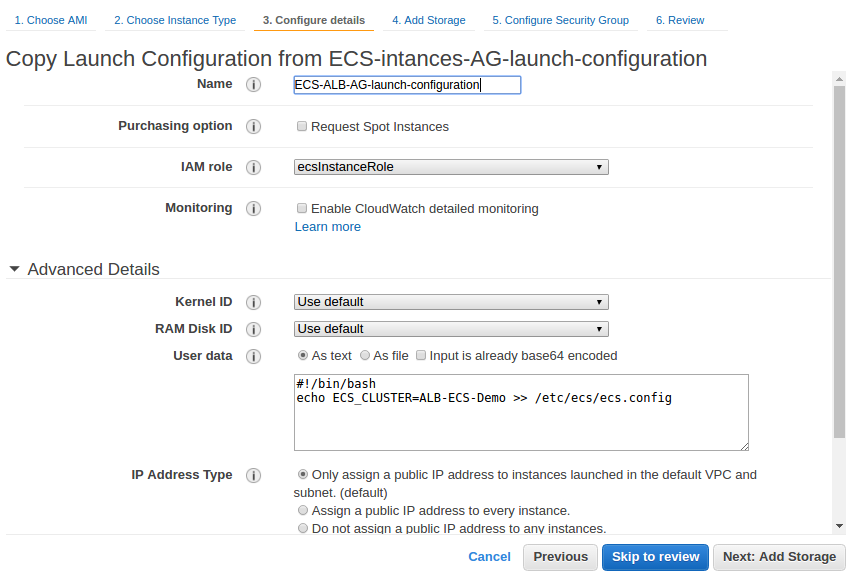
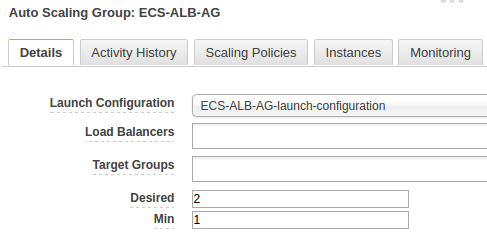
Then we need to edit autoscaling group and select our new launch configuration, set the desired to 2 and save.
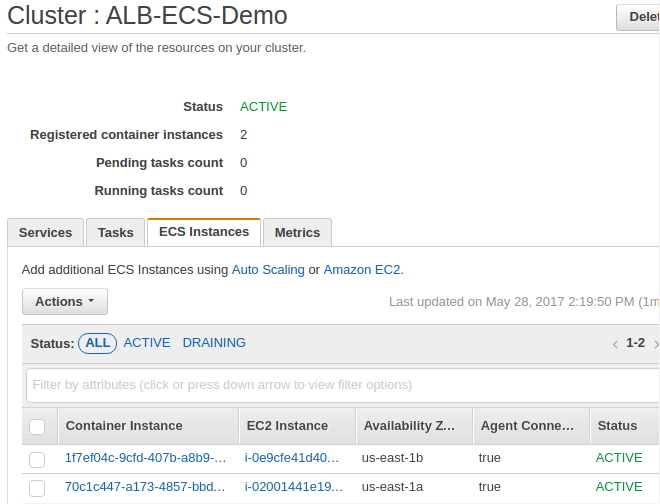
If we wait for a while, our instances are registered in the cluster:
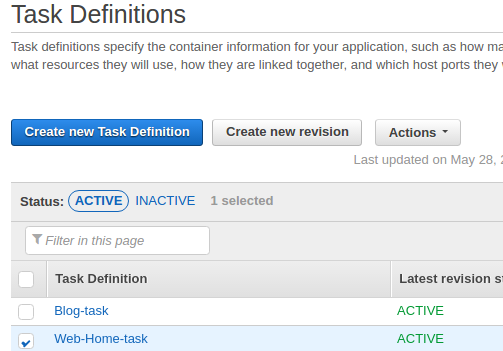
Now let's configure the services. First, select a task definition ("Web-Home-task"), select "Create Service" from drop-down menu under "Actions":
Then, set the number of tasks to 2:
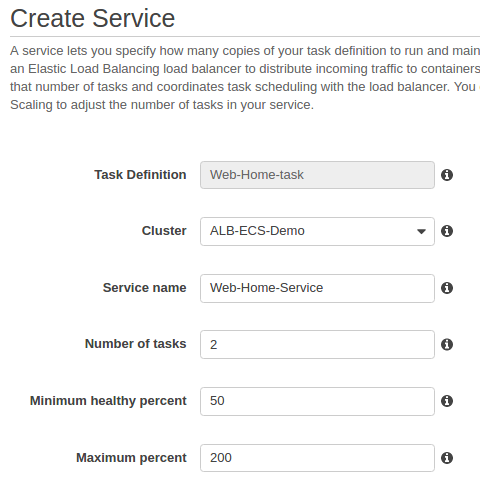
Then click "Configure ELB":
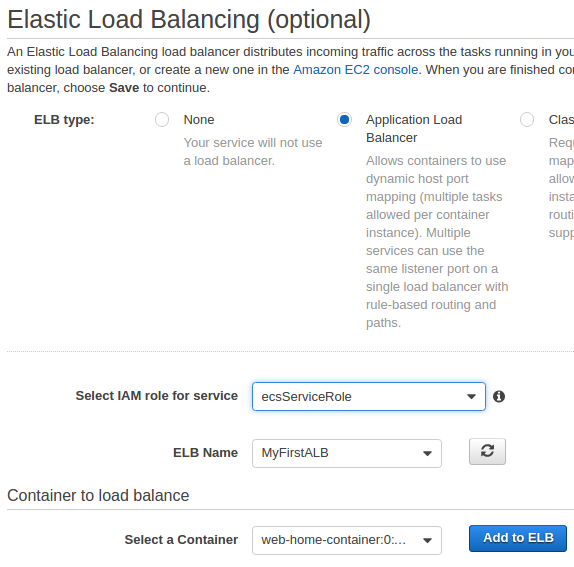
At ELB screen, select "Add to ELB":
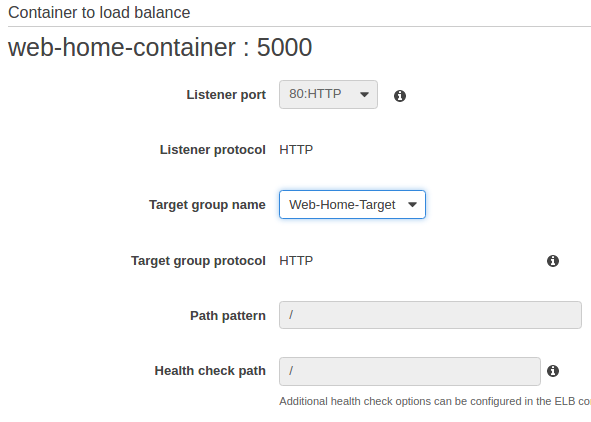
Select "Web-Home-Target" as target group name. Then, click "Save" and "Create Service".
Also We need to take the same steps for blog service.
Select a task definition ("Blog-task"), select "Create Service" from drop-down menu under "Actions":
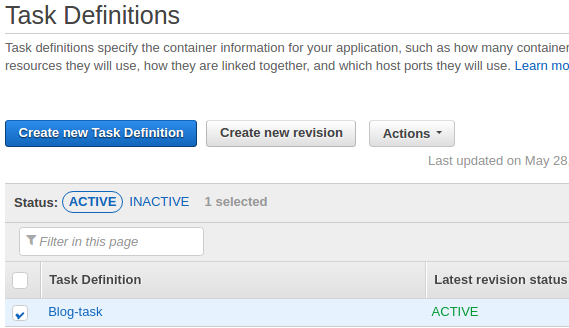
Then, set the number of tasks to 2:
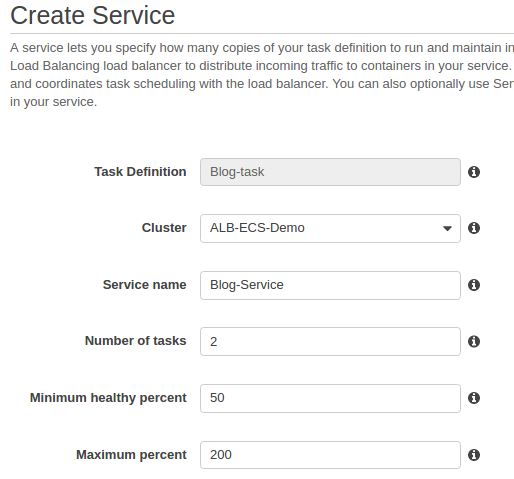
Then click "Configure ELB":
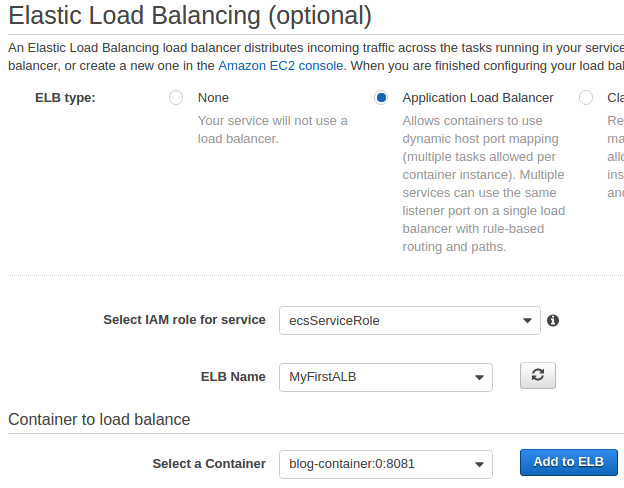
At ELB screen, select "Add to ELB":
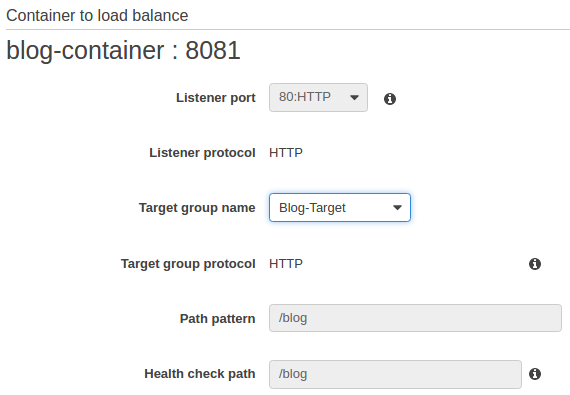
Select "Blog-Target" as target group name. Then, click "Save" and "Create Service".
Once the tasks are running, we can check from console:
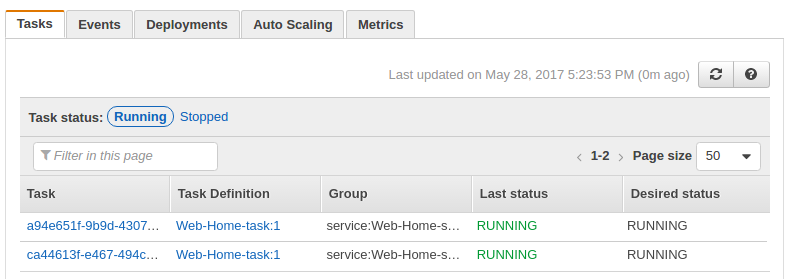
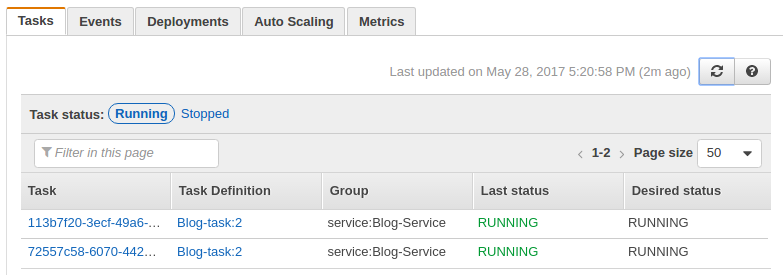
Let's go to our browser:


If we have updated the Docker image of our application, we can revise the task definition with that image and deploy it to our service. For example, we change the "blog":
# blog.py
from flask import Flask
from flask import render_template
app = Flask(__name__)

@app.route('/blog')
def blog():
    return "My Blog version 2"


if __name__ == '__main__':
    app.run(threaded=True,host='0.0.0.0',port=8081)
We upload the new image to ECR:
$ docker build -t bogo-blog-image .
$ docker tag bogo-blog-image:latest 526262051452.dkr.ecr.us-east-1.amazonaws.com/ecs-alb-with-flask/blog:latest
$ docker push 526262051452.dkr.ecr.us-east-1.amazonaws.com/ecs-alb-with-flask/blog:latest
To use the newly uploaded image, we may want to create a new task revision and update the service:

AWS (Amazon Web Services)
- AWS : EKS (Elastic Container Service for Kubernetes)
- AWS : Creating a snapshot (cloning an image)
- AWS : Attaching Amazon EBS volume to an instance
- AWS : Adding swap space to an attached volume via mkswap and swapon
- AWS : Creating an EC2 instance and attaching Amazon EBS volume to the instance using Python boto module with User data
- AWS : Creating an instance to a new region by copying an AMI
- AWS : S3 (Simple Storage Service) 1
- AWS : S3 (Simple Storage Service) 2 - Creating and Deleting a Bucket
- AWS : S3 (Simple Storage Service) 3 - Bucket Versioning
- AWS : S3 (Simple Storage Service) 4 - Uploading a large file
- AWS : S3 (Simple Storage Service) 5 - Uploading folders/files recursively
- AWS : S3 (Simple Storage Service) 6 - Bucket Policy for File/Folder View/Download
- AWS : S3 (Simple Storage Service) 7 - How to Copy or Move Objects from one region to another
- AWS : S3 (Simple Storage Service) 8 - Archiving S3 Data to Glacier
- AWS : Creating a CloudFront distribution with an Amazon S3 origin
- AWS : Creating VPC with CloudFormation
- AWS : WAF (Web Application Firewall) with preconfigured CloudFormation template and Web ACL for CloudFront distribution
- AWS : CloudWatch & Logs with Lambda Function / S3
- AWS : Lambda Serverless Computing with EC2, CloudWatch Alarm, SNS
- AWS : Lambda and SNS - cross account
- AWS : CLI (Command Line Interface)
- AWS : CLI (ECS with ALB & autoscaling)
- AWS : ECS with cloudformation and json task definition
- AWS Application Load Balancer (ALB) and ECS with Flask app
- AWS : Load Balancing with HAProxy (High Availability Proxy)
- AWS : VirtualBox on EC2
- AWS : NTP setup on EC2
- AWS: jq with AWS
- AWS & OpenSSL : Creating / Installing a Server SSL Certificate
- AWS : OpenVPN Access Server 2 Install
- AWS : VPC (Virtual Private Cloud) 1 - netmask, subnets, default gateway, and CIDR
- AWS : VPC (Virtual Private Cloud) 2 - VPC Wizard
- AWS : VPC (Virtual Private Cloud) 3 - VPC Wizard with NAT
- DevOps / Sys Admin Q & A (VI) - AWS VPC setup (public/private subnets with NAT)
- AWS - OpenVPN Protocols : PPTP, L2TP/IPsec, and OpenVPN
- AWS : Autoscaling group (ASG)
- AWS : Setting up Autoscaling Alarms and Notifications via CLI and Cloudformation
- AWS : Adding a SSH User Account on Linux Instance
- AWS : Windows Servers - Remote Desktop Connections using RDP
- AWS : Scheduled stopping and starting an instance - python & cron
- AWS : Detecting stopped instance and sending an alert email using Mandrill smtp
- AWS : Elastic Beanstalk with NodeJS
- AWS : Elastic Beanstalk Inplace/Rolling Blue/Green Deploy
- AWS : Identity and Access Management (IAM) Roles for Amazon EC2
- AWS : Identity and Access Management (IAM) Policies, sts AssumeRole, and delegate access across AWS accounts
- AWS : Identity and Access Management (IAM) sts assume role via aws cli2
- AWS : Creating IAM Roles and associating them with EC2 Instances in CloudFormation
- AWS Identity and Access Management (IAM) Roles, SSO(Single Sign On), SAML(Security Assertion Markup Language), IdP(identity provider), STS(Security Token Service), and ADFS(Active Directory Federation Services)
- AWS : Amazon Route 53
- AWS : Amazon Route 53 - DNS (Domain Name Server) setup
- AWS : Amazon Route 53 - subdomain setup and virtual host on Nginx
- AWS Amazon Route 53 : Private Hosted Zone
- AWS : SNS (Simple Notification Service) example with ELB and CloudWatch
- AWS : Lambda with AWS CloudTrail
- AWS : SQS (Simple Queue Service) with NodeJS and AWS SDK
- AWS : Redshift data warehouse
- AWS : CloudFormation
- AWS : CloudFormation Bootstrap UserData/Metadata
- AWS : CloudFormation - Creating an ASG with rolling update
- AWS : Cloudformation Cross-stack reference
- AWS : OpsWorks
- AWS : Network Load Balancer (NLB) with Autoscaling group (ASG)
- AWS CodeDeploy : Deploy an Application from GitHub
- AWS EC2 Container Service (ECS)
- AWS EC2 Container Service (ECS) II
- AWS Hello World Lambda Function
- AWS Lambda Function Q & A
- AWS Node.js Lambda Function & API Gateway
- AWS API Gateway endpoint invoking Lambda function
- AWS API Gateway invoking Lambda function with Terraform
- AWS API Gateway invoking Lambda function with Terraform - Lambda Container
- Amazon Kinesis Streams
- AWS: Kinesis Data Firehose with Lambda and ElasticSearch
- Amazon DynamoDB
- Amazon DynamoDB with Lambda and CloudWatch
- Loading DynamoDB stream to AWS Elasticsearch service with Lambda
- Amazon ML (Machine Learning)
- Simple Systems Manager (SSM)
- AWS : RDS Connecting to a DB Instance Running the SQL Server Database Engine
- AWS : RDS Importing and Exporting SQL Server Data
- AWS : RDS PostgreSQL & pgAdmin III
- AWS : RDS PostgreSQL 2 - Creating/Deleting a Table
- AWS : MySQL Replication : Master-slave
- AWS : MySQL backup & restore
- AWS RDS : Cross-Region Read Replicas for MySQL and Snapshots for PostgreSQL
- AWS : Restoring Postgres on EC2 instance from S3 backup
- AWS : Q & A
- AWS : Security
- AWS : Security groups vs. network ACLs
- AWS : Scaling-Up
- AWS : Networking
- AWS : Single Sign-on (SSO) with Okta
- AWS : JIT (Just-in-Time) with Okta
Ph.D. / Golden Gate Ave, San Francisco / Seoul National Univ / Carnegie Mellon / UC Berkeley / DevOps / Deep Learning / Visualization