Docker : Deployments to GKE (Rolling update, Canary and Blue-green deployments)
In this post, continued from From a monolithic app to micro services on GCP Kubernetes, we'll learn more about Deployments to GCP Kubernetes: Rolling update, Canary deployments, and Blue-green deployments.
We will be playing with the following DockerHub images:
- kelseyhightower/monolith - Monolith includes auth and hello services.
- kelseyhightower/auth - Auth microservice. Generates JWT tokens for authenticated users.
- kelseyhightower/hello - Hello microservice. Greets authenticated users.
- ngnix - Frontend to the auth and hello services.
To setup the zone in Cloud Shell, we may want to use the gcloud config:
$ gcloud config set compute/zone us-central1-b
Updated property [compute/zone].
Then, start up our cluster setup. This may take a while:
$ gcloud container clusters create deployments-to-gke
NAME                LOCATION       MASTER_VERSION  MASTER_IP     MACHINE_TYPE   NODE_VERSION  NUM_NODES  STATUS
deployments-to-gke  us-central1-b  1.11.6-gke.2    35.188.49.21  n1-standard-1  1.11.6-gke.2  3          RUNNING
$ gcloud compute instances list
NAME                                               ZONE           MACHINE_TYPE   PREEMPTIBLE  INTERNAL_IP  EXTERNAL_IP     STATUS
gke-deployments-to-gke-default-pool-33847025-0038  us-central1-b  n1-standard-1               10.128.0.13  199.223.233.44  RUNNING
gke-deployments-to-gke-default-pool-33847025-h1rq  us-central1-b  n1-standard-1               10.128.0.11  35.226.241.245  RUNNING
gke-deployments-to-gke-default-pool-33847025-n7r3  us-central1-b  n1-standard-1               10.128.0.12  35.226.231.26   RUNNING

Clone the GitHub repository:
$ git clone https://github.com/Einsteinish/MonolithicToMicroServices-GKE.git
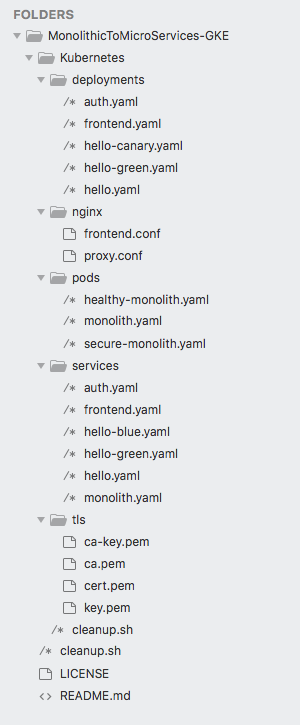
Let's start with deployments/auth.yaml. Modify the version of "image" in "containers" section to "1.0.0":
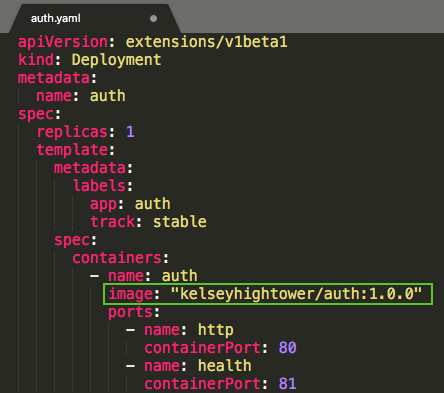
When we run the kubectl create command to create the auth deployment, it will make a pod that conforms to the data in the Deployment manifest. This enables us to scale the number of Pods by changing the number specified in the replicas field.
$ kubectl create -f deployments/auth.yaml
deployment.extensions "auth" created
We can verify that the Deployment was created:
$ kubectl get deployments
NAME      DESIRED   CURRENT   UP-TO-DATE   AVAILABLE   AGE
auth      1         1         1            1           1m
We may also want to view the Pods that were created as part of our Deployment:
$ kubectl get pods
NAME                  READY     STATUS    RESTARTS   AGE
auth-569fc694-26dzj   1/1       Running   0          2m
Once the deployment is created, Kubernetes creates a ReplicaSet. We can verify that a ReplicaSet was created for our Deployment:
$ kubectl get replicaset
NAME            DESIRED   CURRENT   READY     AGE
auth-569fc694   1         1         1         4m
Now, it's time to create a service for our auth deployment based on services/auth.yaml:

$ kubectl create -f services/auth.yaml
service "auth" created
Let's do the same thing to create and expose the "hello" and "frontend" Deployments:
$ kubectl create -f deployments/hello.yaml
deployment.extensions "hello" created

$ kubectl create -f services/hello.yaml
service "hello" created

$ kubectl create secret generic tls-certs --from-file tls/
secret "tls-certs" created

$ kubectl create configmap nginx-frontend-conf --from-file=nginx/frontend.conf
configmap "nginx-frontend-conf" created

$ kubectl create -f deployments/frontend.yaml
deployment.extensions "frontend" created

$ kubectl create -f services/frontend.yaml
service "frontend" created
Let's try to hit the frontend via its external IP:
$ kubectl get svc
NAME         TYPE           CLUSTER-IP      EXTERNAL-IP      PORT(S)         AGE
auth         ClusterIP      10.59.247.28    <none>           80/TCP          9m
frontend     LoadBalancer   10.59.254.111   35.188.216.153   443:32470/TCP   2m
hello        ClusterIP      10.59.242.28    <none>           80/TCP          5m
kubernetes   ClusterIP      10.59.240.1     <none>           443/TCP         29m
$ curl -ks https://35.188.216.153
{"message":"Hello"}
Note that we can also use the output templating feature of kubectl to use curl as a one-liner:
$ curl -ks https://`kubectl get svc frontend -o=jsonpath="{.status.loadBalancer.ingress[0].ip}"`
{"message":"Hello"}
Now that our Deployments have been created, we can scale it by updating the spec.replicas field. We can look at an explanation of this field using the kubectl explain command:
$ kubectl explain deployment.spec.replicas
KIND:     Deployment
VERSION:  extensions/v1beta1
FIELD:    replicas <integer>
DESCRIPTION:
     Number of desired pods. This is a pointer to distinguish between explicit
     zero and not specified. Defaults to 1.
deployments/hello.yaml:

The replicas field can be updated using the kubectl scale command:
$ kubectl scale deployment hello --replicas=5
deployment.extensions "hello" scaled
After the Deployment is updated, Kubernetes will automatically update the associated ReplicaSet and start new Pods to make the total number of Pods equal 5.
We can verify that there are now 5 hello Pods running:
$ kubectl get pods | grep hello
hello-84f68fb667-5srqc     0/1       Pending   0          3m
hello-84f68fb667-6qt84     1/1       Running   0          3m
hello-84f68fb667-bwmlj     1/1       Running   0          38m
hello-84f68fb667-dsfgv     1/1       Running   0          38m
hello-84f68fb667-hr98n     1/1       Running   0          38m
Scale back to 3:
$ kubectl scale deployment hello --replicas=3
deployment.extensions "hello" scaled

$ kubectl get pods | grep hello | wc -l
3
Similar to application Scaling, if a Deployment is exposed publicly, the Service will load-balance the traffic only to available Pods during the update. An available Pod is an instance that is available to the users of the application.
The rolling update removes old pods one-by-one, while adding new ones at the same time. This keeps the application available throughout the process and ensures that there is no drop in its capacity to handle requests. Since this runs the new version before terminating the old one, we should only use this strategy when our app can handle running both old and new versions at the same time.
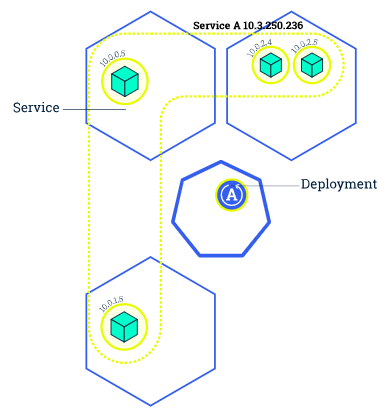
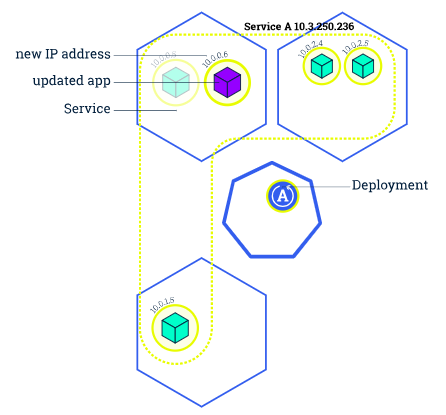


Pictures from Performing a Rolling Update
To update our Deployment, let's first update the container's image version to 2.0.0 from 1.0.0 (deployments/hello.yaml). Then, the updated Deployment will be saved to our cluster and Kubernetes will begin a rolling update.
Let's check the newly created ReplicaSet:
$ kubectl get replicaset
NAME                 DESIRED   CURRENT   READY     AGE
auth-569fc694        1         1         1         1h
frontend-f685c7476   1         1         1         1h
hello-84f68fb667     3         3         3         1h
We should be able to see a new entry in the rollout history:
$ kubectl rollout history deployment/hello
deployments "hello"
REVISION  CHANGE-CAUSE
1         <none>
To roll back to the previous version, we can use the rollout command:
$ kubectl rollout undo deployment/hello
deployment.apps "hello"
To verify the roll back in the history:
$ kubectl rollout history deployment/hello
deployments "hello"
REVISION  CHANGE-CAUSE
1         <none>
We can check if all the Pods have rolled back to their previous versions:
$ kubectl get pods -o jsonpath --template='{range .items[*]}{.metadata.name}{"\t"}{"\t"}{.spec.containers[0].image}{"\n"}{end}'
...
hello-84f68fb667-bwmlj          kelseyhightower/hello:1.0.0
hello-84f68fb667-dsfgv          kelseyhightower/hello:1.0.0
hello-84f68fb667-hr98n          kelseyhightower/hello:1.0.0
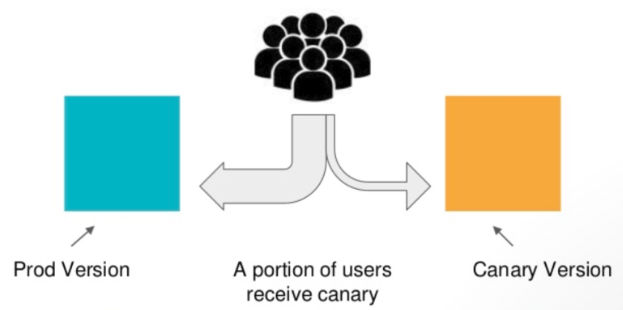
When we want to test a new deployment in production with a subset of our users, we can use a canary deployment. Canary deployments allow us to release a change to a small subset of our users to mitigate risk associated with new releases.
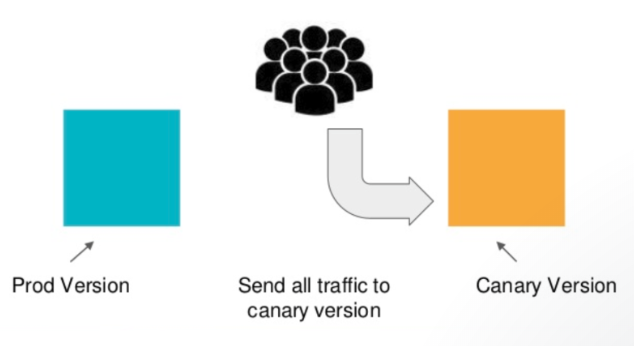
Pictures from Fully automated canary deployments in Kubernetes
As we can see from the picture, a canary deployment consists of a separate deployment with our new version and a service that targets both our stable deployment as well as our canary deployment.
In addition to our stable release ("hello"), we want to create a new canary deployment for the new version (deployments/hello-canary.yaml):

Let's create the canary deployment:
$ kubectl create -f deployments/hello-canary.yaml
deployment.extensions "hello-canary" created

$ kubectl get pods -o jsonpath --template='{range .items[*]}{.metadata.name}{"\t"}{"\t"}{.metadata.labels.version}{"\n"}{end}'
...
hello-84f68fb667-bwmlj          1.0.0
hello-84f68fb667-dsfgv          1.0.0
hello-84f68fb667-hr98n          1.0.0
hello-canary-59656ddfcf-cbtp8           1.0.0
After the canary deployment, we should have two deployments, hello and hello-canary:
$ kubectl get deployments
NAME           DESIRED   CURRENT   UP-TO-DATE   AVAILABLE   AGE
auth           1         1         1            1           3h
frontend       1         1         1            1           2h
hello          3         3         3            3           2h
hello-canary   1         1         1            1           50m
services/hello.yaml:

deployments/hello.yaml:
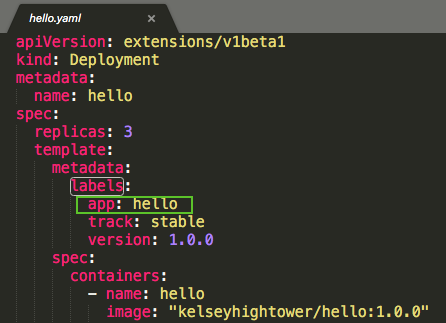
deployments/hello-canary.yaml:

On the hello service, the selector uses the "app:hello" selector which will match pods in both the prod deployment and canary deployment. However, because the canary deployment has a fewer number of pods, it will be visible to fewer users.
We can verify the ratio of "hello" version being served by the request compared with "hello-canary" version being served:
$ curl -ks https://`kubectl get svc frontend -o=jsonpath="{.status.loadBalancer.ingress[0].ip}"`/version
Here is the output when we try the command 20 times with the following code:
$ while true; do curl -ks https://`kubectl get svc frontend -o=jsonpath="{.status.loadBalancer.ingress[0].ip}"`/version; sleep 1; done
{"version":"1.0.0"}
{"version":"1.0.0"}
{"version":"1.0.0"}
{"version":"1.0.0"}
{"version":"1.0.0"}
{"version":"1.0.0"}
{"version":"1.0.0"}
{"version":"2.0.0"}
{"version":"2.0.0"}
{"version":"1.0.0"}
{"version":"2.0.0"}
{"version":"1.0.0"}
{"version":"2.0.0"}
{"version":"2.0.0"}
{"version":"1.0.0"}
{"version":"2.0.0"}
{"version":"1.0.0"}
{"version":"1.0.0"}
{"version":"1.0.0"}
{"version":"2.0.0"}
We can see that some of the requests are served by hello 1.0.0 and a small subset (7/20 = 35%, though not exactly 1/4 = 25% which is the the ratio of the number of pods for the two hellos) are served by 2.0.0.
The canary strategy introduces a new concept of session affinity: making a user "stick" to a specific deployment.
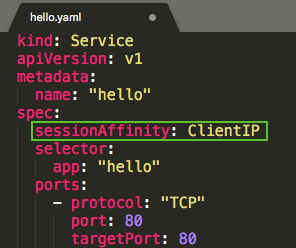
We can achieve this by creating a service with session affinity. This way the same user will always be served from the same version. In the example below, the service is the same as before, however, a new sessionAffinity field has been added, and set to ClientIP, which makes all clients with the same IP address to have their requests sent to the same version of the hello application.
services/hello.yaml:
Picture from Managing Deployments Using Kubernetes Engine
Blue-green deployment is a technique that reduces downtime/risk by running two identical production environments called Blue and Green.
But at a given time, only one of the environments is live, with the live environment serving all production traffic. Initially, Blue is currently live and Green is idle.

As we prepare a new version of our software, deployment and the final stage of testing takes place in the environment that is not live (Green env). Once we have fully tested the software in Green, we switch all incoming requests to Green instead of Blue. Green is now live, and Blue is idle.
Blue-green deployment reduces risk: if something unexpected happens with our new version on Green, we can immediately roll back to the last version by switching back to Blue.
However, this blue-green deployments has its downside which is that we will need to have at least 2x the resources. So, we need to make sure we have enough resources in our cluster before deploying both versions of the application at once.
services/hello-blue.yaml:
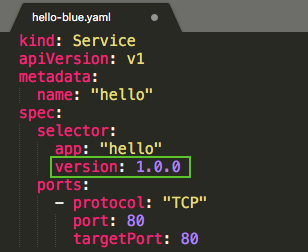
services/hello-green.yaml:

Use the existing hello service, but update it so that it has a selector app:hello, version: 1.0.0. The selector will match the existing "blue" deployment. But it will not match the "green" deployment because it will use a different version.
Let's update the service:
$ kubectl apply -f services/hello-blue.yaml
service "hello" configured
In order to support a blue-green deployment style, we will create a new "green" deployment for our new version. The green deployment updates the version label and the image path.
deployments/hello-green.yaml:
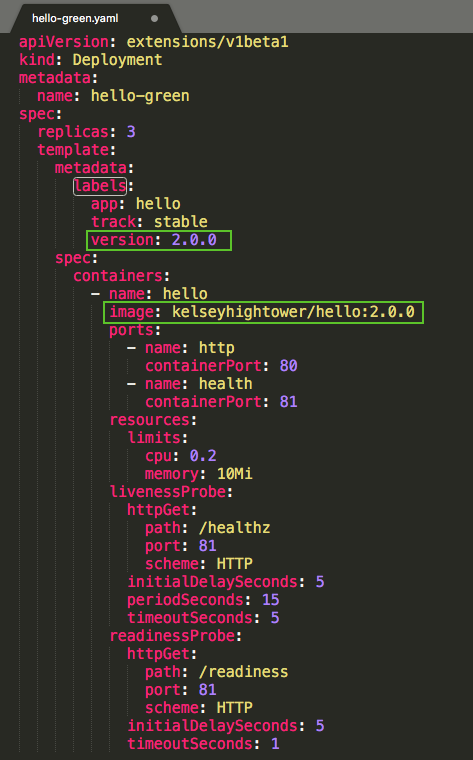
$ kubectl create -f deployments/hello-green.yaml
deployment.extensions "hello-green" created
Let's verify that the current version of 1.0.0 is still being used:
$ kubectl get svc
NAME         TYPE           CLUSTER-IP      EXTERNAL-IP      PORT(S)         AGE
auth         ClusterIP      10.59.247.28    <none>           80/TCP          4h
frontend     LoadBalancer   10.59.254.111   35.188.216.153   443:32470/TCP   4h
hello        ClusterIP      10.59.242.28    <none>           80/TCP          4h
kubernetes   ClusterIP      10.59.240.1     <none>           443/TCP         4h

$ curl -ks https://`kubectl get svc frontend -o=jsonpath="{.status.loadBalancer.ingress[0].ip}"`/version
{"version":"1.0.0"}
Ok, we're still using "1.0.0". Now, let's update the service to point to the new version, 2.0.0:
$ kubectl apply -f services/hello-green.yaml
service "hello" configured
Once the service is updated, the "green" deployment should be used immediately. We can now verify that the new version is always being used:
$ curl -ks https://`kubectl get svc frontend -o=jsonpath="{.status.loadBalancer.ingress[0].ip}"`/version
{"version":"2.0.0"}
Ok, it appears all is well.
Found a bug in the version, let's roll back to "1.0.0". Because the "blue" deployment is still running, we can just update the service back to the old version:
$ kubectl apply -f services/hello-blue.yaml
service "hello" configured
Then, verify that the right version is now being used, "1.0.0":
$ curl -ks https://`kubectl get svc frontend -o=jsonpath="{.status.loadBalancer.ingress[0].ip}"`/version
{"version":"1.0.0"}
Yes, the version is back to the previous one, 1.0.0. The roll-back is successful!
$ kubectl get deployments
NAME          DESIRED   CURRENT   UP-TO-DATE   AVAILABLE   AGE
auth          1         1         1            1           4h
frontend      1         1         1            1           4h
hello         3         3         3            3           4h
hello-green   3         3         3            1           30m

$ kubectl delete deployments auth frontend hello hello-green
deployment.extensions "auth" deleted
deployment.extensions "frontend" deleted
deployment.extensions "hello" deleted
deployment.extensions "hello-green" deleted

$ kubectl get pods
No resources found.

$ kubectl get svc
NAME         TYPE           CLUSTER-IP      EXTERNAL-IP      PORT(S)         AGE
auth         ClusterIP      10.59.247.28    <none>           80/TCP          4h
frontend     LoadBalancer   10.59.254.111   35.188.216.153   443:32470/TCP   4h
hello        ClusterIP      10.59.242.28    <none>           80/TCP          4h
kubernetes   ClusterIP      10.59.240.1     <none>           443/TCP         5h

$ kubectl delete services auth frontend hello
service "auth" deleted
service "frontend" deleted
service "hello" deleted

$ gcloud container clusters delete deployments-to-gke --zone us-central1-b
The following clusters will be deleted.
 - [deployments-to-gke] in [us-central1-b]
Do you want to continue (Y/n)?  y
Deleting cluster deployments-to-gke...done.
Deleted [https://container.googleapis.com/v1/projects/hello-node-231518/zones/us-central1-b/clusters/deployments-to-gke].
Docker & K8s
- Docker install on Amazon Linux AMI
- Docker install on EC2 Ubuntu 14.04
- Docker container vs Virtual Machine
- Docker install on Ubuntu 14.04
- Docker Hello World Application
- Nginx image - share/copy files, Dockerfile
- Working with Docker images : brief introduction
- Docker image and container via docker commands (search, pull, run, ps, restart, attach, and rm)
- More on docker run command (docker run -it, docker run --rm, etc.)
- Docker Networks - Bridge Driver Network
- Docker Persistent Storage
- File sharing between host and container (docker run -d -p -v)
- Linking containers and volume for datastore
- Dockerfile - Build Docker images automatically I - FROM, MAINTAINER, and build context
- Dockerfile - Build Docker images automatically II - revisiting FROM, MAINTAINER, build context, and caching
- Dockerfile - Build Docker images automatically III - RUN
- Dockerfile - Build Docker images automatically IV - CMD
- Dockerfile - Build Docker images automatically V - WORKDIR, ENV, ADD, and ENTRYPOINT
- Docker - Apache Tomcat
- Docker - NodeJS
- Docker - NodeJS with hostname
- Docker Compose - NodeJS with MongoDB
- Docker - Prometheus and Grafana with Docker-compose
- Docker - StatsD/Graphite/Grafana
- Docker - Deploying a Java EE JBoss/WildFly Application on AWS Elastic Beanstalk Using Docker Containers
- Docker : NodeJS with GCP Kubernetes Engine
- Docker : Jenkins Multibranch Pipeline with Jenkinsfile and Github
- Docker : Jenkins Master and Slave
- Docker - ELK : ElasticSearch, Logstash, and Kibana
- Docker - ELK 7.6 : Elasticsearch on Centos 7
- Docker - ELK 7.6 : Filebeat on Centos 7
- Docker - ELK 7.6 : Logstash on Centos 7
- Docker - ELK 7.6 : Kibana on Centos 7
- Docker - ELK 7.6 : Elastic Stack with Docker Compose
- Docker - Deploy Elastic Cloud on Kubernetes (ECK) via Elasticsearch operator on minikube
- Docker - Deploy Elastic Stack via Helm on minikube
- Docker Compose - A gentle introduction with WordPress
- Docker Compose - MySQL
- MEAN Stack app on Docker containers : micro services
- MEAN Stack app on Docker containers : micro services via docker-compose
- Docker Compose - Hashicorp's Vault and Consul Part A (install vault, unsealing, static secrets, and policies)
- Docker Compose - Hashicorp's Vault and Consul Part B (EaaS, dynamic secrets, leases, and revocation)
- Docker Compose - Hashicorp's Vault and Consul Part C (Consul)
- Docker Compose with two containers - Flask REST API service container and an Apache server container
- Docker compose : Nginx reverse proxy with multiple containers
- Docker & Kubernetes : Envoy - Getting started
- Docker & Kubernetes : Envoy - Front Proxy
- Docker & Kubernetes : Ambassador - Envoy API Gateway on Kubernetes
- Docker Packer
- Docker Cheat Sheet
- Docker Q & A #1
- Kubernetes Q & A - Part I
- Kubernetes Q & A - Part II
- Docker - Run a React app in a docker
- Docker - Run a React app in a docker II (snapshot app with nginx)
- Docker - NodeJS and MySQL app with React in a docker
- Docker - Step by Step NodeJS and MySQL app with React - I
- Installing LAMP via puppet on Docker
- Docker install via Puppet
- Nginx Docker install via Ansible
- Apache Hadoop CDH 5.8 Install with QuickStarts Docker
- Docker - Deploying Flask app to ECS
- Docker Compose - Deploying WordPress to AWS
- Docker - WordPress Deploy to ECS with Docker-Compose (ECS-CLI EC2 type)
- Docker - WordPress Deploy to ECS with Docker-Compose (ECS-CLI Fargate type)
- Docker - ECS Fargate
- Docker - AWS ECS service discovery with Flask and Redis
- Docker & Kubernetes : minikube
- Docker & Kubernetes 2 : minikube Django with Postgres - persistent volume
- Docker & Kubernetes 3 : minikube Django with Redis and Celery
- Docker & Kubernetes 4 : Django with RDS via AWS Kops
- Docker & Kubernetes : Kops on AWS
- Docker & Kubernetes : Ingress controller on AWS with Kops
- Docker & Kubernetes : HashiCorp's Vault and Consul on minikube
- Docker & Kubernetes : HashiCorp's Vault and Consul - Auto-unseal using Transit Secrets Engine
- Docker & Kubernetes : Persistent Volumes & Persistent Volumes Claims - hostPath and annotations
- Docker & Kubernetes : Persistent Volumes - Dynamic volume provisioning
- Docker & Kubernetes : DaemonSet
- Docker & Kubernetes : Secrets
- Docker & Kubernetes : kubectl command
- Docker & Kubernetes : Assign a Kubernetes Pod to a particular node in a Kubernetes cluster
- Docker & Kubernetes : Configure a Pod to Use a ConfigMap
- AWS : EKS (Elastic Container Service for Kubernetes)
- Docker & Kubernetes : Run a React app in a minikube
- Docker & Kubernetes : Minikube install on AWS EC2
- Docker & Kubernetes : Cassandra with a StatefulSet
- Docker & Kubernetes : Terraform and AWS EKS
- Docker & Kubernetes : Pods and Service definitions
- Docker & Kubernetes : Service IP and the Service Type
- Docker & Kubernetes : Kubernetes DNS with Pods and Services
- Docker & Kubernetes : Headless service and discovering pods
- Docker & Kubernetes : Scaling and Updating application
- Docker & Kubernetes : Horizontal pod autoscaler on minikubes
- Docker & Kubernetes : From a monolithic app to micro services on GCP Kubernetes
- Docker & Kubernetes : Rolling updates
- Docker & Kubernetes : Deployments to GKE (Rolling update, Canary and Blue-green deployments)
- Docker & Kubernetes : Slack Chat Bot with NodeJS on GCP Kubernetes
- Docker & Kubernetes : Continuous Delivery with Jenkins Multibranch Pipeline for Dev, Canary, and Production Environments on GCP Kubernetes
- Docker & Kubernetes : NodePort vs LoadBalancer vs Ingress
- Docker & Kubernetes : MongoDB / MongoExpress on Minikube
- Docker & Kubernetes : Load Testing with Locust on GCP Kubernetes
- Docker & Kubernetes : MongoDB with StatefulSets on GCP Kubernetes Engine
- Docker & Kubernetes : Nginx Ingress Controller on Minikube
- Docker & Kubernetes : Setting up Ingress with NGINX Controller on Minikube (Mac)
- Docker & Kubernetes : Nginx Ingress Controller for Dashboard service on Minikube
- Docker & Kubernetes : Nginx Ingress Controller on GCP Kubernetes
- Docker & Kubernetes : Kubernetes Ingress with AWS ALB Ingress Controller in EKS
- Docker & Kubernetes : Setting up a private cluster on GCP Kubernetes
- Docker & Kubernetes : Kubernetes Namespaces (default, kube-public, kube-system) and switching namespaces (kubens)
- Docker & Kubernetes : StatefulSets on minikube
- Docker & Kubernetes : RBAC
- Docker & Kubernetes Service Account, RBAC, and IAM
- Docker & Kubernetes - Kubernetes Service Account, RBAC, IAM with EKS ALB, Part 1
- Docker & Kubernetes : Helm Chart
- Docker & Kubernetes : My first Helm deploy
- Docker & Kubernetes : Readiness and Liveness Probes
- Docker & Kubernetes : Helm chart repository with Github pages
- Docker & Kubernetes : Deploying WordPress and MariaDB with Ingress to Minikube using Helm Chart
- Docker & Kubernetes : Deploying WordPress and MariaDB to AWS using Helm 2 Chart
- Docker & Kubernetes : Deploying WordPress and MariaDB to AWS using Helm 3 Chart
- Docker & Kubernetes : Helm Chart for Node/Express and MySQL with Ingress
- Docker & Kubernetes : Deploy Prometheus and Grafana using Helm and Prometheus Operator - Monitoring Kubernetes node resources out of the box
- Docker & Kubernetes : Deploy Prometheus and Grafana using kube-prometheus-stack Helm Chart
- Docker & Kubernetes : Istio (service mesh) sidecar proxy on GCP Kubernetes
- Docker & Kubernetes : Istio on EKS
- Docker & Kubernetes : Istio on Minikube with AWS EC2 for Bookinfo Application
- Docker & Kubernetes : Deploying .NET Core app to Kubernetes Engine and configuring its traffic managed by Istio (Part I)
- Docker & Kubernetes : Deploying .NET Core app to Kubernetes Engine and configuring its traffic managed by Istio (Part II - Prometheus, Grafana, pin a service, split traffic, and inject faults)
- Docker & Kubernetes : Helm Package Manager with MySQL on GCP Kubernetes Engine
- Docker & Kubernetes : Deploying Memcached on Kubernetes Engine
- Docker & Kubernetes : EKS Control Plane (API server) Metrics with Prometheus
- Docker & Kubernetes : Spinnaker on EKS with Halyard
- Docker & Kubernetes : Continuous Delivery Pipelines with Spinnaker and Kubernetes Engine
- Docker & Kubernetes : Multi-node Local Kubernetes cluster : Kubeadm-dind (docker-in-docker)
- Docker & Kubernetes : Multi-node Local Kubernetes cluster : Kubeadm-kind (k8s-in-docker)
- Docker & Kubernetes : nodeSelector, nodeAffinity, taints/tolerations, pod affinity and anti-affinity - Assigning Pods to Nodes
- Docker & Kubernetes : Jenkins-X on EKS
- Docker & Kubernetes : ArgoCD App of Apps with Heml on Kubernetes
- Docker & Kubernetes : ArgoCD on Kubernetes cluster
- Docker & Kubernetes : GitOps with ArgoCD for Continuous Delivery to Kubernetes clusters (minikube) - guestbook
Ph.D. / Golden Gate Ave, San Francisco / Seoul National Univ / Carnegie Mellon / UC Berkeley / DevOps / Deep Learning / Visualization