Kubernetes II - kops (kubernetes-ops) on AWS
In this post, using kops installed on my Mac, we'll make Kubernetes cluster consists of 1 master
(t3.medium instance will be used in this post but the smaller instances such as t3.micro or t3.small will work as well) and 2 worker nodes (t2.nano). Note that the t3 is more suitable for the master
because it is better tuned for the burst nature of the master node.
Then, we are going to deploy two types of services: NodePort and LoadBalancer.
kops (kubernetes-ops) helps us create, destroy, upgrade and maintain production-grade, highly available, Kubernetes clusters from the command line. AWS (Amazon Web Services) is currently officially supported, with GCE and OpenStack in beta support, and VMware vSphere in alpha, and other platforms planned.
Kubernetes provides us with highly resilient infrastructure, automatic scaling (rollback), and self-healing of containers. It provides us REST APIs, thus hiding the complicated management of containers from us.
In short, we can think of it as kubectl for clusters.
One of the ways kops integrates with the existing Kubernetes community and software is that the main interaction with kops is via a relatively easy to use, declarative syntax command line utility, that's a lot like kubectl.
At a basic level, the difference between kops and kubectl is that kubectl interacts with applications or services deployed in your cluster, while kops interacts with entire clusters at a time. Instead of scaling an application deployment to 30 replicas like before, you might scale the number of nodes to 30 with a few quick declarative commands. As the administrator, that means you're not responsible for individually provisioning all the extra compute instances, and you don't have to rely on traditional DevOps tools like Chef or Ansible to configure them.
If you give kops a job within its scope, it gets it done and helps direct your choices to industry best practices. In addition, creating and managing Kubernetes clusters with kops is much faster than the first generation, more generalized DevOps tools. We're talking about under 20 minutes for a highly available multiple master cluster of essentially any size in private network topology. All it takes is a few choices, and kops works out the details of how to get it done.
In this tutorial, we'll be Installing Kubernetes on AWS with kops.
- Nodes:
Hosts that run Kubernetes applications - Maser:
The Master is responsible for managing the cluster. The master coordinates all activities in our cluster (scheduling applications, maintaining applications' desired state, scaling applications, and rolling out new updates). - Containers:
Units of packaging - kubelets:
Each node has a Kubelet. It is an agent for managing the node and communicating with the Kubernetes master - Pods:
Units of deployment which is collection of containers - Replication Controller:
Ensures availability and scalability - Labels:
Key-value pairs for identification - Services:
Collection of pods exposed as an endpoint
We must have kubectl installed in order to control Kubernetes clusters. As described earlier, kubectl is a command line tool that interacts with kube-apiserver and send commands to the master node and each kubectl command is converted into an API call.
On Linux, we can install it as binary using native Ubamtu/Debian package management:
$ sudo apt-get update && sudo apt-get install -y apt-transport-https
$ curl -s https://packages.cloud.google.com/apt/doc/apt-key.gpg | sudo apt-key add -
$ sudo touch /etc/apt/sources.list.d/kubernetes.list
$ echo "deb http://apt.kubernetes.io/ kubernetes-xenial main" | sudo tee -a /etc/apt/sources.list.d/kubernetes.list
$ sudo apt-get update
$ sudo apt-get install -y kubectl

$ kubectl version
Client Version: version.Info{Major:"1", Minor:"6", GitVersion:"v1.6.1", GitCommit:"b0b7a323cc5a4a2019b2e9520c21c7830b7f708e", GitTreeState:"clean", BuildDate:"2017-04-03T20:44:38Z", GoVersion:"go1.7.5", Compiler:"gc", Platform:"linux/amd64"}
...
We must have kubectl installed in order for kops to work with AWS. As described earlier, kubectl is a command line tool that interacts with kube-apiserver and send commands to the master node and each kubectl command is converted into an API call.
On Linux, we can install it as follows:
$ sudo pip install awscli
Download kops from the releases page :
$ curl -LO  https://github.com/kubernetes/kops/releases/download/v1.18.0/kops-darwin-amd64
$ chmod +x ./kops-darwin-amd64
$ sudo mv ./kops-darwin-amd64 /usr/local/bin/kops
kops is an opinionated provisioning system:
- Fully automated installation
- Uses DNS to identify clusters
- Self-healing: everything runs in Auto-Scaling Groups
- Multiple OS support (Debian, Ubuntu 16.04 supported, CentOS & RHEL, Amazon Linux and CoreOS)
- High-Availability support
- Can directly provision, or generate terraform manifests
kops uses DNS for discovery, both inside the cluster and so that we can reach the kubernetes API server from clients. We will use one of my already existing domains in Route53, pykey.com.
kops has a strong opinion on the cluster name: it should be a valid DNS name. By doing so we will no longer get our clusters confused, we can share clusters with our colleagues unambiguously, and we can reach them without relying on remembering an IP address.
A Route53 hosted zone can serve subdomains. We can use subdomains to divide our clusters. As for our example, we will use useast1.dev.pykey.com. The API server endpoint will then be api.useast1.dev.pykey.com.
We can double-check that our cluster is configured correctly if we have the dig tool by running:
$ dig ns dev.pykey.com
...
;; ANSWER SECTION:
dev.pykey.com.		300	IN	CNAME	pykey.com.
pykey.com.		172800	IN	NS	ns-569.awsdns-07.net.
pykey.com.		172800	IN	NS	ns-105.awsdns-13.com.
pykey.com.		172800	IN	NS	ns-1158.awsdns-16.org.
pykey.com.		172800	IN	NS	ns-1785.awsdns-31.co.uk.
...
We should see the 4 NS records that Route53 assigned our hosted zone. This is a critical component when setting up clusters. If we are experiencing problems with the Kubernetes API not coming up, chances are something is wrong with the cluster's DNS.
kops lets us manage our clusters even after installation. To do this, it must keep track of the clusters that we have created, along with their configuration, the keys they are using etc. This information is stored in an S3 bucket. S3 permissions are used to control access to the bucket.
In our example, we chose dev.pykey.com as our hosted zone, so let's pick clusters.dev.pykey.com as the S3 bucket name.
Let's create the S3 bucket using:
$ aws s3 mb s3://clusters.dev.pykey.com
make_bucket: clusters.dev.pykey.com
We can export KOPS_STATE_STORE=s3://clusters.dev.pykey.com and then kops will use this location by default:
$ export KOPS_STATE_STORE=s3://clusters.dev.pykey.com
We may want to put this in our bash profile.
The following commands are used in this section:
kops create cluster: creates a cluster configuration. It does NOT actually create the cloud resources. This give us an opportunity to review the configuration or change it.kops update cluster: it does actually create the cloud resources.
Run kops create cluster to create our cluster configuration:
$ kops create cluster --zones=us-east-1a,us-east-1b,us-east-1c useast1.dev.pykey.com
I0903 14:24:04.227661   49380 create_cluster.go:557] Inferred --cloud=aws from zone "us-east-1a"
I0903 14:24:04.649711   49380 subnets.go:184] Assigned CIDR 172.20.32.0/19 to subnet us-east-1a
I0903 14:24:04.649756   49380 subnets.go:184] Assigned CIDR 172.20.64.0/19 to subnet us-east-1b
I0903 14:24:04.649778   49380 subnets.go:184] Assigned CIDR 172.20.96.0/19 to subnet us-east-1c
I0903 14:24:07.083525   49380 create_cluster.go:1547] Using SSH public key: /Users/kihyuckhong/.ssh/id_rsa.pub
Previewing changes that will be made:

I0903 14:24:09.588591   49380 executor.go:103] Tasks: 0 done / 91 total; 43 can run
I0903 14:24:10.950585   49380 executor.go:103] Tasks: 43 done / 91 total; 28 can run
I0903 14:24:11.651943   49380 executor.go:103] Tasks: 71 done / 91 total; 18 can run
I0903 14:24:12.270655   49380 executor.go:103] Tasks: 89 done / 91 total; 2 can run
I0903 14:24:12.420486   49380 executor.go:103] Tasks: 91 done / 91 total; 0 can run
Will create resources:
  AutoscalingGroup/master-us-east-1a.masters.useast1.dev.pykey.com
  	Granularity         	1Minute
  	LaunchConfiguration 	name:master-us-east-1a.masters.useast1.dev.pykey.com
  	MaxSize             	1
  	Metrics             	[GroupDesiredCapacity, GroupInServiceInstances, GroupMaxSize, GroupMinSize, GroupPendingInstances, GroupStandbyInstances, GroupTerminatingInstances, GroupTotalInstances]
  	MinSize             	1
  	Subnets             	[name:us-east-1a.useast1.dev.pykey.com]
  	SuspendProcesses    	[]
  	Tags                	{Name: master-us-east-1a.masters.useast1.dev.pykey.com, KubernetesCluster: useast1.dev.pykey.com, kubernetes.io/cluster/useast1.dev.pykey.com: owned, k8s.io/cluster-autoscaler/node-template/label/kops.k8s.io/instancegroup: master-us-east-1a, k8s.io/role/master: 1, kops.k8s.io/instancegroup: master-us-east-1a}

  AutoscalingGroup/nodes.useast1.dev.pykey.com
  	Granularity         	1Minute
  	LaunchConfiguration 	name:nodes.useast1.dev.pykey.com
  	MaxSize             	2
  	Metrics             	[GroupDesiredCapacity, GroupInServiceInstances, GroupMaxSize, GroupMinSize, GroupPendingInstances, GroupStandbyInstances, GroupTerminatingInstances, GroupTotalInstances]
  	MinSize             	2
  	Subnets             	[name:us-east-1a.useast1.dev.pykey.com, name:us-east-1b.useast1.dev.pykey.com, name:us-east-1c.useast1.dev.pykey.com]
  	SuspendProcesses    	[]
  	Tags                	{Name: nodes.useast1.dev.pykey.com, KubernetesCluster: useast1.dev.pykey.com, kubernetes.io/cluster/useast1.dev.pykey.com: owned, k8s.io/cluster-autoscaler/node-template/label/kops.k8s.io/instancegroup: nodes, k8s.io/role/node: 1, kops.k8s.io/instancegroup: nodes}

  DHCPOptions/useast1.dev.pykey.com
  	DomainName          	ec2.internal
  	DomainNameServers   	AmazonProvidedDNS
  	Shared              	false
  	Tags                	{Name: useast1.dev.pykey.com, KubernetesCluster: useast1.dev.pykey.com, kubernetes.io/cluster/useast1.dev.pykey.com: owned}

  EBSVolume/a.etcd-events.useast1.dev.pykey.com
  	AvailabilityZone    	us-east-1a
  	Encrypted           	false
  	SizeGB              	20
  	Tags                	{kubernetes.io/cluster/useast1.dev.pykey.com: owned, Name: a.etcd-events.useast1.dev.pykey.com, KubernetesCluster: useast1.dev.pykey.com, k8s.io/etcd/events: a/a, k8s.io/role/master: 1}
  	VolumeType          	gp2

  EBSVolume/a.etcd-main.useast1.dev.pykey.com
  	AvailabilityZone    	us-east-1a
  	Encrypted           	false
  	SizeGB              	20
  	Tags                	{k8s.io/etcd/main: a/a, k8s.io/role/master: 1, kubernetes.io/cluster/useast1.dev.pykey.com: owned, Name: a.etcd-main.useast1.dev.pykey.com, KubernetesCluster: useast1.dev.pykey.com}
  	VolumeType          	gp2

  IAMInstanceProfile/masters.useast1.dev.pykey.com
  	Shared              	false

  IAMInstanceProfile/nodes.useast1.dev.pykey.com
  	Shared              	false

  IAMInstanceProfileRole/masters.useast1.dev.pykey.com
  	InstanceProfile     	name:masters.useast1.dev.pykey.com id:masters.useast1.dev.pykey.com
  	Role                	name:masters.useast1.dev.pykey.com

  IAMInstanceProfileRole/nodes.useast1.dev.pykey.com
  	InstanceProfile     	name:nodes.useast1.dev.pykey.com id:nodes.useast1.dev.pykey.com
  	Role                	name:nodes.useast1.dev.pykey.com

  IAMRole/masters.useast1.dev.pykey.com
  	ExportWithID        	masters

  IAMRole/nodes.useast1.dev.pykey.com
  	ExportWithID        	nodes

  IAMRolePolicy/master-policyoverride
  	Role                	name:masters.useast1.dev.pykey.com
  	Managed             	true

  IAMRolePolicy/masters.useast1.dev.pykey.com
  	Role                	name:masters.useast1.dev.pykey.com
  	Managed             	false

  IAMRolePolicy/node-policyoverride
  	Role                	name:nodes.useast1.dev.pykey.com
  	Managed             	true

  IAMRolePolicy/nodes.useast1.dev.pykey.com
  	Role                	name:nodes.useast1.dev.pykey.com
  	Managed             	false

  InternetGateway/useast1.dev.pykey.com
  	VPC                 	name:useast1.dev.pykey.com
  	Shared              	false
  	Tags                	{Name: useast1.dev.pykey.com, KubernetesCluster: useast1.dev.pykey.com, kubernetes.io/cluster/useast1.dev.pykey.com: owned}

  Keypair/apiserver-aggregator
  	Signer              	name:apiserver-aggregator-ca id:cn=apiserver-aggregator-ca
  	Subject             	cn=aggregator
  	Type                	client
  	LegacyFormat        	false

  Keypair/apiserver-aggregator-ca
  	Subject             	cn=apiserver-aggregator-ca
  	Type                	ca
  	LegacyFormat        	false

  Keypair/apiserver-proxy-client
  	Signer              	name:ca id:cn=kubernetes
  	Subject             	cn=apiserver-proxy-client
  	Type                	client
  	LegacyFormat        	false

  Keypair/ca
  	Subject             	cn=kubernetes
  	Type                	ca
  	LegacyFormat        	false

  Keypair/etcd-clients-ca
  	Subject             	cn=etcd-clients-ca
  	Type                	ca
  	LegacyFormat        	false

  Keypair/etcd-manager-ca-events
  	Subject             	cn=etcd-manager-ca-events
  	Type                	ca
  	LegacyFormat        	false

  Keypair/etcd-manager-ca-main
  	Subject             	cn=etcd-manager-ca-main
  	Type                	ca
  	LegacyFormat        	false

  Keypair/etcd-peers-ca-events
  	Subject             	cn=etcd-peers-ca-events
  	Type                	ca
  	LegacyFormat        	false

  Keypair/etcd-peers-ca-main
  	Subject             	cn=etcd-peers-ca-main
  	Type                	ca
  	LegacyFormat        	false

  Keypair/kops
  	Signer              	name:ca id:cn=kubernetes
  	Subject             	o=system:masters,cn=kops
  	Type                	client
  	LegacyFormat        	false

  Keypair/kube-controller-manager
  	Signer              	name:ca id:cn=kubernetes
  	Subject             	cn=system:kube-controller-manager
  	Type                	client
  	LegacyFormat        	false

  Keypair/kube-proxy
  	Signer              	name:ca id:cn=kubernetes
  	Subject             	cn=system:kube-proxy
  	Type                	client
  	LegacyFormat        	false

  Keypair/kube-scheduler
  	Signer              	name:ca id:cn=kubernetes
  	Subject             	cn=system:kube-scheduler
  	Type                	client
  	LegacyFormat        	false

  Keypair/kubecfg
  	Signer              	name:ca id:cn=kubernetes
  	Subject             	o=system:masters,cn=kubecfg
  	Type                	client
  	LegacyFormat        	false

  Keypair/kubelet
  	Signer              	name:ca id:cn=kubernetes
  	Subject             	o=system:nodes,cn=kubelet
  	Type                	client
  	LegacyFormat        	false

  Keypair/kubelet-api
  	Signer              	name:ca id:cn=kubernetes
  	Subject             	cn=kubelet-api
  	Type                	client
  	LegacyFormat        	false

  Keypair/master
  	AlternateNames      	[100.64.0.1, 127.0.0.1, api.internal.useast1.dev.pykey.com, api.useast1.dev.pykey.com, kubernetes, kubernetes.default, kubernetes.default.svc, kubernetes.default.svc.cluster.local]
  	Signer              	name:ca id:cn=kubernetes
  	Subject             	cn=kubernetes-master
  	Type                	server
  	LegacyFormat        	false

  LaunchConfiguration/master-us-east-1a.masters.useast1.dev.pykey.com
  	AssociatePublicIP   	true
  	IAMInstanceProfile  	name:masters.useast1.dev.pykey.com id:masters.useast1.dev.pykey.com
  	ImageID             	099720109477/ubuntu/images/hvm-ssd/ubuntu-focal-20.04-amd64-server-20200716
  	InstanceType        	t3.medium
  	RootVolumeDeleteOnTermination	true
  	RootVolumeSize      	64
  	RootVolumeType      	gp2
  	SSHKey              	name:kubernetes.useast1.dev.pykey.com-f4:e6:ca:e1:b3:ee:fc:6c:91:13:3b:a8:f5:36:e4:92 id:kubernetes.useast1.dev.pykey.com-f4:e6:ca:e1:b3:ee:fc:6c:91:13:3b:a8:f5:36:e4:92
  	SecurityGroups      	[name:masters.useast1.dev.pykey.com]
  	SpotPrice

  LaunchConfiguration/nodes.useast1.dev.pykey.com
  	AssociatePublicIP   	true
  	IAMInstanceProfile  	name:nodes.useast1.dev.pykey.com id:nodes.useast1.dev.pykey.com
  	ImageID             	099720109477/ubuntu/images/hvm-ssd/ubuntu-focal-20.04-amd64-server-20200716
  	InstanceType        	t3.medium
  	RootVolumeDeleteOnTermination	true
  	RootVolumeSize      	128
  	RootVolumeType      	gp2
  	SSHKey              	name:kubernetes.useast1.dev.pykey.com-f4:e6:ca:e1:b3:ee:fc:6c:91:13:3b:a8:f5:36:e4:92 id:kubernetes.useast1.dev.pykey.com-f4:e6:ca:e1:b3:ee:fc:6c:91:13:3b:a8:f5:36:e4:92
  	SecurityGroups      	[name:nodes.useast1.dev.pykey.com]
  	SpotPrice

  ManagedFile/etcd-cluster-spec-events
  	Base                	s3://clusters.dev.pykey.com/useast1.dev.pykey.com/backups/etcd/events
  	Location            	/control/etcd-cluster-spec

  ManagedFile/etcd-cluster-spec-main
  	Base                	s3://clusters.dev.pykey.com/useast1.dev.pykey.com/backups/etcd/main
  	Location            	/control/etcd-cluster-spec

  ManagedFile/manifests-etcdmanager-events
  	Location            	manifests/etcd/events.yaml

  ManagedFile/manifests-etcdmanager-main
  	Location            	manifests/etcd/main.yaml

  ManagedFile/manifests-static-kube-apiserver-healthcheck
  	Location            	manifests/static/kube-apiserver-healthcheck.yaml

  ManagedFile/useast1.dev.pykey.com-addons-bootstrap
  	Location            	addons/bootstrap-channel.yaml

  ManagedFile/useast1.dev.pykey.com-addons-core.addons.k8s.io
  	Location            	addons/core.addons.k8s.io/v1.4.0.yaml

  ManagedFile/useast1.dev.pykey.com-addons-dns-controller.addons.k8s.io-k8s-1.12
  	Location            	addons/dns-controller.addons.k8s.io/k8s-1.12.yaml

  ManagedFile/useast1.dev.pykey.com-addons-dns-controller.addons.k8s.io-k8s-1.6
  	Location            	addons/dns-controller.addons.k8s.io/k8s-1.6.yaml

  ManagedFile/useast1.dev.pykey.com-addons-kops-controller.addons.k8s.io-k8s-1.16
  	Location            	addons/kops-controller.addons.k8s.io/k8s-1.16.yaml

  ManagedFile/useast1.dev.pykey.com-addons-kube-dns.addons.k8s.io-k8s-1.12
  	Location            	addons/kube-dns.addons.k8s.io/k8s-1.12.yaml

  ManagedFile/useast1.dev.pykey.com-addons-kube-dns.addons.k8s.io-k8s-1.6
  	Location            	addons/kube-dns.addons.k8s.io/k8s-1.6.yaml

  ManagedFile/useast1.dev.pykey.com-addons-kubelet-api.rbac.addons.k8s.io-k8s-1.9
  	Location            	addons/kubelet-api.rbac.addons.k8s.io/k8s-1.9.yaml

  ManagedFile/useast1.dev.pykey.com-addons-limit-range.addons.k8s.io
  	Location            	addons/limit-range.addons.k8s.io/v1.5.0.yaml

  ManagedFile/useast1.dev.pykey.com-addons-rbac.addons.k8s.io-k8s-1.8
  	Location            	addons/rbac.addons.k8s.io/k8s-1.8.yaml

  ManagedFile/useast1.dev.pykey.com-addons-storage-aws.addons.k8s.io-v1.15.0
  	Location            	addons/storage-aws.addons.k8s.io/v1.15.0.yaml

  ManagedFile/useast1.dev.pykey.com-addons-storage-aws.addons.k8s.io-v1.7.0
  	Location            	addons/storage-aws.addons.k8s.io/v1.7.0.yaml

  Route/0.0.0.0/0
  	RouteTable          	name:useast1.dev.pykey.com
  	CIDR                	0.0.0.0/0
  	InternetGateway     	name:useast1.dev.pykey.com

  RouteTable/useast1.dev.pykey.com
  	VPC                 	name:useast1.dev.pykey.com
  	Shared              	false
  	Tags                	{kubernetes.io/cluster/useast1.dev.pykey.com: owned, kubernetes.io/kops/role: public, Name: useast1.dev.pykey.com, KubernetesCluster: useast1.dev.pykey.com}

  RouteTableAssociation/us-east-1a.useast1.dev.pykey.com
  	RouteTable          	name:useast1.dev.pykey.com
  	Subnet              	name:us-east-1a.useast1.dev.pykey.com

  RouteTableAssociation/us-east-1b.useast1.dev.pykey.com
  	RouteTable          	name:useast1.dev.pykey.com
  	Subnet              	name:us-east-1b.useast1.dev.pykey.com

  RouteTableAssociation/us-east-1c.useast1.dev.pykey.com
  	RouteTable          	name:useast1.dev.pykey.com
  	Subnet              	name:us-east-1c.useast1.dev.pykey.com

  SSHKey/kubernetes.useast1.dev.pykey.com-f4:e6:ca:e1:b3:ee:fc:6c:91:13:3b:a8:f5:36:e4:92
  	KeyFingerprint      	99:18:2b:e4:dd:e8:4c:87:fb:b7:4d:ba:94:74:3a:bb

  Secret/admin

  Secret/kube

  Secret/kube-proxy

  Secret/kubelet

  Secret/system:controller_manager

  Secret/system:dns

  Secret/system:logging

  Secret/system:monitoring

  Secret/system:scheduler

  SecurityGroup/masters.useast1.dev.pykey.com
  	Description         	Security group for masters
  	VPC                 	name:useast1.dev.pykey.com
  	RemoveExtraRules    	[port=22, port=443, port=2380, port=2381, port=4001, port=4002, port=4789, port=179]
  	Tags                	{Name: masters.useast1.dev.pykey.com, KubernetesCluster: useast1.dev.pykey.com, kubernetes.io/cluster/useast1.dev.pykey.com: owned}

  SecurityGroup/nodes.useast1.dev.pykey.com
  	Description         	Security group for nodes
  	VPC                 	name:useast1.dev.pykey.com
  	RemoveExtraRules    	[port=22]
  	Tags                	{Name: nodes.useast1.dev.pykey.com, KubernetesCluster: useast1.dev.pykey.com, kubernetes.io/cluster/useast1.dev.pykey.com: owned}

  SecurityGroupRule/all-master-to-master
  	SecurityGroup       	name:masters.useast1.dev.pykey.com
  	SourceGroup         	name:masters.useast1.dev.pykey.com

  SecurityGroupRule/all-master-to-node
  	SecurityGroup       	name:nodes.useast1.dev.pykey.com
  	SourceGroup         	name:masters.useast1.dev.pykey.com

  SecurityGroupRule/all-node-to-node
  	SecurityGroup       	name:nodes.useast1.dev.pykey.com
  	SourceGroup         	name:nodes.useast1.dev.pykey.com

  SecurityGroupRule/https-external-to-master-0.0.0.0/0
  	SecurityGroup       	name:masters.useast1.dev.pykey.com
  	CIDR                	0.0.0.0/0
  	Protocol            	tcp
  	FromPort            	443
  	ToPort              	443

  SecurityGroupRule/master-egress
  	SecurityGroup       	name:masters.useast1.dev.pykey.com
  	CIDR                	0.0.0.0/0
  	Egress              	true

  SecurityGroupRule/node-egress
  	SecurityGroup       	name:nodes.useast1.dev.pykey.com
  	CIDR                	0.0.0.0/0
  	Egress              	true

  SecurityGroupRule/node-to-master-tcp-1-2379
  	SecurityGroup       	name:masters.useast1.dev.pykey.com
  	Protocol            	tcp
  	FromPort            	1
  	ToPort              	2379
  	SourceGroup         	name:nodes.useast1.dev.pykey.com

  SecurityGroupRule/node-to-master-tcp-2382-4000
  	SecurityGroup       	name:masters.useast1.dev.pykey.com
  	Protocol            	tcp
  	FromPort            	2382
  	ToPort              	4000
  	SourceGroup         	name:nodes.useast1.dev.pykey.com

  SecurityGroupRule/node-to-master-tcp-4003-65535
  	SecurityGroup       	name:masters.useast1.dev.pykey.com
  	Protocol            	tcp
  	FromPort            	4003
  	ToPort              	65535
  	SourceGroup         	name:nodes.useast1.dev.pykey.com

  SecurityGroupRule/node-to-master-udp-1-65535
  	SecurityGroup       	name:masters.useast1.dev.pykey.com
  	Protocol            	udp
  	FromPort            	1
  	ToPort              	65535
  	SourceGroup         	name:nodes.useast1.dev.pykey.com

  SecurityGroupRule/ssh-external-to-master-0.0.0.0/0
  	SecurityGroup       	name:masters.useast1.dev.pykey.com
  	CIDR                	0.0.0.0/0
  	Protocol            	tcp
  	FromPort            	22
  	ToPort              	22

  SecurityGroupRule/ssh-external-to-node-0.0.0.0/0
  	SecurityGroup       	name:nodes.useast1.dev.pykey.com
  	CIDR                	0.0.0.0/0
  	Protocol            	tcp
  	FromPort            	22
  	ToPort              	22

  Subnet/us-east-1a.useast1.dev.pykey.com
  	ShortName           	us-east-1a
  	VPC                 	name:useast1.dev.pykey.com
  	AvailabilityZone    	us-east-1a
  	CIDR                	172.20.32.0/19
  	Shared              	false
  	Tags                	{SubnetType: Public, kubernetes.io/role/elb: 1, Name: us-east-1a.useast1.dev.pykey.com, KubernetesCluster: useast1.dev.pykey.com, kubernetes.io/cluster/useast1.dev.pykey.com: owned}

  Subnet/us-east-1b.useast1.dev.pykey.com
  	ShortName           	us-east-1b
  	VPC                 	name:useast1.dev.pykey.com
  	AvailabilityZone    	us-east-1b
  	CIDR                	172.20.64.0/19
  	Shared              	false
  	Tags                	{kubernetes.io/role/elb: 1, Name: us-east-1b.useast1.dev.pykey.com, KubernetesCluster: useast1.dev.pykey.com, kubernetes.io/cluster/useast1.dev.pykey.com: owned, SubnetType: Public}

  Subnet/us-east-1c.useast1.dev.pykey.com
  	ShortName           	us-east-1c
  	VPC                 	name:useast1.dev.pykey.com
  	AvailabilityZone    	us-east-1c
  	CIDR                	172.20.96.0/19
  	Shared              	false
  	Tags                	{Name: us-east-1c.useast1.dev.pykey.com, KubernetesCluster: useast1.dev.pykey.com, kubernetes.io/cluster/useast1.dev.pykey.com: owned, SubnetType: Public, kubernetes.io/role/elb: 1}

  VPC/useast1.dev.pykey.com
  	CIDR                	172.20.0.0/16
  	EnableDNSHostnames  	true
  	EnableDNSSupport    	true
  	Shared              	false
  	Tags                	{Name: useast1.dev.pykey.com, KubernetesCluster: useast1.dev.pykey.com, kubernetes.io/cluster/useast1.dev.pykey.com: owned}

  VPCDHCPOptionsAssociation/useast1.dev.pykey.com
  	VPC                 	name:useast1.dev.pykey.com
  	DHCPOptions         	name:useast1.dev.pykey.com

Must specify --yes to apply changes

Cluster configuration has been created.

Suggestions:
 * list clusters with: kops get cluster
 * edit this cluster with: kops edit cluster useast1.dev.pykey.com
 * edit your node instance group: kops edit ig --name=useast1.dev.pykey.com nodes
 * edit your master instance group: kops edit ig --name=useast1.dev.pykey.com master-us-east-1a

Finally configure your cluster with: kops update cluster --name useast1.dev.pykey.com --yes
The kops create cluster command created the configuration for our cluster.
Note that it only created the configuration, it did not actually create the cloud resources - we'll do that in the next step with a kops update cluster.
This gives us an opportunity to review the configuration or change it.
It prints commands we can use to explore further:
- list clusters with:
kops get cluster:
$ kops get cluster --state s3://clusters.dev.pykey.com
NAME			CLOUD	ZONES
useast1.dev.pykey.com	aws	us-east-1a,us-east-1b,us-east-1c
Or after setting export KOPS_STATE_STOR=s3://clusters.dev.pykey.com:
$ kops get cluster
NAME			CLOUD	ZONES
useast1.dev.pykey.com	aws	us-east-1a,us-east-1b,us-east-1c
- edit this cluster with:
kops edit cluster useast1.dev.pykey.com:
# Please edit the object below. Lines beginning with a '#' will be ignored, # and an empty file will abort the edit. If an error occurs while saving this file will be # reopened with the relevant failures. # apiVersion: kops.k8s.io/v1alpha2 kind: Cluster metadata: creationTimestamp: "2020-09-03T21:24:06Z" name: useast1.dev.pykey.com spec: api: dns: {} authorization: rbac: {} channel: stable cloudProvider: aws configBase: s3://clusters.dev.pykey.com/useast1.dev.pykey.com containerRuntime: docker etcdClusters: - cpuRequest: 200m etcdMembers: - instanceGroup: master-us-east-1a name: a memoryRequest: 100Mi name: main - cpuRequest: 100m etcdMembers: - instanceGroup: master-us-east-1a name: a memoryRequest: 100Mi name: events iam: allowContainerRegistry: true legacy: false kubelet: anonymousAuth: false kubernetesApiAccess: - 0.0.0.0/0 kubernetesVersion: 1.18.8 masterInternalName: api.internal.useast1.dev.pykey.com masterPublicName: api.useast1.dev.pykey.com networkCIDR: 172.20.0.0/16 networking: kubenet: {} nonMasqueradeCIDR: 100.64.0.0/10 sshAccess: - 0.0.0.0/0 subnets: - cidr: 172.20.32.0/19 name: us-east-1a type: Public zone: us-east-1a - cidr: 172.20.64.0/19 name: us-east-1b type: Public zone: us-east-1b - cidr: 172.20.96.0/19 name: us-east-1c type: Public zone: us-east-1c topology: dns: type: Public masters: public nodes: public - edit node instance group:
kops edit ig --name=useast1.dev.pykey.com nodes:
apiVersion: kops.k8s.io/v1alpha2
kind: InstanceGroup
metadata:
  creationTimestamp: "2020-09-01T23:17:45Z"
  labels:
    kops.k8s.io/cluster: useast1.dev.pykey.com
  name: nodes
spec:
  image: 099720109477/ubuntu/images/hvm-ssd/ubuntu-focal-20.04-amd64-server-20200716
  machineType: t3.medium
  maxSize: 2
  minSize: 2
  nodeLabels:
    kops.k8s.io/instancegroup: nodes
  role: Node
  subnets:
  - us-east-1a
  - us-east-1b
  - us-east-1c
Modify it:
  machineType: t3.medium
  maxSize: 2
  minSize: 2
=>
  machineType: t2.nano
  maxSize: 1
  minSize: 1
- edit master instance group:
kops edit ig --name=useast1.dev.pykey.com master-us-east-1a:
apiVersion: kops.k8s.io/v1alpha2
kind: InstanceGroup
metadata:
  creationTimestamp: "2020-09-03T21:24:06Z"
  labels:
    kops.k8s.io/cluster: useast1.dev.pykey.com
  name: master-us-east-1a
spec:
  image: 099720109477/ubuntu/images/hvm-ssd/ubuntu-focal-20.04-amd64-server-20200716
  machineType: t3.medium
  maxSize: 1
  minSize: 1
  nodeLabels:
    kops.k8s.io/instancegroup: master-us-east-1a
  role: Master
  subnets:
  - us-east-1a
- Finally configure cluster with:
kops update cluster --name useast1.dev.pykey.com --yesSee next section.
If this is the first time using kops, do spend a few minutes to try those out! An instance group is a set of instances, which will be registered as kubernetes nodes. On AWS this is implemented via auto-scaling-groups.
Run kops update cluster to preview what it is going to do our cluster in AWS:
$ kops update cluster useast1.dev.pykey.com
...
Now we'll use the same command, kops update cluster but with --yes to actually create the cluster:
$ kops update cluster useast1.dev.pykey.com --yes
I0903 14:44:07.068796   49581 executor.go:103] Tasks: 0 done / 91 total; 43 can run
I0903 14:44:08.166320   49581 vfs_castore.go:590] Issuing new certificate: "ca"
I0903 14:44:08.232347   49581 vfs_castore.go:590] Issuing new certificate: "apiserver-aggregator-ca"
I0903 14:44:08.345192   49581 vfs_castore.go:590] Issuing new certificate: "etcd-manager-ca-events"
I0903 14:44:08.417344   49581 vfs_castore.go:590] Issuing new certificate: "etcd-manager-ca-main"
I0903 14:44:08.483010   49581 vfs_castore.go:590] Issuing new certificate: "etcd-clients-ca"
I0903 14:44:08.638627   49581 vfs_castore.go:590] Issuing new certificate: "etcd-peers-ca-main"
I0903 14:44:08.725188   49581 vfs_castore.go:590] Issuing new certificate: "etcd-peers-ca-events"
I0903 14:44:10.040967   49581 executor.go:103] Tasks: 43 done / 91 total; 28 can run
I0903 14:44:11.128125   49581 vfs_castore.go:590] Issuing new certificate: "kube-controller-manager"
I0903 14:44:11.263449   49581 vfs_castore.go:590] Issuing new certificate: "kubelet"
I0903 14:44:11.308451   49581 vfs_castore.go:590] Issuing new certificate: "master"
I0903 14:44:11.571119   49581 vfs_castore.go:590] Issuing new certificate: "kube-proxy"
I0903 14:44:11.590496   49581 vfs_castore.go:590] Issuing new certificate: "kube-scheduler"
I0903 14:44:11.687091   49581 vfs_castore.go:590] Issuing new certificate: "kops"
I0903 14:44:11.910723   49581 vfs_castore.go:590] Issuing new certificate: "apiserver-proxy-client"
I0903 14:44:11.937927   49581 vfs_castore.go:590] Issuing new certificate: "kubelet-api"
I0903 14:44:11.988192   49581 vfs_castore.go:590] Issuing new certificate: "apiserver-aggregator"
I0903 14:44:11.988308   49581 vfs_castore.go:590] Issuing new certificate: "kubecfg"
I0903 14:44:13.140444   49581 executor.go:103] Tasks: 71 done / 91 total; 18 can run
I0903 14:44:14.250941   49581 launchconfiguration.go:375] waiting for IAM instance profile "nodes.useast1.dev.pykey.com" to be ready
I0903 14:44:14.296649   49581 launchconfiguration.go:375] waiting for IAM instance profile "masters.useast1.dev.pykey.com" to be ready
I0903 14:44:25.409587   49581 executor.go:103] Tasks: 89 done / 91 total; 2 can run
I0903 14:44:26.361856   49581 executor.go:103] Tasks: 91 done / 91 total; 0 can run
I0903 14:44:26.364272   49581 dns.go:156] Pre-creating DNS records
I0903 14:44:27.953961   49581 update_cluster.go:308] Exporting kubecfg for cluster
kops has set your kubectl context to useast1.dev.pykey.com

Cluster is starting.  It should be ready in a few minutes.

Suggestions:
 * validate cluster: kops validate cluster --wait 10m
 * list nodes: kubectl get nodes --show-labels
 * ssh to the master: ssh -i ~/.ssh/id_rsa ubuntu@api.useast1.dev.pykey.com
 * the ubuntu user is specific to Ubuntu. If not using Ubuntu please use the appropriate user based on your OS.
 * read about installing addons at: https://kops.sigs.k8s.io/operations/addons.
This may take a few seconds to run, but then our cluster will likely take a few minutes to actually be ready.
The kops update cluster will be the tool we'll use whenever we change the configuration of our cluster.
It applies the changes we have made to the configuration to our cluster - reconfiguring AWS or kubernetes as needed.
For example, after we kops edit ig nodes, then kops update cluster --yes to apply our configuration,
and sometimes we will also have to kops rolling-update cluster to roll out the configuration immediately.
Now that our cluster is ready, let's check:
$ kops validate cluster
Using cluster from kubectl context: useast1.dev.pykey.com

Validating cluster useast1.dev.pykey.com

INSTANCE GROUPS
NAME			ROLE	MACHINETYPE	MIN	MAX	SUBNETS
master-us-east-1a	Master	t3.medium	1	1	us-east-1a
nodes			Node	t2.nano		2	2	us-east-1a,us-east-1b,us-east-1c

NODE STATUS
NAME				ROLE	READY
ip-172-20-42-41.ec2.internal	master	True
ip-172-20-63-75.ec2.internal	node	True
ip-172-20-97-84.ec2.internal	node	True

Your cluster useast1.dev.pykey.com is ready
list nodes:
$ kubectl get nodes
NAME                           STATUS   ROLES    AGE     VERSION
ip-172-20-42-41.ec2.internal   Ready    master   4m14s   v1.18.8
ip-172-20-63-75.ec2.internal   Ready    node     2m48s   v1.18.8
ip-172-20-97-84.ec2.internal   Ready    node     2m52s   v1.18.8

$ kubectl get nodes --show-labels
NAME                           STATUS   ROLES    AGE     VERSION   LABELS
ip-172-20-42-41.ec2.internal   Ready    master   4m35s   v1.18.8   beta.kubernetes.io/arch=amd64,beta.kubernetes.io/instance-type=t3.medium,beta.kubernetes.io/os=linux,failure-domain.beta.kubernetes.io/region=us-east-1,failure-domain.beta.kubernetes.io/zone=us-east-1a,kops.k8s.io/instancegroup=master-us-east-1a,kubernetes.io/arch=amd64,kubernetes.io/hostname=ip-172-20-42-41.ec2.internal,kubernetes.io/os=linux,kubernetes.io/role=master,node-role.kubernetes.io/master=,node.kubernetes.io/instance-type=t3.medium,topology.kubernetes.io/region=us-east-1,topology.kubernetes.io/zone=us-east-1a
ip-172-20-63-75.ec2.internal   Ready    node     3m9s    v1.18.8   beta.kubernetes.io/arch=amd64,beta.kubernetes.io/instance-type=t2.nano,beta.kubernetes.io/os=linux,failure-domain.beta.kubernetes.io/region=us-east-1,failure-domain.beta.kubernetes.io/zone=us-east-1a,kops.k8s.io/instancegroup=nodes,kubernetes.io/arch=amd64,kubernetes.io/hostname=ip-172-20-63-75.ec2.internal,kubernetes.io/os=linux,kubernetes.io/role=node,node-role.kubernetes.io/node=,node.kubernetes.io/instance-type=t2.nano,topology.kubernetes.io/region=us-east-1,topology.kubernetes.io/zone=us-east-1a
ip-172-20-97-84.ec2.internal   Ready    node     3m13s   v1.18.8   beta.kubernetes.io/arch=amd64,beta.kubernetes.io/instance-type=t2.nano,beta.kubernetes.io/os=linux,failure-domain.beta.kubernetes.io/region=us-east-1,failure-domain.beta.kubernetes.io/zone=us-east-1c,kops.k8s.io/instancegroup=nodes,kubernetes.io/arch=amd64,kubernetes.io/hostname=ip-172-20-97-84.ec2.internal,kubernetes.io/os=linux,kubernetes.io/role=node,node-role.kubernetes.io/node=,node.kubernetes.io/instance-type=t2.nano,topology.kubernetes.io/region=us-east-1,topology.kubernetes.io/zone=us-east-1c
ssh to the master:
$ ssh -i ~/.ssh/id_rsa ubuntu@api.useast1.dev.pykey.com The authenticity of host 'api.useast1.dev.pykey.com (3.218.244.1)' can't be established. ECDSA key fingerprint is SHA256:96RKZe6hI555FhPZloK0O5B21+7lO2nDY7YshB7UAcE. Are you sure you want to continue connecting (yes/no)? yes Warning: Permanently added 'api.useast1.dev.pykey.com,3.218.244.1' (ECDSA) to the list of known hosts. Welcome to Ubuntu 20.04 LTS (GNU/Linux 5.4.0-1018-aws x86_64) * Documentation: https://help.ubuntu.com * Management: https://landscape.canonical.com * Support: https://ubuntu.com/advantage System information as of Thu Sep 3 21:56:13 UTC 2020 System load: 0.08 Processes: 160 Usage of /: 6.4% of 61.98GB Users logged in: 0 Memory usage: 24% IPv4 address for docker0: 172.17.0.1 Swap usage: 0% IPv4 address for ens5: 172.20.42.41 55 updates can be installed immediately. 29 of these updates are security updates. To see these additional updates run: apt list --upgradable The programs included with the Ubuntu system are free software; the exact distribution terms for each program are described in the individual files in /usr/share/doc/*/copyright. Ubuntu comes with ABSOLUTELY NO WARRANTY, to the extent permitted by applicable law. To run a command as administrator (user "root"), use "sudo". See "man sudo_root" for details. ubuntu@ip-172-20-42-41:~$
$ kubectl get pods --all-namespaces
NAMESPACE     NAME                                                   READY   STATUS    RESTARTS   AGE
kube-system   dns-controller-78f77977f-bxtsg                         1/1     Running   0          8m57s
kube-system   etcd-manager-events-ip-172-20-42-41.ec2.internal       1/1     Running   0          8m10s
kube-system   etcd-manager-main-ip-172-20-42-41.ec2.internal         1/1     Running   0          8m29s
kube-system   kops-controller-9ncgv                                  1/1     Running   0          8m1s
kube-system   kube-apiserver-ip-172-20-42-41.ec2.internal            2/2     Running   0          8m12s
kube-system   kube-controller-manager-ip-172-20-42-41.ec2.internal   1/1     Running   0          7m34s
kube-system   kube-dns-64f86fb8dd-9p8p4                              3/3     Running   0          7m22s
kube-system   kube-dns-64f86fb8dd-9q22z                              3/3     Running   0          8m57s
kube-system   kube-dns-autoscaler-cd7778b7b-xsxsx                    1/1     Running   0          8m57s
kube-system   kube-proxy-ip-172-20-42-41.ec2.internal                1/1     Running   0          7m8s
kube-system   kube-proxy-ip-172-20-63-75.ec2.internal                1/1     Running   0          6m56s
kube-system   kube-proxy-ip-172-20-97-84.ec2.internal                1/1     Running   0          6m50s
kube-system   kube-scheduler-ip-172-20-42-41.ec2.internal            1/1     Running   0          8m19s
We now have two instances - 1 master and 1 node:

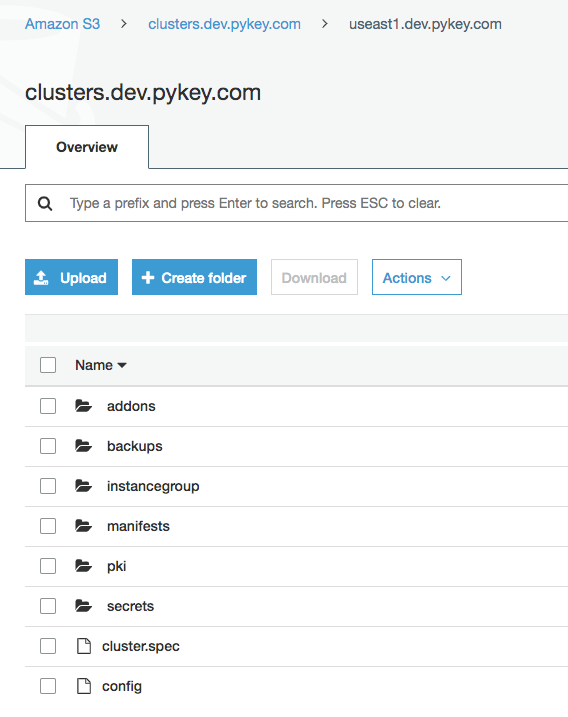
Cluster info at S3:
Autoscaling Group:

Dashboard is a web interface for Kubernetes.
Let's check if the dashboard is deployed:
$ kubectl get pods --all-namespaces | grep dashboard
Looks like the dashboard is missing, so we need to install the latest stable release by running the following command:
$ kubectl apply -f https://raw.githubusercontent.com/kubernetes/dashboard/v2.0.0/aio/deploy/recommended.yaml
namespace/kubernetes-dashboard created
serviceaccount/kubernetes-dashboard created
service/kubernetes-dashboard created
secret/kubernetes-dashboard-certs created
secret/kubernetes-dashboard-csrf created
secret/kubernetes-dashboard-key-holder created
configmap/kubernetes-dashboard-settings created
role.rbac.authorization.k8s.io/kubernetes-dashboard created
clusterrole.rbac.authorization.k8s.io/kubernetes-dashboard created
rolebinding.rbac.authorization.k8s.io/kubernetes-dashboard created
clusterrolebinding.rbac.authorization.k8s.io/kubernetes-dashboard created
deployment.apps/kubernetes-dashboard created
service/dashboard-metrics-scraper created
deployment.apps/dashboard-metrics-scraper created

$ kubectl get pods --all-namespaces
NAMESPACE              NAME                                                    READY   STATUS    RESTARTS   AGE
kube-system            dns-controller-78f77977f-6t6fz                          1/1     Running   0          72m
kube-system            etcd-manager-events-ip-172-20-54-121.ec2.internal       1/1     Running   0          72m
kube-system            etcd-manager-main-ip-172-20-54-121.ec2.internal         1/1     Running   0          72m
kube-system            kops-controller-pgpjc                                   1/1     Running   0          72m
kube-system            kube-apiserver-ip-172-20-54-121.ec2.internal            2/2     Running   1          72m
kube-system            kube-controller-manager-ip-172-20-54-121.ec2.internal   1/1     Running   0          72m
kube-system            kube-dns-64f86fb8dd-7zsk8                               3/3     Running   0          71m
kube-system            kube-dns-64f86fb8dd-zw785                               3/3     Running   0          72m
kube-system            kube-dns-autoscaler-cd7778b7b-btv4j                     1/1     Running   0          72m
kube-system            kube-proxy-ip-172-20-49-53.ec2.internal                 1/1     Running   0          71m
kube-system            kube-proxy-ip-172-20-54-121.ec2.internal                1/1     Running   0          72m
kube-system            kube-scheduler-ip-172-20-54-121.ec2.internal            1/1     Running   0          72m
kubernetes-dashboard   dashboard-metrics-scraper-6b4884c9d5-l68cf              1/1     Running   0          12m
kubernetes-dashboard   kubernetes-dashboard-7b544877d5-c58gh                   1/1     Running   0          12m
By default, the Kubernetes Dashboard user has limited permissions. In this section, we create a kops-admin service account and cluster role binding that we can use to securely connect to the dashboard with admin-level permissions.
- Create a file called kops-admin-service-account.yaml:
apiVersion: v1
kind: ServiceAccount
metadata:
  name: kops-admin
  namespace: kube-system
---
apiVersion: rbac.authorization.k8s.io/v1beta1
kind: ClusterRoleBinding
metadata:
  name: kops-admin
roleRef:
  apiGroup: rbac.authorization.k8s.io
  kind: ClusterRole
  name: cluster-admin
subjects:
- kind: ServiceAccount
  name: kops-admin
  namespace: kube-system
This manifest defines a service account and cluster role binding called kops-admin (we can name whatever we want).
-
Apply the service account and cluster role binding to our cluster:
$ kubectl apply -f kops-admin-service-account.yaml
serviceaccount/kops-admin created
clusterrolebinding.rbac.authorization.k8s.io/kops-admin created


$ kubectl get serviceaccounts --all-namespaces
NAMESPACE              NAME                                 SECRETS   AGE
default                default                              1         28m
kube-node-lease        default                              1         28m
kube-public            default                              1         28m
kube-system            attachdetach-controller              1         28m
kube-system            aws-cloud-provider                   1         28m
kube-system            certificate-controller               1         28m
kube-system            clusterrole-aggregation-controller   1         28m
kube-system            cronjob-controller                   1         28m
kube-system            daemon-set-controller                1         28m
kube-system            default                              1         28m
kube-system            deployment-controller                1         28m
kube-system            disruption-controller                1         28m
kube-system            dns-controller                       1         28m
kube-system            endpoint-controller                  1         28m
kube-system            endpointslice-controller             1         28m
kube-system            expand-controller                    1         28m
kube-system            generic-garbage-collector            1         28m
kube-system            horizontal-pod-autoscaler            1         28m
kube-system            job-controller                       1         28m
kube-system            kops-admin                           1         2m23s
kube-system            kops-controller                      1         28m
kube-system            kube-dns                             1         28m
kube-system            kube-dns-autoscaler                  1         28m
kube-system            kube-proxy                           1         28m
kube-system            namespace-controller                 1         28m
kube-system            node-controller                      1         28m
kube-system            persistent-volume-binder             1         28m
kube-system            pod-garbage-collector                1         28m
kube-system            pv-protection-controller             1         28m
kube-system            pvc-protection-controller            1         28m
kube-system            replicaset-controller                1         28m
kube-system            replication-controller               1         28m
kube-system            resourcequota-controller             1         28m
kube-system            route-controller                     1         28m
kube-system            service-account-controller           1         28m
kube-system            service-controller                   1         28m
kube-system            statefulset-controller               1         28m
kube-system            ttl-controller                       1         28m
kubernetes-dashboard   default                              1         10m
kubernetes-dashboard   kubernetes-dashboard                 1         10m
Now that the Kubernetes Dashboard is deployed to our cluster, and we have an administrator service account that we can use to view and control our cluster, we can connect to the dashboard with that service account.
Retrieve an authentication token for the kops-admin service account. Copy the "authentication_token" value from the output. We use this token to connect to the dashboard:
$ kubectl -n kube-system describe secret $(kubectl -n kube-system get secret | grep kops-admin | awk '{print $1}')
Name:         kops-admin-token-ffbm6
Namespace:    kube-system
Labels:       <none>
Annotations:  kubernetes.io/service-account.name: kops-admin
              kubernetes.io/service-account.uid: 8ea467e6-fe18-40de-a288-ccb9a07bdd24

Type:  kubernetes.io/service-account-token

Data
====
ca.crt:     1042 bytes
namespace:  11 bytes
token:      eyJhbGc...MImg
Start the kubectl proxy:
$ kubectl proxy
To access the dashboard endpoint, open the following link with a web browser: http://localhost:8001/api/v1/namespaces/kubernetes-dashboard/services/https:kubernetes-dashboard:/proxy/#!/login
Choose Token, paste the "authentication_token" output from the previous command into the Token field, and choose SIGN IN:
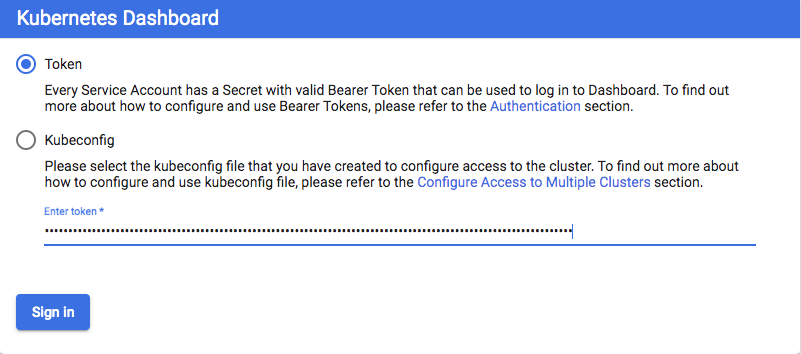
After we have connected to our Kubernetes Dashboard, we can view and control your cluster using your kops-admin service account.
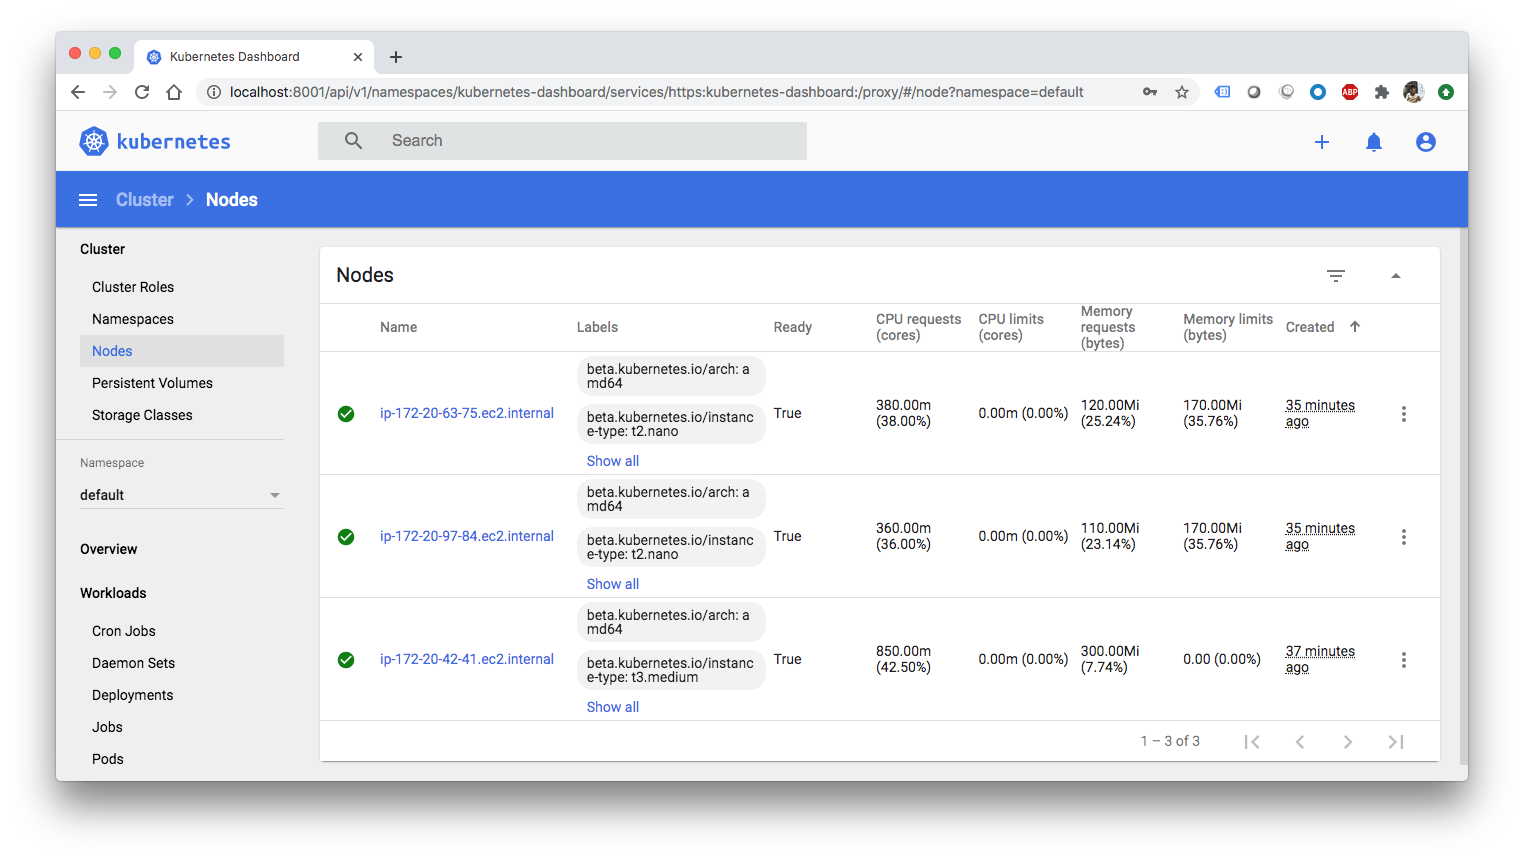
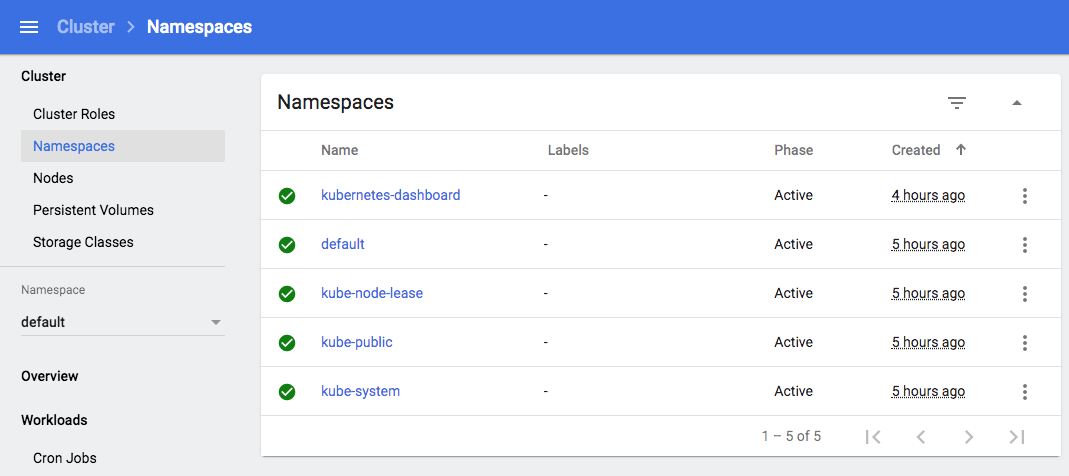
At this point, we haven't deployed any apps:
$ kubectl get pods
No resources found in default namespace.
Now, we may want to deploy a simple service using this deployment (hello.yaml):
apiVersion: apps/v1
kind: Deployment
metadata:
  name: hello-world
spec:
  selector:
    matchLabels:
      run: load-balancer-example
  replicas: 2
  template:
    metadata:
      labels:
        run: load-balancer-example
    spec:
      containers:
        - name: hello-world
          image: gcr.io/google-samples/node-hello:1.0
          ports:
            - containerPort: 8080
              protocol: TCP
Run a Hello World application in our cluster. Create the application deployment:
$ kubectl apply -f hello.yaml
deployment.apps/hello-world created

$ kubectl get pods
NAME                           READY   STATUS    RESTARTS   AGE
hello-world-86d6c6f84d-nkm2d   1/1     Running   0          2m42s
hello-world-86d6c6f84d-qw95v   1/1     Running   0          2m42s

$ kubectl get deployment
NAME          READY   UP-TO-DATE   AVAILABLE   AGE
hello-world   2/2     2            2           2m50s

$ kubectl get rs
NAME                     DESIRED   CURRENT   READY   AGE
hello-world-86d6c6f84d   2         2         2       4m46s
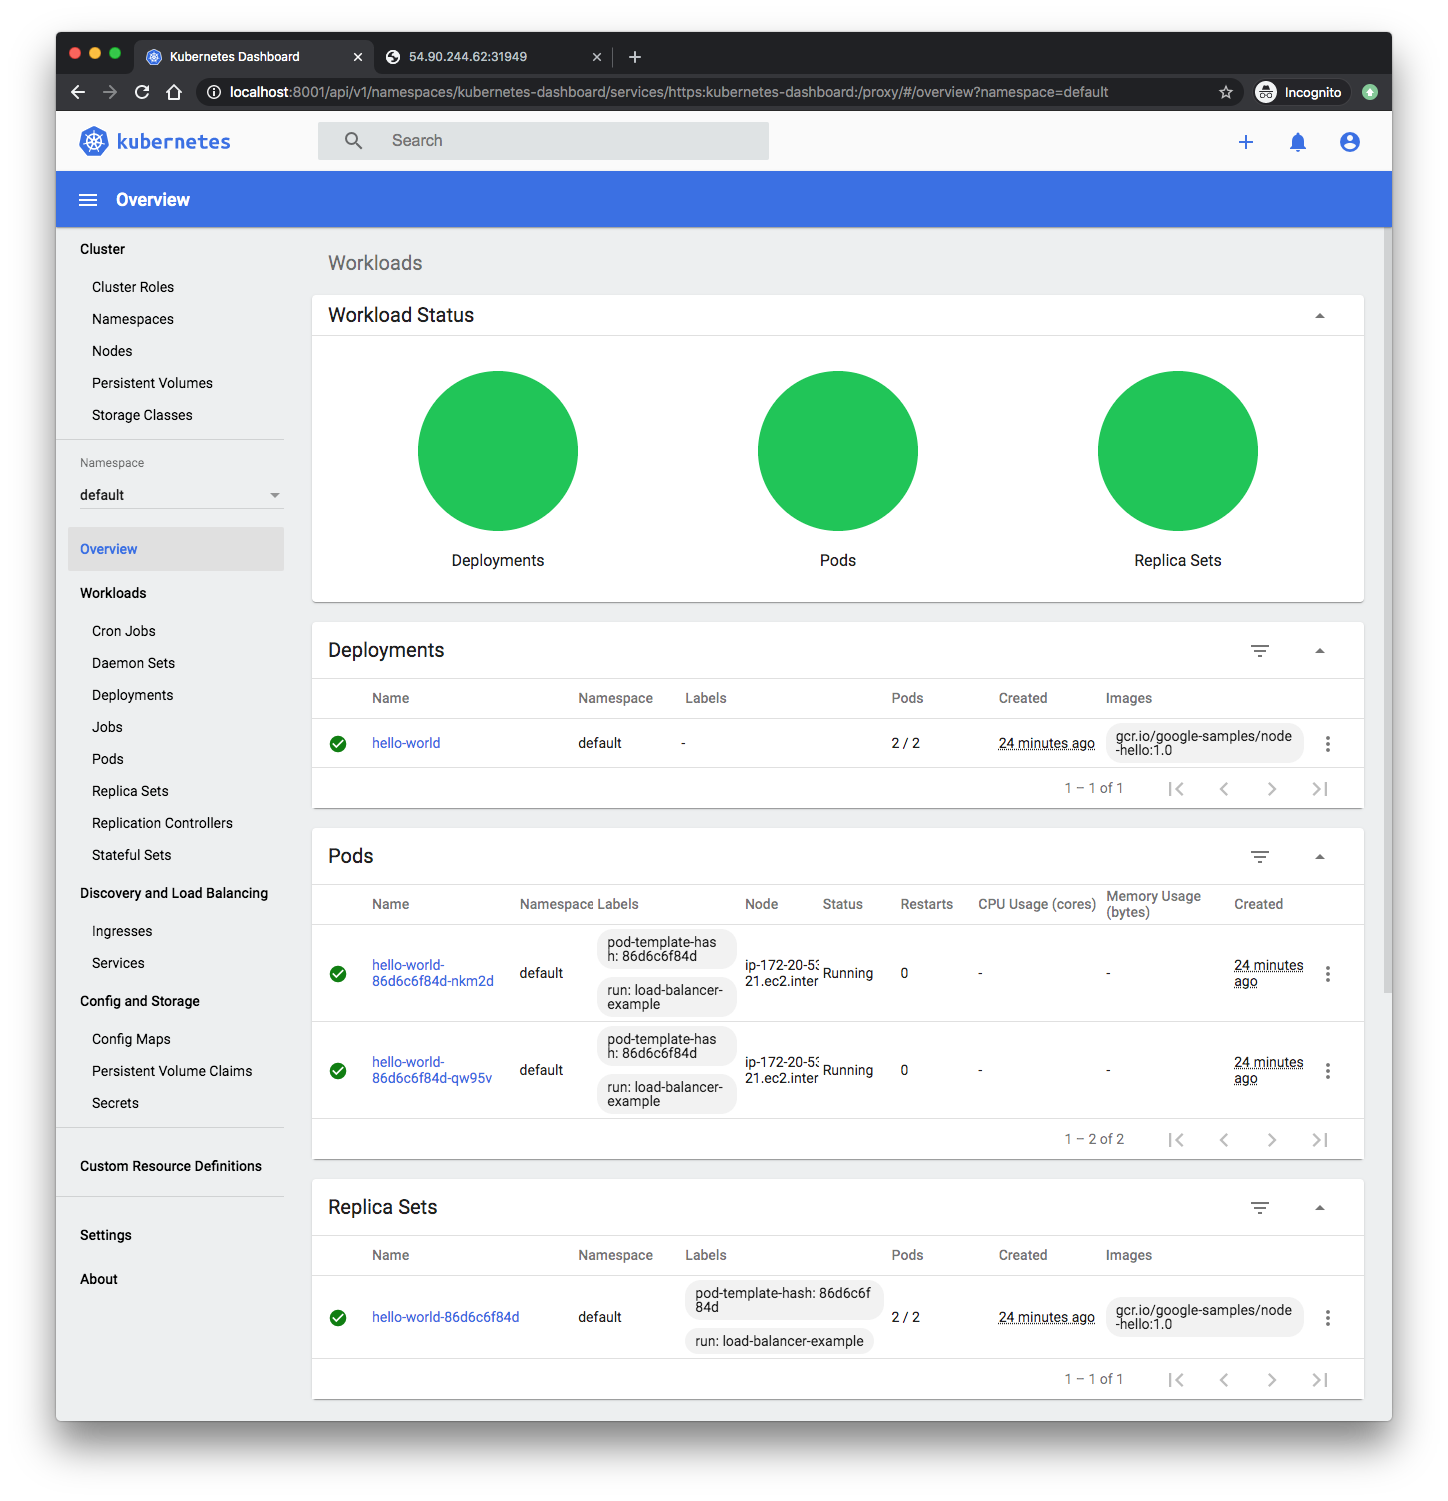
The command created a Deployment and an associated ReplicaSet. The ReplicaSet has two Pods each of which runs the Hello World application.
Create a Service object that exposes the deployment:
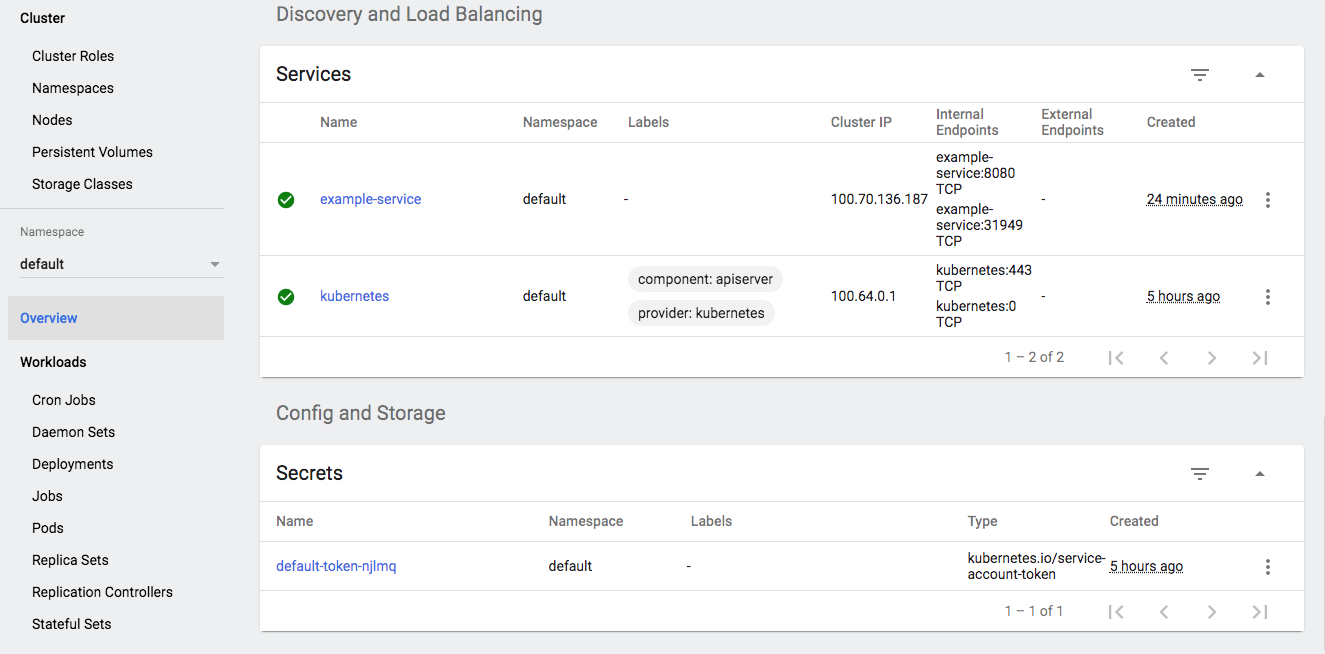
$ kubectl expose deployment hello-world --type=NodePort --name=example-service
service/example-service exposed

$ kubectl get services -o wide
NAME              TYPE        CLUSTER-IP       EXTERNAL-IP   PORT(S)          AGE     SELECTOR
example-service   NodePort    100.71.100.203   <none>        8080:32438/TCP   49s     run=load-balancer-example
kubernetes        ClusterIP   100.64.0.1       <none>        443/TCP          5h27m   <none>
List the pods that are running the Hello World application:
$ kubectl get pods --selector="run=load-balancer-example" --output=wide
NAME                           READY   STATUS    RESTARTS   AGE     IP           NODE                           NOMINATED NODE   READINESS GATES
hello-world-86d6c6f84d-9m6gc   1/1     Running   0          10m     100.96.1.3   ip-172-20-97-84.ec2.internal   <none>           <none>
hello-world-86d6c6f84d-zw287   1/1     Running   0          10m     100.96.2.4   ip-172-20-63-75.ec2.internal   <none>           <none>
Get the public IP address of one of our nodes that is running a Hello World pod. Use the node address and node port to access the Hello World application:
curl http://<public-node-ip>:<node-port>
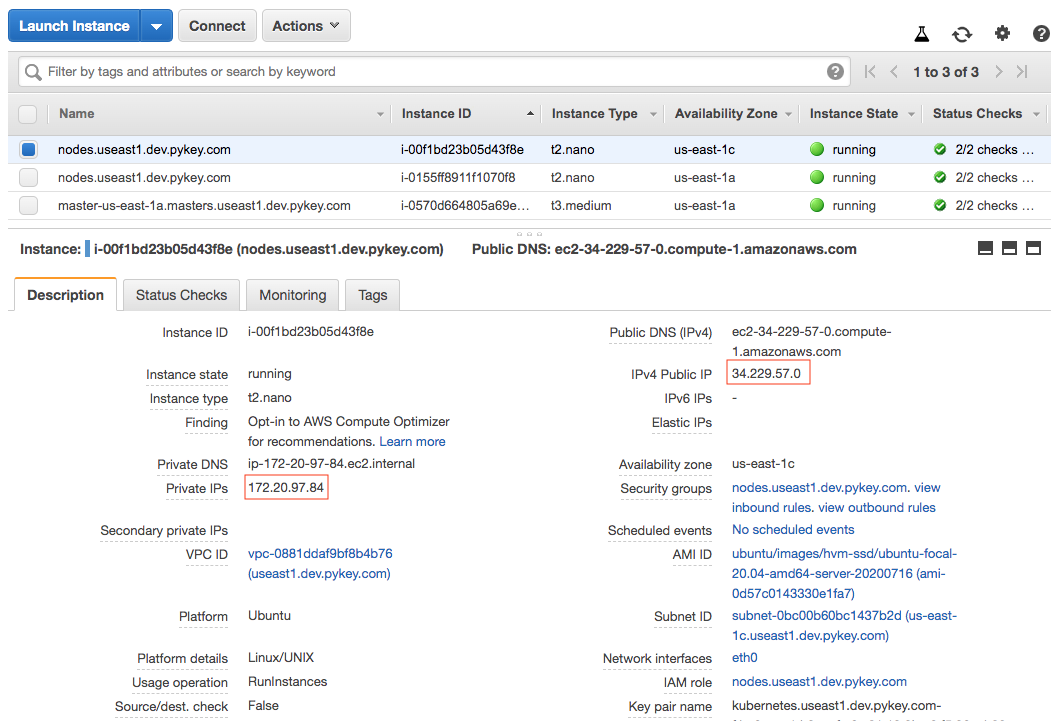
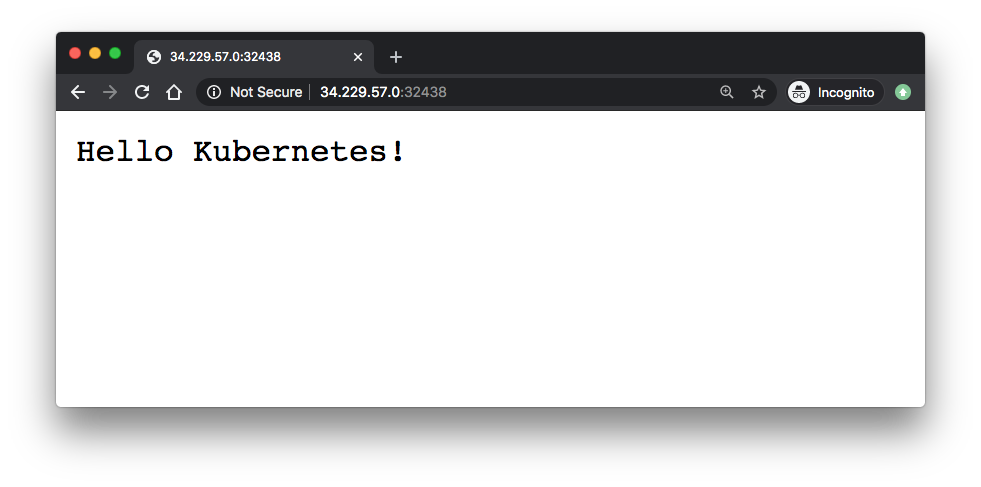
After modifying the inbound rule to allow TCP from the :node-port, we get the following page:
We can see the pods/services/deployments/replicasets on Web-UI:
To delete the Service, enter this command:
$ kubectl delete services example-service
service "example-service" deleted
To delete the Deployment, the ReplicaSet, and the Pods that are running the Hello World application, enter this command:
$ kubectl delete -f hello.yaml
deployment.apps "hello-world" deleted
nginx-deploy.yam:
kind: Deployment
apiVersion: apps/v1
metadata:
  name: nginx
spec:
  replicas: 2
  selector:
    matchLabels:
      app: nginx

  template:
    metadata:
      labels:
        app: nginx
    spec:
      containers:
      - name: nginx
        image: "nginxdemos/hello"
---
kind: Service
apiVersion: v1

metadata:
  name: nginx-elb
spec:
  type: LoadBalancer
  selector:
    app: nginx
  ports:
    - name: http
      port: 80
      targetPort: 80
      nodePort: 30008
Deploy:
$ kubectl apply -f nginx-deploy.yaml
deployment.apps/nginx created
service/nginx-elb created

$ kubectl get pods -o wide
NAME                     READY   STATUS    RESTARTS   AGE   IP           NODE                           NOMINATED NODE   READINESS GATES
nginx-66d58cb8c4-8mdr9   1/1     Running   0          43m   100.96.2.5   ip-172-20-63-75.ec2.internal   <none>           <none>
nginx-66d58cb8c4-nxjfw   1/1     Running   0          44m   100.96.1.4   ip-172-20-97-84.ec2.internal   <none>           <none>

$ kubectl get svc
NAME         TYPE           CLUSTER-IP      EXTERNAL-IP                                                               PORT(S)        AGE
kubernetes   ClusterIP      100.64.0.1      <none>                                                                    443/TCP        105m
nginx-elb    LoadBalancer   100.67.53.146   aa09b8bc3ffb4483ebb29442642c1a2b-1326065343.us-east-1.elb.amazonaws.com   80:30008/TCP   2m5s

$ kubectl describe svc nginx-elb
Name:                     nginx-elb
Namespace:                default
Labels:                   <none>
Annotations:              Selector:  app=nginx
Type:                     LoadBalancer
IP:                       100.67.53.146
LoadBalancer Ingress:     aa09b8bc3ffb4483ebb29442642c1a2b-1326065343.us-east-1.elb.amazonaws.com
Port:                     http  80/TCP
TargetPort:               80/TCP
NodePort:                 http  30008/TCP
Endpoints:                100.96.1.4:80,100.96.2.5:80
Session Affinity:         None
External Traffic Policy:  Cluster
Events:
  Type    Reason                Age    From                Message
  ----    ------                ----   ----                -------
  Normal  EnsuringLoadBalancer  9m15s  service-controller  Ensuring load balancer
  Normal  EnsuredLoadBalancer   9m13s  service-controller  Ensured load balancer
In the description of the LoadBalancer service, we see the LoadBalancer Ingress property, which is the DNS name we'll use to connect to our web service. The load balancer exposes the port 80 and redirects this traffic to the kubernetes node port 30008. This node will then redirect the traffic to the nginx container.
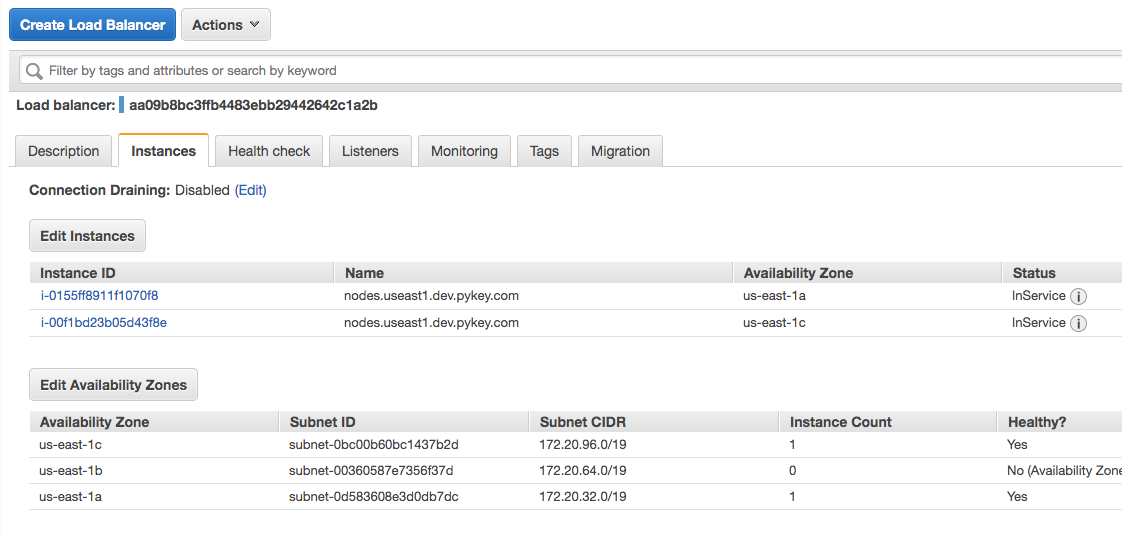

To test if the DNS works we just need to use the LoadBalancer Ingress address:
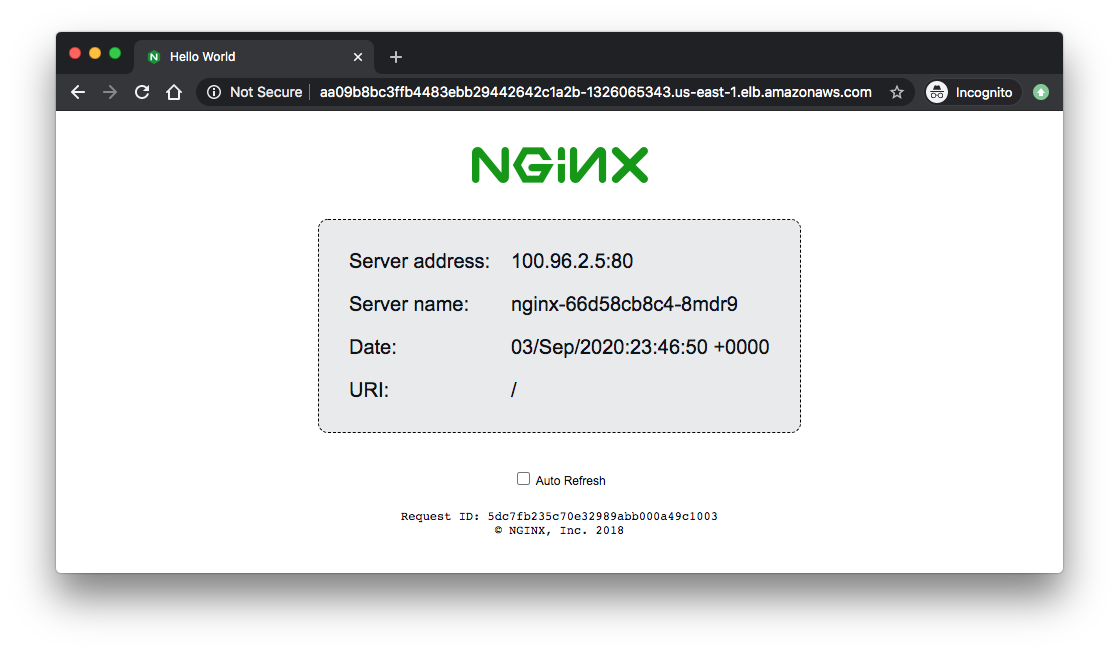
Usually we don't use LoadBalancer Ingress directly, instead we create a CNAME record with a domain (like dev.pykey.com) which points to the load balancer dns name:
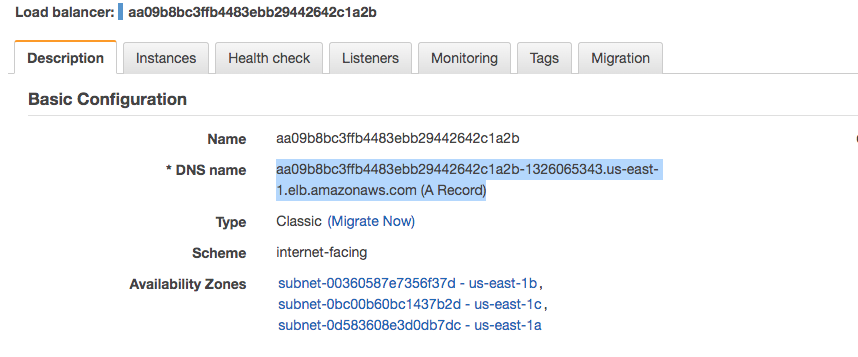
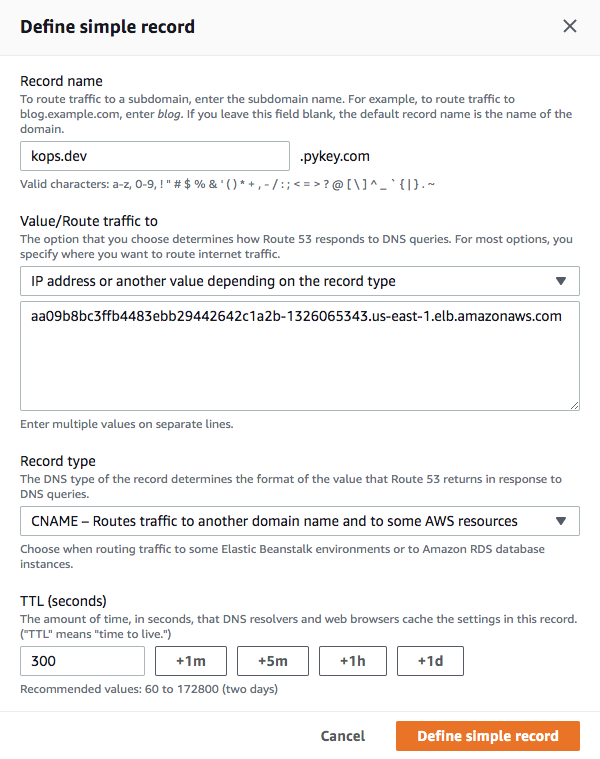
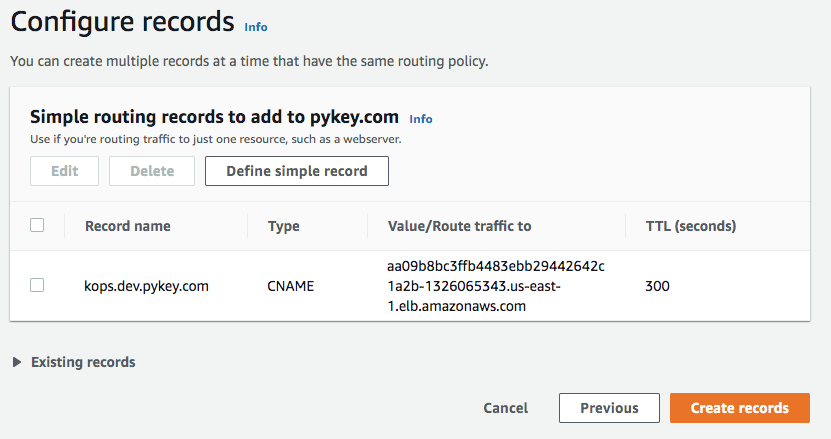
Now that our CNAME for kops.dev.pykey.com is pointing to the LB address, let's try it:
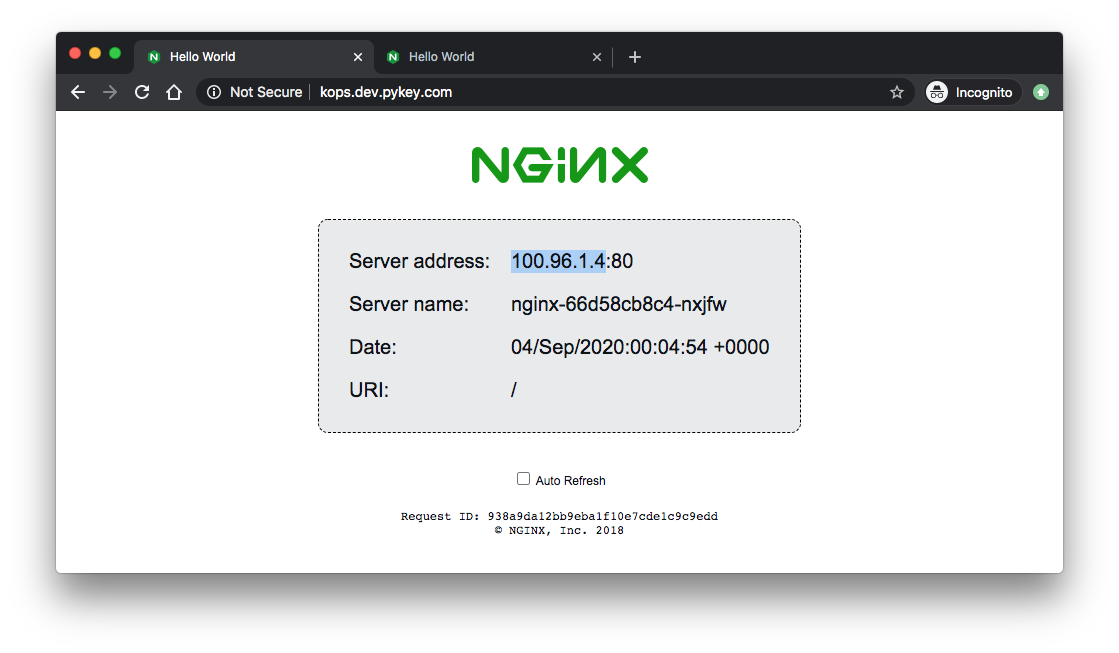
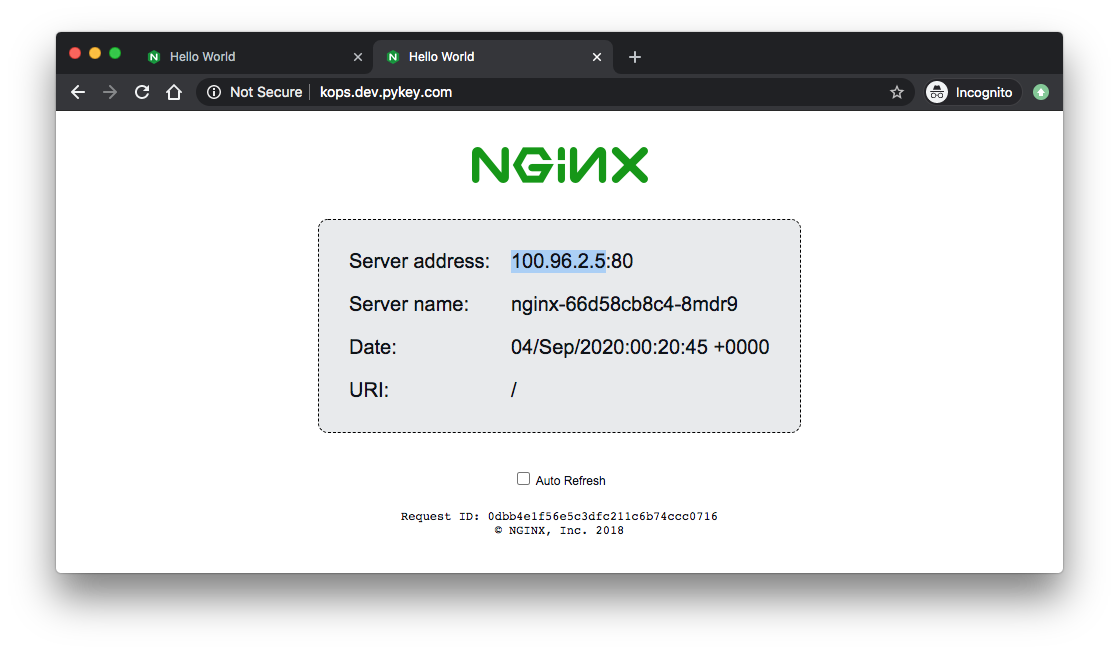
We can also see the load balancing is working. Compare the IPs with the server addresses of the browser:
$ kubectl get pods -o wide
NAME                     READY   STATUS    RESTARTS   AGE   IP           NODE                           NOMINATED NODE   READINESS GATES
nginx-66d58cb8c4-8mdr9   1/1     Running   0          43m   100.96.2.5   ip-172-20-63-75.ec2.internal   <none>           <none>
nginx-66d58cb8c4-nxjfw   1/1     Running   0          44m   100.96.1.4   ip-172-20-97-84.ec2.internal   <none>           <none>
To delete our cluster:
$ kops delete cluster useast1.dev.pykey.com --yes
Delete S3 bucket:
$ aws s3 rb s3://clusters.dev.pykey.com
For Nginx controller / Ingress with LoadBalancer type service on AWS, check Docker & Kubernetes - Ingress controller on AWS with Kops
- Installing Kubernetes with kops
- kubernetes/kops
- Getting Started with kops on AWS
- Install and Set Up kubectl
- Tutorial: Deploy the Kubernetes Dashboard (web UI)
- Use a Service to Access an Application in a Cluster
- https://github.com/nginxinc/NGINX-Demos/tree/master/nginx-hello
Docker & K8s
- Docker install on Amazon Linux AMI
- Docker install on EC2 Ubuntu 14.04
- Docker container vs Virtual Machine
- Docker install on Ubuntu 14.04
- Docker Hello World Application
- Nginx image - share/copy files, Dockerfile
- Working with Docker images : brief introduction
- Docker image and container via docker commands (search, pull, run, ps, restart, attach, and rm)
- More on docker run command (docker run -it, docker run --rm, etc.)
- Docker Networks - Bridge Driver Network
- Docker Persistent Storage
- File sharing between host and container (docker run -d -p -v)
- Linking containers and volume for datastore
- Dockerfile - Build Docker images automatically I - FROM, MAINTAINER, and build context
- Dockerfile - Build Docker images automatically II - revisiting FROM, MAINTAINER, build context, and caching
- Dockerfile - Build Docker images automatically III - RUN
- Dockerfile - Build Docker images automatically IV - CMD
- Dockerfile - Build Docker images automatically V - WORKDIR, ENV, ADD, and ENTRYPOINT
- Docker - Apache Tomcat
- Docker - NodeJS
- Docker - NodeJS with hostname
- Docker Compose - NodeJS with MongoDB
- Docker - Prometheus and Grafana with Docker-compose
- Docker - StatsD/Graphite/Grafana
- Docker - Deploying a Java EE JBoss/WildFly Application on AWS Elastic Beanstalk Using Docker Containers
- Docker : NodeJS with GCP Kubernetes Engine
- Docker : Jenkins Multibranch Pipeline with Jenkinsfile and Github
- Docker : Jenkins Master and Slave
- Docker - ELK : ElasticSearch, Logstash, and Kibana
- Docker - ELK 7.6 : Elasticsearch on Centos 7
- Docker - ELK 7.6 : Filebeat on Centos 7
- Docker - ELK 7.6 : Logstash on Centos 7
- Docker - ELK 7.6 : Kibana on Centos 7
- Docker - ELK 7.6 : Elastic Stack with Docker Compose
- Docker - Deploy Elastic Cloud on Kubernetes (ECK) via Elasticsearch operator on minikube
- Docker - Deploy Elastic Stack via Helm on minikube
- Docker Compose - A gentle introduction with WordPress
- Docker Compose - MySQL
- MEAN Stack app on Docker containers : micro services
- MEAN Stack app on Docker containers : micro services via docker-compose
- Docker Compose - Hashicorp's Vault and Consul Part A (install vault, unsealing, static secrets, and policies)
- Docker Compose - Hashicorp's Vault and Consul Part B (EaaS, dynamic secrets, leases, and revocation)
- Docker Compose - Hashicorp's Vault and Consul Part C (Consul)
- Docker Compose with two containers - Flask REST API service container and an Apache server container
- Docker compose : Nginx reverse proxy with multiple containers
- Docker & Kubernetes : Envoy - Getting started
- Docker & Kubernetes : Envoy - Front Proxy
- Docker & Kubernetes : Ambassador - Envoy API Gateway on Kubernetes
- Docker Packer
- Docker Cheat Sheet
- Docker Q & A #1
- Kubernetes Q & A - Part I
- Kubernetes Q & A - Part II
- Docker - Run a React app in a docker
- Docker - Run a React app in a docker II (snapshot app with nginx)
- Docker - NodeJS and MySQL app with React in a docker
- Docker - Step by Step NodeJS and MySQL app with React - I
- Installing LAMP via puppet on Docker
- Docker install via Puppet
- Nginx Docker install via Ansible
- Apache Hadoop CDH 5.8 Install with QuickStarts Docker
- Docker - Deploying Flask app to ECS
- Docker Compose - Deploying WordPress to AWS
- Docker - WordPress Deploy to ECS with Docker-Compose (ECS-CLI EC2 type)
- Docker - WordPress Deploy to ECS with Docker-Compose (ECS-CLI Fargate type)
- Docker - ECS Fargate
- Docker - AWS ECS service discovery with Flask and Redis
- Docker & Kubernetes : minikube
- Docker & Kubernetes 2 : minikube Django with Postgres - persistent volume
- Docker & Kubernetes 3 : minikube Django with Redis and Celery
- Docker & Kubernetes 4 : Django with RDS via AWS Kops
- Docker & Kubernetes : Kops on AWS
- Docker & Kubernetes : Ingress controller on AWS with Kops
- Docker & Kubernetes : HashiCorp's Vault and Consul on minikube
- Docker & Kubernetes : HashiCorp's Vault and Consul - Auto-unseal using Transit Secrets Engine
- Docker & Kubernetes : Persistent Volumes & Persistent Volumes Claims - hostPath and annotations
- Docker & Kubernetes : Persistent Volumes - Dynamic volume provisioning
- Docker & Kubernetes : DaemonSet
- Docker & Kubernetes : Secrets
- Docker & Kubernetes : kubectl command
- Docker & Kubernetes : Assign a Kubernetes Pod to a particular node in a Kubernetes cluster
- Docker & Kubernetes : Configure a Pod to Use a ConfigMap
- AWS : EKS (Elastic Container Service for Kubernetes)
- Docker & Kubernetes : Run a React app in a minikube
- Docker & Kubernetes : Minikube install on AWS EC2
- Docker & Kubernetes : Cassandra with a StatefulSet
- Docker & Kubernetes : Terraform and AWS EKS
- Docker & Kubernetes : Pods and Service definitions
- Docker & Kubernetes : Service IP and the Service Type
- Docker & Kubernetes : Kubernetes DNS with Pods and Services
- Docker & Kubernetes : Headless service and discovering pods
- Docker & Kubernetes : Scaling and Updating application
- Docker & Kubernetes : Horizontal pod autoscaler on minikubes
- Docker & Kubernetes : From a monolithic app to micro services on GCP Kubernetes
- Docker & Kubernetes : Rolling updates
- Docker & Kubernetes : Deployments to GKE (Rolling update, Canary and Blue-green deployments)
- Docker & Kubernetes : Slack Chat Bot with NodeJS on GCP Kubernetes
- Docker & Kubernetes : Continuous Delivery with Jenkins Multibranch Pipeline for Dev, Canary, and Production Environments on GCP Kubernetes
- Docker & Kubernetes : NodePort vs LoadBalancer vs Ingress
- Docker & Kubernetes : MongoDB / MongoExpress on Minikube
- Docker & Kubernetes : Load Testing with Locust on GCP Kubernetes
- Docker & Kubernetes : MongoDB with StatefulSets on GCP Kubernetes Engine
- Docker & Kubernetes : Nginx Ingress Controller on Minikube
- Docker & Kubernetes : Setting up Ingress with NGINX Controller on Minikube (Mac)
- Docker & Kubernetes : Nginx Ingress Controller for Dashboard service on Minikube
- Docker & Kubernetes : Nginx Ingress Controller on GCP Kubernetes
- Docker & Kubernetes : Kubernetes Ingress with AWS ALB Ingress Controller in EKS
- Docker & Kubernetes : Setting up a private cluster on GCP Kubernetes
- Docker & Kubernetes : Kubernetes Namespaces (default, kube-public, kube-system) and switching namespaces (kubens)
- Docker & Kubernetes : StatefulSets on minikube
- Docker & Kubernetes : RBAC
- Docker & Kubernetes Service Account, RBAC, and IAM
- Docker & Kubernetes - Kubernetes Service Account, RBAC, IAM with EKS ALB, Part 1
- Docker & Kubernetes : Helm Chart
- Docker & Kubernetes : My first Helm deploy
- Docker & Kubernetes : Readiness and Liveness Probes
- Docker & Kubernetes : Helm chart repository with Github pages
- Docker & Kubernetes : Deploying WordPress and MariaDB with Ingress to Minikube using Helm Chart
- Docker & Kubernetes : Deploying WordPress and MariaDB to AWS using Helm 2 Chart
- Docker & Kubernetes : Deploying WordPress and MariaDB to AWS using Helm 3 Chart
- Docker & Kubernetes : Helm Chart for Node/Express and MySQL with Ingress
- Docker & Kubernetes : Deploy Prometheus and Grafana using Helm and Prometheus Operator - Monitoring Kubernetes node resources out of the box
- Docker & Kubernetes : Deploy Prometheus and Grafana using kube-prometheus-stack Helm Chart
- Docker & Kubernetes : Istio (service mesh) sidecar proxy on GCP Kubernetes
- Docker & Kubernetes : Istio on EKS
- Docker & Kubernetes : Istio on Minikube with AWS EC2 for Bookinfo Application
- Docker & Kubernetes : Deploying .NET Core app to Kubernetes Engine and configuring its traffic managed by Istio (Part I)
- Docker & Kubernetes : Deploying .NET Core app to Kubernetes Engine and configuring its traffic managed by Istio (Part II - Prometheus, Grafana, pin a service, split traffic, and inject faults)
- Docker & Kubernetes : Helm Package Manager with MySQL on GCP Kubernetes Engine
- Docker & Kubernetes : Deploying Memcached on Kubernetes Engine
- Docker & Kubernetes : EKS Control Plane (API server) Metrics with Prometheus
- Docker & Kubernetes : Spinnaker on EKS with Halyard
- Docker & Kubernetes : Continuous Delivery Pipelines with Spinnaker and Kubernetes Engine
- Docker & Kubernetes : Multi-node Local Kubernetes cluster : Kubeadm-dind (docker-in-docker)
- Docker & Kubernetes : Multi-node Local Kubernetes cluster : Kubeadm-kind (k8s-in-docker)
- Docker & Kubernetes : nodeSelector, nodeAffinity, taints/tolerations, pod affinity and anti-affinity - Assigning Pods to Nodes
- Docker & Kubernetes : Jenkins-X on EKS
- Docker & Kubernetes : ArgoCD App of Apps with Heml on Kubernetes
- Docker & Kubernetes : ArgoCD on Kubernetes cluster
- Docker & Kubernetes : GitOps with ArgoCD for Continuous Delivery to Kubernetes clusters (minikube) - guestbook
Ph.D. / Golden Gate Ave, San Francisco / Seoul National Univ / Carnegie Mellon / UC Berkeley / DevOps / Deep Learning / Visualization