Ansible - Setting up web servers with Nginx, configure enviroments, and deploy an App

Ansible 2.0
In this tutorial, as a quick preview for Ansible, we want to set up two web servers: one for testing and one for production, on AWS. We'll install Nginx and configure the environments. Then, lastly, we'll deploy an app.
SSH communications is the key for deploying via Ansible. So, the first part is to setup SSH between our laptop and AWS. Then, we setup local machine for Ansible: install Ansible, writing inventory and playbook. Then, finally, we'll deploy our app by running "ansible-playbook" command.
On local machine, we may want to create a user "ans":
k@laptop:~$ sudo adduser --home /home/ans --shell /bin/bash ans
[sudo] password for k:
Adding user `ans' ...
Adding new group `ans' (1009) ...
Adding new user `ans' (1006) with group `ans' ...
Creating home directory `/home/ans' ...
Copying files from `/etc/skel' ...
Enter new UNIX password:
Retype new UNIX password:
passwd: password updated successfully
Changing the user information for ans
Enter the new value, or press ENTER for the default
	Full Name []:
	Room Number []:
	Work Phone []:
	Home Phone []:
	Other []:
Is the information correct? [Y/n] Y

k@laptop:~$ su ans
Password:
ans@laptop:/home/k$
To ssh to our remote servers, we need ssh key. So, let's create it:
ans@laptop:/home/k$ ssh-keygen
Generating public/private rsa key pair.
Enter file in which to save the key (/home/ans/.ssh/id_rsa):
Created directory '/home/ans/.ssh'.
Enter passphrase (empty for no passphrase):
Enter same passphrase again:
Your identification has been saved in /home/ans/.ssh/id_rsa.
Your public key has been saved in /home/ans/.ssh/id_rsa.pub.
The key fingerprint is:
60:6e:0b:db:b5:8e:bd:8c:00:3e:aa:65:71:76:4e:8e ans@laptop
The key's randomart image is:
+--[ RSA 2048]----+
|                 |
|                 |
|      o          |
|     o .         |
|  o + = S        |
| . = @ o .       |
|  = E = .        |
| + . . *         |
|+     o =.       |
+-----------------+
ans@laptop:/home/k$
When we create an EC2 instance, AWS provides us a key and we can use it to access the instance. However, here we'll put our public key (/home/ans/.ssh/id_rsa.pub) for "ans" user into the /home/ubuntu/.ssh/authorized_keys file :
ssh-rsa AAAAB3NzaC1yc2EAAAADAQABAAABAQCsivZ9l1v/gF2O2QzNthm1B9ugt9WVBSBEn0Rrzx6ksSjPT/I64a8aADjsDG61SNapidzd86HBd2WubIiVAJvQLr3h0pN6n36Eba7D3Z/krmRmRRxjcXFvabnedCTGpzNsRH0ByvNtzQfyp7bo7Ul1N5Sup7aAmt2HlOvzdx1zxwxNm4eohS6e3VpaGmmLBTJ1ZcyHgSnMbM+nsD6KTAykJPAwt0Xze6amrfNvaIElxZFZEb6mEE0SjcRKZeMaGfnwTQMQgXz3YDl4Ngso10TPhrN0sSa10DMi9mlTV7ruQxUMmxaZMZq3rzAKvcNC7NWkIZYmaFQ2SXBJ4BcsJUQV ans@laptop
To place the public key at our remote host, instead of logging into that machine, we can use ssh-copy-id. But before we doing it, "ssh-agent" should be running on our control (most likely local machine):
ansible@laptop:~$ eval `ssh-agent -s`
Probably, we may need to add ec2 key-pair (*.pem) into the agent:
ansible@laptop:~$ ssh-add ~/.ssh/einsteinish.pem
Identity added: /home/ansible/.ssh/einsteinish.pem (/home/ansible/.ssh/einsteinish.pem)

ansible@laptop:~$ ssh-add -l
2048 SHA256:NQp2twy8c9Leaht4Z0r7Whgpr97wIhLJB6kFIQfU3j0 /home/ansible/.ssh/einsteinish.pem (RSA)
Now we'll be able to add our public key to the authorized_keys file on remote machine:
ansible@laptop:~$ ssh-copy-id -f ubuntu@52.54.142.56

Number of key(s) added: 1
Once our local machine's public key record is in the "authorized_keys" of remote node, we can ssh to the AWS instance (52.54.142.56) from our local machine:
ans@laptop:~$ ssh ubuntu@52.54.142.56
...
ubuntu@ip-172-31-46-193:~$
Let's create another instance (18.209.15.95) do the same things.
Now, we need to install Ansible on our local system (Ubuntu 16.04):
k@laptop:~$ sudo apt-get install ansible

k@laptop:~$ ansible --version
ansible 2.0.0.2
  config file = /etc/ansible/ansible.cfg
  configured module search path = Default w/o overrides
We need to tell Ansible which hosts to talk to.
To do this, we need to create an Ansible hosts file.
Ansible has a default inventory file (/etc/ansible/hosts) used to define which servers it will be managing.
The default Ansible hosts file contains groups of hosts. However, the default inventory file is applied globally across our system and often requires admin permissions.
Instead, to make things simpler, we're going to make our own inventory file here.
Go into the home directory of "ans" user:
k@laptop:~$ su ans
Password:
ans@laptop:/home/k$ cd
ans@laptop:~$ pwd
/home/ans
Let's make a ~/hosts file which will be used as an inventory for Ansible:
[test]
52.54.142.56

[prod]
18.209.15.95
Note that we put two IPs of AWS instances. The description within '[]' will be used later but we can put anything there as far as we let Ansible know what it should do with them.
Let's do a simple connection testing (this used to be working with aws ubuntu 14):
ans@laptop:~$ ls
hosts

$ ans@laptop:~$ ansible -i hosts all -m ping -u ubuntu
52.54.142.56 | SUCCESS => {
    "changed": false,
    "ping": "pong"
}
18.209.15.95 | SUCCESS => {
    "changed": false,
    "ping": "pong"
}
We run a simple Ansible testing command, and the json output looks good.
- The "-i" is for inventory, and we want to test all.
- "-m" is for command, and we used ping.
- "-u" specifies the user, and in our case, it's ubuntu.
We can check only the production server which is specified as "prod" in our inventory file, "hosts":
ans@laptop:~$ ansible -i hosts prod -m ping -u ubuntu
18.209.15.95 | SUCCESS => {
    "changed": false,
    "ping": "pong"
}
ans@laptop:~$
For newer instances such as ubuntu 16, we need to run tasks in playbook:
$ ansible-playbook -i hosts -s -u ubuntu my_playbook.yaml

PLAY ***************************************************************************

TASK [install python 2] ********************************************************
ok: [18.209.15.95]
ok: [52.54.142.56]

PLAY RECAP *********************************************************************
18.209.15.95               : ok=1    changed=0    unreachable=0    failed=0
52.54.142.56               : ok=1    changed=0    unreachable=0    failed=0
where the playbook (my_playbook.yaml) looks like this (ref):
- hosts: all
  gather_facts: False

  tasks:
  - name: install python 2
    raw: test -e /usr/bin/python || (apt -y update && apt install -y python-minimal)
Actually, because the tasks in the playbook are more like bootstraping of the instances we may name it as "pre_tasks".
The "gather_facts: False" on the playbook allows implicit fact gathering to be skipped. We used the "raw" module to run a command.
Create a template file called index.html.j2 which is our app to deploy.
Please don't be surprised. The single index file is the app we're going to deploy!
The ".j2" extension is nothing but a convention telling it's a template module. The purpose of using it in this tutorial is nothing more than just to demonstrate the updating feature of Ansible when we redeploy our app.
<html>
<body>

<h1>Ansible Demo</h1>
<p>{{MyMessage}}</p>

</body>
</html>
As we can see from the template file above, Ansible allows us to reference variables in our playbooks using the Jinja2 templating system. While we can do a lot of complex things in Jinja, we used the basic form of variable substitution in this tutorial.
Now, we want to create our playbook in yaml format (my_playbook_2).
The new playbook does:
- hosts: Find our servers names as a group mywebservers in hosts inentory file.
- vars: Assign a string for the variable (MyMessage) used in our app (index.html).
- pre_tasks: Added bootstrapping task - installing python 2.
- tasks: Then in the tasks, we setup Nginx with "apt" Ubuntu package tool, and then copy our app using template by specifying "src" and "dest".
- hosts: mywebservers
  gather_facts: False

  vars:
   - MyMessage: "Welcome to Ansible world!"

  pre_tasks:
  - name: install python 2
    raw: test -e /usr/bin/python || (apt -y update && apt install -y python-minimal)

  tasks:
   - name: Nginx setup
     apt: pkg=nginx state=installed update_cache=true
   - name: index.html copy
     template: src=index.html.j2 dest=/usr/share/nginx/html/index.html
...
Ref: YAML Syntax.
Let's check what files we have in our directory:
ans@laptop:~$ ls
examples.desktop  hosts  index.html.j2  server-setup.yaml
ans@laptop:~$
Time to play with our playbook (my_playbook_2.yaml):
ans@laptop:~$ ansible-playbook -i hosts -s -u ubuntu my_playbook_2.yaml

PLAY ***************************************************************************

TASK [install python 2] ********************************************************
ok: [52.54.142.56]
ok: [18.209.15.95]

TASK [Nginx setup] *************************************************************
changed: [18.209.15.95]
changed: [52.54.142.56]

TASK [index.html copy] *********************************************************
changed: [52.54.142.56]
changed: [18.209.15.95]

PLAY RECAP *********************************************************************
18.209.15.95               : ok=3    changed=2    unreachable=0    failed=0
52.54.142.56               : ok=3    changed=2    unreachable=0    failed=0
The "-s" was used to run as "sudo".
Here is the result for the production server:
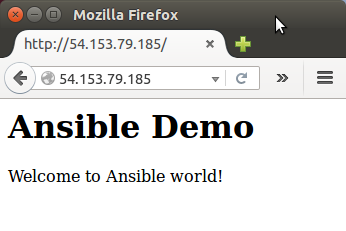
As a sample for potential database updates, we'll add another variable on the index.html.j2:
<html>
<body>

<h1>Ansible Demo</h1>
<p>{{MyMessage}}</p>
<p>{{DBMessage}}</p>

</body>
</html>
Modify the my_playbook_2.yaml accordingly and save it to my_playbook_3.yaml:
---

- hosts: mywebservers

  vars:
   - MyMessage: "Welcome to Ansible world!"
   - DBMessage: "Hello from MongoDB"

  tasks:
   - name: Nginx setup
     apt: pkg=nginx state=installed update_cache=true
   - name: index.html copy
     template: src=index.html.j2 dest=/usr/share/nginx/html/index.html
Run "ansible-playbook" one more time:
ans@laptop:~$ ansible-playbook -i hosts -s -u ubuntu my_playbook_3.yaml

PLAY ***************************************************************************

TASK [install python 2] ********************************************************
ok: [52.54.142.56]
ok: [18.209.15.95]

TASK [Nginx setup] *************************************************************
ok: [18.209.15.95]
ok: [52.54.142.56]

TASK [index.html copy] *********************************************************
changed: [52.54.142.56]
changed: [18.209.15.95]

PLAY RECAP *********************************************************************
18.209.15.95               : ok=3    changed=1    unreachable=0    failed=0
52.54.142.56               : ok=3    changed=1    unreachable=0    failed=0
Here is our updated page on the production server:
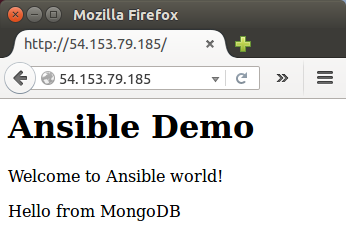
What we've done so far was quiet an achievement, and right now we feel like we can do anything with Ansible.
Well, as always, it takes times to learn something and become comfortable.
Here is a sample of ansible file structure to deploy a demo app:
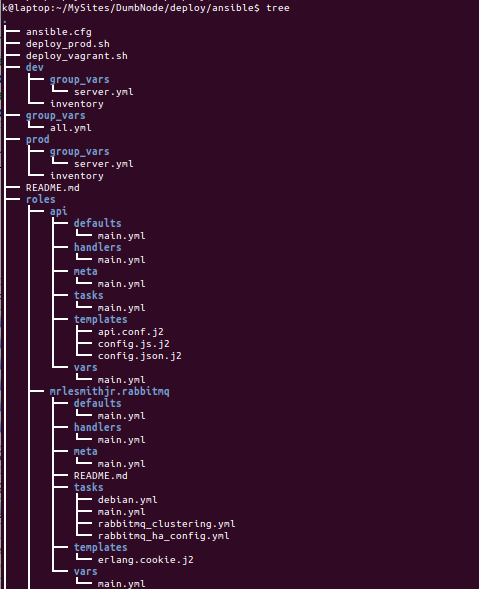
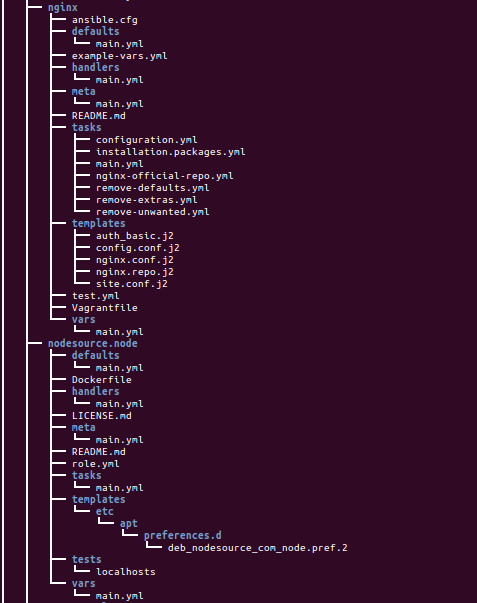
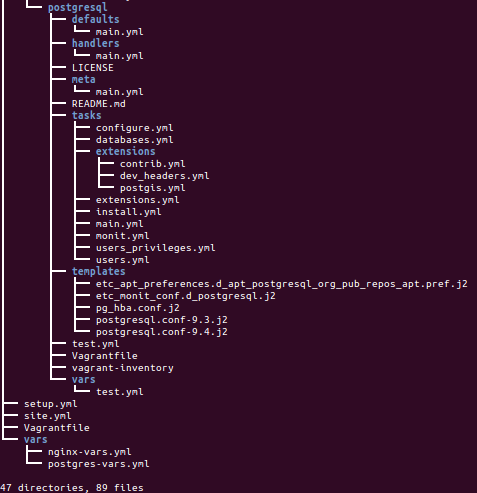
Yes, we still have a long way to go.
Ansible 2.0
Ph.D. / Golden Gate Ave, San Francisco / Seoul National Univ / Carnegie Mellon / UC Berkeley / DevOps / Deep Learning / Visualization