Docker & Kubernetes : Jenkins-X on EKS
Though Jenkins-X can be used on several cloud environments, in this article, we'll used it on AWS.
Amazon EKS and Jenkins-X installed on the cluster provide a continuous delivery platform that allows developers to focus on their applications.
Jenkins-X follows the best practices outlined by the Accelerate book and the State of DevOps report. This includes practices such as using Continuous Integration and Continuous Delivery, using trunk-based development, and using the cloud well.
Jenkins-X's jx command creates a git repository in Github for us, registers a Webhook to capture git push events and creates a Helm chart for our project. The Helm is used to package and perform installations and upgrade for our apps.
Jenkins-X manages deployment via source control. Each pull request is built and deployed to its own with an isolated preview environment (each promotion is actually a pull request to a per-environment repository-GitOps). Merges to master are automatically promoted to staging.
It uses Skaffold for image generation and CustomResourceDefinition(CRD) of Kubernetes to manage the pipeline activity.
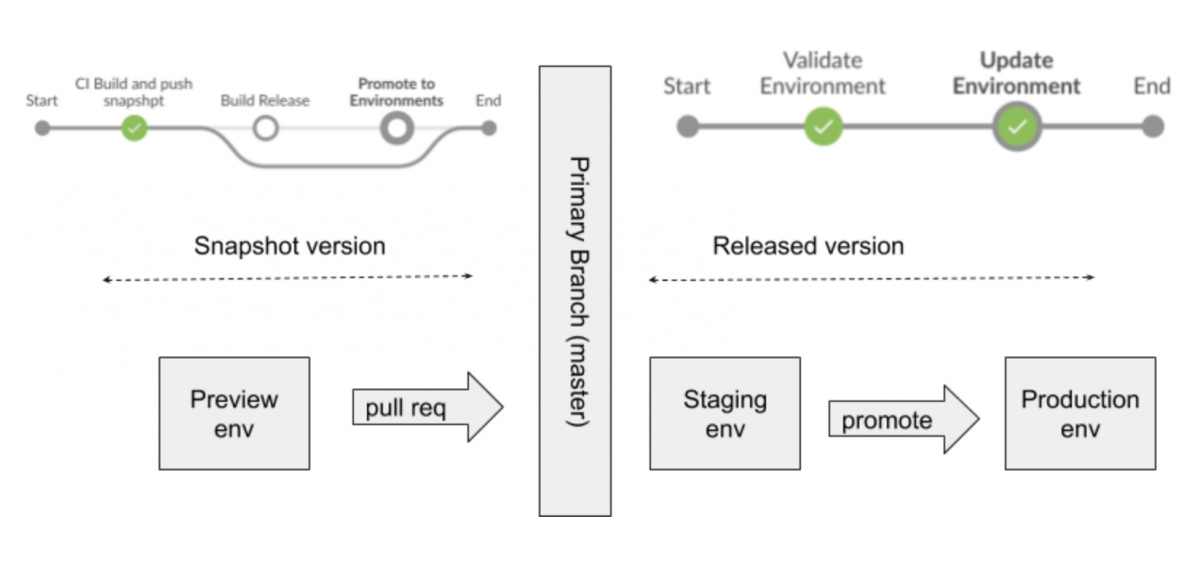
Picture from Opinionated Kubernetes and Jenkins X
Jenkins-X keeps environment configuration in source control. Deployments to master are done via pull request to the production configuration repository.
Compared with mature CI/CD tool Spinnaker, Jenkins-X is released recently (2018 March). So, we may want to use it for a pilot project in a smaller team as suggested in Spinnaker over Jenkins-X for Enterprise.
That's because Jenkins-X is quick to setup both CI and CD and it's quite straight forward (requires less intervention to pipeline configurations by providing strong defaults) to deploy kubernetes apps while the Spinnaker is mostly focused on the CD side providing various deployment strategies (red/black, rolling, and canary), roll back on problems, approval, proper tearing down (thus, it gives us more freedom for CI tools, instead) as shown in the picture below.
Picture from Global Continuous Delivery with Spinnaker
For in-depth on Jenkins-X, please check out Introducing Jenkins X: a CI/CD solution for modern cloud applications on Kubernetes or Get Started.
We will need to get the jx command line tool locally on our machine.
On a Mac we can use brew:
$ brew tap jenkins-x/jx

$ brew install jx
==> Installing jx from jenkins-x/jx
==> Downloading https://github.com/jenkins-x/jx/releases/download/v1.3.560/jx-darwin-amd64.tar.gz
==> Downloading from https://github-production-release-asset-2e65be.s3.amazonaws.com/116400734/1ba97f00-e82f-11e8-8059-69feb9ff2b63?X-Amz-Al
######################################################################## 100.0%
/usr/local/Cellar/jx/1.3.560: 3 files, 82.6MB, built in 21 seconds
Linux:
$ mkdir -p ~/.jx/bin
$ curl -L https://github.com/jenkins-x/jx/releases/download/v1.3.560/jx-linux-amd64.tar.gz | tar xzv -C ~/.jx/bin
$ export PATH=$PATH:~/.jx/bin
$ echo 'export PATH=$PATH:~/.jx/bin' >> ~/.bashrc
To find out the available commands type:
$ jx
Or to get help on a specific command, say, create then type:
$ jx help create
After successful installation of jx client we should now be able to display the jx client version by executing the following command:
$ jx version
Using helmBinary helm with feature flag: none
NAME               VERSION
jx                 1.3.560
jenkins x platform 0.0.2871
Kubernetes cluster v1.10.3-eks
kubectl            v1.11.3
helm client        v2.11.0+g2e55dbe
helm server        v2.11.0+g2e55dbe
git                git version 2.15.1 (Apple Git-101)
We can create Kubernetes on AWS, Ggoogle, or Azure:
$ jx create cluster eks
$ jx create cluster gke
$ jx create cluster aks
Here, we will use AWS.
Now that we have jx client installed, we're ready to create the EKS cluster which will be used to run the Jenkins-X server, CI builds, and the application itself. Jenkins-X makes this task trivial by leveraging the power of the eksctl project.
We don't have to worry if we don't have eksctl, kubectl (Kubernetes client), Helm (package manager for Kubernetes), or the Heptio Authenticator for AWS installed: jx will detect anything that's missing and can automatically download and install it for us.
We can use the jx command line to create a new kubernetes cluster with Jenkins-X installed automatically.
While Jenkins recommends using Google Container Engine (GKE) for the best getting started experience, we're going to use AWS. Again, we have two options on AWS: either kops or eks which we'll use.
Before we start working with EKS, ensure that we have our AWS credentials set up. The Jenkins-X client is smart enough to retrieve AWS credentials from standard AWS cli locations, including environment variables or ~/.aws config files.
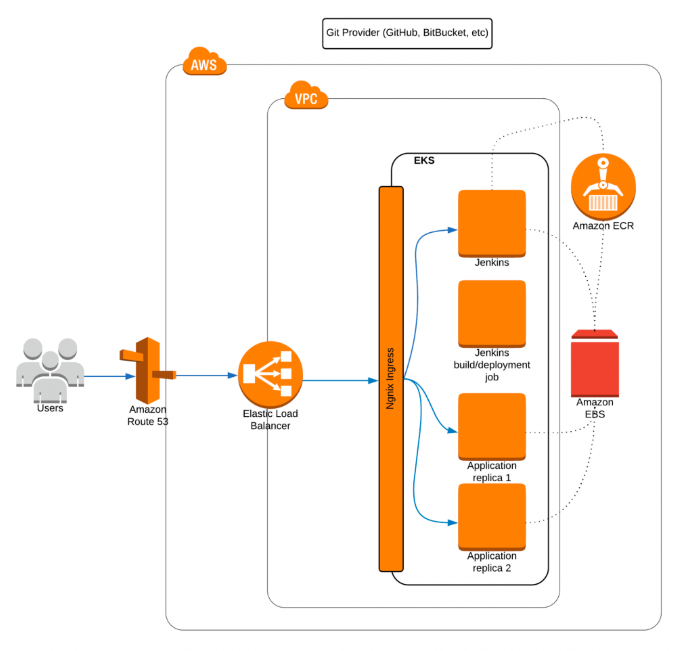
Picture from Continuous Delivery with Amazon EKS and Jenkins-X
The diagram shows what we're going to build. Our goal is to have a EKS cluster deployed exposed to the outside world using Elastic Load Balancing (ELB) and Route 53 domain mapping (note that we'll use the nip.io service instead of a real domain).
Inside our cluster, we want to have a Jenkins server (reacting on the Git changes) which can start Kubernetes-based builds which end up as Docker images pushed into Elastic Container Registry (ECR).
Finally, we want Jenkins to deploy our application image into an EKS cluster and expose it via ingress to the outside world. All the persistence needs of our infrastructure and applications will be handled by Amazon services, for example using Amazon Elastic Block Store (Amazon EBS), which will be used by ECR or Kubernetes persistent volumes.
To take a quick way to get the taste of Jenkins-X, for Ingress, as mentioned earlier, we won't use DNS wildcard CNAME to point at our NLB hostname. Instead, we'll use an NLP and use one of the IP addresses of one of the availability zones as our domain via $IP.ip, which means we utilize only a single availability zone IP address by resolving the NLB host name to one of the availability zone IP addresses.
Note that this approach is not really intended for real production installations.
Now, we will download and use the eksctl tool to create a new EKS cluster, then it'll install Jenkins-X on top of the cluster (we can use "--skip-installation=true" option for provisioning the cluster only without installing Jenkins-X into it).
"jx create cluster eks command creates a new Kubernetes cluster on Amazon Web Services (AWS) using EKS, installing required local dependencies and provisions the Jenkins-X platform. For more options for the command,
check jx-docs/content/commands/jx_create_cluster_eks.md.
$ jx create cluster eks
? Missing required dependencies, deselect to avoid auto installing:  [Use arrows to move, type to filter]
> [x]  eksctl
  [x]  heptio-authenticator-aws
  [x]  helm
Hit "return":
Missing required dependencies, deselect to avoid auto installing: eksctl, heptio-authenticator-aws, helm
Downloading https://github.com/weaveworks/eksctl/releases/download/0.1.5/eksctl_darwin_amd64.tar.gz to /Users/kihyuckhong/.jx/bin/eksctl.tar.gz...
Downloaded /Users/kihyuckhong/.jx/bin/eksctl.tar.gz
Downloading https://amazon-eks.s3-us-west-2.amazonaws.com/1.10.3/2018-06-05/bin/darwin/amd64/heptio-authenticator-aws to /Users/kihyuckhong/.jx/bin/heptio-authenticator-aws...
Downloaded /Users/kihyuckhong/.jx/bin/heptio-authenticator-aws
Downloading https://storage.googleapis.com/kubernetes-helm/helm-v2.11.0-darwin-amd64.tar.gz to /Users/kihyuckhong/.jx/bin/helm.tgz...
Downloaded /Users/kihyuckhong/.jx/bin/helm.tgz
Using helmBinary helm with feature flag: none
Creating EKS cluster - this can take a while so please be patient...
You can watch progress in the CloudFormation console: https://console.aws.amazon.com/cloudformation/
...
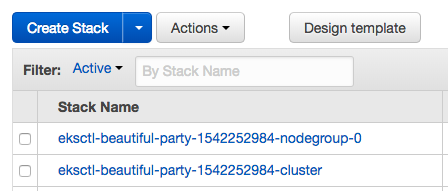
Creating cluster on EKS takes much longer than on Google GKE.
There are more outputs:
Initialising cluster ...

Using helmBinary helm with feature flag: none
Namespace jx created
 Storing the kubernetes provider eks in the TeamSettings
Updated the team settings in namespace jx
? Please enter the name you wish to use with git:  Einsteinish
? Please enter the email address you wish to use with git:  kihyuck.hong@gmail.com
Git configured for user: Einsteinish and email kihyuck.hong@gmail.com
Trying to create ClusterRoleBinding kihyuck-hong-gmail-com-cluster-admin-binding for role: cluster-admin for user kihyuck.hong@gmail.com
 clusterrolebindings.rbac.authorization.k8s.io "kihyuck-hong-gmail-com-cluster-admin-binding" not found
Created ClusterRoleBinding kihyuck-hong-gmail-com-cluster-admin-binding
Using helm2
Configuring tiller
Created ServiceAccount tiller in namespace kube-system
Trying to create ClusterRoleBinding tiller for role: cluster-admin and ServiceAccount: kube-system/tiller
Created ClusterRoleBinding tiller
Initialising helm using ServiceAccount tiller in namespace kube-system
Using helmBinary helm with feature flag: none
Waiting for tiller-deploy to be ready in tiller namespace kube-system
helm installed and configured
? No existing ingress controller found in the kube-system namespace, shall we install one? Yes
Using helm values file: /var/folders/3s/42rgkz495lj4ydjgnqhxn_400000gn/T/ing-values-920523981
Installing using helm binary: helm
Waiting for external loadbalancer to be created and update the nginx-ingress-controller service in kube-system namespace
External loadbalancer created
Waiting to find the external host name of the ingress controller Service in namespace kube-system with name jxing-nginx-ingress-controller

On AWS we recommend using a custom DNS name to access services in your Kubernetes cluster to ensure you can use all of your Availability Zones
If you do not have a custom DNS name you can use yet you can register a new one here: https://console.aws.amazon.com/route53/home?#DomainRegistration:

? Would you like to register a wildcard DNS ALIAS to point at this ELB address?  [? for help] (Y/n) n
? Would you like wait and resolve this address to an IP address and use it for the domain? Yes

Waiting for a82b8afa0e86411e8b74e166e925a7f8-97772dc3463ccff9.elb.us-east-1.amazonaws.com to be resolvable to an IP address...
retrying after error: Address cannot be resolved yet a82b8afa0e86411e8b74e166e925a7f8-97772dc3463ccff9.elb.us-east-1.amazonaws.com
.
a82b8afa0e86411e8b74e166e925a7f8-97772dc3463ccff9.elb.us-east-1.amazonaws.com resolved to IP 54.172.116.89
You can now configure a wildcard DNS pointing to the new loadbalancer address 54.172.116.89

If you do not have a custom domain setup yet, Ingress rules will be set for magic dns nip.io.
Once you have a customer domain ready, you can update with the command jx upgrade ingress --cluster
If you don't have a wildcard DNS setup then setup a new CNAME and point it at: 54.172.116.89.nip.io then use the DNS domain in the next input...

? Domain 54.172.116.89.nip.io
nginx ingress controller installed and configured
Lets set up a Git username and API token to be able to perform CI/CD

? GitHub user name: Einsteinish
To be able to create a repository on GitHub we need an API Token
Please click this URL https://github.com/settings/tokens/new?scopes=repo,read:user,read:org,user:email,write:repo_hook,delete_repo

Then COPY the token and enter in into the form below:
We can generate the GitHub API token with the scopes given as the parameters (scopes=repo,read:user,read:org,user:email,write:repo_hook,delete_repo):

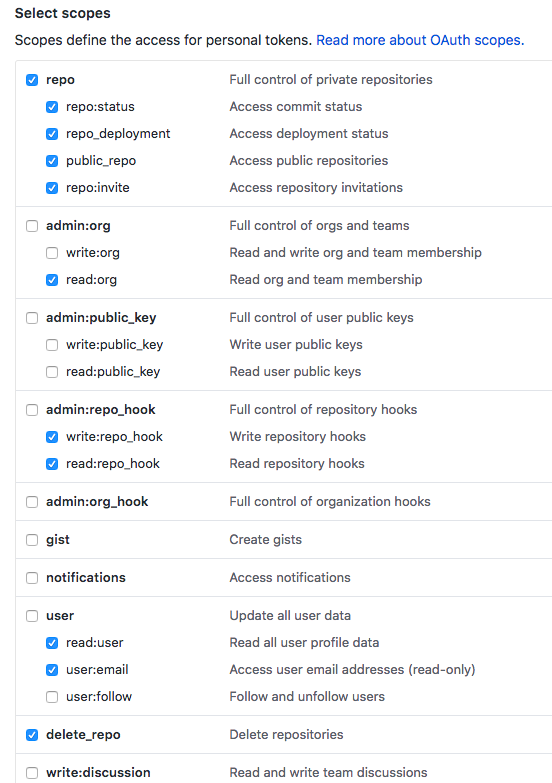
A personal access token (Kubernetes-EKS-Jenkins-X) with delete_repo, read:org, read:user, repo, user:email, and write:repo_hook scopes was recently added to our account. We may want to visit https://github.com/settings/tokens for more information.
To see this security events for our GitHub account, visit https://github.com/settings/security
Type in the newly created GitHub token.
? API Token: *****************************************
Updated the team settings in namespace jx
Cloning the Jenkins X cloud environments repo to /Users/kihyuckhong/.jx/cloud-environments
Enumerating objects: 1210, done.
Total 1210 (delta 0), reused 0 (delta 0), pack-reused 1210
No default password set, generating a random one
Creating secret jx-install-config in namespace jx
Generated helm values /Users/kihyuckhong/.jx/extraValues.yaml
? Select Jenkins installation type:  [Use arrows to move, type to filter]
  Serverless Jenkins
> Static Master Jenkins
Here is the final output:
? Select Jenkins installation type: Static Master Jenkins
Installing Jenkins X platform helm chart from: /Users/kihyuckhong/.jx/cloud-environments/env-eks
Installing jx into namespace jx
Waiting for tiller pod to be ready, service account name is tiller, namespace is jx, tiller namespace is kube-system
Waiting for cluster role binding to be defined, named tiller-role-binding in namespace jx
 tiller cluster role defined: cluster-admin in namespace jx
tiller pod running
Adding values file /Users/kihyuckhong/.jx/cloud-environments/env-eks/myvalues.yaml
Adding values file /Users/kihyuckhong/.jx/gitSecrets.yaml
Adding values file /Users/kihyuckhong/.jx/adminSecrets.yaml
Adding values file /Users/kihyuckhong/.jx/extraValues.yaml
Adding values file /Users/kihyuckhong/.jx/cloud-environments/env-eks/secrets.yaml
waiting for install to be ready, if this is the first time then it will take a while to download images
Jenkins X deployments ready in namespace jx


	********************************************************

	     NOTE: Your admin password is: swisherpepper

	********************************************************


Getting Jenkins API Token
Using url http://jenkins.jx.54.147.194.9.nip.io/me/configure
Generating the API token...
Created user admin API Token for Jenkins server jenkins.jx.54.147.194.9.nip.io at http://jenkins.jx.54.147.194.9.nip.io
Updating Jenkins with new external URL details http://jenkins.jx.54.147.194.9.nip.io
Creating default staging and production environments
Using Git provider GitHub at https://github.com


About to create repository environment-sagepinto-staging on server https://github.com with user Einsteinish


Creating repository Einsteinish/environment-sagepinto-staging
Creating Git repository Einsteinish/environment-sagepinto-staging
Pushed Git repository to https://github.com/Einsteinish/environment-sagepinto-staging

Creating staging Environment in namespace jx
Created environment staging
Namespace jx-staging created
 Updated the team settings in namespace jx
Created Jenkins Project: http://jenkins.jx.54.147.194.9.nip.io/job/Einsteinish/job/environment-sagepinto-staging/

Note that your first pipeline may take a few minutes to start while the necessary images get downloaded!

Creating GitHub webhook for Einsteinish/environment-sagepinto-staging for url http://jenkins.jx.54.147.194.9.nip.io/github-webhook/
Using Git provider GitHub at https://github.com


About to create repository environment-sagepinto-production on server https://github.com with user Einsteinish


Creating repository Einsteinish/environment-sagepinto-production
Creating Git repository Einsteinish/environment-sagepinto-production
Pushed Git repository to https://github.com/Einsteinish/environment-sagepinto-production

Creating production Environment in namespace jx
Created environment production
Namespace jx-production created
 Updated the team settings in namespace jx
Created Jenkins Project: http://jenkins.jx.54.147.194.9.nip.io/job/Einsteinish/job/environment-sagepinto-production/

Note that your first pipeline may take a few minutes to start while the necessary images get downloaded!

Creating GitHub webhook for Einsteinish/environment-sagepinto-production for url http://jenkins.jx.54.147.194.9.nip.io/github-webhook/

Jenkins X installation completed successfully


	********************************************************

	     NOTE: Your admin password is: swisherpepper

	********************************************************


Your Kubernetes context is now set to the namespace: jx
To switch back to your original namespace use: jx ns default
For help on switching contexts see: https://jenkins-x.io/developing/kube-context/

To import existing projects into Jenkins:       jx import
To create a new Spring Boot microservice:       jx create spring -d web -d actuator
To create a new microservice from a quickstart: jx create quickstart
$
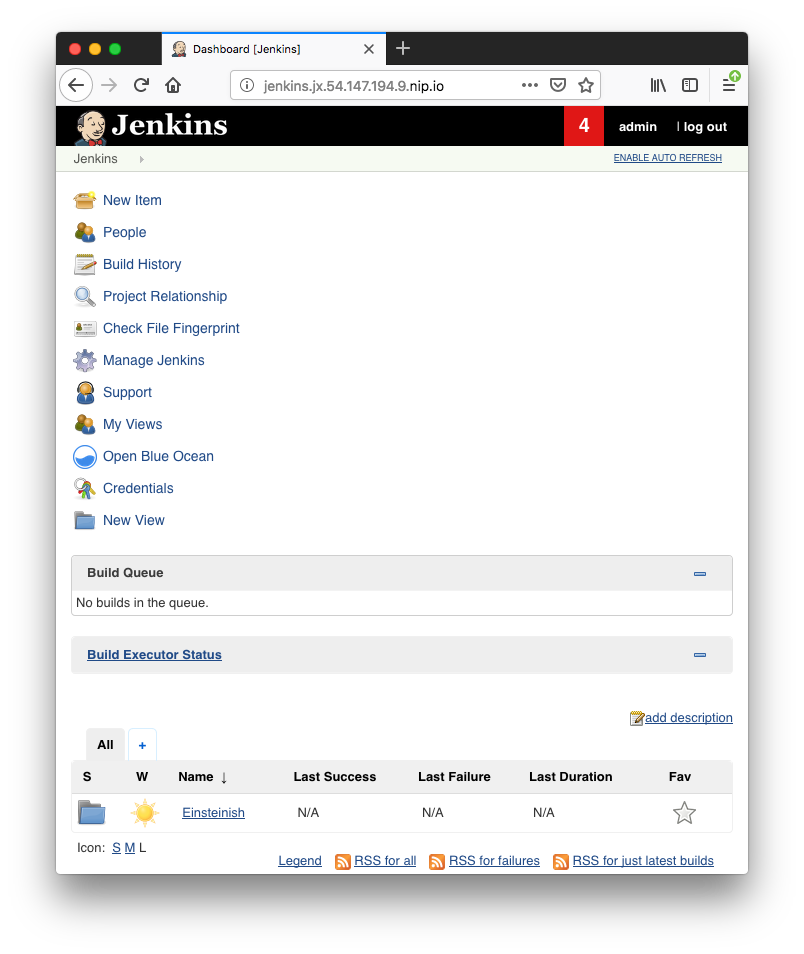
Now we will be able to see our cluster:

We should also be able to see the EC2 worker nodes associated with our cluster:

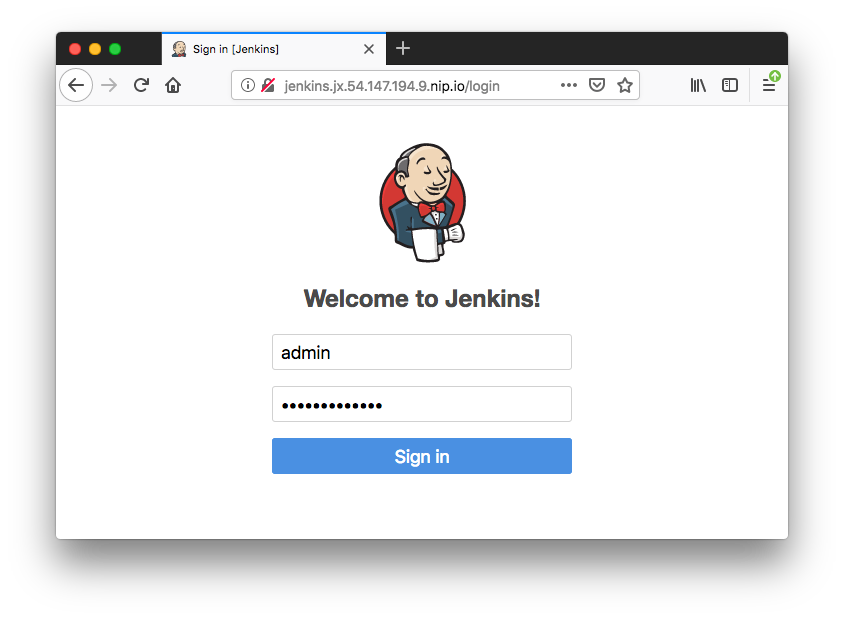
Jenkins-X with nip.io address:

$ jx get env
NAME       LABEL       KIND        PROMOTE NAMESPACE     ORDER CLUSTER SOURCE                                                              REF PR
dev        Development Development Never   jx            0
staging    Staging     Permanent   Auto    jx-staging    100           https://github.com/Einsteinish/environment-sagepinto-staging.git
production Production  Permanent   Manual  jx-production 200           https://github.com/Einsteinish/environment-sagepinto-production.git

$ jx get app
No applications found in environments staging, production
We can also navigate to GitHub and see that Jenkins X provisioned the projects:
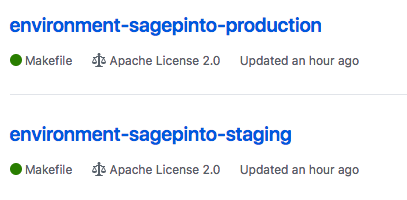
Below is the environments' Helm chart definitions as just built by Jenkins (environment-sagepinto-production/env/values.yaml):
expose:
  Args:
    - --v
    - 4
  Annotations:
    helm.sh/hook: post-install,post-upgrade
    helm.sh/hook-delete-policy: hook-succeeded

cleanup:
  Args:
    - --cleanup
  Annotations:
    helm.sh/hook: pre-delete
    helm.sh/hook-delete-policy: hook-succeeded
expose:
  config:
    domain: 54.147.194.9.nip.io
    exposer: Ingress
    http: "true"
    tlsacme: "false"
    pathMode: ""
  Annotations:
    helm.sh/hook: post-install,post-upgrade
    helm.sh/hook-delete-policy: hook-succeeded
jenkins:
  Servers:
    Global:
      EnvVars:
        DOCKER_REGISTRY: 526262051452.dkr.ecr.us-east-1.amazonaws.com
        TILLER_NAMESPACE: kube-system
Let's create a bare-bones Spring Boot app from Cloud Shell (Continuous Delivery with Amazon EKS and Jenkins X or Automated CI+CD for Spring Boot with Jenkins X).
During the process of creating the Spring Boot app, jx will ask us about the project name, the language you want to use for the project, Maven coordinates, etc.
$ jx create spring -d web -d actuator
? Language: java
? Group: com.example
? Artifact: jenkinsx-eks
Created Spring Boot project at /Users/kihyuckhong/Documents/TEST/SpringJenkinsX/demo
No username defined for the current Git server!
? Do you wish to use Einsteinish as the Git user name: Yes
The directory /Users/kihyuckhong/Documents/TEST/SpringJenkinsX/demo is not yet using git
? Would you like to initialise git now? Yes
? Commit message:  Initial import

Git repository created
selected pack: /Users/kihyuckhong/.jx/draft/packs/github.com/jenkins-x/draft-packs/packs/maven
existing Dockerfile, Jenkinsfile and charts folder found so skipping 'draft create' step
Using Git provider GitHub at https://github.com


About to create repository demo on server https://github.com with user Einsteinish
? Which organisation do you want to use? Einsteinish
? Enter the new repository name:  jenkinsx-eks


Creating repository Einsteinish/jenkinsx-eks
Pushed Git repository to https://github.com/Einsteinish/jenkinsx-eks

Let's ensure that we have an ECR repository for the Docker image einsteinish/jenkins-x-eks
Created ECR repository: 526262051452.dkr.ecr.us-east-1.amazonaws.com/einsteinish/jenkins-x-eks
Updated the team settings in namespace jx
Created Jenkins Project: http://jenkins.jx.54.147.194.9.nip.io/job/Einsteinish/job/jenkinsx-eks/

Watch pipeline activity via:    jx get activity -f jenkinsx-eks -w
Browse the pipeline log via:    jx get build logs Einsteinish/jenkinsx-eks/master
Open the Jenkins console via    jx console
You can list the pipelines via: jx get pipelines
When the pipeline is complete:  jx get applications

For more help on available commands see: https://jenkins-x.io/developing/browsing/

Note that your first pipeline may take a few minutes to start while the necessary images get downloaded!

Creating GitHub webhook for Einsteinish/jenkinsx-eks for url http://jenkins.jx.54.147.194.9.nip.io/github-webhook/
Now we can see that our application has been created on our local laptop, pushed into the remote GitHub repository, and added into the Jenkins X CD pipeline.
Let's check that our app is in Jenkins X CD pipeline with jx get pipe command:
$ jx get pipe
Name                                                URL                                                                                                    LAST_BUILD STATUS  DURATION
Einsteinish/environment-sagepinto-production/master http://jenkins.jx.54.147.194.9.nip.io/job/Einsteinish/job/environment-sagepinto-production/job/master/ #1         SUCCESS 177.955µs
Einsteinish/environment-sagepinto-staging/PR-1      http://jenkins.jx.54.147.194.9.nip.io/job/Einsteinish/job/environment-sagepinto-staging/job/PR-1/      #1         SUCCESS 83.107µs
Einsteinish/environment-sagepinto-staging/master    http://jenkins.jx.54.147.194.9.nip.io/job/Einsteinish/job/environment-sagepinto-staging/job/master/    #2         SUCCESS 71.465µs
Einsteinish/jenkinsx-eks/master                     http://jenkins.jx.54.147.194.9.nip.io/job/Einsteinish/job/jenkinsx-eks/job/master/                     #1         SUCCESS 382.321µs
The command shows the list of pipelines registered in Jenkins X. As we can see, we have dedicated pipelines for changes that should be applied to staging and production environments.
We can also use the Jenkins UI to see the pipeline progress:

cWe can see this is listed as an app:
$ jx get app
APPLICATION   STAGING PODS URL                                                 PRODUCTION PODS URL
jenkins-x-eks 0.0.1   1/1  http://jenkins-x-eks.jx-staging.54.147.194.9.nip.io
Jenkins X has now built and deployed our application into the staging environment. Let's use the URL of the application provided by the jx command output (http://jenkins-x-eks.jx-staging.54.147.194.9.nip.io) to see if it is up and running:
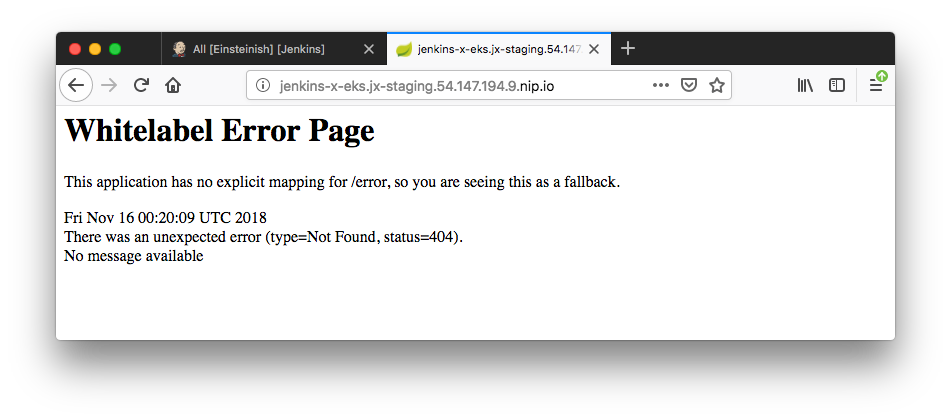
If we can see the Spring Whitelabel error message, our application has been successfully deployed into our EKS cluster and exposed via the Ingress controller.
Now let's modify README file in our application.
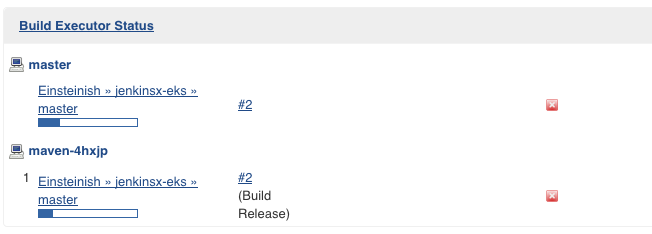
As we can see from the picture above, Jenkins X is rebuilding the app and and then redeploy the project. Now we see the app version has been changed to 0.0.2 from 0.0.1:
$ jx get app
APPLICATION   STAGING PODS URL                                                 PRODUCTION PODS URL
jenkins-x-eks 0.0.2   1/1  http://jenkins-x-eks.jx-staging.54.147.194.9.nip.io
Here are the Cloudformation templates used to create eks at "jx create cluster eks".
EKS cluster template:
{
	"AWSTemplateFormatVersion": "2010-09-09",
	"Description": "EKS cluster (with dedicated VPC \u0026 IAM role)  [created and managed by eksctl]",
	"Resources": {
		"ControlPlane": {
			"Type": "AWS::EKS::Cluster",
			"Properties": {
				"Name": "ferocious-unicorn-1542319251",
				"ResourcesVpcConfig": {
					"SecurityGroupIds": [{
						"Ref": "ControlPlaneSecurityGroup"
					}],
					"SubnetIds": [{
						"Ref": "SubnetUSEAST1B"
					}, {
						"Ref": "SubnetUSEAST1A"
					}, {
						"Ref": "SubnetUSEAST1F"
					}]
				},
				"RoleArn": {
					"Fn::GetAtt": "ServiceRole.Arn"
				},
				"Version": "1.10"
			}
		},
		"ControlPlaneSecurityGroup": {
			"Type": "AWS::EC2::SecurityGroup",
			"Properties": {
				"GroupDescription": "Communication between the control plane and worker node groups",
				"Tags": [{
					"Key": "Name",
					"Value": {
						"Fn::Sub": "${AWS::StackName}/ControlPlaneSecurityGroup"
					}
				}],
				"VpcId": {
					"Ref": "VPC"
				}
			}
		},
		"InternetGateway": {
			"Type": "AWS::EC2::InternetGateway",
			"Properties": {
				"Tags": [{
					"Key": "Name",
					"Value": {
						"Fn::Sub": "${AWS::StackName}/InternetGateway"
					}
				}]
			}
		},
		"PolicyNLB": {
			"Type": "AWS::IAM::Policy",
			"Properties": {
				"PolicyDocument": {
					"Statement": [{
						"Action": ["elasticloadbalancing:*", "ec2:CreateSecurityGroup", "ec2:Describe*"],
						"Effect": "Allow",
						"Resource": "*"
					}],
					"Version": "2012-10-17"
				},
				"PolicyName": {
					"Fn::Sub": "${AWS::StackName}-PolicyNLB"
				},
				"Roles": [{
					"Ref": "ServiceRole"
				}]
			}
		},
		"PublicSubnetRoute": {
			"Type": "AWS::EC2::Route",
			"Properties": {
				"DestinationCidrBlock": "0.0.0.0/0",
				"GatewayId": {
					"Ref": "InternetGateway"
				},
				"RouteTableId": {
					"Ref": "RouteTable"
				}
			}
		},
		"RouteTable": {
			"Type": "AWS::EC2::RouteTable",
			"Properties": {
				"Tags": [{
					"Key": "Name",
					"Value": {
						"Fn::Sub": "${AWS::StackName}/RouteTable"
					}
				}],
				"VpcId": {
					"Ref": "VPC"
				}
			}
		},
		"RouteTableAssociationUSEAST1A": {
			"Type": "AWS::EC2::SubnetRouteTableAssociation",
			"Properties": {
				"RouteTableId": {
					"Ref": "RouteTable"
				},
				"SubnetId": {
					"Ref": "SubnetUSEAST1A"
				}
			}
		},
		"RouteTableAssociationUSEAST1B": {
			"Type": "AWS::EC2::SubnetRouteTableAssociation",
			"Properties": {
				"RouteTableId": {
					"Ref": "RouteTable"
				},
				"SubnetId": {
					"Ref": "SubnetUSEAST1B"
				}
			}
		},
		"RouteTableAssociationUSEAST1F": {
			"Type": "AWS::EC2::SubnetRouteTableAssociation",
			"Properties": {
				"RouteTableId": {
					"Ref": "RouteTable"
				},
				"SubnetId": {
					"Ref": "SubnetUSEAST1F"
				}
			}
		},
		"ServiceRole": {
			"Type": "AWS::IAM::Role",
			"Properties": {
				"AssumeRolePolicyDocument": {
					"Statement": [{
						"Action": ["sts:AssumeRole"],
						"Effect": "Allow",
						"Principal": {
							"Service": ["eks.amazonaws.com"]
						}
					}],
					"Version": "2012-10-17"
				},
				"ManagedPolicyArns": ["arn:aws:iam::aws:policy/AmazonEKSServicePolicy", "arn:aws:iam::aws:policy/AmazonEKSClusterPolicy"]
			}
		},
		"SubnetUSEAST1A": {
			"Type": "AWS::EC2::Subnet",
			"Properties": {
				"AvailabilityZone": "us-east-1a",
				"CidrBlock": "192.168.64.0/18",
				"Tags": [{
					"Key": "Name",
					"Value": {
						"Fn::Sub": "${AWS::StackName}/SubnetUSEAST1A"
					}
				}],
				"VpcId": {
					"Ref": "VPC"
				}
			}
		},
		"SubnetUSEAST1B": {
			"Type": "AWS::EC2::Subnet",
			"Properties": {
				"AvailabilityZone": "us-east-1b",
				"CidrBlock": "192.168.192.0/18",
				"Tags": [{
					"Key": "Name",
					"Value": {
						"Fn::Sub": "${AWS::StackName}/SubnetUSEAST1B"
					}
				}],
				"VpcId": {
					"Ref": "VPC"
				}
			}
		},
		"SubnetUSEAST1F": {
			"Type": "AWS::EC2::Subnet",
			"Properties": {
				"AvailabilityZone": "us-east-1f",
				"CidrBlock": "192.168.128.0/18",
				"Tags": [{
					"Key": "Name",
					"Value": {
						"Fn::Sub": "${AWS::StackName}/SubnetUSEAST1F"
					}
				}],
				"VpcId": {
					"Ref": "VPC"
				}
			}
		},
		"VPC": {
			"Type": "AWS::EC2::VPC",
			"Properties": {
				"CidrBlock": "192.168.0.0/16",
				"EnableDnsHostnames": true,
				"EnableDnsSupport": true,
				"Tags": [{
					"Key": "Name",
					"Value": {
						"Fn::Sub": "${AWS::StackName}/VPC"
					}
				}]
			}
		},
		"VPCGatewayAttachment": {
			"Type": "AWS::EC2::VPCGatewayAttachment",
			"Properties": {
				"InternetGatewayId": {
					"Ref": "InternetGateway"
				},
				"VpcId": {
					"Ref": "VPC"
				}
			}
		}
	},
	"Outputs": {
		"ARN": {
			"Export": {
				"Name": {
					"Fn::Sub": "${AWS::StackName}::ARN"
				}
			},
			"Value": {
				"Fn::GetAtt": "ControlPlane.Arn"
			}
		},
		"CertificateAuthorityData": {
			"Value": {
				"Fn::GetAtt": "ControlPlane.CertificateAuthorityData"
			}
		},
		"ClusterStackName": {
			"Value": {
				"Ref": "AWS::StackName"
			}
		},
		"Endpoint": {
			"Export": {
				"Name": {
					"Fn::Sub": "${AWS::StackName}::Endpoint"
				}
			},
			"Value": {
				"Fn::GetAtt": "ControlPlane.Endpoint"
			}
		},
		"SecurityGroup": {
			"Export": {
				"Name": {
					"Fn::Sub": "${AWS::StackName}::SecurityGroup"
				}
			},
			"Value": {
				"Fn::Join": [",", [{
					"Ref": "ControlPlaneSecurityGroup"
				}]]
			}
		},
		"Subnets": {
			"Export": {
				"Name": {
					"Fn::Sub": "${AWS::StackName}::Subnets"
				}
			},
			"Value": {
				"Fn::Join": [",", [{
					"Ref": "SubnetUSEAST1B"
				}, {
					"Ref": "SubnetUSEAST1A"
				}, {
					"Ref": "SubnetUSEAST1F"
				}]]
			}
		},
		"VPC": {
			"Export": {
				"Name": {
					"Fn::Sub": "${AWS::StackName}::VPC"
				}
			},
			"Value": {
				"Ref": "VPC"
			}
		}
	}
}
Worker nodes template:
{
	"AWSTemplateFormatVersion": "2010-09-09",
	"Description": "EKS nodes (Amazon Linux 2 with SSH)  [created and managed by eksctl]",
	"Resources": {
		"EgressInterCluster": {
			"Type": "AWS::EC2::SecurityGroupEgress",
			"Properties": {
				"Description": "Allow control plane to communicate with worker nodes in group ferocious-unicorn-1542319251-0 (kubelet and workload TCP ports)",
				"DestinationSecurityGroupId": {
					"Ref": "SG"
				},
				"FromPort": 1025,
				"GroupId": {
					"Fn::ImportValue": "eksctl-ferocious-unicorn-1542319251-cluster::SecurityGroup"
				},
				"IpProtocol": "tcp",
				"ToPort": 65535
			}
		},
		"EgressInterClusterAPI": {
			"Type": "AWS::EC2::SecurityGroupEgress",
			"Properties": {
				"Description": "Allow control plane to communicate with worker nodes in group ferocious-unicorn-1542319251-0 (workloads using HTTPS port, commonly used with extension API servers)",
				"DestinationSecurityGroupId": {
					"Ref": "SG"
				},
				"FromPort": 443,
				"GroupId": {
					"Fn::ImportValue": "eksctl-ferocious-unicorn-1542319251-cluster::SecurityGroup"
				},
				"IpProtocol": "tcp",
				"ToPort": 443
			}
		},
		"IngressInterCluster": {
			"Type": "AWS::EC2::SecurityGroupIngress",
			"Properties": {
				"Description": "Allow worker nodes in group ferocious-unicorn-1542319251-0 to communicate with control plane (kubelet and workload TCP ports)",
				"FromPort": 1025,
				"GroupId": {
					"Ref": "SG"
				},
				"IpProtocol": "tcp",
				"SourceSecurityGroupId": {
					"Fn::ImportValue": "eksctl-ferocious-unicorn-1542319251-cluster::SecurityGroup"
				},
				"ToPort": 65535
			}
		},
		"IngressInterClusterAPI": {
			"Type": "AWS::EC2::SecurityGroupIngress",
			"Properties": {
				"Description": "Allow worker nodes in group ferocious-unicorn-1542319251-0 to communicate with control plane (workloads using HTTPS port, commonly used with extension API servers)",
				"FromPort": 443,
				"GroupId": {
					"Ref": "SG"
				},
				"IpProtocol": "tcp",
				"SourceSecurityGroupId": {
					"Fn::ImportValue": "eksctl-ferocious-unicorn-1542319251-cluster::SecurityGroup"
				},
				"ToPort": 443
			}
		},
		"IngressInterClusterCP": {
			"Type": "AWS::EC2::SecurityGroupIngress",
			"Properties": {
				"Description": "Allow control plane to receive API requests from worker nodes in group ferocious-unicorn-1542319251-0",
				"FromPort": 443,
				"GroupId": {
					"Fn::ImportValue": "eksctl-ferocious-unicorn-1542319251-cluster::SecurityGroup"
				},
				"IpProtocol": "tcp",
				"SourceSecurityGroupId": {
					"Ref": "SG"
				},
				"ToPort": 443
			}
		},
		"IngressInterSG": {
			"Type": "AWS::EC2::SecurityGroupIngress",
			"Properties": {
				"Description": "Allow worker nodes in group ferocious-unicorn-1542319251-0 to communicate with each other (all ports)",
				"FromPort": 0,
				"GroupId": {
					"Ref": "SG"
				},
				"IpProtocol": "-1",
				"SourceSecurityGroupId": {
					"Ref": "SG"
				},
				"ToPort": 65535
			}
		},
		"NodeGroup": {
			"Type": "AWS::AutoScaling::AutoScalingGroup",
			"Properties": {
				"DesiredCapacity": "2",
				"LaunchConfigurationName": {
					"Ref": "NodeLaunchConfig"
				},
				"MaxSize": "2",
				"MinSize": "2",
				"Tags": [{
					"Key": "Name",
					"PropagateAtLaunch": "true",
					"Value": "ferocious-unicorn-1542319251-0-Node"
				}, {
					"Key": "kubernetes.io/cluster/ferocious-unicorn-1542319251",
					"PropagateAtLaunch": "true",
					"Value": "owned"
				}],
				"VPCZoneIdentifier": {
					"Fn::Split": [",", {
						"Fn::ImportValue": "eksctl-ferocious-unicorn-1542319251-cluster::Subnets"
					}]
				}
			},
			"UpdatePolicy": {
				"AutoScalingRollingUpdate": {
					"MaxBatchSize": "1",
					"MinInstancesInService": "1"
				}
			}
		},
		"NodeInstanceProfile": {
			"Type": "AWS::IAM::InstanceProfile",
			"Properties": {
				"Path": "/",
				"Roles": [{
					"Ref": "NodeInstanceRole"
				}]
			}
		},
		"NodeInstanceRole": {
			"Type": "AWS::IAM::Role",
			"Properties": {
				"AssumeRolePolicyDocument": {
					"Statement": [{
						"Action": ["sts:AssumeRole"],
						"Effect": "Allow",
						"Principal": {
							"Service": ["ec2.amazonaws.com"]
						}
					}],
					"Version": "2012-10-17"
				},
				"ManagedPolicyArns": ["arn:aws:iam::aws:policy/AmazonEKSWorkerNodePolicy", "arn:aws:iam::aws:policy/AmazonEKS_CNI_Policy", "arn:aws:iam::aws:policy/AmazonEC2ContainerRegistryPowerUser"],
				"Path": "/"
			}
		},
		"NodeLaunchConfig": {
			"Type": "AWS::AutoScaling::LaunchConfiguration",
			"Properties": {
				"AssociatePublicIpAddress": true,
				"IamInstanceProfile": {
					"Ref": "NodeInstanceProfile"
				},
				"ImageId": "ami-0440e4f6b9713faf6",
				"InstanceType": "m5.large",
				"SecurityGroups": [{
					"Ref": "SG"
				}],
				"UserData": "H4sIAAAAAAAA/6xY63LiOBb+n6fw9vSPmWKMscMloYqtlS+AA+Z+CexupYQsjIItOZKMIb3z7lu2SZqke7azM+NUJSXp6NO56dM5+QmFLPFVxOiWBFcxRHsYYNFUaBKGVzyhKPKbV6qiKtoBci0kGy3foAnESSyFFmOuEiokpAhrG8akkBzGZRgaZbG7SjmR+GFLQiwyFMSoxFQ2lf9cKYqi/KTgvUAyVEWMEdkSpIiTkDjyFZ+zWCVUSSiRypZxZZ9scIjlr/kARPCZUaVPaHJUDOVn0Dd+ucoR/znF/EAQ/vcZv88QDJUIS+hDCZUYchhhibloKhOn4w4HvypgOX2wnTaY92cPxVy+16EHwhmNMJVtEuKWhiXSCnW1F7wypofzQZ2QbWCoQOorQkJJ0JuzPHD/MBra018Vqz+fzpzJgz2Y/vCYs80XpxTmUEbV7xwyGNrOgzv6MGyYgeXgxZYjRlMJuWy9G2qJ4NqG0JeNyr9yAUVRVej7HAvRqpTzn4sVynyskrj1+ctZrd8uFlGYCIm56lPR+vzlwiWXQhE8qjHzM4kX910uw0TuMJUEQUkYVSXbY6qmeLNjbP9OjHHyXEhFzMet5bdCYchSNebkQEIcYL8leYIv1mPmq4RuOcyuiYSEZjkfwQC36hWjWtH16nW1ZpT9PS9jxMufv3ybU7+VYZ60MBVlxKIsFloME4FVGPn1avO6rL9xUHYnY84OxMe8BVPxPe+xCBLaOg+LcF6KUaJuCFV9wlsai6WGKMnC+E4ku/iFTJYimQzFsuxfSr3azBMqSYRbPkN7zC+jjWXK+F6NwyTIVKLkcn/AWRKrPicHzFvFaHtpEMcByS3Kkua977OkK8jpmyQupssnGF3avcVQJhyrAZRYtCZMQol7ReZm5IC5hbnMyAbKbw6DlNFTxBKR501rC0OB33ieYCpVBNXt+0uFYBlxeaUoLKWYNxXOmGxmv64UJYZy11Ry6TO/nf++XkVRsFbZ1/SKmiGGMmfQzMIMAPOICEEYFU3lU6VerX56Q6ZqruG3SddKhIqhkKr+KuD0pg8vF24APKe1xZwhkpmcUIIYp6peqxrX+q1Re7vLGdijoTuYtXZSxqKpabYBwLXuGA2rblbAdeO67bRvbqyaVbVqADSM8imsll81KOO9eHsHfuis77Ptx5zxQhkt4zYfX5BMS6+U9UpGWHrlozq8peIfqXBVpIuqqqbTcQeK5Uxmbtu1wMzJZwsNXdc62ZYFNlYAUtcEgWsCGwzMYP+025PObVoxwVi0gQ0W3sRLnfHKXozHtpPG3F/ehTkIimqh31k8e2b13p45VW/mHAcz9+TZ+9Nwwe7tmZvPeY+vc2l75sw80+kAfe4UET56PXi9IOv7u2R9PwnRs2WBqZva49Vdj63d3QENwNgxzTGwg8AZgUzrMbOCwDGB17CK94IvRoH05mQcJjrqLEv1QzfqNLzx8rRwGydtzRZxfdkBTmkW9Wp3RsP0faex6LuEXXdnK5CDdLZBOOi2HXMWd3upzY/7+sBwn+iyd2w7XTlMRvWQPK6MlXs3ZXvPepbdClhoxKgcB9FmSXOQUakOdegHJtovG6doOVxb16uUhcP9faM+g+T+5tTvea68gd3utlt/Rs/2MeqMF557rNrBpDDHdaD12FiapL28ufXDY2/jpIf0NBtUjEaIH/ttZHgnZ9iX1bvSvP2o4ZI/1PDTXVgdt4dTrZeDyErac2joeq7WvwX9EtXQrNSbQqi3j5E/pbcMUzBMKu7k3rAbo+10XH/aAyDupe5uT0kR4hiMrLtlZNbqKxZPkt1qhCyQOgBA79GznNQOVvZiUhmBcVczwdgGQW/vgZssvL6TOmYOoqXjtgc8E2xv3oe1fw6rCSy4PPE6TYRXLS39FIqkPRuMH5/AYz8H2dyhhTfXo9Gp47qD2n1sJnO/3ymtjGT1+BRuj4TIuvM0ct3HI62svRQnQzia7pL5SZN2v5aD8E0KazftWZ8nm0408bbd6k066c9H7SqU6wMY3JQO6yC0q72164uBr3dX1YlxeByaWigXsqiEzAnSS6O6d4zT/lTSZbpsVMDw1KkeWenAFs+d9gZuO4f1tHoq6aV55+bZserXB39evXX90T4tzCmtbhvtYWM9qaXb+fB6aDzrfqm/FKukVtp099tJIEr2zvT6O/JEAu/WNdfGtrvpOEHMUaWUg6yjySm095FtogoQ1z09hkODTg61kYAzonPDnxzTXrC91wx7z55ru8oObf323Dyh1leacAb290jiQ9T0+vJ8iJVgTBaYZ0JN5VAQ/LmAEM1Cn5dx8/zsKQr6+mC+1FPy9DtKFJ/IH9qm8hc+FdlHYYSbyv96sd6CIBmWCSuMzNxwlF+NLMYXRp6t/mPw2ZeIbPv5pfjHH4QpTPxTICjhPC9Tzib+ObQ9oX5TsYr2MOcjjreYY4qyLvHLb1cvpr+69i8w4ezMV9fiI0ZfR2+zuCjKym/7gfL+RpQJ0w46DOMd1C/38kBcYqlK3ju8mVHJm+EPa6RzCrEogpm3YCpUAqPLHoXxC0FMD+cG+/8oPy6q3Y9e9p/+lvdtYqeoOCm6PIx2TPl07slan3/eMSGzgCkq+eWT8vfvFj3vGsWidkUyVHyII0ZVjkMG/XdrmMJNiF/S4N2iyBrLi7Xfd8If+afDN95p1Gqfrv4bAAD//528jYbpEAAA"
			}
		},
		"PolicyStackSignal": {
			"Type": "AWS::IAM::Policy",
			"Properties": {
				"PolicyDocument": {
					"Statement": [{
						"Action": ["cloudformation:SignalResource"],
						"Effect": "Allow",
						"Resource": {
							"Fn::Join": [":", ["arn:aws:cloudformation", {
								"Ref": "AWS::Region"
							}, {
								"Ref": "AWS::AccountId"
							}, {
								"Fn::Join": ["/", ["stack", {
									"Ref": "AWS::StackName"
								}, "*"]]
							}]]
						}
					}],
					"Version": "2012-10-17"
				},
				"PolicyName": {
					"Fn::Sub": "${AWS::StackName}-PolicyStackSignal"
				},
				"Roles": [{
					"Ref": "NodeInstanceRole"
				}]
			}
		},
		"PolicyTagDiscovery": {
			"Type": "AWS::IAM::Policy",
			"Properties": {
				"PolicyDocument": {
					"Statement": [{
						"Action": ["ec2:DescribeTags"],
						"Effect": "Allow",
						"Resource": "*"
					}],
					"Version": "2012-10-17"
				},
				"PolicyName": {
					"Fn::Sub": "${AWS::StackName}-PolicyTagDiscovery"
				},
				"Roles": [{
					"Ref": "NodeInstanceRole"
				}]
			}
		},
		"SG": {
			"Type": "AWS::EC2::SecurityGroup",
			"Properties": {
				"GroupDescription": "Communication between the control plane and worker nodes in group ferocious-unicorn-1542319251-0",
				"Tags": [{
					"Key": "kubernetes.io/cluster/ferocious-unicorn-1542319251",
					"Value": "owned"
				}, {
					"Key": "Name",
					"Value": {
						"Fn::Sub": "${AWS::StackName}/SG"
					}
				}],
				"VpcId": {
					"Fn::ImportValue": "eksctl-ferocious-unicorn-1542319251-cluster::VPC"
				}
			}
		}
	},
	"Outputs": {
		"NodeInstanceRoleARN": {
			"Export": {
				"Name": {
					"Fn::Sub": "${AWS::StackName}::NodeInstanceRoleARN"
				}
			},
			"Value": {
				"Fn::GetAtt": "NodeInstanceRole.Arn"
			}
		}
	}
}
Note:
- Jenkins-X does not appear to be stable, at least for EKS. Successfully run after a couple of tries (reinstall jx, helm error etc.)
- Could not find an easy way of tearing down. Used cloudformation templates.
- Not easy to interrupt the CI/CD pipe line. Actually, I haven't put much effort on this.
- Really slow on EKS.
error: failed to install/upgrade the jenkins-x platform chart: failed to run 'helm upgrade --namespace jx --install --timeout 6000 --version 0.0.2902 --values /Users/kihyuckhong/.jx/cloud-environments/env-eks/myvalues.yaml --values /Users/kihyuckhong/.jx/gitSecrets.yaml --values /Users/kihyuckhong/.jx/adminSecrets.yaml --values /Users/kihyuckhong/.jx/extraValues.yaml --values /Users/kihyuckhong/.jx/cloud-environments/env-eks/secrets.yaml jenkins-x jenkins-x/jenkins-x-platform' command in directory '/Users/kihyuckhong/.jx/cloud-environments/env-eks', output: '': fork/exec .jx/bin/helm: no such file or directory
Docker & K8s
- Docker install on Amazon Linux AMI
- Docker install on EC2 Ubuntu 14.04
- Docker container vs Virtual Machine
- Docker install on Ubuntu 14.04
- Docker Hello World Application
- Nginx image - share/copy files, Dockerfile
- Working with Docker images : brief introduction
- Docker image and container via docker commands (search, pull, run, ps, restart, attach, and rm)
- More on docker run command (docker run -it, docker run --rm, etc.)
- Docker Networks - Bridge Driver Network
- Docker Persistent Storage
- File sharing between host and container (docker run -d -p -v)
- Linking containers and volume for datastore
- Dockerfile - Build Docker images automatically I - FROM, MAINTAINER, and build context
- Dockerfile - Build Docker images automatically II - revisiting FROM, MAINTAINER, build context, and caching
- Dockerfile - Build Docker images automatically III - RUN
- Dockerfile - Build Docker images automatically IV - CMD
- Dockerfile - Build Docker images automatically V - WORKDIR, ENV, ADD, and ENTRYPOINT
- Docker - Apache Tomcat
- Docker - NodeJS
- Docker - NodeJS with hostname
- Docker Compose - NodeJS with MongoDB
- Docker - Prometheus and Grafana with Docker-compose
- Docker - StatsD/Graphite/Grafana
- Docker - Deploying a Java EE JBoss/WildFly Application on AWS Elastic Beanstalk Using Docker Containers
- Docker : NodeJS with GCP Kubernetes Engine
- Docker : Jenkins Multibranch Pipeline with Jenkinsfile and Github
- Docker : Jenkins Master and Slave
- Docker - ELK : ElasticSearch, Logstash, and Kibana
- Docker - ELK 7.6 : Elasticsearch on Centos 7
- Docker - ELK 7.6 : Filebeat on Centos 7
- Docker - ELK 7.6 : Logstash on Centos 7
- Docker - ELK 7.6 : Kibana on Centos 7
- Docker - ELK 7.6 : Elastic Stack with Docker Compose
- Docker - Deploy Elastic Cloud on Kubernetes (ECK) via Elasticsearch operator on minikube
- Docker - Deploy Elastic Stack via Helm on minikube
- Docker Compose - A gentle introduction with WordPress
- Docker Compose - MySQL
- MEAN Stack app on Docker containers : micro services
- MEAN Stack app on Docker containers : micro services via docker-compose
- Docker Compose - Hashicorp's Vault and Consul Part A (install vault, unsealing, static secrets, and policies)
- Docker Compose - Hashicorp's Vault and Consul Part B (EaaS, dynamic secrets, leases, and revocation)
- Docker Compose - Hashicorp's Vault and Consul Part C (Consul)
- Docker Compose with two containers - Flask REST API service container and an Apache server container
- Docker compose : Nginx reverse proxy with multiple containers
- Docker & Kubernetes : Envoy - Getting started
- Docker & Kubernetes : Envoy - Front Proxy
- Docker & Kubernetes : Ambassador - Envoy API Gateway on Kubernetes
- Docker Packer
- Docker Cheat Sheet
- Docker Q & A #1
- Kubernetes Q & A - Part I
- Kubernetes Q & A - Part II
- Docker - Run a React app in a docker
- Docker - Run a React app in a docker II (snapshot app with nginx)
- Docker - NodeJS and MySQL app with React in a docker
- Docker - Step by Step NodeJS and MySQL app with React - I
- Installing LAMP via puppet on Docker
- Docker install via Puppet
- Nginx Docker install via Ansible
- Apache Hadoop CDH 5.8 Install with QuickStarts Docker
- Docker - Deploying Flask app to ECS
- Docker Compose - Deploying WordPress to AWS
- Docker - WordPress Deploy to ECS with Docker-Compose (ECS-CLI EC2 type)
- Docker - WordPress Deploy to ECS with Docker-Compose (ECS-CLI Fargate type)
- Docker - ECS Fargate
- Docker - AWS ECS service discovery with Flask and Redis
- Docker & Kubernetes : minikube
- Docker & Kubernetes 2 : minikube Django with Postgres - persistent volume
- Docker & Kubernetes 3 : minikube Django with Redis and Celery
- Docker & Kubernetes 4 : Django with RDS via AWS Kops
- Docker & Kubernetes : Kops on AWS
- Docker & Kubernetes : Ingress controller on AWS with Kops
- Docker & Kubernetes : HashiCorp's Vault and Consul on minikube
- Docker & Kubernetes : HashiCorp's Vault and Consul - Auto-unseal using Transit Secrets Engine
- Docker & Kubernetes : Persistent Volumes & Persistent Volumes Claims - hostPath and annotations
- Docker & Kubernetes : Persistent Volumes - Dynamic volume provisioning
- Docker & Kubernetes : DaemonSet
- Docker & Kubernetes : Secrets
- Docker & Kubernetes : kubectl command
- Docker & Kubernetes : Assign a Kubernetes Pod to a particular node in a Kubernetes cluster
- Docker & Kubernetes : Configure a Pod to Use a ConfigMap
- AWS : EKS (Elastic Container Service for Kubernetes)
- Docker & Kubernetes : Run a React app in a minikube
- Docker & Kubernetes : Minikube install on AWS EC2
- Docker & Kubernetes : Cassandra with a StatefulSet
- Docker & Kubernetes : Terraform and AWS EKS
- Docker & Kubernetes : Pods and Service definitions
- Docker & Kubernetes : Service IP and the Service Type
- Docker & Kubernetes : Kubernetes DNS with Pods and Services
- Docker & Kubernetes : Headless service and discovering pods
- Docker & Kubernetes : Scaling and Updating application
- Docker & Kubernetes : Horizontal pod autoscaler on minikubes
- Docker & Kubernetes : From a monolithic app to micro services on GCP Kubernetes
- Docker & Kubernetes : Rolling updates
- Docker & Kubernetes : Deployments to GKE (Rolling update, Canary and Blue-green deployments)
- Docker & Kubernetes : Slack Chat Bot with NodeJS on GCP Kubernetes
- Docker & Kubernetes : Continuous Delivery with Jenkins Multibranch Pipeline for Dev, Canary, and Production Environments on GCP Kubernetes
- Docker & Kubernetes : NodePort vs LoadBalancer vs Ingress
- Docker & Kubernetes : MongoDB / MongoExpress on Minikube
- Docker & Kubernetes : Load Testing with Locust on GCP Kubernetes
- Docker & Kubernetes : MongoDB with StatefulSets on GCP Kubernetes Engine
- Docker & Kubernetes : Nginx Ingress Controller on Minikube
- Docker & Kubernetes : Setting up Ingress with NGINX Controller on Minikube (Mac)
- Docker & Kubernetes : Nginx Ingress Controller for Dashboard service on Minikube
- Docker & Kubernetes : Nginx Ingress Controller on GCP Kubernetes
- Docker & Kubernetes : Kubernetes Ingress with AWS ALB Ingress Controller in EKS
- Docker & Kubernetes : Setting up a private cluster on GCP Kubernetes
- Docker & Kubernetes : Kubernetes Namespaces (default, kube-public, kube-system) and switching namespaces (kubens)
- Docker & Kubernetes : StatefulSets on minikube
- Docker & Kubernetes : RBAC
- Docker & Kubernetes Service Account, RBAC, and IAM
- Docker & Kubernetes - Kubernetes Service Account, RBAC, IAM with EKS ALB, Part 1
- Docker & Kubernetes : Helm Chart
- Docker & Kubernetes : My first Helm deploy
- Docker & Kubernetes : Readiness and Liveness Probes
- Docker & Kubernetes : Helm chart repository with Github pages
- Docker & Kubernetes : Deploying WordPress and MariaDB with Ingress to Minikube using Helm Chart
- Docker & Kubernetes : Deploying WordPress and MariaDB to AWS using Helm 2 Chart
- Docker & Kubernetes : Deploying WordPress and MariaDB to AWS using Helm 3 Chart
- Docker & Kubernetes : Helm Chart for Node/Express and MySQL with Ingress
- Docker & Kubernetes : Deploy Prometheus and Grafana using Helm and Prometheus Operator - Monitoring Kubernetes node resources out of the box
- Docker & Kubernetes : Deploy Prometheus and Grafana using kube-prometheus-stack Helm Chart
- Docker & Kubernetes : Istio (service mesh) sidecar proxy on GCP Kubernetes
- Docker & Kubernetes : Istio on EKS
- Docker & Kubernetes : Istio on Minikube with AWS EC2 for Bookinfo Application
- Docker & Kubernetes : Deploying .NET Core app to Kubernetes Engine and configuring its traffic managed by Istio (Part I)
- Docker & Kubernetes : Deploying .NET Core app to Kubernetes Engine and configuring its traffic managed by Istio (Part II - Prometheus, Grafana, pin a service, split traffic, and inject faults)
- Docker & Kubernetes : Helm Package Manager with MySQL on GCP Kubernetes Engine
- Docker & Kubernetes : Deploying Memcached on Kubernetes Engine
- Docker & Kubernetes : EKS Control Plane (API server) Metrics with Prometheus
- Docker & Kubernetes : Spinnaker on EKS with Halyard
- Docker & Kubernetes : Continuous Delivery Pipelines with Spinnaker and Kubernetes Engine
- Docker & Kubernetes : Multi-node Local Kubernetes cluster : Kubeadm-dind (docker-in-docker)
- Docker & Kubernetes : Multi-node Local Kubernetes cluster : Kubeadm-kind (k8s-in-docker)
- Docker & Kubernetes : nodeSelector, nodeAffinity, taints/tolerations, pod affinity and anti-affinity - Assigning Pods to Nodes
- Docker & Kubernetes : Jenkins-X on EKS
- Docker & Kubernetes : ArgoCD App of Apps with Heml on Kubernetes
- Docker & Kubernetes : ArgoCD on Kubernetes cluster
- Docker & Kubernetes : GitOps with ArgoCD for Continuous Delivery to Kubernetes clusters (minikube) - guestbook
Ph.D. / Golden Gate Ave, San Francisco / Seoul National Univ / Carnegie Mellon / UC Berkeley / DevOps / Deep Learning / Visualization