Chef workstation setup on EC2 Ubuntu 14.04

Chef
Continued from
Chef install on Ubuntu 14.04 .
Official installation:
Install Chef 11.x on a Workstation
or
https://docs.getchef.com/install_workstation.html
In this tutorial we use the following two EC2 instances:
- Chef server on an AWS EC2 Ubuntu instance that was setup in Chef server install on EC2 Ubuntu 14.04
- Workstation on an AWS EC2 Ubuntu 14.04 instance that we're going to setup in this chapter.
On EC2 instance for our Workstation, we need to make sure ports for SSH, HTTP, HTTPS, and DNS are opened:
Now, we can login to our workstation on EC2 we've just created using ssh. The workstation shares its private key with Chef Server (Chef_Server.pem):
As we've done for the server, we may want to set alias with shorter name. Modify the file called ~/.ssh/config, add the following line:
Host Chef_Workstation
  Hostname      ec2-54-172-74-156.compute-1.amazonaws.com
  User          ubuntu
  IdentityFile  ~/.ssh/Chef_Workstation.pem
Then, our login to EC2 will be much easier:
$ ssh Chef_Workstation
ubuntu@ip-172-31-49-135:~$
The omnibus installer is used to set up a workstation. The omnibus installer uses a single command to install the chef-client and all of its dependencies, including an embedded version of Ruby, RubyGems, OpenSSL, key-value stores, parsers, libraries, and command line utilities. The omnibus installer puts everything into a unique directory (opt/opscode/) so that the chef-client will not interfere with other applications that may be running on the target machine.
To install the chef-client on a workstation, we must run the omnibus installer. To run the omnibus installer, w need to download and run the client installation script from the Chef website:
ubuntu@ip-172-31-48-124:~$ curl -L https://www.opscode.com/chef/install.sh | sudo bash
...
Downloading Chef  for ubuntu...
...
downloading https://opscode-omnibus-packages.s3.amazonaws.com/ubuntu/13.04/x86_64/chef_11.16.4-1_amd64.deb
  to file /tmp/install.sh.1411/chef_11.16.4-1_amd64.deb
...
Preparing to unpack .../chef_11.16.4-1_amd64.deb ...
Unpacking chef (11.16.4-1) ...
Setting up chef (11.16.4-1) ...
Thank you for installing Chef!
ubuntu@ip-172-31-48-124:~$
When the installation is finished enter the following to verify that the chef-client was installed. When the chef-client is installed correctly, the command shell will return a note that says the version of that was installed:
ubuntu@ip-172-31-48-124:~$ chef-client -v
Chef: 11.16.4
After the chef-client has been installed, the following folder structure will be present on the local machine:
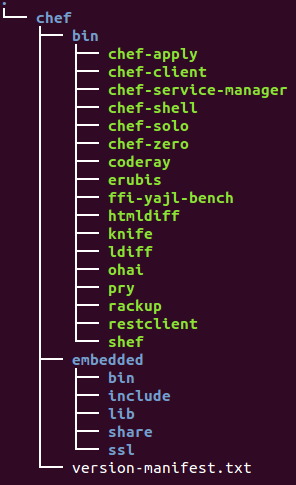
git must be installed before the chef-repo can be cloned to the workstation from GitHub:
ubuntu@ip-172-31-48-124:~$ sudo apt-get update
ubuntu@ip-172-31-48-124:~$ sudo apt-get install git
Let's clone the chef-repo skeleton directory.
The chef-repo on GitHub must be cloned to every workstation that will interact with a Chef server.
To clone the chef-repo, in a command window, open the home directory, and then clone the chef-repo:
ubuntu@ip-172-31-48-124:~$ cd ~
ubuntu@ip-172-31-48-124:~$ git clone git://github.com/opscode/chef-repo.git
After the chef-repo has been cloned, the following folder structure will be present on the local machine:
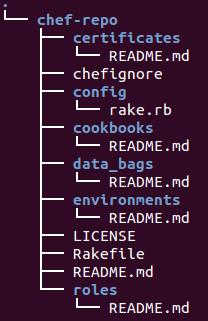
Setup email and name with git:
ubuntu@ip-172-31-48-124:~/chef-repo$ git config --global user.email "k@bogotobogo.com"
ubuntu@ip-172-31-48-124:~/chef-repo$ git config --global user.name "bogotobogo"
The .chef directory is used to store three files:
- knife.rb
- ORGANIZATION-validator.pem
- USER.pem
Where ORGANIZATION and USER represent strings that are unique to each organization. These files must be present in the .chef directory in order for a workstation to be able to connect to a Chef server.
To create the .chef directory:
ubuntu@ip-172-31-48-124:~$ sudo mkdir -p ~/chef-repo/.chef
Add .chef to the .gitignore file to prevent uploading the contents of the .cheffolder to GitHub:
ubuntu@ip-172-31-48-124:~$ echo '.chef' >> ~/chef-repo/.gitignore
Login to the Chef Server with the admin credentials. we can access the web interface by typing https://domain from our browser. Because the SSL certificate is signed by an authority not recognized by our browser, we may get a warning. Click on the "Proceed anyway" button.
Login with the default admin credentials:
username: admin
password: p@ssw0rd1
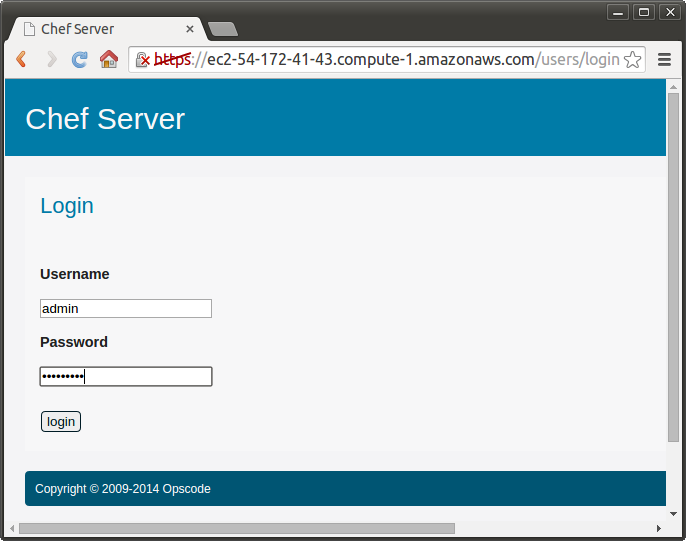
When we try to login, it may won't allow, and keep giving us the same window. To fix this issue, we need to modify session_store.rb file under
/opt/chef-server/embedded/service/chef-server-webui/config/initializers file:
# Be sure to restart your server when you modify this file.

#ChefServerWebui::Application.config.session_store :cookie_store, :key => '_sandbox_session', :domain => :all
ChefServerWebui::Application.config.session_store :cookie_store, :key => '_sandbox_session', :domain => 'ec2-54-172-41-43.compute-1.amazonaws.com'
Note that we changed :all to public domain name.
Then, we need to restart chef server:
ubuntu@ip-172-31-52-254:~$ sudo chef-server-ctl restart
After login, we get a new window for password confirmation/change:
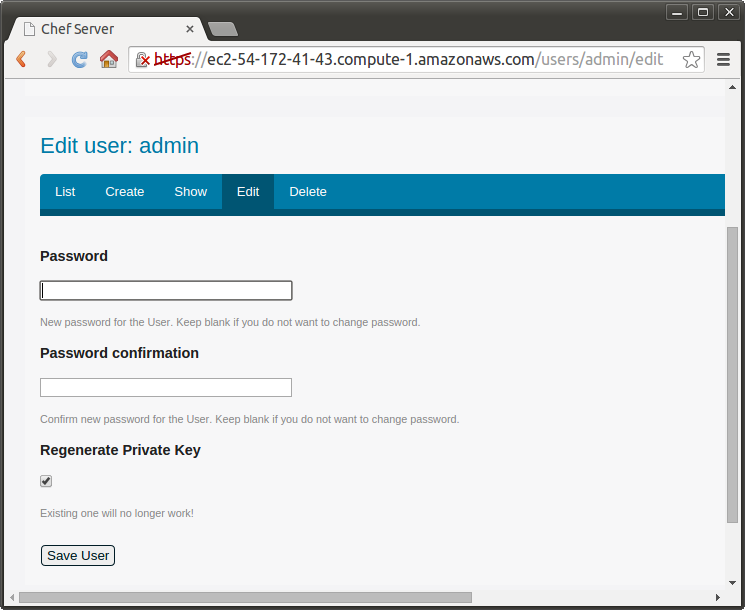
Click on "Save User":
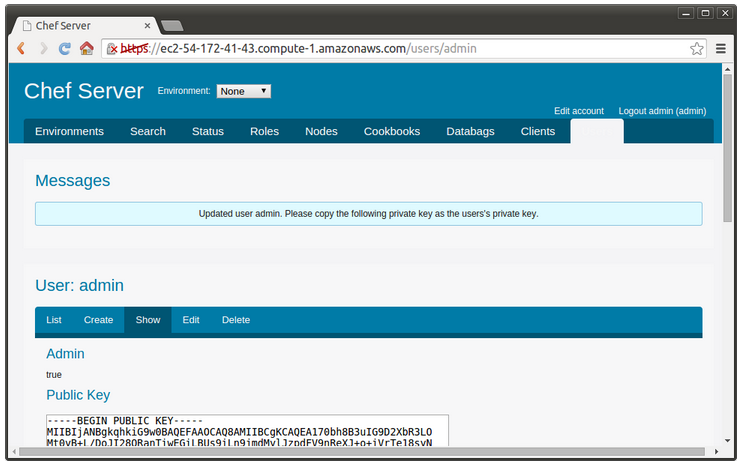
Copy the private key and save it in admin.pem file in ~/chef-repo/.chef directory.
Click on the "Clients" tab in the top navigation bar:
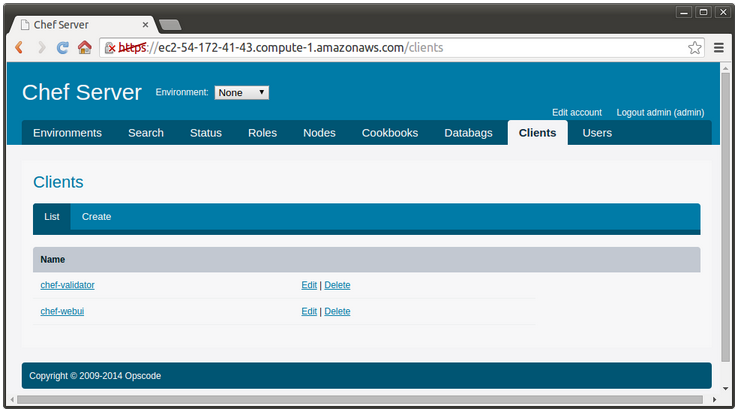
Click on the "Edit" button associated with the chef-validator client. Regenerate the private key by selecting that check box and clicking "Save Client":
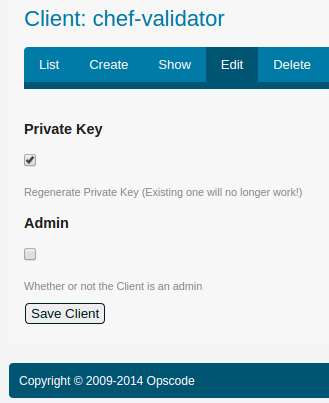
Copy the private key and save it in the chef-validator.pem file in ~/chef-repo/.chef directory.
Knife is a command-line tool that provides an interface between a local chef-repo and the Chef server. Knife helps provisioning resources, manage recipes/cookbooks, nodes etc.
Create a knife.rb file. This configuration file must be created by running the knife configure --initial command on the machine that will be run as a workstation.
The validation_key attribute in the knife.rb file must specify the path to the validation key. The validation_client_name attribute defaults to chef-validator (which is the chef-validator.pem private key created by the open source Chef server on startup). When prompted for the URL for the Chef server, use the FQDN for the Chef server:
ubuntu@ip-172-31-48-124:~/chef-repo$ sudo knife configure --initial
WARNING: No knife configuration file found
Where should I put the config file? [/home/ubuntu/.chef/knife.rb] /home/ubuntu/chef-repo/.chef/knife.rb
Please enter the chef server URL: [https://ip-172-31-48-124.ec2.internal:443] https://ec2-54-172-41-43.compute-1.amazonaws.com
Please enter a name for the new user: [ubuntu]
Please enter the existing admin name: [admin]
Please enter the location of the existing admin's private key: [/etc/chef-server/admin.pem] /home/ubuntu/chef-repo/.chef/admin.pem
Please enter the validation clientname: [chef-validator]
Please enter the location of the validation key: [/etc/chef-server/chef-validator.pem] /home/ubuntu/chef-repo/.chef/chef-validator.pem
Please enter the path to a chef repository (or leave blank): /home/ubuntu/chef-repo
Creating initial API user...
Please enter a password for the new user:
Created user[bogotobogo]
Configuration file written to /home/ubuntu/chef-repo/.chef/knife.rb
ubuntu@ip-172-31-48-124:~/chef-repo$ knife user list
admin
bogotobogo
Verify that the files are in the .chef folder:
ubuntu@ip-172-31-48-124:~/chef-repo/.chef$ pwd
/home/ubuntu/chef-repo/.chef
ubuntu@ip-172-31-48-124:~/chef-repo/.chef$ ls
admin.pem  bogotobogo.pem  chef-validator.pem  knife.rb
The chef-client includes a stable version of Ruby as part of the omnibus installer. The path to this version of Ruby must be added to the $PATH environment variable and saved in the configuration file for the command shell that is used on the workstation:
ubuntu@ip-172-31-48-124:~/chef-repo$ echo 'export PATH="/opt/chef/embedded/bin:$PATH"' >> ~/.configuration_file && source ~/.configuration_file
where configuration_file is the name of the configuration file for the specific command shell. For example, if Bash were the command shell and the configuration file were named bash_profile:
ubuntu@ip-172-31-48-124:~/chef-repo$ echo 'export PATH="/opt/chef/embedded/bin:$PATH"' >> ~/.bash_profile && source ~/.bash_profile
A workstation is installed correctly when it is able to use knife to communicate with the Chef server. To verify that a workstation can connect to the Chef server:
ubuntu@ip-172-31-48-124:~$ cd chef-repo/
ubuntu@ip-172-31-48-124:~/chef-repo$ knife user list
admin
bogotobogo

ubuntu@ip-172-31-48-124:~/chef-repo$ knife client list
chef-validator
chef-webui
If this is successful, then our workstation can successfully communicate with our server.
Just for reference, here is knife.rb in /home/ubuntu/chef-repo/.chef/ folder:
log_level                :info
log_location             STDOUT
node_name                'bogotobogo'
client_key               '/home/ubuntu/chef-repo/.chef/bogotobogo.pem'
validation_client_name   'chef-validator'
validation_key           '/home/ubuntu/chef-repo/.chef/chef-validator.pem'
chef_server_url          'https://ec2-54-172-41-43.compute-1.amazonaws.com'
syntax_check_cache_path  '/home/ubuntu/chef-repo/.chef/syntax_check_cache'
cookbook_path [ '/home/ubuntu/chef-repo/cookbooks' ]
If we don't prepend https:// to the url when we do code>knife configure --initial, we may get the following error:
ubuntu@ip-172-31-48-124:~/chef-repo$ knife client list
ERROR: TypeError: can't dup NilClass
Ph.D. / Golden Gate Ave, San Francisco / Seoul National Univ / Carnegie Mellon / UC Berkeley / DevOps / Deep Learning / Visualization