Apache Spark 2.0.2 with PySpark (Spark Python API) Shell
In this tutorial, we'll learn about Spark and then we'll install it. Also, we're going to see how to use Spark via Scala and Python.
For whom likes Jupyter, we'll see how we can use it with PySpark.
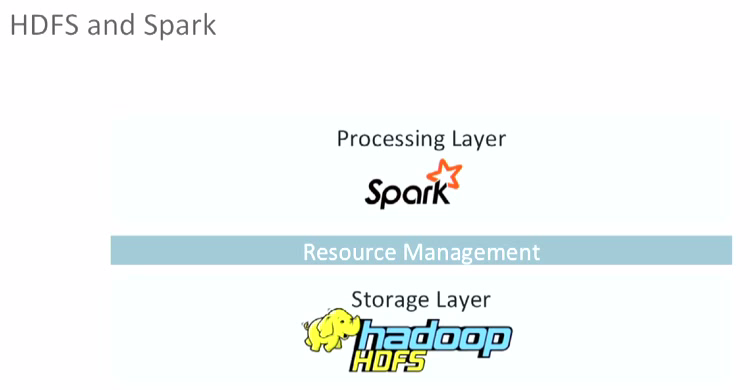
Apache Spark (http://spark.apache.org/docs/latest/) is a fast and general-purpose cluster computing system.
It provides high-level APIs in Java, Scala, Python and R, and an optimized engine that supports general execution graphs.
Apache Spark is a cluster computing platform designed to be fast and general-purpose.
On the speed side, Spark extends the popular MapReduce model to efficiently support more types of computations, including interactive queries and stream processing. Speed is important in processing large datasets, as it means the difference between exploring data interactively and waiting minutes or hours. One of the main features Spark offers for speed is the ability to run computations in memory, but the system is also more efficient than MapReduce for complex applications running on disk.
Spark is designed to cover a wide range of workloads that previously required separate distributed systems, including batch applications, iterative algorithms, interactive queries, and streaming. By supporting these workloads in the same engine, Spark makes it easy and inexpensive to combine different processing types, which is often necessary in production data analysis pipelines. - from Learning Spark, 2015
While the Spark contains multiple closely integrated components, at its core, Spark is a computational engine that is responsible for scheduling, distributing, and monitoring applications consisting of many computational tasks on a computing cluster.
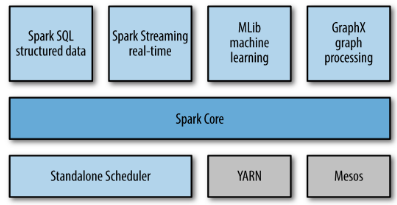
Spark supports a rich set of higher-level tools including Spark SQL for SQL and structured data processing, MLlib for machine learning, GraphX for graph processing, and Spark Streaming.
Spark allows us to create distributed datasets from any file stored including the Hadoop distributed filesystem (HDFS) or other storage systems supported by the Hadoop APIs such as local filesystem, Amazon S3, Cassandra, Hive, HBase, etc.
Note that Spark does not require Hadoop, and it simply supports for storage systems that implement the Hadoop APIs.
Spark supports text files, SequenceFiles, Avro, Parquet, and Hadoop InputFormat.
The Spark Python API (PySpark) exposes the Spark programming model to Python (Spark Programming Guide)
PySpark is built on top of Spark's Java API.
PySpark shell is responsible for linking the python API to the spark core and initializing the spark context.
Data is processed in Python and cached / shuffled in the JVM.
Every Spark application consists of a driver program that launches various parallel operations on a cluster. The driver program contains our application's main function and defines distributed datasets on the cluster, then applies operations to them.
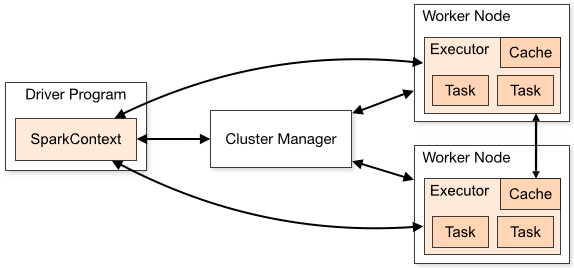
Picture from Cluster Mode Overview
To run these operations, driver programs typically manage a number of nodes called executors.
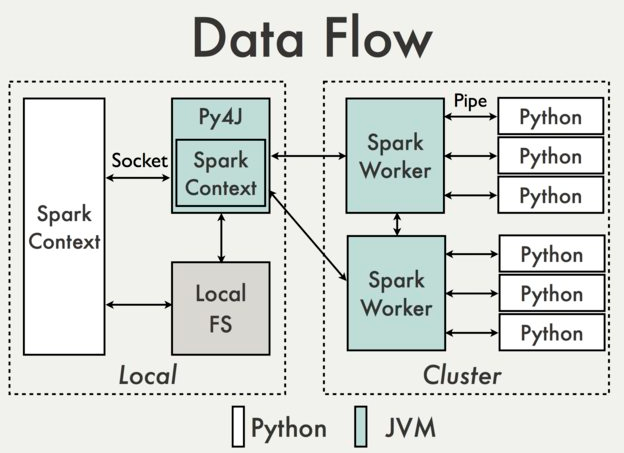
Picture from PySpark Internals
Driver programs access Spark through a SparkContext, and SparkContext uses Py4J to launch a JVM and create a JavaSparkContext. Py4J is only used on the driver for local communication between the Python and Java SparkContext objects; large data transfers are performed through a different mechanism.
Spark Context allows the users to handle the managed spark cluster resources so that users can read, tune and configure the spark cluster. Since PySpark has Spark Context available as sc, PySpark itself acts as the driver program.
As discussed earlier, Spark Core contains the basic functionality of Spark such components as task scheduling, memory management, fault recovery, interacting with storage systems.
RDD (Resilient Distributed Datasets) is defined in Spark Core, and RDD represent a collection of items distributed across the cluster that can be manipulated in parallel.
In other words, with Spark, we express our computation through operations on distributed collections that are automatically parallelized across the cluster. These collections / datasets are RDDs. RDDs are Spark's fundamental abstraction for distributed data and computation.
RDD transformations in Python are mapped to transformations on PythonRDD objects in Java. On remote worker machines, PythonRDD objects launch Python subprocesses and communicate with them using pipes, sending the user's code and the data to be processed.
Download Apache Spark from http://spark.apache.org/downloads.html:
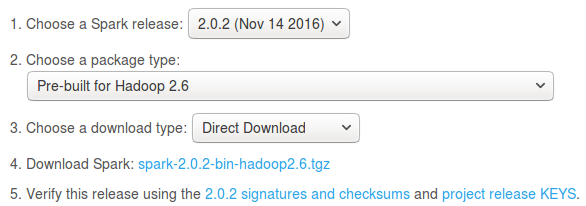
$ wget d3kbcqa49mib13.cloudfront.net/spark-2.0.2-bin-hadoop2.6.tgz

$ sudo tar xvzf spark-2.0.2-bin-hadoop2.6.tgz -C /usr/local
Let's modify ~/.bashrc:
export SPARK_HOME=/usr/local/spark-2.0.2-bin-hadoop2.6
export PATH=$SPARK_HOME/bin:$PATH
Now, we're ready to use pyspark:

There are many other shells which let us manipulate data using the disk and memory on a single machine, however, Spark's shells allow us to interact with data that is distributed on disk or in memory across many machines, and Spark takes care of automatically distributing this processing.
In the Spark shell, a special interpreter-aware SparkContext is already created for us, in the variable called sc. So, making our own SparkContext will not work.
Let's step back a little and think about the initialization to be done behind curtain when we fire a Spark shell.
The first thing a Spark program must do is to create a SparkContext object, which tells Spark how to access a cluster. To create a SparkContext, we first need to build a SparkConf object that contains information about our application:
conf = SparkConf().setAppName(appName).setMaster(master)
sc = SparkContext(conf=conf)
The appName parameter is a name for our application to show on the cluster UI. The master is a Spark, Mesos or YARN cluster URL, or a special "local" string to run in local mode.
In practice, when running on a cluster, we will not want to hardcode master in the program, but rather launch the application with spark-submit and receive it there.
However, for local testing and unit tests, we can pass "local" to run Spark in-process.
We can launch Spark's interactive shell using either spark-shell for the Scala shell or pyspark for the Python shell.
Scala:
$ spark-shell
      ____              __
     / __/__  ___ _____/ /__
    _\ \/ _ \/ _ `/ __/  '_/
   /___/ .__/\_,_/_/ /_/\_\   version 2.0.2
      /_/

Using Scala version 2.11.8 (OpenJDK 64-Bit Server VM, Java 1.8.0_111)
...
scala>
Python:
$ pyspark
      ____              __
     / __/__  ___ _____/ /__
    _\ \/ _ \/ _ `/ __/  '_/
   /__ / .__/\_,_/_/ /_/\_\   version 2.0.2
      /_/

Using Python version 2.7.12 (default, Jul  1 2016 15:12:24)
SparkSession available as 'spark'.
>>>
Since Spark can load data into memory on the worker nodes, many distributed computations that process terabytes of data across dozens of nodes, can run in a few seconds. This makes the sort of iterative, ad hoc, and exploratory analysis commonly done in shells a good fit for Spark.
We can control the verbosity of the logging. To do this, we can create a file, conf/log4j.properties.
Actually, we already have a template for this file called log4j.properties.template. To make the logging less verbose, make a copy of conf/log4j.properties.template and save it as conf/log4j.properties and find the following line:
log4j.rootCategory=INFO, console
Then lower the log level so that we show only the WARN messages by changing it to the following:
log4j.rootCategory=WARN, console
When we reopen the shell, we should see less output.
Then, from the scala> prompt, let's create some data. First, run the following command to create a scala collection of numbers between 1, 5:
scala> val data = 1 to 5
data: scala.collection.immutable.Range.Inclusive = Range(1, 2, 3, 4, 5)
scala>
This will create an resilient distributed dataset (RDD) based on the data. Spark revolves around the concept of the RDD, which is a fault-tolerant collection of elements that can be operated on in parallel.
There are two ways to create RDDs:
- Parallelizing an existing collection in our driver program.
- Referencing a dataset in an external storage system, such as a shared filesystem, HDFS, HBase, or any data source offering a Hadoop InputFormat.
scala> val distData = sc.parallelize(data)
distData: org.apache.spark.rdd.RDD[Int] = ParallelCollectionRDD[0] at parallelize at </console>:26
Parallelized collections are created by calling SparkContext's parallelize method on an existing collection in our driver program (a Scala Seq). The elements of the collection are copied to form a distributed dataset that can be operated on in parallel. In our example, we created a parallelized collection holding the numbers 1 to 5.
Once created, the distributed dataset (distData) can be operated on in parallel. For example, we might call distData.reduce((a, b) => a + b) to add up the elements of the array.
One important parameter for parallel collections is the number of partitions to cut the dataset into. Spark will run one task for each partition of the cluster. Typically we want 2-4 partitions for each CPU in our cluster. Normally, Spark tries to set the number of partitions automatically based on our cluster. However, we can also set it manually by passing it as a second parameter to parallelize (e.g. sc.parallelize(data, 10)).
Now we want to transform the RDD with a filter transformation to keep only the even numbers and then run a collect action to bring the results back to the driver (Spark shell):
If we want to get a collection of even numbers, we can use filter():
scala> distData.filter(_ %2 == 0).collect()
res0: Array[Int] = Array(2, 4)
We can check the set if each element is even or odd using map():
scala> distData.map(_ %2 == 0).collect()
res1: Array[Boolean] = Array(false, true, false, true, false)
As discused earlier, in the PySpark shell, a special interpreter-aware SparkContext is already created for us, in the variable called sc. Therefore, making our own SparkContext will not work.
We can invoke PySpark shell using ./bin/pyspark, and as a review, we'll repeat the previous Scala example using Python.
We'll see two samples: one in this section and the other in next section. The two examples demonstrate two ways of creating RDDs:
- By distributing a collection of objects such as a list or a set in a driver program (the example in this section).
- By loading an external dataset (the example in next section).
$ pyspark
>>> data = [1, 2, 3, 4, 5]
>>> distData = sc.parallelize(data)
Let's use filter:
>>> f = distData.filter(lambda x: x % 2 == 0)
>>> f.take(5)
[2, 4]
Now, map:
>>> f = distData.map(lambda x: x % 2 == 0)
>>> f.take(5)
[False, True, False, True, False]
PySpark can create distributed datasets from any storage source supported by Hadoop, including our local file system, HDFS, Cassandra, HBase, Amazon S3, etc. Spark supports text files, SequenceFiles, and any other Hadoop InputFormat.
Text file RDDs can be created using SparkContext's textFile method. This method takes an URI for the file (either a local path on the machine, or a hdfs://, s3n://, etc URI) and reads it as a collection of lines. Here is an example invocation using n input "README.me located in /usr/local/spark-2.0.2-bin-hadoop2.6:
>>> distFile = sc.textFile("/usr/local/spark-2.0.2-bin-hadoop2.6/README.md")

>>> distFile
/usr/local/spark-2.0.2-bin-hadoop2.6/README.md MapPartitionsRDD[1] at textFile at NativeMethodAccessorImpl.java:-2
Once created, distFile can be acted on by dataset operations.
Let's see what's in the RDD using the collect() action:
>>> distFile.collect()
[u'# Apache Spark',
 u'',
 u'Spark is a fast and general cluster computing system for Big Data. It provides',
 u'high-level APIs in Scala, Java, Python, and R, and an optimized engine that',
...
When performing collect action on a larger file, the data is pulled from multiples nodes and the driver node might run out of memory. Therefore, the collect action is not recommended on a huge file.
Line count:
>>> distFile.count()
99
To see the content of Spark RDD's, we can use organized format actions such as first() or take().
The first line:
>>> distFile.first()
u'# Apache Spark'
take(n) returns the first n lines from the dataset and display them on the console:
>>> distFile.take(3)
[u'# Apache Spark',
 u'',
 u'Spark is a fast and general cluster computing system for Big Data. It provides']
Number of lines that has "Spark":
>>> distFile.filter(lambda line: "Spark" in line).count()
19
>>>
>>> distFile.filter(lambda line: "Spark" in line).take(5)
[u'# Apache Spark', u'Spark is a fast and general cluster computing system for Big Data. It provides', u'rich set of higher-level tools including Spark SQL for SQL and DataFrames,', u'and Spark Streaming for stream processing.', u'You can find the latest Spark documentation, including a programming']
A lot of Spark's API revolves around passing functions to its operators to run them on the cluster. As we can see from the example, we extend our README example by filtering the lines in the file that contain a word, such as "Spark".
Also, we can add up the sizes of all the lines using the map and reduce operations as follows:
>>> distFile.map(lambda s: len(s)).reduce(lambda a, b: a + b)
3729
SequenceFiles can be saved and loaded by specifying the path:
>>> rdd = sc.parallelize(range(1, 5)).map(lambda x: (x, "z" * x ))
>>> rdd.saveAsSequenceFile("./myOutput.txt")
>>> sorted(sc.sequenceFile("./myOutput.txt").collect())
[(1, u'z'), (2, u'zz'), (3, u'zzz'), (4, u'zzzz')]
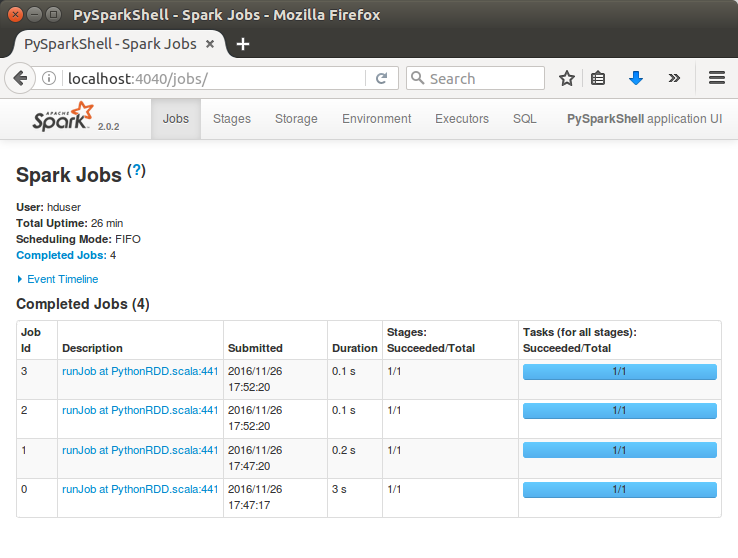
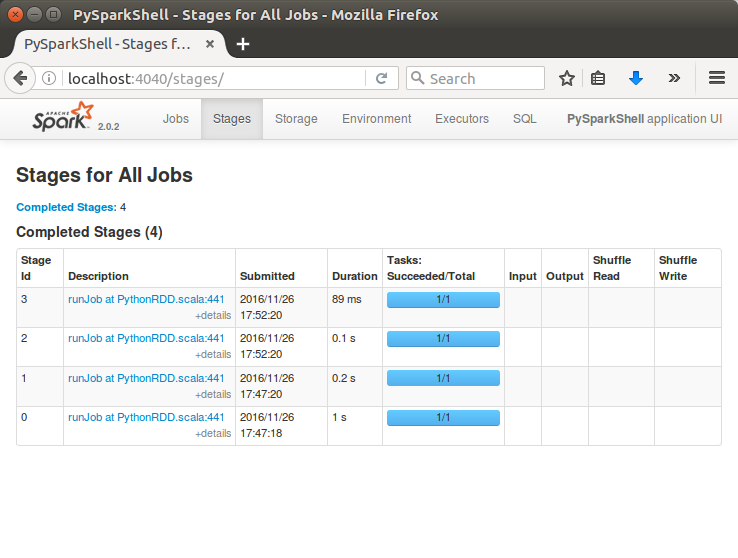
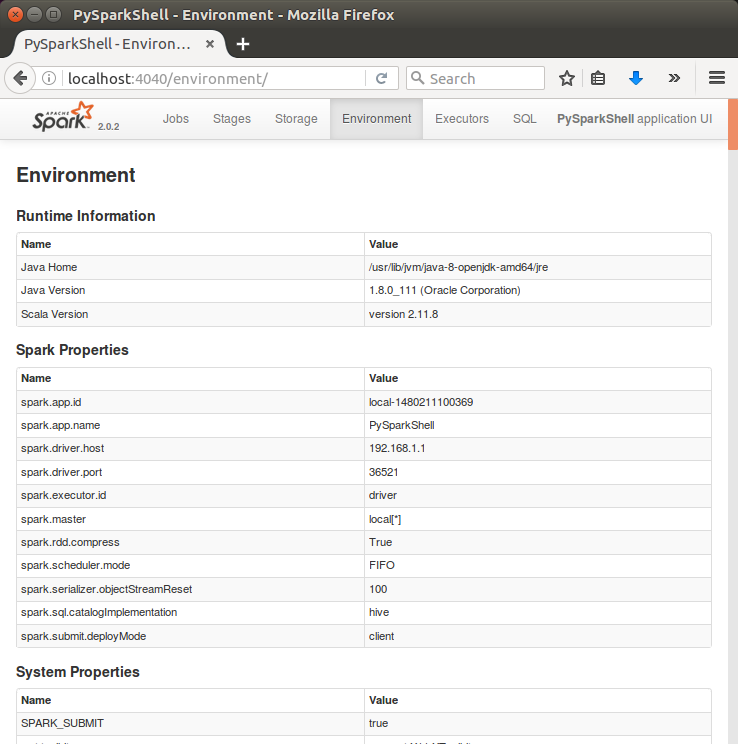
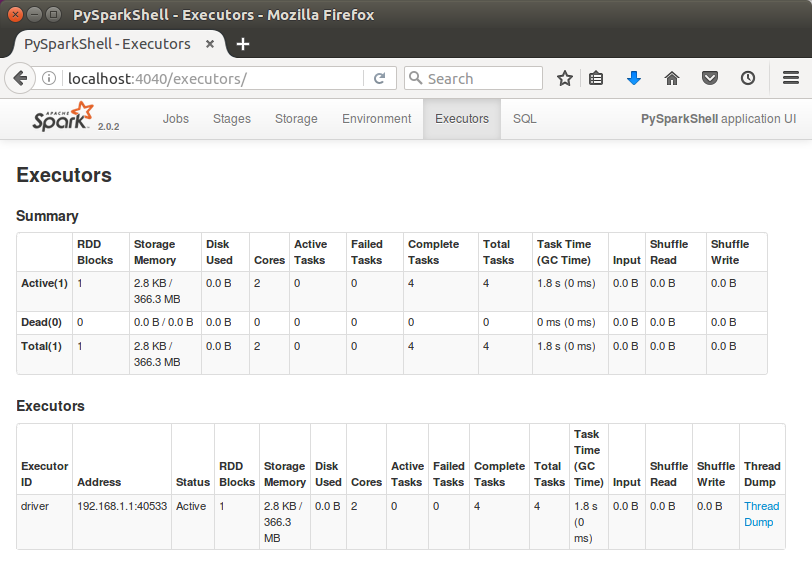
If Jupyter not installed, please visit Ipython and Jupyter Notebook Install via Pip.
After install Jupyter, we need to add the following in ~/.bashrc:
export PYSPARK_DRIVER_PYTHON=/usr/local/bin/jupyter
export PYSPARK_DRIVER_PYTHON_OPTS="notebook --NotebookApp.open_browser=False --NotebookApp.ip='*' --NotebookApp.port=8880"
export PYSPARK_PYTHON=/usr/bin/python
Next, fire up Jupyter:
k@laptop:~/TEST/PySpark$ pyspark
[W 22:59:18.294 NotebookApp] WARNING: The notebook server is listening on all IP addresses and not using encryption. This is not recommended.
[W 22:59:18.294 NotebookApp] WARNING: The notebook server is listening on all IP addresses and not using authentication. This is highly insecure and not recommended.
[I 22:59:18.551 NotebookApp] Serving notebooks from local directory: /home/k/TEST/PySpark
[I 22:59:18.551 NotebookApp] 0 active kernels
[I 22:59:18.552 NotebookApp] The Jupyter Notebook is running at: http://[all ip addresses on your system]:8880/
[I 22:59:18.552 NotebookApp] Use Control-C to stop this server and shut down all kernels (twice to skip confirmation).
[I 23:00:16.282 NotebookApp] 302 GET / (127.0.0.1) 5.42ms
Then, go to the browser and type localhost:8880:
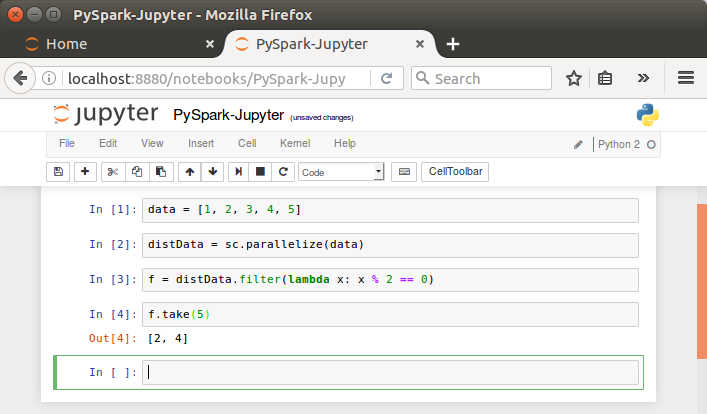
As we can see from the picture, now we can use PySpark on Jupyter!
Ph.D. / Golden Gate Ave, San Francisco / Seoul National Univ / Carnegie Mellon / UC Berkeley / DevOps / Deep Learning / Visualization