Docker : Run a React app in a docker
npm (Node Package Manager) is a package manager for the JavaScript programming language. It has become the de facto package manager for the web. It is installed with Node.js
$ npm -v
6.14.5

$ node -v
v11.9.0
Create React App (CRA) is a tool to create a blank React app using a single terminal command.
Besides providing something that works out-of-the-box, this has the added benefit of providing a consistent structure for React apps. It also provides an out-of-the-box build script and development server.
We will use npm to install Create React App command line interface (CLI) globally:
$ npm install -g create-react-app
/usr/local/bin/create-react-app -> /usr/local/lib/node_modules/create-react-app/index.js
+ create-react-app@3.4.1
added 98 packages from 46 contributors in 8.297s
React App the works by running the following command:
$ npx create-react-app hello-world
...
Installing packages. This might take a couple of minutes.
Installing react, react-dom, and react-scripts with cra-template...
...
This generates all of the files, folders, and libraries we need, as well as automatically configuring all of the pieces together so that we can jump start on React.
Once Create React App has finished downloading all of the required packages, modules and scripts, it will configure webpack and we end up with a new folder named after what we decided to call our React project. In our case, hello-world.
We can see three top level sub-folders:
- /node_modules: Where all of the external libraries used to piece together the React app are located. We shouldn't modify any of the code inside this folder as that would be modifying a third party library, and our changes would be overwritten the next time we run the npm install command.
- /public: Assets that aren't compiled or dynamically generated are stored here. These can be static assets like logos or the robots.txt file.
- /src: Where we'll be spending most of our time. This folder contains all of our React components, external CSS files, and dynamic assets that we'll bring into our component files.
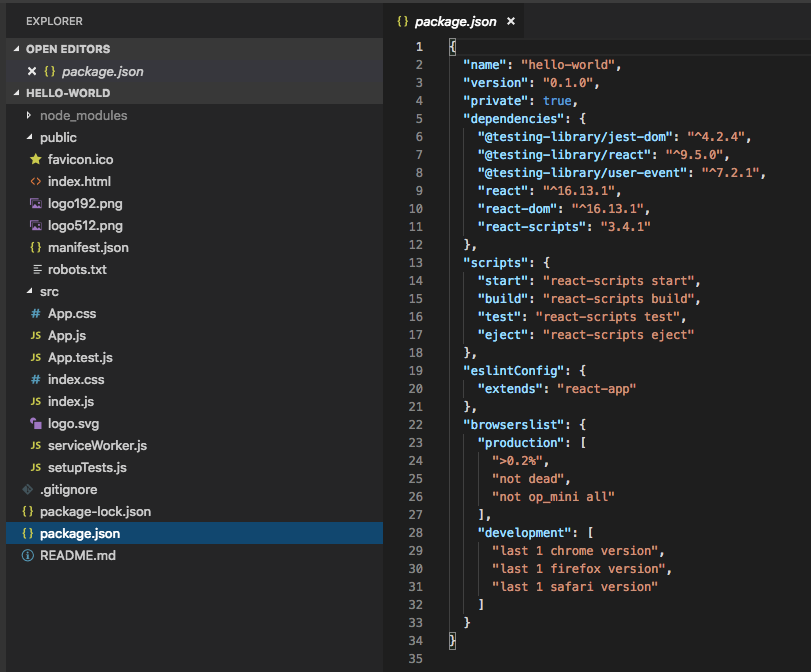
The package.json file outlines all the settings for the React app:
- name is the name of our app
- version is the current version
- "private": true is a failsafe setting to avoid accidentally publishing our app as a public package within the npm ecosystem.
- dependencies contains all the required node modules and versions required for the application. Here, it contains htree dependencies, which allow us to use react, react-dom, and react-scripts in our JavaScript. In the screenshot above, the react version specified is ^16.13.1. This means that npm will install the most recent major version matching 16.x.x. We may also see something like ~1.2.3 in package.json, which will only install the most recent minor version matching 1.2.x.
- scripts specifies aliases that we can use to access some of the react-scripts commands in a more efficient manner.
For example running
npm testin our command line will runreact-scripts test --env=jsdombehind the scenes.
We must be in the folder where package.json is:
$ cd hello-world
Start the React app by typing npm start into the terminal.
$ npm start
...
Compiled successfully!

You can now view hello-world in the browser.

  Local:            http://localhost:3000
  On Your Network:  http://10.0.0.161:3000

Note that the development build is not optimized.
To create a production build, use npm run build.
Changes made to the React app code are automatically shown in the browser thanks to hot reloading (any changes we make to the running app’s code will automatically refresh the app in the browser to reflect those changes).
If everything goes well, a new browser tab should open showing the placeholder React component:
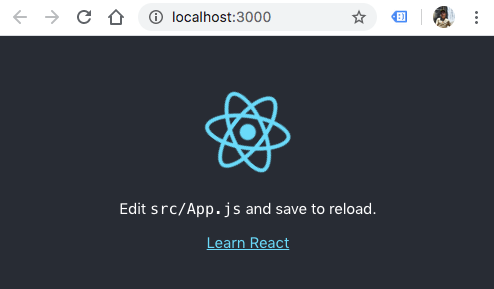
As we can see, Create React App runs the web app on port 3000.
Let's run another HelloWorld app by importing a new HelloWorld React component at the top of the App.js file, alongisde the other imports. Then, use the HelloWorld component by declaring it inside of the return statement (React Hello World: Your First React App (2019)).
It should look like this:
import React from 'react';
import HelloWorld from './HelloWorld';
import './App.css';

function App() {
  return (
    <div className="App">
      <HelloWorld />
    </div>
  );
}

export default App;
Now, we need to create a new file (HelloWorld.js) under the /src directory:
import React from 'react';

const HelloWorld = () => {

  function sayHello() {
    alert('Hello, World!');
  }

  return (
    <button onClick={sayHello}>Click me!</button>
  );
};

export default HelloWorld;
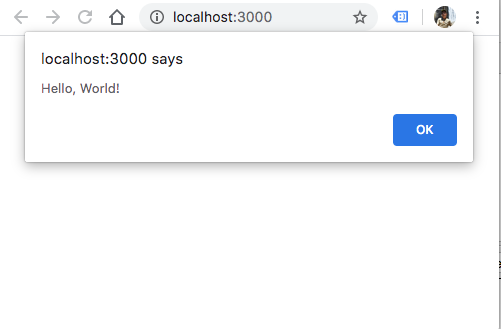
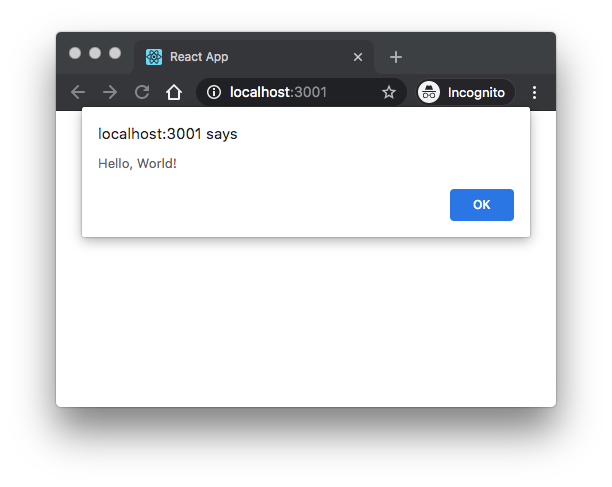
Note that it contains a button, which when clicked, shows an alert that says “Hello, World!”.
Save the files.
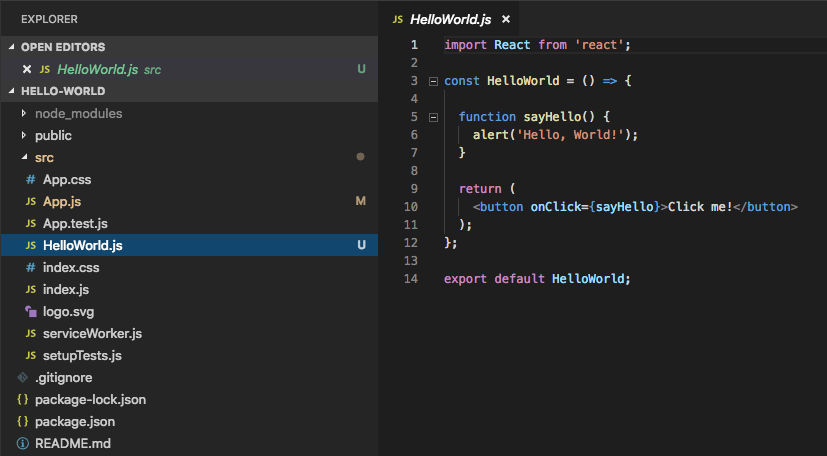
Then, the Hot Reloading takes care of reloading the running app in the browser and we should see our new HelloWorld component now displayed:
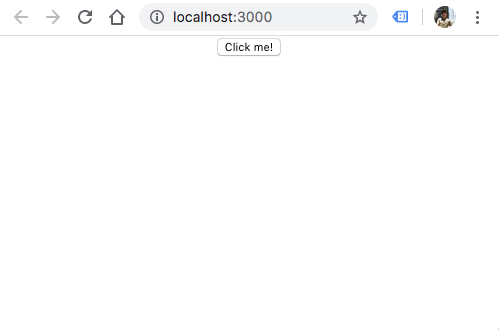
At the click of the button, we'll see something like this:
$ docker --version
Docker version 19.03.8, build afacb8b
Add the following Dockerfile to the root of the project:
# pull official base image
FROM node:13.12.0-alpine

# set working directory
WORKDIR /app

# add `/app/node_modules/.bin` to $PATH
ENV PATH /app/node_modules/.bin:$PATH

# install app dependencies
COPY package.json ./
COPY package-lock.json ./
RUN npm install

# add app
COPY . ./

# start app
CMD ["npm", "start"]
To speed up the creation of the Docker container, make sure to add a .dockerignore to our project to exclude such as node_modules from being sent to the Docker context. Here is the .dockerignore file:
node_modules
npm-debug.log
build
.dockerignore
**/.git
**/.DS_Store
**/node_modules
Build and tag the Docker image:
$ docker build -t hello-world:dev .
Sending build context to Docker daemon  630.3kB
Step 1/8 : FROM node:13.12.0-alpine
 ---> 483343d6c5f5
Step 2/8 : WORKDIR /app
 ---> Using cache
 ---> a4d081072ee9
Step 3/8 : ENV PATH /app/node_modules/.bin:$PATH
 ---> Using cache
 ---> 45ae875244e7
Step 4/8 : COPY package.json ./
 ---> Using cache
 ---> d20df95f90a0
Step 5/8 : COPY package-lock.json ./
 ---> cdc331d084a3
Step 6/8 : RUN npm install
 ---> Running in 6410d716fc08
 ...
Step 7/8 : COPY . ./
 ---> ca58e0ca87b9
Step 8/8 : CMD ["npm", "start"]
 ---> Running in cdcb3617af0c
Removing intermediate container cdcb3617af0c
 ---> d89b7bb5b6fa
Successfully built d89b7bb5b6fa
Successfully tagged hello-world:dev

$ docker image ls
REPOSITORY              TAG                 IMAGE ID            CREATED              SIZE
hello-world             dev                 d89b7bb5b6fa        About a minute ago   302MB
Let's create and run a new container instance from the image we created in the previous section.
$ docker run -it --rm \
-v ${PWD}:/app \
-v /app/node_modules \
-p 3001:3000 \
-e CHOKIDAR_USEPOLLING=true \
hello-world:dev
...
Compiled successfully!

You can now view hello-world in the browser.

  Local:            http://localhost:3000
  On Your Network:  http://172.17.0.2:3000

Note that the development build is not optimized.
To create a production build, use npm run build.
-itstarts the container in interactive mode.--rmremoves the container and volumes after the container exits.-v ${PWD}:/appmounts the code into the container at "/app".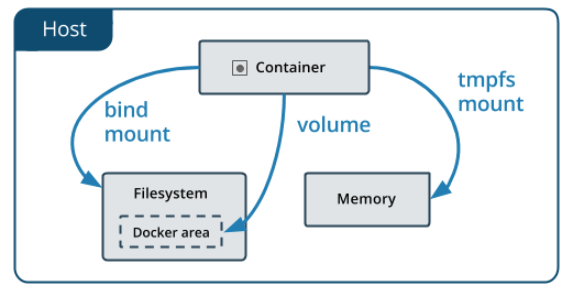
Source: https://docs.docker.com/storage/
-v /app/node_modules
Since we want to use the container version of the "node_modules" folder, we configured another volume: -v /app/node_modules. We should now be able to remove the local "node_modules" flavor.
-p 3001:3000exposes port 3000 to other Docker containers on the same network (for inter-container communication) and port 3001 to the host.-e CHOKIDAR_USEPOLLING=trueenables a polling mechanism via chokidar (which wraps fs.watch, fs.watchFile, and fsevents) so that hot-reloading will work. (check npm:chokidar
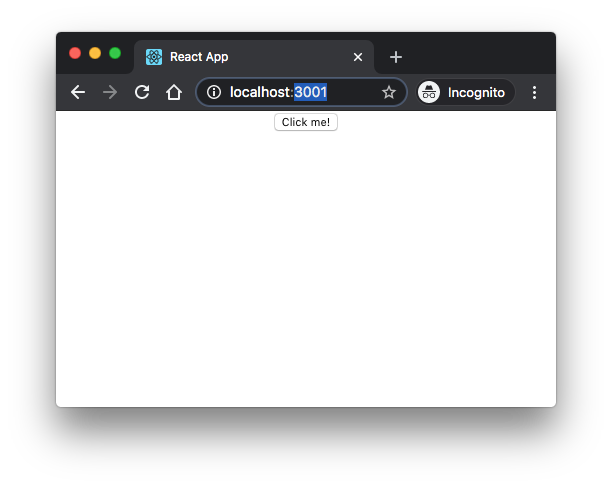
Open a browser to http://localhost:3001/ and we should see the app:
Stop the container, ^C.
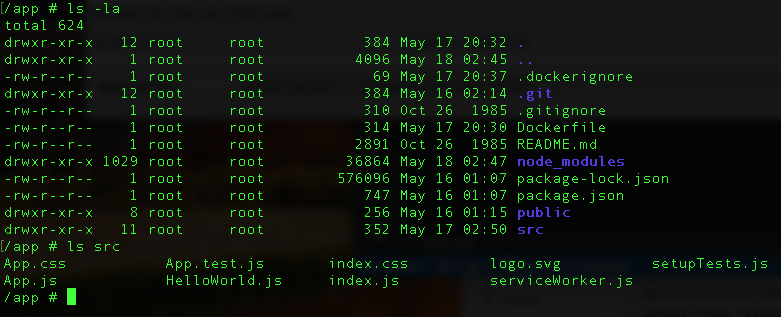
We can check the files in the container:
$ docker run -itd --rm \
-v ${PWD}:/app \
-v /app/node_modules \
-p 3001:3000 \
-e CHOKIDAR_USEPOLLING=true \
hello-world:dev

$ docker ps
CONTAINER ID        IMAGE               COMMAND                  CREATED             STATUS              PORTS                    NAMES
3536cb1d0e34        hello-world:dev      "docker-entrypoint.s…"   12 minutes ago      Up 11 minutes       0.0.0.0:3001->3000/tcp   stupefied_mclean

$ docker exec -it 3536cb1d0e34 sh
/app #
Stop the container:
$ docker stop 3536cb1d0e34
Add the following docker-compose.yml file to the project root:
version: '3.7'

services:

  hello-world:
    container_name: hello-world
    build:
      context: .
      dockerfile: Dockerfile
    volumes:
      - '.:/app'
      - '/app/node_modules'
    ports:
      - 3001:3000
    environment:
      - CHOKIDAR_USEPOLLING=true
Note that we're using the anonymous volume ('/app/node_modules') so the node_modules directory would not be overwritten by the mounting of the host directory at runtime. Actually, this would happen:
- build - The node_modules directory is created in the image.
- run - The current directory is mounted into the container, overwriting the node_modules that were installed during the build.
Let's build the image and spin up the container:
$ docker-compose up -d --build
Building hello-world
Step 1/8 : FROM node:13.12.0-alpine
 ---> 483343d6c5f5
Step 2/8 : WORKDIR /app
 ---> Using cache
 ---> a4d081072ee9
Step 3/8 : ENV PATH /app/node_modules/.bin:$PATH
 ---> Using cache
 ---> 45ae875244e7
Step 4/8 : COPY package.json ./
 ---> bbd874a89ca3
Step 5/8 : COPY package-lock.json ./
 ---> 441870583c81
Step 6/8 : RUN npm install
 ---> Running in a8e705083104
...
Step 7/8 : COPY . ./
 ---> e900c05dd005
Step 8/8 : CMD ["npm", "start"]
 ---> Running in 561b803a0ee3
Removing intermediate container 561b803a0ee3
 ---> 63267dae8fdf

Successfully built 63267dae8fdf
Successfully tagged hello-world_hello-world:latest
Creating hello-world ... done

$ docker-compose ps
   Name                  Command               State    Ports
-------------------------------------------------------------
hello-world   docker-entrypoint.sh npm start   Exit 0
Note that the container exited with 0. To resolve the issue, we need to add stdin_open: true to the docker-compose file as shown below:
version: '3.7'

services:

  hello-world:
    container_name: hello-world
    build:
      context: .
      dockerfile: Dockerfile
    volumes:
      - '.:/app'
      - '/app/node_modules'
    ports:
      - 3001:3000
    environment:
      - CHOKIDAR_USEPOLLING=true
    stdin_open: true
We can try to up the container again:
$ docker-compose up -d --build
Building hello-world
Step 1/8 : FROM node:13.12.0-alpine
 ---> 483343d6c5f5
Step 2/8 : WORKDIR /app
 ---> Using cache
 ---> a4d081072ee9
Step 3/8 : ENV PATH /app/node_modules/.bin:$PATH
 ---> Using cache
 ---> 45ae875244e7
Step 4/8 : COPY package.json ./
 ---> Using cache
 ---> bbd874a89ca3
Step 5/8 : COPY package-lock.json ./
 ---> Using cache
 ---> 441870583c81
Step 6/8 : RUN npm install
 ---> Using cache
 ---> 6fd73ada45a6
Step 7/8 : COPY . ./
 ---> 77e2c82a12f4
Step 8/8 : CMD ["npm", "start"]
 ---> Running in f3dbd15e8be8
Removing intermediate container f3dbd15e8be8
 ---> 54e0b956086b

Successfully built 54e0b956086b
Successfully tagged hello-world_hello-world:latest
Recreating hello-world ... done

$ docker-compose ps
   Name                  Command               State           Ports
-----------------------------------------------------------------------------
hello-world   docker-entrypoint.sh npm start   Up      0.0.0.0:3001->3000/tcp
We may want to make sure the app is running in the browser and test hot-reloading again.
Bring down the container before moving on:
$ docker-compose stop
Stopping hello-world ... done
So far, we've been working on React app for development environment. Now, let's make it on production environment.
We'll be using nginx to serve the content of our React application.
We take advantage of the multistage build pattern: "One of the most challenging things about building images is keeping the image size down. Each instruction in the Dockerfile adds a layer to the image, and you need to remember to clean up any artifacts you don’t need before moving on to the next layer."
With multi-stage builds, we use multiple FROM statements in our Dockerfile.
Each FROM instruction can use a different base, and each of them begins a new stage of the build.
We can selectively copy artifacts from one stage to another,
leaving behind everything we don't want in the final image.
So, we create a temporary image used for building the artifact – the production-ready React static files – that is then copied over to the production image. The temporary build image is discarded along with the original files and folders associated with the image. This produces a lean, production-ready image.
Here is our Dockerfile.prod file:
# build environment
FROM node:13.12.0-alpine as builder
WORKDIR /app
ENV PATH /app/node_modules/.bin:$PATH
COPY package.json ./
COPY package-lock.json ./
RUN npm ci --silent
RUN npm install react-scripts@3.4.1 -g --silent
COPY . ./
RUN npm run build

# production environment
FROM nginx:stable-alpine
COPY --from=builder /app/build /usr/share/nginx/html
EXPOSE 80
CMD ["nginx", "-g", "daemon off;"]
By default, the stages are not named. However, as we can see from the Dockerfile.prod file above, we name our stage, by adding an as <NAME> to the FROM instruction, in our case, it is builder. And then using the name in the COPY instruction. This means that even if the instructions in our Dockerfile are re-ordered later, the COPY doesn't break.
Note that we have another way though not used here - we can run npm run-script build to create ./build/
and then just copy the ./build/ folder to container as done in
Docker : Run a React app in a minikube.
Using the production Dockerfile, build and tag the Docker image:
$ docker build -f Dockerfile.prod -t hello-world:prod .
Sending build context to Docker daemon  632.3kB
Step 1/13 : FROM node:13.12.0-alpine as build
 ---> 483343d6c5f5
Step 2/13 : WORKDIR /app
 ---> Using cache
 ---> a4d081072ee9
Step 3/13 : ENV PATH /app/node_modules/.bin:$PATH
 ---> Using cache
 ---> 45ae875244e7
Step 4/13 : COPY package.json ./
 ---> Using cache
 ---> d20df95f90a0
Step 5/13 : COPY package-lock.json ./
 ---> Using cache
 ---> cdc331d084a3
Step 6/13 : RUN npm ci --silent
 ---> Running in 9537d7fc88da

Skipping 'fsevents' build as platform linux is not supported

Skipping 'fsevents' build as platform linux is not supported

Skipping 'fsevents' build as platform linux is not supported
added 1658 packages in 29.487s
Removing intermediate container 9537d7fc88da
 ---> cfd4cdb6be06
Step 7/13 : RUN npm install react-scripts@3.4.1 -g --silent
 ---> Running in 90baf726082b
/usr/local/bin/react-scripts -> /usr/local/lib/node_modules/react-scripts/bin/react-scripts.js
+ react-scripts@3.4.1
added 1612 packages from 750 contributors in 78.915s
Removing intermediate container 90baf726082b
 ---> 696aa9957fa9
Step 8/13 : COPY . ./
 ---> 0fabb60db2f1
Step 9/13 : RUN npm run build
 ---> Running in dde1b431e853

> hello-world@0.1.0 build /app
> react-scripts build

Creating an optimized production build...
Compiled successfully.

File sizes after gzip:

  39.39 KB  build/static/js/2.2139f4a8.chunk.js
  777 B     build/static/js/runtime-main.820c8c1d.js
  547 B     build/static/css/main.5f361e03.chunk.css
  517 B     build/static/js/main.01e41ee0.chunk.js

The project was built assuming it is hosted at /.
You can control this with the homepage field in your package.json.

The build folder is ready to be deployed.
You may serve it with a static server:

  npm install -g serve
  serve -s build

Find out more about deployment here:

  bit.ly/CRA-deploy

Removing intermediate container dde1b431e853
 ---> af9bc578d410
Step 10/13 : FROM nginx:stable-alpine
stable-alpine: Pulling from library/nginx
cbdbe7a5bc2a: Pull complete
6ade829cd166: Pull complete
Digest: sha256:2668e65e1a36a749aa8b3a5297eee45504a4efea423ec2affcbbf85e31a9a571
Status: Downloaded newer image for nginx:stable-alpine
 ---> ab94f84cc474
Step 11/13 : COPY --from=build /app/build /usr/share/nginx/html
 ---> d63cde39a46b
Step 12/13 : EXPOSE 80
 ---> Running in 3cc065a9beae
Removing intermediate container 3cc065a9beae
 ---> fa4edbfa3364
Step 13/13 : CMD ["nginx", "-g", "daemon off;"]
 ---> Running in 08efc7a24d38
Removing intermediate container 08efc7a24d38
 ---> f8dd4ec0558f
Successfully built f8dd4ec0558f
Successfully tagged hello-world:prod
Spin up the container:
$ docker run -it --rm -p 8787:80 hello-world:prod
In another terminal:
$ docker ps
CONTAINER ID        IMAGE               COMMAND                  CREATED             STATUS              PORTS                  NAMES
c931c9861125        hello-world:prod    "nginx -g 'daemon of…"   33 seconds ago      Up 32 seconds       0.0.0.0:8787->80/tcp   agitated_keldysh

$ docker exec -it c931c9861125 sh
/ # ps aux
PID   USER     TIME  COMMAND
    1 root      0:00 nginx: master process nginx -g daemon off;
    6 nginx     0:00 nginx: worker process
    7 nginx     0:00 nginx: worker process
    8 root      0:00 sh
   14 root      0:00 ps aux
/ #
Navigate to http://localhost:8787/ in a browser to view the app:
Now, let's try a new Docker Compose file (docker-compose.prod.yaml):
version: '3.7'

services:

  hello-world-prod:
    container_name: hello-world-prod
    build:
      context: .
      dockerfile: Dockerfile.prod
    ports:
      - '8877:80'
Spin up the container:
$ docker-compose -f docker-compose.prod.yaml up -d --build
Building hello-world-prod
Step 1/13 : FROM node:13.12.0-alpine as build
 ---> 483343d6c5f5
Step 2/13 : WORKDIR /app
 ---> Using cache
 ---> a4d081072ee9
Step 3/13 : ENV PATH /app/node_modules/.bin:$PATH
 ---> Using cache
 ---> 45ae875244e7
Step 4/13 : COPY package.json ./
 ---> Using cache
 ---> bbd874a89ca3
Step 5/13 : COPY package-lock.json ./
 ---> Using cache
 ---> 441870583c81
Step 6/13 : RUN npm ci --silent
 ---> Using cache
 ---> a0bfe88eaa00
Step 7/13 : RUN npm install react-scripts@3.4.1 -g --silent
 ---> Using cache
 ---> 0414dc5961c7
Step 8/13 : COPY . ./
 ---> d9461c1ccff0
Step 9/13 : RUN npm run build
 ---> Running in 74231ddc8439

> hello-world@0.1.0 build /app
> react-scripts build

Creating an optimized production build...
Compiled successfully.

File sizes after gzip:

  39.39 KB  build/static/js/2.2139f4a8.chunk.js
  777 B     build/static/js/runtime-main.820c8c1d.js
  547 B     build/static/css/main.5f361e03.chunk.css
  517 B     build/static/js/main.01e41ee0.chunk.js

The project was built assuming it is hosted at /.
You can control this with the homepage field in your package.json.

The build folder is ready to be deployed.
You may serve it with a static server:

  npm install -g serve
  serve -s build

Find out more about deployment here:

  bit.ly/CRA-deploy

Removing intermediate container 74231ddc8439
 ---> 59cd5aa2f66a

Step 10/13 : FROM nginx:stable-alpine
 ---> ab94f84cc474
Step 11/13 : COPY --from=build /app/build /usr/share/nginx/html
 ---> Using cache
 ---> d63cde39a46b
Step 12/13 : EXPOSE 80
 ---> Using cache
 ---> fa4edbfa3364
Step 13/13 : CMD ["nginx", "-g", "daemon off;"]
 ---> Using cache
 ---> f8dd4ec0558f

Successfully built f8dd4ec0558f
Successfully tagged hello-world_hello-world-prod:latest
Creating hello-world-prod ... done

$ docker ps
CONTAINER ID        IMAGE                          COMMAND                  CREATED             STATUS              PORTS                  NAMES
a87741d60e5c        hello-world_hello-world-prod   "nginx -g 'daemon of…"   51 seconds ago      Up 50 seconds       0.0.0.0:8877->80/tcp   hello-world-prod
Test it out again on port 8877:
We can go into the container and check the processes:
$ docker exec -it a87741d60e5c sh
/ # ps
PID   USER     TIME  COMMAND
    1 root      0:00 nginx: master process nginx -g daemon off;
    6 nginx     0:00 nginx: worker process
    7 nginx     0:00 nginx: worker process
    8 root      0:00 sh
   14 root      0:00 ps
/ #
- Hello World
- React Hello World: Your First React App (2019)
- Dockerizing a React App
- React in Docker with Nginx, built with multi-stage Docker builds, including testing
Docker & K8s
- Docker install on Amazon Linux AMI
- Docker install on EC2 Ubuntu 14.04
- Docker container vs Virtual Machine
- Docker install on Ubuntu 14.04
- Docker Hello World Application
- Nginx image - share/copy files, Dockerfile
- Working with Docker images : brief introduction
- Docker image and container via docker commands (search, pull, run, ps, restart, attach, and rm)
- More on docker run command (docker run -it, docker run --rm, etc.)
- Docker Networks - Bridge Driver Network
- Docker Persistent Storage
- File sharing between host and container (docker run -d -p -v)
- Linking containers and volume for datastore
- Dockerfile - Build Docker images automatically I - FROM, MAINTAINER, and build context
- Dockerfile - Build Docker images automatically II - revisiting FROM, MAINTAINER, build context, and caching
- Dockerfile - Build Docker images automatically III - RUN
- Dockerfile - Build Docker images automatically IV - CMD
- Dockerfile - Build Docker images automatically V - WORKDIR, ENV, ADD, and ENTRYPOINT
- Docker - Apache Tomcat
- Docker - NodeJS
- Docker - NodeJS with hostname
- Docker Compose - NodeJS with MongoDB
- Docker - Prometheus and Grafana with Docker-compose
- Docker - StatsD/Graphite/Grafana
- Docker - Deploying a Java EE JBoss/WildFly Application on AWS Elastic Beanstalk Using Docker Containers
- Docker : NodeJS with GCP Kubernetes Engine
- Docker : Jenkins Multibranch Pipeline with Jenkinsfile and Github
- Docker : Jenkins Master and Slave
- Docker - ELK : ElasticSearch, Logstash, and Kibana
- Docker - ELK 7.6 : Elasticsearch on Centos 7
- Docker - ELK 7.6 : Filebeat on Centos 7
- Docker - ELK 7.6 : Logstash on Centos 7
- Docker - ELK 7.6 : Kibana on Centos 7
- Docker - ELK 7.6 : Elastic Stack with Docker Compose
- Docker - Deploy Elastic Cloud on Kubernetes (ECK) via Elasticsearch operator on minikube
- Docker - Deploy Elastic Stack via Helm on minikube
- Docker Compose - A gentle introduction with WordPress
- Docker Compose - MySQL
- MEAN Stack app on Docker containers : micro services
- MEAN Stack app on Docker containers : micro services via docker-compose
- Docker Compose - Hashicorp's Vault and Consul Part A (install vault, unsealing, static secrets, and policies)
- Docker Compose - Hashicorp's Vault and Consul Part B (EaaS, dynamic secrets, leases, and revocation)
- Docker Compose - Hashicorp's Vault and Consul Part C (Consul)
- Docker Compose with two containers - Flask REST API service container and an Apache server container
- Docker compose : Nginx reverse proxy with multiple containers
- Docker & Kubernetes : Envoy - Getting started
- Docker & Kubernetes : Envoy - Front Proxy
- Docker & Kubernetes : Ambassador - Envoy API Gateway on Kubernetes
- Docker Packer
- Docker Cheat Sheet
- Docker Q & A #1
- Kubernetes Q & A - Part I
- Kubernetes Q & A - Part II
- Docker - Run a React app in a docker
- Docker - Run a React app in a docker II (snapshot app with nginx)
- Docker - NodeJS and MySQL app with React in a docker
- Docker - Step by Step NodeJS and MySQL app with React - I
- Installing LAMP via puppet on Docker
- Docker install via Puppet
- Nginx Docker install via Ansible
- Apache Hadoop CDH 5.8 Install with QuickStarts Docker
- Docker - Deploying Flask app to ECS
- Docker Compose - Deploying WordPress to AWS
- Docker - WordPress Deploy to ECS with Docker-Compose (ECS-CLI EC2 type)
- Docker - WordPress Deploy to ECS with Docker-Compose (ECS-CLI Fargate type)
- Docker - ECS Fargate
- Docker - AWS ECS service discovery with Flask and Redis
- Docker & Kubernetes : minikube
- Docker & Kubernetes 2 : minikube Django with Postgres - persistent volume
- Docker & Kubernetes 3 : minikube Django with Redis and Celery
- Docker & Kubernetes 4 : Django with RDS via AWS Kops
- Docker & Kubernetes : Kops on AWS
- Docker & Kubernetes : Ingress controller on AWS with Kops
- Docker & Kubernetes : HashiCorp's Vault and Consul on minikube
- Docker & Kubernetes : HashiCorp's Vault and Consul - Auto-unseal using Transit Secrets Engine
- Docker & Kubernetes : Persistent Volumes & Persistent Volumes Claims - hostPath and annotations
- Docker & Kubernetes : Persistent Volumes - Dynamic volume provisioning
- Docker & Kubernetes : DaemonSet
- Docker & Kubernetes : Secrets
- Docker & Kubernetes : kubectl command
- Docker & Kubernetes : Assign a Kubernetes Pod to a particular node in a Kubernetes cluster
- Docker & Kubernetes : Configure a Pod to Use a ConfigMap
- AWS : EKS (Elastic Container Service for Kubernetes)
- Docker & Kubernetes : Run a React app in a minikube
- Docker & Kubernetes : Minikube install on AWS EC2
- Docker & Kubernetes : Cassandra with a StatefulSet
- Docker & Kubernetes : Terraform and AWS EKS
- Docker & Kubernetes : Pods and Service definitions
- Docker & Kubernetes : Service IP and the Service Type
- Docker & Kubernetes : Kubernetes DNS with Pods and Services
- Docker & Kubernetes : Headless service and discovering pods
- Docker & Kubernetes : Scaling and Updating application
- Docker & Kubernetes : Horizontal pod autoscaler on minikubes
- Docker & Kubernetes : From a monolithic app to micro services on GCP Kubernetes
- Docker & Kubernetes : Rolling updates
- Docker & Kubernetes : Deployments to GKE (Rolling update, Canary and Blue-green deployments)
- Docker & Kubernetes : Slack Chat Bot with NodeJS on GCP Kubernetes
- Docker & Kubernetes : Continuous Delivery with Jenkins Multibranch Pipeline for Dev, Canary, and Production Environments on GCP Kubernetes
- Docker & Kubernetes : NodePort vs LoadBalancer vs Ingress
- Docker & Kubernetes : MongoDB / MongoExpress on Minikube
- Docker & Kubernetes : Load Testing with Locust on GCP Kubernetes
- Docker & Kubernetes : MongoDB with StatefulSets on GCP Kubernetes Engine
- Docker & Kubernetes : Nginx Ingress Controller on Minikube
- Docker & Kubernetes : Setting up Ingress with NGINX Controller on Minikube (Mac)
- Docker & Kubernetes : Nginx Ingress Controller for Dashboard service on Minikube
- Docker & Kubernetes : Nginx Ingress Controller on GCP Kubernetes
- Docker & Kubernetes : Kubernetes Ingress with AWS ALB Ingress Controller in EKS
- Docker & Kubernetes : Setting up a private cluster on GCP Kubernetes
- Docker & Kubernetes : Kubernetes Namespaces (default, kube-public, kube-system) and switching namespaces (kubens)
- Docker & Kubernetes : StatefulSets on minikube
- Docker & Kubernetes : RBAC
- Docker & Kubernetes Service Account, RBAC, and IAM
- Docker & Kubernetes - Kubernetes Service Account, RBAC, IAM with EKS ALB, Part 1
- Docker & Kubernetes : Helm Chart
- Docker & Kubernetes : My first Helm deploy
- Docker & Kubernetes : Readiness and Liveness Probes
- Docker & Kubernetes : Helm chart repository with Github pages
- Docker & Kubernetes : Deploying WordPress and MariaDB with Ingress to Minikube using Helm Chart
- Docker & Kubernetes : Deploying WordPress and MariaDB to AWS using Helm 2 Chart
- Docker & Kubernetes : Deploying WordPress and MariaDB to AWS using Helm 3 Chart
- Docker & Kubernetes : Helm Chart for Node/Express and MySQL with Ingress
- Docker & Kubernetes : Deploy Prometheus and Grafana using Helm and Prometheus Operator - Monitoring Kubernetes node resources out of the box
- Docker & Kubernetes : Deploy Prometheus and Grafana using kube-prometheus-stack Helm Chart
- Docker & Kubernetes : Istio (service mesh) sidecar proxy on GCP Kubernetes
- Docker & Kubernetes : Istio on EKS
- Docker & Kubernetes : Istio on Minikube with AWS EC2 for Bookinfo Application
- Docker & Kubernetes : Deploying .NET Core app to Kubernetes Engine and configuring its traffic managed by Istio (Part I)
- Docker & Kubernetes : Deploying .NET Core app to Kubernetes Engine and configuring its traffic managed by Istio (Part II - Prometheus, Grafana, pin a service, split traffic, and inject faults)
- Docker & Kubernetes : Helm Package Manager with MySQL on GCP Kubernetes Engine
- Docker & Kubernetes : Deploying Memcached on Kubernetes Engine
- Docker & Kubernetes : EKS Control Plane (API server) Metrics with Prometheus
- Docker & Kubernetes : Spinnaker on EKS with Halyard
- Docker & Kubernetes : Continuous Delivery Pipelines with Spinnaker and Kubernetes Engine
- Docker & Kubernetes : Multi-node Local Kubernetes cluster : Kubeadm-dind (docker-in-docker)
- Docker & Kubernetes : Multi-node Local Kubernetes cluster : Kubeadm-kind (k8s-in-docker)
- Docker & Kubernetes : nodeSelector, nodeAffinity, taints/tolerations, pod affinity and anti-affinity - Assigning Pods to Nodes
- Docker & Kubernetes : Jenkins-X on EKS
- Docker & Kubernetes : ArgoCD App of Apps with Heml on Kubernetes
- Docker & Kubernetes : ArgoCD on Kubernetes cluster
- Docker & Kubernetes : GitOps with ArgoCD for Continuous Delivery to Kubernetes clusters (minikube) - guestbook
Ph.D. / Golden Gate Ave, San Francisco / Seoul National Univ / Carnegie Mellon / UC Berkeley / DevOps / Deep Learning / Visualization