GCP: Django Deploy via Kubernetes I (Local)
In this tutorial, we'll use two dev machines for a local test before we deploying the app to Kubernetes:
- local - GCP console
- local - my MacBook Air
We'll deploy the official Django tutorial app to Google Kubernetes Engine. The app's models represent polls that contain questions, and we can interact with the models using the Django admin console.
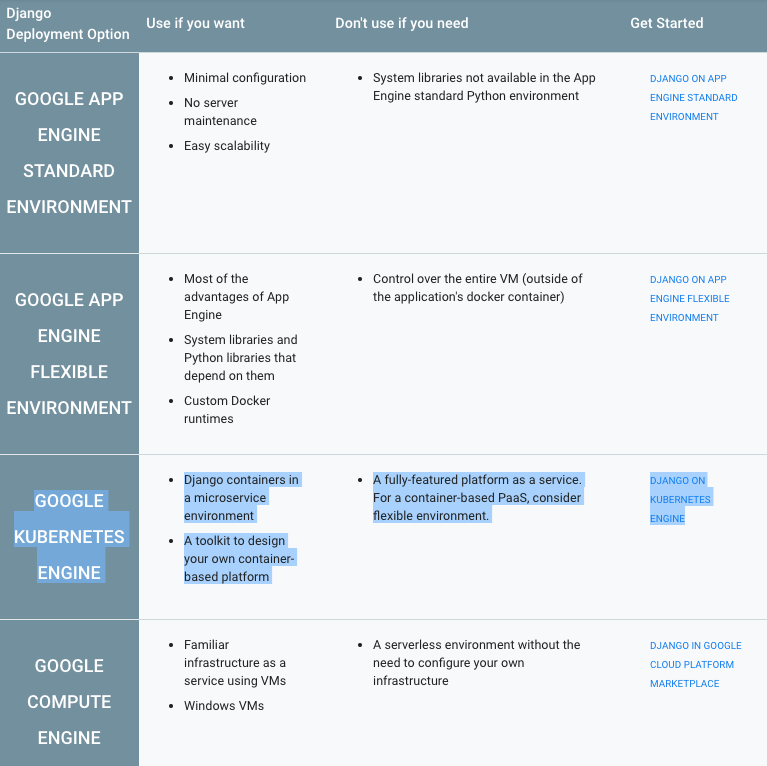
There are four main options (Getting Started With Django) for deploying Django on Cloud Platform.
The Django object-relational mapper (ORM) works best with a traditional SQL database. If we are starting a new project, Google Cloud SQL is a good choice.
App Engine comes with a built-in Memcached service.
To install Memcached on Compute Engine, we can use GCP Marketplace. To install Memcached on either Compute Engine or Kubernetes Engine, we can use the Memcached Docker image.
Similarly we can install Redis by using GCP Marketplace or the Redis docker image.
For task queuing, App Engine comes with a built-in task queue feature for long-running background jobs. Outside of App Engine, consider the massively scalable Cloud Pub/Sub service, which can be turned into a task queue using Cloud Pub/Sub Task Queue for Python (psq).
Other popular task queuing options, available in GCP Marketplace, include RabbitMQ and Kafka. There are also Docker images for RabbitMQ and Kafka.
Before we begin, here are the check list we need complete it.
-
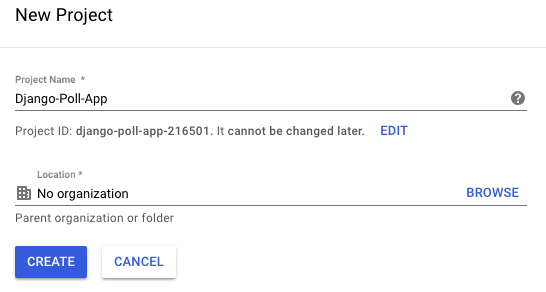
Create a project in the Google Cloud Platform Console.
If haven't already created a project, create one now. Projects enable us to manage all Google Cloud Platform resources for our app, including deployment, access control, billing, and services.- Open the GCP Console.
- In the drop-down menu at the top, select Create a project.
- Give the project a name.
- Make a note of the project ID, which might be different from the project name. The project ID is used in commands and in configurations.
-
Install the Google Cloud SDK.
If haven't already installed the Google Cloud SDK, install and initialize the Google Cloud SDK now. The SDK contains tools and libraries that enable us to create and manage resources on Google Cloud Platform.
-
Enable APIs for our project.
This takes us to the GCP Console and automatically enables the APIs used by this tutorial. The APIs used are: Cloud SQL API, Compute Engine API.
The code for the Django sample app is in the Google Cloud Platform repository on GitHub.
Clone the repository to our local machine:
kihyuck_hong@cloudshell:~ (django-poll-app-216501)$ git clone https://github.com/GoogleCloudPlatform/python-docs-samples.git
Go to the directory that contains the sample code:
kihyuck_hong@cloudshell:~ (django-poll-app-216501)$ cd python-docs-samples/container_engine/django_tutorial

kihyuck_hong@cloudshell:~/python-docs-samples/container_engine/django_tutorial (django-poll-app-216501)$
Alternatively, we can download the sample as a zip and extract it.
When deployed, our application uses the Cloud SQL Proxy that is built in to the App Engine environment to communicate with our Cloud SQL instance.
The Cloud SQL Proxy works by having a local client, called the proxy, running in the local environment. Our application communicates with the proxy with the standard database protocol used by our database. The proxy uses a secure tunnel to communicate with its companion process running on the server.
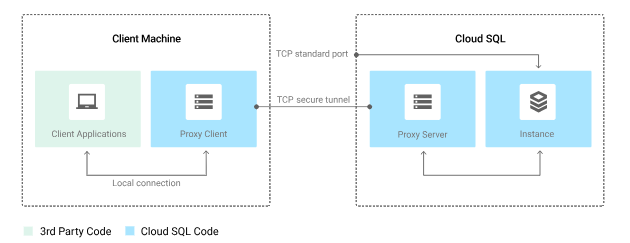
However, to test our application locally, we must install and use a local copy of the Cloud SQL Proxy in our development environment.
Learn more about the Cloud SQL Proxy.
To perform basic administrative tasks on our Cloud SQL instance, we can use the PostgreSQL Client.
Download and install the Cloud SQL Proxy. The Cloud SQL Proxy is used to connect to our Cloud SQL instance when running locally.
We can install the proxy anywhere in your local environment. The location of the proxy binaries does not impact where it listens for data from your application.
For Linux 64-BIT:
- Download the proxy:
wget https://dl.google.com/cloudsql/cloud_sql_proxy.linux.amd64 -O cloud_sql_proxy
kihyuck_hong@cloudshell:~/python-docs-samples/container_engine/django_tutorial (django-poll-app-216501)$ wget https://dl.google.com/cloudsql/cloud_sql_proxy.linux
.amd64 -O cloud_sql_proxy
- Make the proxy executable:
$ chmod +x cloud_sql_proxy
kihyuck_hong@cloudshell:~/python-docs-samples/container_engine/django_tutorial (django-poll-app-216501)$ chmod +x cloud_sql_proxy

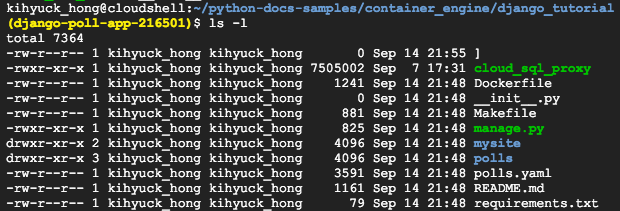
$ ls -l
total 7308
-rw-r--r-- 1 kihyuck_hong kihyuck_hong       0 Sep 14 21:55 ]
-rwxr-xr-x 1 kihyuck_hong kihyuck_hong 7448368 Sep 14 22:00 cloud_sql_proxy
-rw-r--r-- 1 kihyuck_hong kihyuck_hong    1241 Sep 14 21:48 Dockerfile
-rw-r--r-- 1 kihyuck_hong kihyuck_hong       0 Sep 14 21:48 __init__.py
-rw-r--r-- 1 kihyuck_hong kihyuck_hong     881 Sep 14 21:48 Makefile
-rwxr-xr-x 1 kihyuck_hong kihyuck_hong     825 Sep 14 21:48 manage.py
drwxr-xr-x 2 kihyuck_hong kihyuck_hong    4096 Sep 14 21:48 mysite
drwxr-xr-x 3 kihyuck_hong kihyuck_hong    4096 Sep 14 21:48 polls
-rw-r--r-- 1 kihyuck_hong kihyuck_hong    3591 Sep 14 21:48 polls.yaml
-rw-r--r-- 1 kihyuck_hong kihyuck_hong    1161 Sep 14 21:48 README.md
-rw-r--r-- 1 kihyuck_hong kihyuck_hong      79 Sep 14 21:48 requirements.txt
-
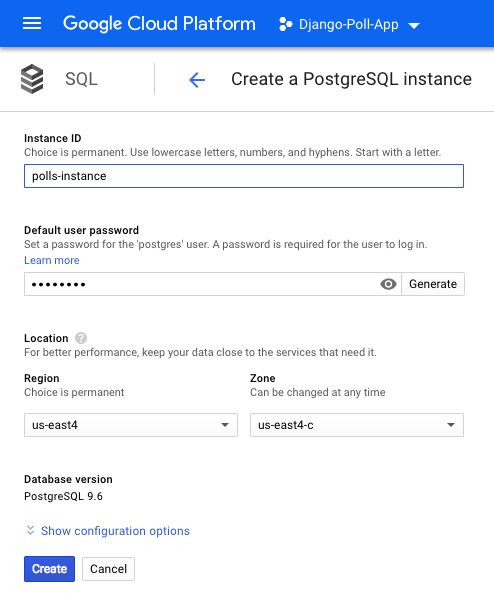
Create a Cloud SQL for PostgreSQL instance.
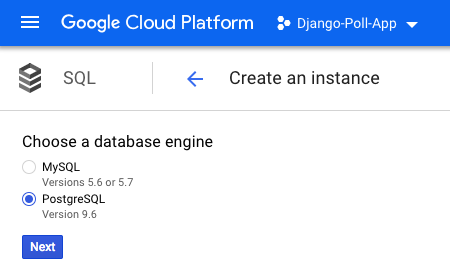
Name the instance as
polls-instance. It can take a few minutes for the instance to be ready. After the instance is ready, it should be visible in the instances list. - Now use the Cloud SDK from command line to run the following command. Copy
the value shown for connectionName for the next step.
gcloud sql instances describe [INSTANCE_NAME]
kihyuck_hong@cloudshell:~/python-docs-samples/container_engine/django_tutorial (django-poll-app-216501)$ gcloud sql instances describe polls-instance
backendType: SECOND_GEN
connectionName: django-poll-app-216501:us-east4:polls-instance
databaseVersion: POSTGRES_9_6
etag: '"v2uwXMbh3dlV5GKTL9aEU1EZQxc/MQ"'
gceZone: us-east4-c
instanceType: CLOUD_SQL_INSTANCE
ipAddresses:
- ipAddress: 35.236.201.91
...
The connectionName value is in the format
[PROJECT_NAME]:[REGION_NAME]:[INSTANCE_NAME].

- Start the Cloud SQL Proxy using the connectionName from the
previous step.
Linux/Mac OS X
./cloud_sql_proxy -instances="[INSTANCE_CONNECTION_NAME]"=tcp:5432
Replace
[INSTANCE_CONNECTION_NAME]with the value of connectionName that we recorded in the previous step.kihyuck_hong@cloudshell:~/python-docs-samples/container_engine/django_tutorial (django-poll-app-216501)$ ./cloud_sql_proxy -instances="django-poll-app-216501:us-east4:polls-instance"=tcp:5432 2018/09/14 22:55:26 Listening on 127.0.0.1:5432 for django-poll-app-216501:us-east4:polls-instance 2018/09/14 22:55:26 Ready for new connectionsThis step establishes a connection from our local computer (in this case, Cloud Shell) to our Cloud SQL instance for local testing purposes. Keep the Cloud SQL Proxy running the entire time we test our application locally.
First GCP shell:

The 2nd shell (new):

-
In a separate command-line tab, install the
Postgres
client.
sudo apt-get install postgresql
kihyuck_hong@cloudshell:~ (django-poll-app-216501)$ sudo apt-get install postgresql
-
Use the Postgres client or similar program to connect to our
instance. When prompted, use the root password we configured.
psql --host 127.0.0.1 --user postgres --password
kihyuck_hong@cloudshell:~ (django-poll-app-216501)$ psql --host 127.0.0.1 --user postgres --password
Password for user postgres:
psql (9.6.10, server 9.6.6)
Type "help" for help.
postgres=>
-
Create the required databases, users, and access permissions in our
Cloud SQL database using the commands below. Replace
[POSTGRES_USER]and[POSTGRES_PASSWORD]with the desired username and password.CREATE DATABASE polls; CREATE USER [POSTGRES_USER] WITH PASSWORD '[POSTGRES_PASSWORD]'; GRANT ALL PRIVILEGES ON DATABASE polls TO [POSTGRES_USER]; GRANT ALL PRIVILEGES ON ALL TABLES IN SCHEMA public TO [POSTGRES_USER];
postgres=> CREATE DATABASE polls;
CREATE DATABASE
postgres=> CREATE USER khong WITH PASSWORD 'postgres';
CREATE ROLE
postgres=> GRANT ALL PRIVILEGES ON DATABASE polls TO khong;
GRANT
postgres=> GRANT ALL PRIVILEGES ON ALL TABLES IN SCHEMA public TO khong;
GRANT
postgres=>
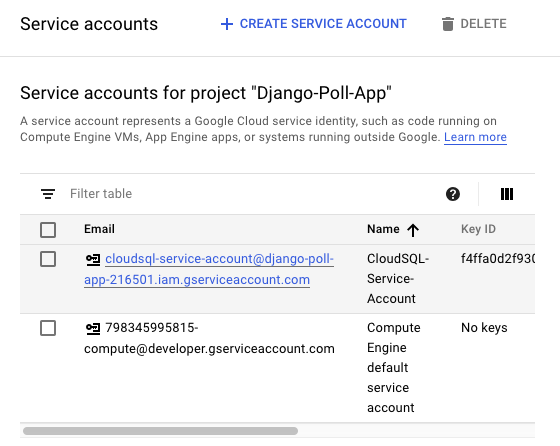
- Go to the Cloud SQL Service accounts page of the Google Cloud Platform Console.
-
If needed, select the project that contains our Cloud SQL instance.
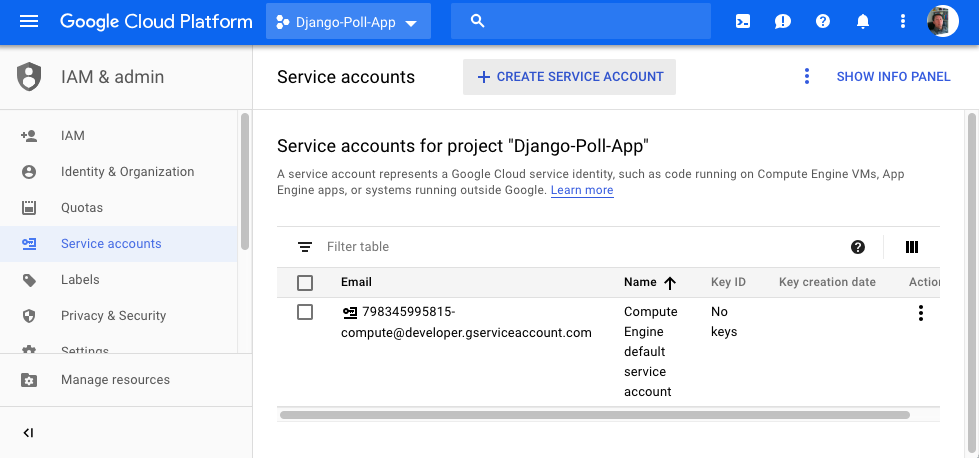
- Click Create service account.
- In the Create service account dialog, provide a descriptive name for the service account.
-
For Role, select one of the following roles:
- Cloud SQL > Cloud SQL Client
- Cloud SQL > Cloud SQL Editor
- Cloud SQL > Cloud SQL Admin
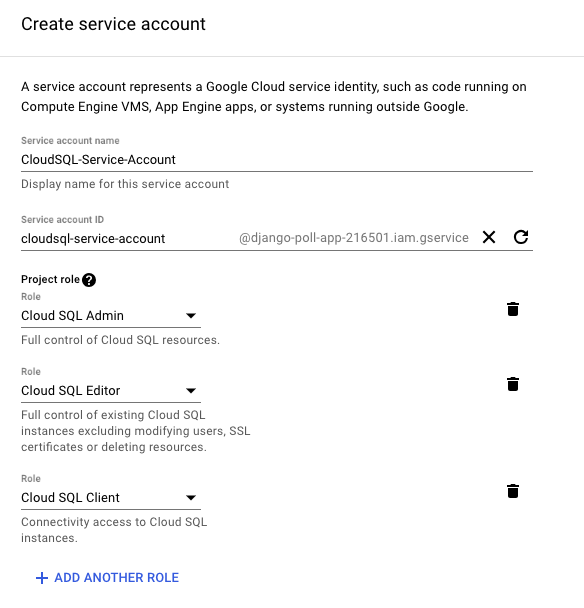
- Change the Service account ID to a unique value that we will recognize so we can easily find this service account later if needed.
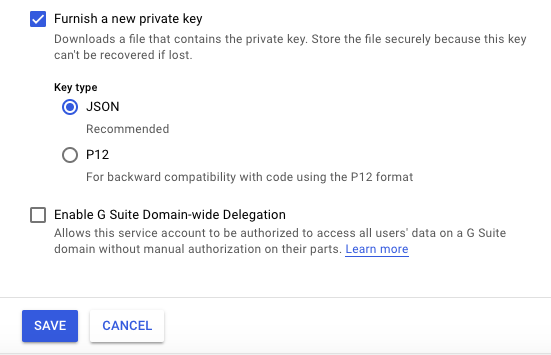
- Click Furnish a new private key.
-
The default key type is
JSON, which is the correct value to use. -
Click Create.

The private key file is downloaded to our machine. We can move it to another location. Keep the key file secure.
-
This application is represented in a single Kubernetes configuration, called
polls. Inpolls.yamlreplace<your-project-id>with our project ID.
-
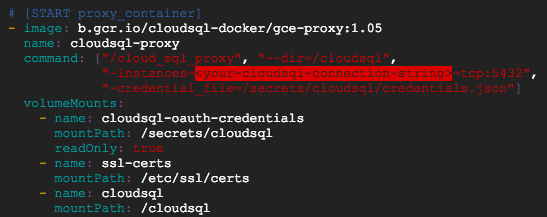
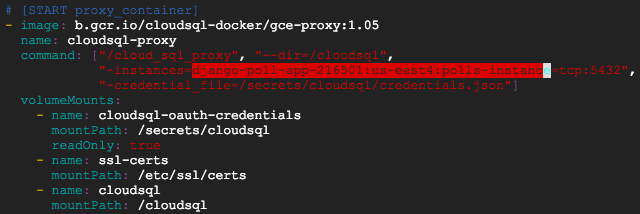
In
polls.yamlreplace<your-cloudsql-connection-string>with the value of connectionName outputted from the following command:gcloud beta sql instances describe [YOUR_INSTANCE_NAME]kihyuck_hong@cloudshell:~/python-docs-samples/container_engine/django_tutorial (django-poll-app-216501)$ gcloud beta sql instances describe polls-instance backendType: SECOND_GEN connectionName: django-poll-app-216501:us-east4:polls-instance ...
-
To run the Django app on our local computer, we need to set up a Python development environment, including Python, pip, and virtualenv.
-
Create an isolated Python environment, and install dependencies:
virtualenv venv source venv/bin/activate pip install -r requirements.txtkihyuck_hong@cloudshell:~/python-docs-samples/container_engine/django_tutorial (django-poll-app-216501)$ virtualenv venv Using base prefix '/usr' New python executable in /home/kihyuck_hong/python-docs-samples/container_engine/django_tutorial/venv/bin/python3 Not overwriting existing python script /home/kihyuck_hong/python-docs-samples/container_engine/django_tutorial/venv/bin/python (you must use /home/kihyuck_hong/pyth on-docs-samples/container_engine/django_tutorial/venv/bin/python3) Installing setuptools, pip, wheel...done. kihyuck_hong@cloudshell:~/python-docs-samples/container_engine/django_tutorial (django-poll-app-216501)$ source venv/bin/activate (venv) kihyuck_hong@cloudshell:~/python-docs-samples/container_engine/django_tutorial (django-poll-app-216501)$
But I got the following error "mysql_config not found":
(venv) kihyuck_hong@cloudshell:~/python-docs-samples/container_engine/django_tutorial (django-poll-app-216501)$ pip install -r requirements.txt Collecting Django==2.1 (from -r requirements.txt (line 1)) Using cached https://files.pythonhosted.org/packages/51/1a/e0ac7886c7123a03814178d7517dc822af0fe51a72e1a6bff26153103322/Django-2.1-py3-none-any.whl Collecting mysqlclient==1.3.13 (from -r requirements.txt (line 2)) Using cached https://files.pythonhosted.org/packages/ec/fd/83329b9d3e14f7344d1cb31f128e6dbba70c5975c9e57896815dbb1988ad/mysqlclient-1.3.13.tar.gz Complete output from command python setup.py egg_info: /bin/sh: 1: mysql_config: not found Traceback (most recent call last): File "", line 1, in File "/tmp/pip-install-fzfeevpd/mysqlclient/setup.py", line 18, in metadata, options = get_config() File "/tmp/pip-install-fzfeevpd/mysqlclient/setup_posix.py", line 53, in get_config libs = mysql_config("libs_r") File "/tmp/pip-install-fzfeevpd/mysqlclient/setup_posix.py", line 28, in mysql_config raise EnvironmentError("%s not found" % (mysql_config.path,)) OSError: mysql_config not found ---------------------------------------- Command "python setup.py egg_info" failed with error code 1 in /tmp/pip-install-fzfeevpd/mysqlclient/
Installing "libmysqlclient-dev" resolved the issue:
kihyuck_hong@cloudshell:/usr/local/bin (django-poll-app-216501)$ sudo apt-get install libmysqlclient-dev
-
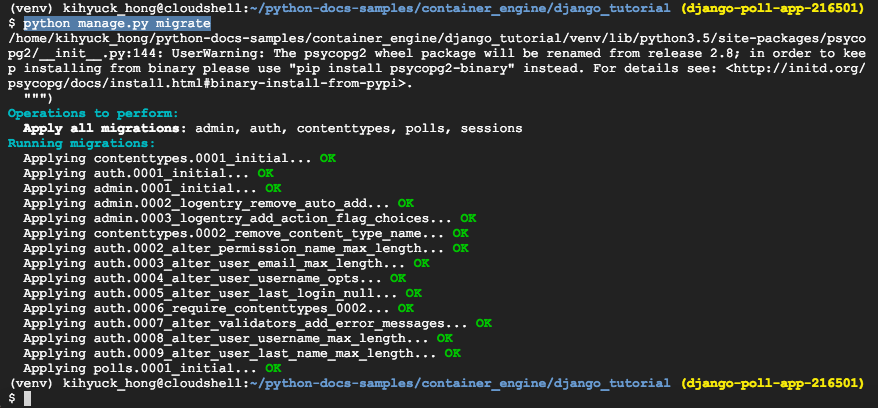
Run the Django migrations to set up our models:
python manage.py makemigrations python manage.py makemigrations polls python manage.py migrate


-
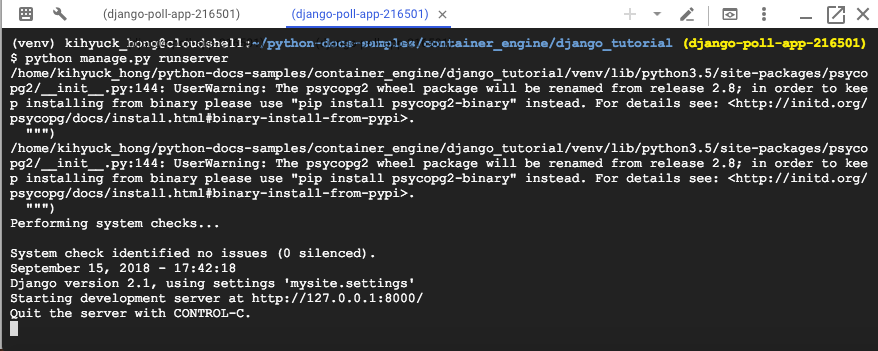
Start a local web server:
python manage.py runserver
-
Go to http://localhost:8000.
- Download the proxy:
curl -o cloud_sql_proxy https://dl.google.com/cloudsql/cloud_sql_proxy.darwin.386
Kihyucks-Air:Kubernetes kihyuckhong$ curl -o cloud_sql_proxy https://dl.google.com/cloudsql/cloud_sql_proxy.darwin.386
- Make the proxy executable:
$ chmod +x cloud_sql_proxy
-
Create a Cloud SQL for PostgreSQL instance.
Not related to local environment. So, we don't need to do anymore. We can use the same Cloud SQL instance we setup in the earlier section (Cloud shell local).
- We need to set a default project, run the following command from our local machine:
gcloud config set project PROJECT_ID
Kihyucks-Air:Kubernetes kihyuckhong$ $ gcloud config set project django-poll-app-216501 Updated property [core/project].
- Now use the Cloud SDK from command line to run the following command. Copy
the value shown for connectionName for the next step.
gcloud sql instances describe [INSTANCE_NAME]
Kihyucks-Air:Kubernetes kihyuckhong$ gcloud sql instances describe polls-instance backendType: SECOND_GEN connectionName: django-poll-app-216501:us-east4:polls-instance databaseVersion: POSTGRES_9_6 etag: '"v2uwXMbh3dlV5GKTL9aEU1EZQxc/MQ"' gceZone: us-east4-c instanceType: CLOUD_SQL_INSTANCE ipAddresses: - ipAddress: 35.236.201.91 type: PRIMARY kind: sql#instance name: polls-instance project: django-poll-app-216501 region: us-east4 ...
The connectionName value is in the format
[PROJECT_NAME]:[REGION_NAME]:[INSTANCE_NAME]. - At this point, we may need to get application default creadentials. Otherwise, we will get "could not find default credentials" error when we try to run the Cloud SQL Proxy:
Kihyucks-Air:Kubernetes kihyuckhong$ gcloud auth application-default login ... Credentials saved to file: [/Users/kihyuckhong/.config/gcloud/application_default_credentials.json] These credentials will be used by any library that requests Application Default Credentials. To generate an access token for other uses, run: gcloud auth application-default print-access-token
- Start the Cloud SQL Proxy using the connectionName from the
previous step.
Linux/Mac OS X
./cloud_sql_proxy -instances="[INSTANCE_CONNECTION_NAME]"=tcp:5432
Replace
[INSTANCE_CONNECTION_NAME]with the value of connectionName that we recorded in the previous step.Kihyucks-Air:Kubernetes kihyuckhong$ ./cloud_sql_proxy -instances="django-poll-app-216501:us-east4:polls-instance"=tcp:5432 2018/09/15 12:57:02 Listening on 127.0.0.1:5432 for django-poll-app-216501:us-east4:polls-instance 2018/09/15 12:57:02 Ready for new connectionsThis step establishes a connection from our local computer (Mac) to our Cloud SQL instance for local testing purposes. Keep the Cloud SQL Proxy running the entire time we test our application locally. So, we may need to open up another local shell terminal.
-
In a separate command-line tab, install the
Postgres
client.
Kihyucks-Air:Kubernetes kihyuckhong$ brew install postgres ... To have launchd start postgresql now and restart at login: brew services start postgresql Or, if you don't want/need a background service you can just run: pg_ctl -D /usr/local/var/postgres start
- Because we don't want/need a background service we can just run:
-
Use the Postgres client or similar program to connect to our
instance. When prompted, use the root password we configured.
psql --host 127.0.0.1 --user postgres --password
- In the earlier section, we've already created the required databases, users, and access permissions in our Cloud SQL database.
-
This application is represented in a single Kubernetes configuration, called
polls. Inpolls.yamlreplace<your-project-id>with our project ID.

-
In
polls.yamlreplace<your-cloudsql-connection-string>with the value of connectionName outputted from the following command:gcloud beta sql instances describe [YOUR_INSTANCE_NAME]Kihyucks-Air:django_tutorial kihyuckhong$ gcloud beta sql instances describe polls-instance backendType: SECOND_GEN connectionName: django-poll-app-216501:us-east4:polls-instance ...


-
To run the Django app on our local computer (on Mac), we need to set up a Python development environment, including Python, pip, and virtualenv.
-
Kihyucks-Air:django_tutorial kihyuckhong$ pwd /Users/kihyuckhong/Documents/Django/Kubernetes/python-docs-samples/container_engine/django_tutorial
Create an isolated Python environment, and install dependencies:
virtualenv venv source venv/bin/activate pip install -r requirements.txtKihyucks-Air:django_tutorial kihyuckhong$ python -V Python 3.7.0 Kihyucks-Air:django_tutorial kihyuckhong$ pip3 install virtualenv Kihyucks-Air:django_tutorial kihyuckhong$ virtualenv venv Kihyucks-Air:django_tutorial kihyuckhong$ source venv/bin/activate (venv) Kihyucks-Air:django_tutorial kihyuckhong$
But I got the following error "mysql_config not found" while "pip install -r requirements.txt":
(venv) Kihyucks-Air:django_tutorial kihyuckhong$ pip install -r requirements.txt Collecting Django==2.1 (from -r requirements.txt (line 1)) Downloading https://files.pythonhosted.org/packages/51/1a/e0ac7886c7123a03814178d7517dc822af0fe51a72e1a6bff26153103322/Django-2.1-py3-none-any.whl (7.3MB) ... Collecting mysqlclient==1.3.13 (from -r requirements.txt (line 2)) ... raise EnvironmentError("%s not found" % (mysql_config.path,)) OSError: mysql_config not found
Installing "mysql" resolved the issue:
(venv) Kihyucks-Air:django_tutorial kihyuckhong$ brew install mysql ==> Downloading https://homebrew.bintray.com/bottles/mysql-8.0.12.high_sierra.bottle.tar.gz ######################################################################## 100.0% ==> Pouring mysql-8.0.12.high_sierra.bottle.tar.gz ==> /usr/local/Cellar/mysql/8.0.12/bin/mysqld --initialize-insecure --user=kihyuckhong --basedir=/usr/local/Cellar/mysql/8.0.12 --datadir=/usr/local/var/mysql --tmpdir=/tmp ... To connect run: mysql -uroot To have launchd start mysql now and restart at login: brew services start mysql Or, if you don't want/need a background service you can just run: mysql.server start ... We need to give credentials to our environment:
(venv) Kihyucks-Air:django_tutorial kihyuckhong$ export DATABASE_USER=khong (venv) Kihyucks-Air:django_tutorial kihyuckhong$ export DATABASE_PASSWORD=postgres
-
Run the Django migrations to set up our models:
python manage.py makemigrations python manage.py makemigrations polls python manage.py migrate
(venv) Kihyucks-Air:django_tutorial kihyuckhong$ python manage.py makemigrations ... Migrations for 'polls': polls/migrations/0002_auto_20180915_2309.py - Alter field pub_date on question
(venv) Kihyucks-Air:django_tutorial kihyuckhong$ python manage.py makemigrations polls ... No changes detected in app 'polls'
(venv) Kihyucks-Air:django_tutorial kihyuckhong$ python manage.py migrate ... Operations to perform: Apply all migrations: admin, auth, contenttypes, polls, sessions Running migrations: Applying polls.0002_auto_20180915_2309... OK
-
Start a local web server:
python manage.py runserver
(venv) Kihyucks-Air:django_tutorial kihyuckhong$ python manage.py runserver ... Django version 2.1, using settings 'mysite.settings' Starting development server at http://127.0.0.1:8000/ Quit the server with CONTROL-C.
-
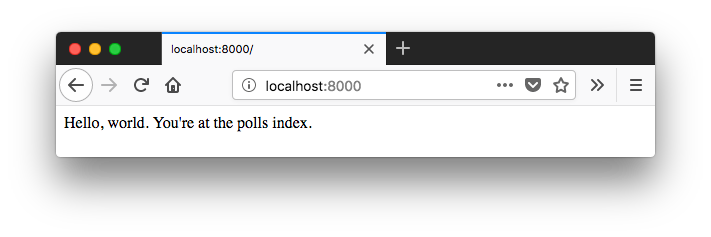
Go to http://localhost:8000.
-
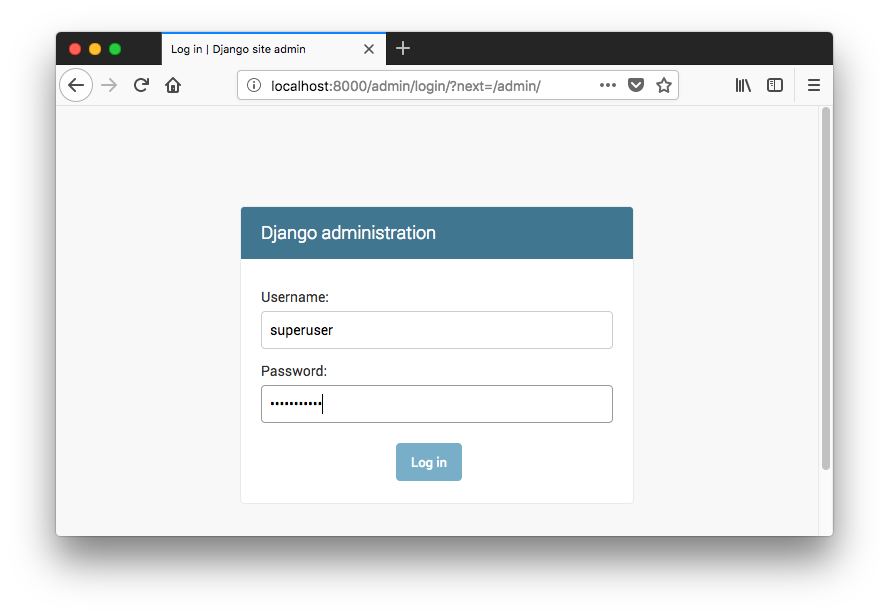
Log in to the admin site using the username and password we created when you ran
createsuperuser. -
Create a superuser:
python manage.py createsuperuser(venv) Kihyucks-Air:django_tutorial kihyuckhong$ python manage.py createsuperuser ... Username (leave blank to use 'kihyuckhong'): superuser Email address: kihyuck.hong@gmail.com Password: Password (again): Superuser created successfully.
-
Run the main program:
python manage.py runserver(venv) Kihyucks-Air:django_tutorial kihyuckhong$ python manage.py runserver ... Django version 2.1, using settings 'mysite.settings' Starting development server at http://127.0.0.1:8000/ Quit the server with CONTROL-C.
-
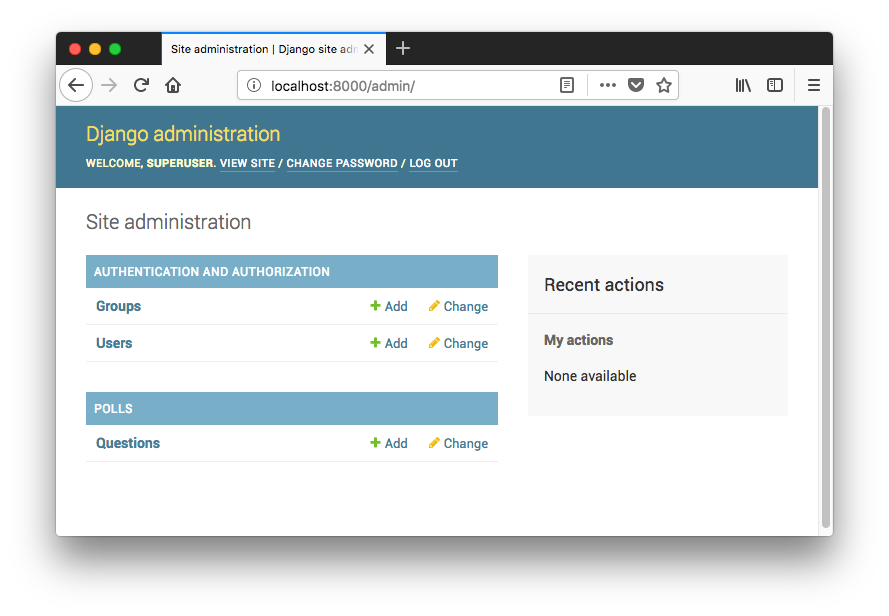
In the browser, go to http://localhost:8000/admin.
-
Log in to the admin site using the username and password we created when we ran
createsuperuser.
- GCP: Creating an Instance
- GCP: gcloud compute command-line tool
- GCP: Deploying Containers
- GCP: Kubernetes Quickstart
- GCP: Deploying a containerized web application via Kubernetes
- GCP: Django Deploy via Kubernetes I (local)
- GCP: Django Deploy via Kubernetes II (GKE)
On a Postgres client:
The proxy requires a service account with Editor privileges for our Cloud SQL instance. For more information about service accounts, see the GCP Auth Guide.
Now, we want to set environment variables for database access for local testing:
export DATABASE_USER=<your-database-user>
export DATABASE_PASSWORD=<your-database-password>
kihyuck_hong@cloudshell:~ (django-poll-app-216501)$ export DATABASE_USER=khong
kihyuck_hong@cloudshell:~ (django-poll-app-216501)$ export DATABASE_PASSWORD=postgres
(venv) kihyuck_hong@cloudshell:~/python-docs-samples/container_engine/django_tutorial (django-poll-app-216501)
$ curl http://localhost
:8000

Hello, world. You're at the polls index.
We should see a simple webpage with the following text: "Hello, world. You're at the polls index." The sample app pages are delivered by the Django web server running on our computer. When we're ready to move forward, press Ctrl+C to stop the local web server.
The code for the Django sample app is in the GCP Python Samples repository on GitHub.
Clone the repository to our local machine:
~/Documents/Django/Kubernetes$ git clone https://github.com/GoogleCloudPlatform/python-docs-samples.git
Go to the directory that contains the sample code:
~/Documents/Django/Kubernetes$ cd python-docs-samples/container_engine/django_tutorial

Kihyucks-Air:django_tutorial kihyuckhong$
Alternatively, we can download the sample as a zip and extract it.
When deployed, our application uses the Cloud SQL Proxy that is built in to the App Engine environment to communicate with our Cloud SQL instance.
The Cloud SQL Proxy works by having a local client, called the proxy, running in the local environment. Our application communicates with the proxy with the standard database protocol used by our database. The proxy uses a secure tunnel to communicate with its companion process running on the server.

However, to test our application locally, we must install and use a local copy of the Cloud SQL Proxy in our development environment.
Learn more about the Cloud SQL Proxy.
To perform basic administrative tasks on our Cloud SQL instance, we can use the PostgreSQL Client.
Download and install the Cloud SQL Proxy. The Cloud SQL Proxy is used to connect to our Cloud SQL instance when running locally.
We can install the proxy anywhere in your local environment. The location of the proxy binaries does not impact where it listens for data from your application.
For Mac 64-BIT:
In this section, we just want to install Postgres.
We've already created the service account in the earlier section
Now, we want to set environment variables for database access for local testing on Mac:
export DATABASE_USER=<your-database-user>
export DATABASE_PASSWORD=<your-database-password>
Kihyucks-Air:Kubernetes kihyuckhong$ export DATABASE_USER=khong
Kihyucks-Air:Kubernetes kihyuckhong$ export DATABASE_PASSWORD=postgres
We should see a simple webpage with the following text: "Hello, world. You're at the polls index." The sample app pages are delivered by the Django web server running on our computer. When we're ready to move forward, press Ctrl+C to stop the local web server.
GCP (Google Cloud Platform)
Ph.D. / Golden Gate Ave, San Francisco / Seoul National Univ / Carnegie Mellon / UC Berkeley / DevOps / Deep Learning / Visualization