Docker & Kubernetes : Setting up Ingress with NGINX Controller on Minikube (Mac)
On a Mac, we cannot use the NodePort service directly because of the way Docker networking is implemented. Instead, we must use the Minikube tunnel.
To use the Minikube tunnel, simply run the following command:
minikube service <service-name>
Ingress is a Kubernetes API object designed to control and manage external network traffic to services within a Kubernetes cluster. It functions as a set of routing rules, allowing us to define how external users can access services hosted in a Kubernetes cluster. In other words, Ingress acts as a traffic manager, determining how requests from the outside world should be directed to specific services (based on hostnames, paths, etc.) within the cluster.
Ingress resources are typically defined in YAML files and applied to the cluster using kubectl apply.
Ingress resources themselves do not specify the implementation details of how the routing rules should be enforced.
They define the rules, but the actual routing and load balancing are implemented by Ingress Controllers.
An Ingress Controller is a component responsible for implementing the rules defined in Ingress resources. It is the part of the Kubernetes infrastructure that enforces the routing and load balancing rules.
The following diagram shows how we can access using the Kubernetes service:
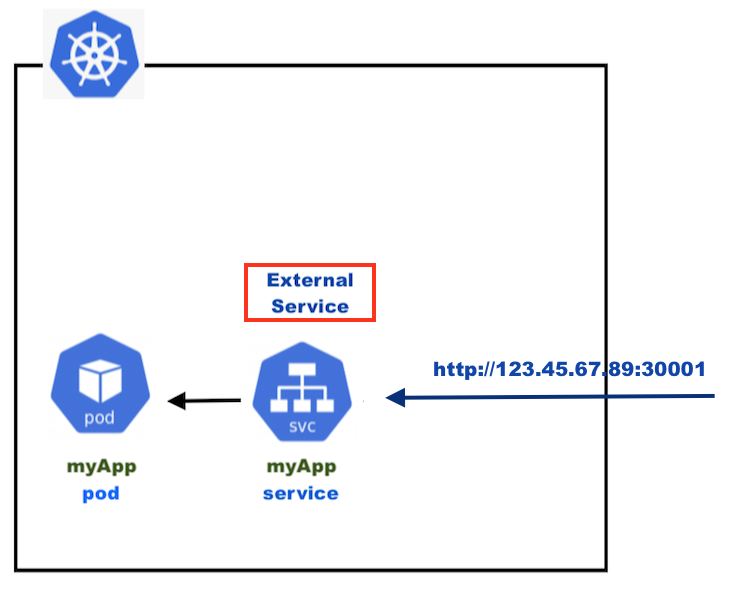
As we can see, we use http://node-ip:port but what we want is to access our pod via https://myApp. This is where the Ingress comes into the picture:
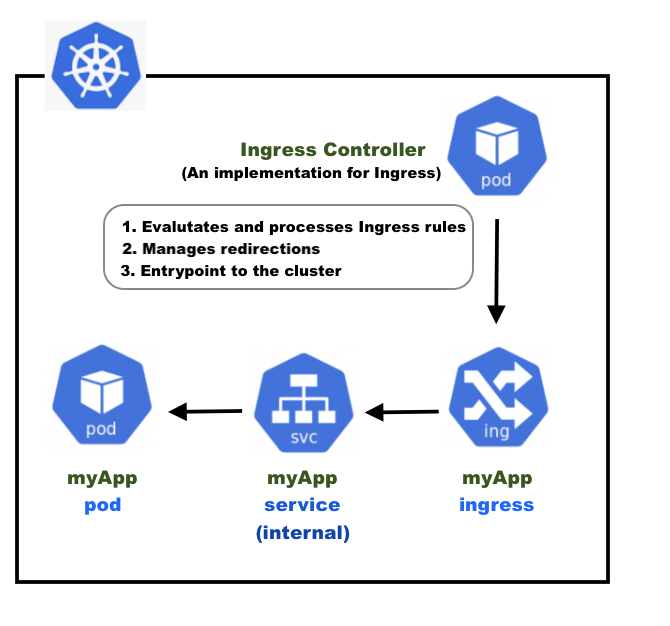
The Ingress exposes HTTP and HTTPS routes from outside the cluster to services within the cluster. Traffic routing is controlled by rules defined on the Ingress resource. An Ingress may be configured to give Services externally-reachable URLs, load balance traffic, terminate SSL / TLS, and offer name-based virtual hosting.
For more details on Ingress, please check out Kubernetes Documentation/ Concepts/ Services, Load Balancing, and Networking/ Ingress.
The Ingress controller is responsible for fulfilling the Ingress, usually with a load balancer, though it may also configure our edge router or additional frontends to help handle the traffic:
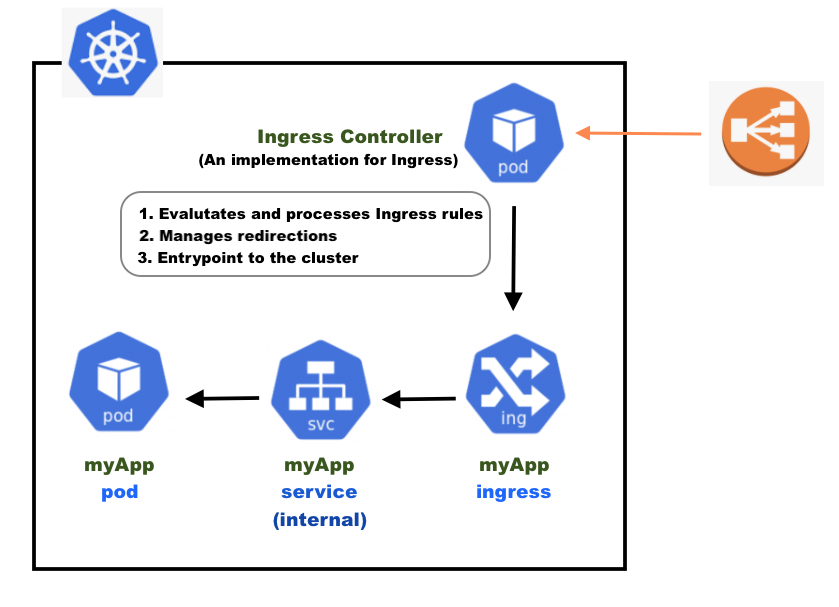
If we use a Cloud provider's load balancer, we don't have to implement it by ourselves.
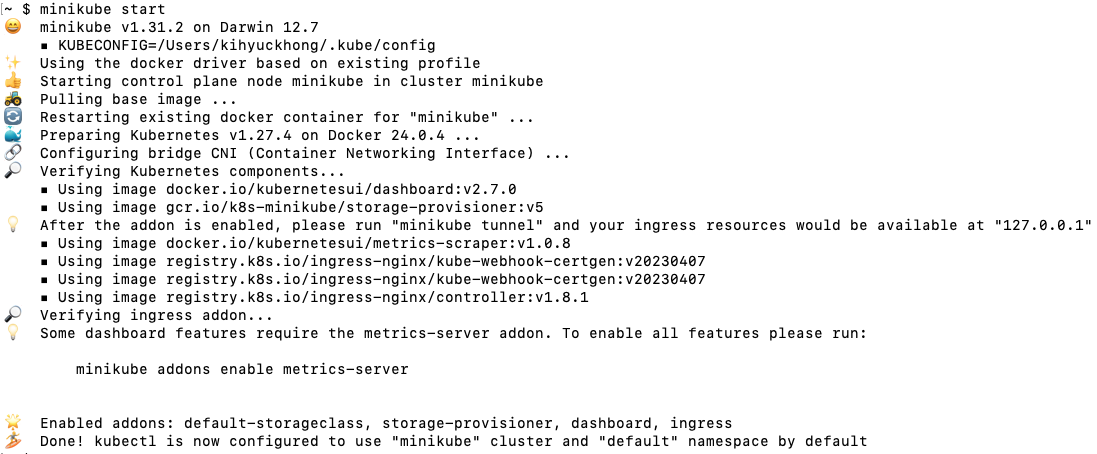
We'll use Minikube which runs a single-node (or multi-node with minikube 1.10.1 or higher) Kubernetes cluster inside a VM on our laptop:
$ kubectl config current-context
minikube
The Ingress Controller is created when we run the minikube addons enable ingress. It creates an ingress-nginx-controller pod in the "ingress-nginx" namespace.
$ minikube addons enable ingress
ingress was successfully enabled

$ kubectl get pods -A
NAMESPACE              NAME                                         READY   STATUS      RESTARTS        AGE
default                web-548f6458b5-598j8                         1/1     Running     2 (142m ago)    23h
ingress-nginx          ingress-nginx-admission-create-8x4bq         0/1     Completed   0               2d
ingress-nginx          ingress-nginx-admission-patch-ccdhn          0/1     Completed   1               2d
ingress-nginx          ingress-nginx-controller-7799c6795f-l8gw4    1/1     Running     10 (142m ago)   2d
...
Create a Deployment using the following command:
$ kubectl create deployment web --image=gcr.io/google-samples/hello-app:1.0
deployment.apps/web created
Expose the Deployment:
$ kubectl expose deployment web --type=NodePort --port=8080
service/web exposed
$ kubectl get pods
NAME                   READY   STATUS    RESTARTS   AGE
web-548f6458b5-mgtqj   1/1     Running   0          63s

$ kubectl get svc
NAME         TYPE        CLUSTER-IP      EXTERNAL-IP   PORT(S)          AGE
kubernetes   ClusterIP   10.96.0.1       <none>        443/TCP          5d16h
web          NodePort    10.108.236.35   <none>        8080:31041/TCP   41s
$ minikube service web --url
http://127.0.0.1:53995
❗  Because you are using a Docker driver on darwin, the terminal needs to be open to run it.
The minikube service command starts a tunnel from our local machine to the minikube VM.
This tunnel allows us to access services running on minikube from our local machine.
The output http://127.0.0.1:53995 means that we can access the "web" service running on minikube on mac by visiting http://localhost:53995 in our web browser.
$ curl http://localhost:53995/
Hello, world!
Version: 1.0.0
Hostname: web-548f6458b5-mgtqj
Summary:
When we run the minikube service web --url command in Minikube, it opens a local port forwarding tunnel
that maps a specific port on our local machine to the NodePort service running in our Minikube cluster.
The generated URL, like http://127.0.0.1:53995, is the URL we can use to access our service.
Here's how it works:
minikube service web --urlcommand detects the service name ("web") and its associated NodePort service in our Minikube cluster.- Minikube automatically sets up a port forwarding tunnel that listens on a random available port on our local machine (in this case, 53995).
- It routes traffic from our local machine's port (53995) to the NodePort of the "web" service in our Minikube cluster (31041).
- We can access our service using the URL http://127.0.0.1:53995. When we access this URL, the request is forwarded through the port forwarding tunnel to the NodePort service, and we receive a response as if we were accessing the service directly.
This allows us to access services running inside our Minikube cluster as if they were running locally on our Mac. It's a convenient way to access and test services without dealing with manual port mappings or exposing services externally, and it works for NodePort services as well as services of other types.
The following manifest (example-ingress.yaml) defines an Ingress that sends traffic to our Service via hello-world.info.
apiVersion: networking.k8s.io/v1
kind: Ingress
metadata:
  name: example-ingress
  annotations:
    nginx.ingress.kubernetes.io/rewrite-target: /$1
spec:
  rules:
    - host: hello-world.info
      http:
        paths:
          - path: /
            pathType: Prefix
            backend:
              service:
                name: web
                port:
                  number: 8080
Create the Ingress object by running the following command:
$ kubectl apply -f example-ingress.yaml
ingress.networking.k8s.io/example-ingress created

$ kubectl get ingress
NAME              CLASS   HOSTS              ADDRESS   PORTS   AGE
example-ingress   nginx   hello-world.info             80      19s
Let's access the "web" service through the Ingress named "example-ingress" using the Minikube tunnel. Start the Minikube tunnel in a separate terminal window or tab. The tunnel helps us to route traffic to services exposed via NodePort:

We should now be able to access the "web" service through the Ingress using the specified host name. We can do this by opening a web browser or using curl as follows:
$ curl -H "Host: hello-world.info" http://localhost
Hello, world!
Version: 1.0.0
Hostname: web-548f6458b5-mgtqj
When we use curl -H "Host: hello-world.info" http://localhost,
we're setting the Host header to hello-world.info. This matches the hostname configured in our Ingress resource.
As a result, the Ingress routes the request to our "web" service, which responds with "Hello, world!" along with version and hostname information.
This behavior is expected when the hostname in the Host header matches the Ingress configuration.
Or we can use the following:
$ curl --resolve "hello-world.info:80:127.0.0.1" -i http://hello-world.info
HTTP/1.1 200 OK
Date: Fri, 03 Nov 2023 23:02:19 GMT
Content-Type: text/plain; charset=utf-8
Content-Length: 60
Connection: keep-alive

Hello, world!
Version: 1.0.0
Hostname: web-548f6458b5-mgtqj
The --resolve flag is telling curl to resolve the hostname "hello-world.info" to the IP address "127.0.0.1" on port 80 and the -i
option tells curl to include the HTTP response headers in the output.
Currently, we have a deployment called "web":
$ kubectl get deployment
NAME   READY   UP-TO-DATE   AVAILABLE   AGE
web    1/1     1            1           128m
Now, we want to create another Deployment using the following command:
$ kubectl create deployment web2 --image=gcr.io/google-samples/hello-app:2.0
deployment.apps/web2 created

$ kubectl get pod -A
NAMESPACE              NAME                                         READY   STATUS      RESTARTS         AGE
default                web-548f6458b5-mgtqj                         1/1     Running     0                134m
default                web2-65959ff6d4-5rd9j                        1/1     Running     0                80s
Expose the second Deployment:
$ kubectl expose deployment web2 --port=8080 --type=NodePort
service/web2 exposed
Modify the existing example-ingress.yaml manifest, and the following is the new manifest:
apiVersion: networking.k8s.io/v1
kind: Ingress
metadata:
  name: example-ingress
  annotations:
    nginx.ingress.kubernetes.io/rewrite-target: /$1
spec:
  rules:
    - host: hello-world.info
      http:
        paths:
          - path: /
            pathType: Prefix
            backend:
              service:
                name: web
                port:
                  number: 8080
          - path: /v2
            pathType: Prefix
            backend:
              service:
                name: web2
                port:
                  number: 8080
Apply the changes:
$ kubectl apply -f example-ingress.yaml
ingress.networking.k8s.io/example-ingress configured
Let's modify our service (e2e-service.yaml) to make it work with Ingress:
$ curl -H "Host: hello-world.info" http://localhost
Hello, world!
Version: 1.0.0
Hostname: web-548f6458b5-mgtqj

$ curl -H "Host: hello-world.info" http://localhost/v2
Hello, world!
Version: 2.0.0
Hostname: web2-65959ff6d4-5rd9j
Note: we can also add a line to /etc/hosts:
127.0.0.1 hello-world.info
127.0.0.1 hello-world.info/v2
Then, we can access the "web" and "web2" like the following:
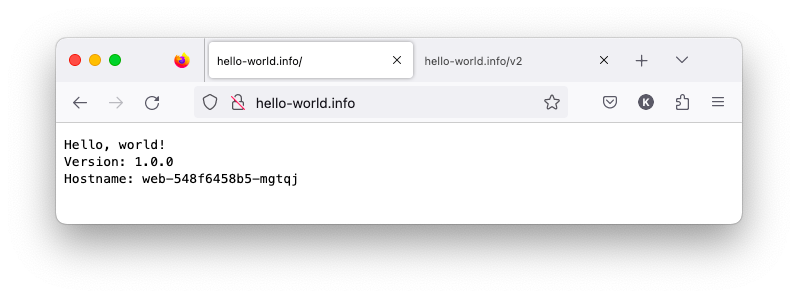
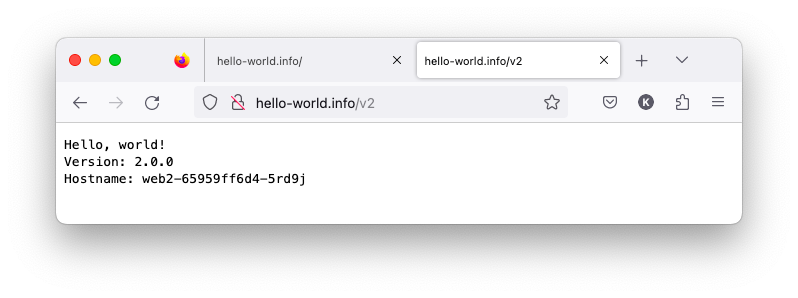
As we can see modifying the /etc/hosts file allows us to associate custom hostnames with our local machine's IP address, making it easier to access local development websites without specifying the Host header in every request. This method is useful for local development and testing purposes.
Also, note that the minikube tunnel is doing all port forwarding for us.
So, we need to keep the command running in another terminal!
Additionally, please be aware that the minikube tunnel command is handling all the necessary port forwarding for us.
To ensure this functionality remains active, we should keep the minikube tunnel command running in a separate terminal window.
To access Kubernetes dashboard on manikube, we can just issue a minikube dashboard command which is a convenient command
provided by Minikube that simplifies the process of accessing the Kubernetes dashboard.
It sets up the required port forwarding, and opens the dashboard in our web browser, all in one go.
Actually, it opens a tunnel from our local machine to the Minikube cluster, allowing us to access the dashboard as if it were running locally.
It keeps the port forwarding tunnel active, ensuring we can continue to access the dashboard until we manually terminate it.
We can use "nginx ingress" for the minikube dashboard and here is how.
dashboard-ingress.yaml:
apiVersion: networking.k8s.io/v1
kind: Ingress
metadata:
  name: dashboard-ingress
  namespace: kubernetes-dashboard
spec:
  rules:
  - host: minikube.dashboard.info
    http:
      paths:
        - pathType: Prefix
          path: "/"
          backend:
            service:
              name: kubernetes-dashboard
              port:
                number: 80
Create the ingress object:
$ kubectl apply -f dashboard-ingress.yaml
ingress.networking.k8s.io/dashboard-ingress created
Add "127.0.0.1 minikube.dashboard.info" to /etc/hosts file.
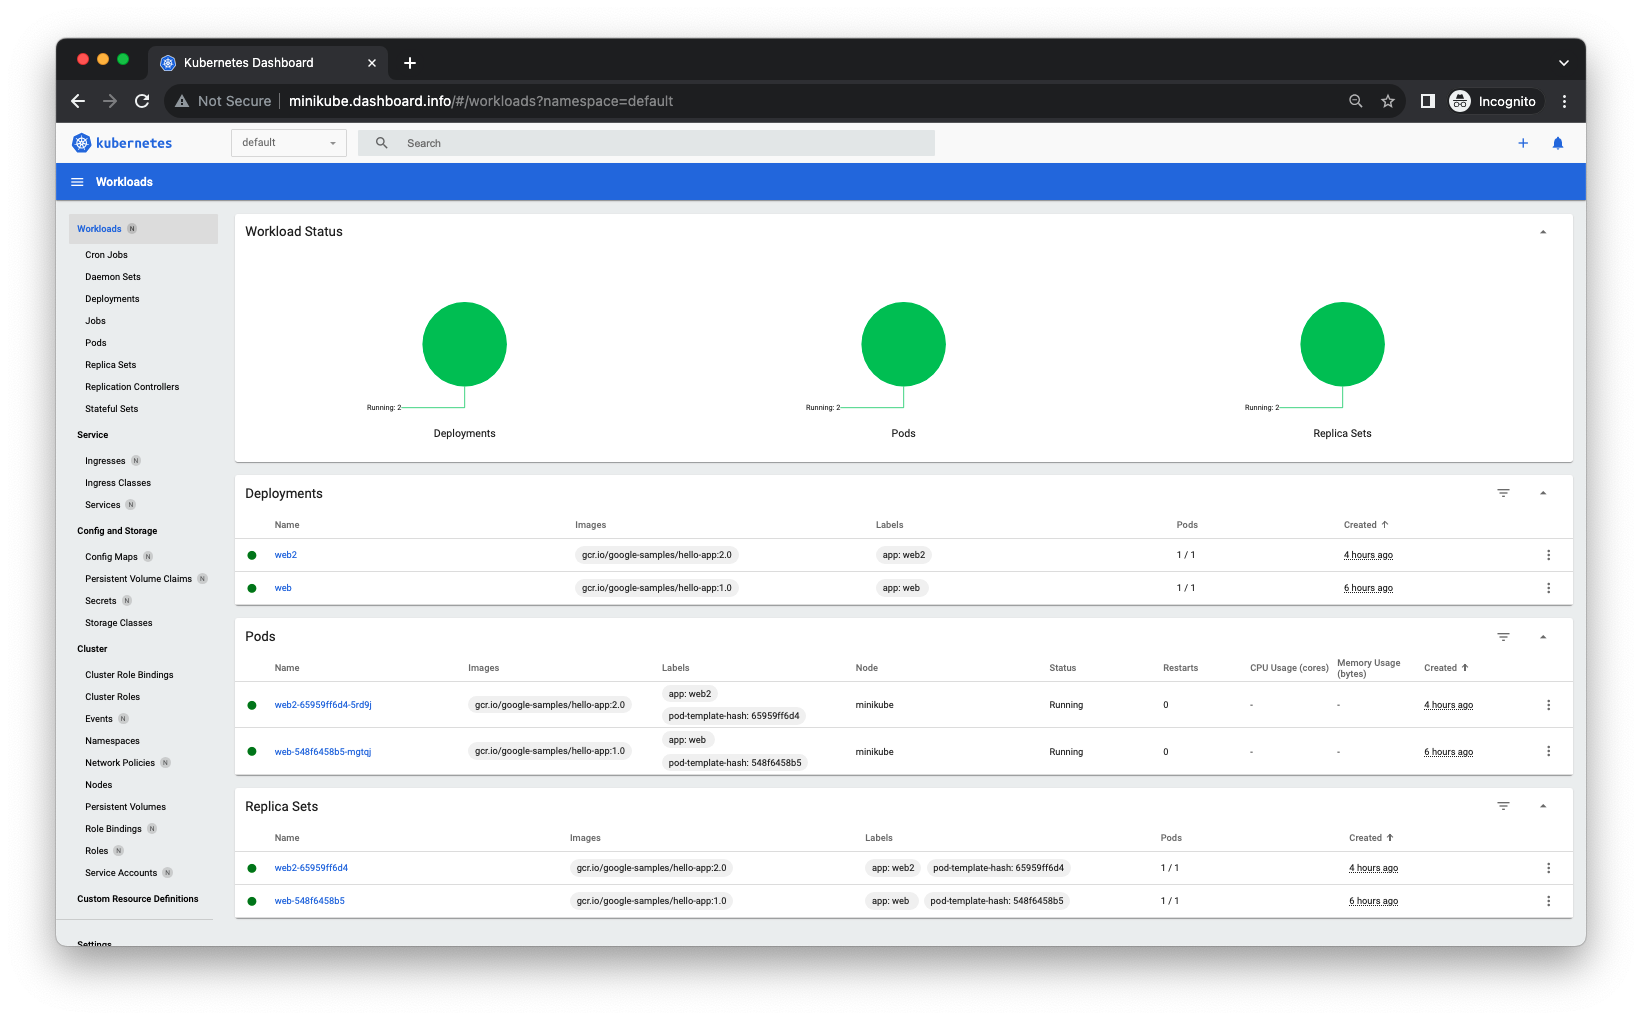
Now, we can access the dashboard via minikube.dashboard.info:
Refs Set up Ingress on Minikube with the NGINX Ingress Controller.
Docker & K8s
- Docker install on Amazon Linux AMI
- Docker install on EC2 Ubuntu 14.04
- Docker container vs Virtual Machine
- Docker install on Ubuntu 14.04
- Docker Hello World Application
- Nginx image - share/copy files, Dockerfile
- Working with Docker images : brief introduction
- Docker image and container via docker commands (search, pull, run, ps, restart, attach, and rm)
- More on docker run command (docker run -it, docker run --rm, etc.)
- Docker Networks - Bridge Driver Network
- Docker Persistent Storage
- File sharing between host and container (docker run -d -p -v)
- Linking containers and volume for datastore
- Dockerfile - Build Docker images automatically I - FROM, MAINTAINER, and build context
- Dockerfile - Build Docker images automatically II - revisiting FROM, MAINTAINER, build context, and caching
- Dockerfile - Build Docker images automatically III - RUN
- Dockerfile - Build Docker images automatically IV - CMD
- Dockerfile - Build Docker images automatically V - WORKDIR, ENV, ADD, and ENTRYPOINT
- Docker - Apache Tomcat
- Docker - NodeJS
- Docker - NodeJS with hostname
- Docker Compose - NodeJS with MongoDB
- Docker - Prometheus and Grafana with Docker-compose
- Docker - StatsD/Graphite/Grafana
- Docker - Deploying a Java EE JBoss/WildFly Application on AWS Elastic Beanstalk Using Docker Containers
- Docker : NodeJS with GCP Kubernetes Engine
- Docker : Jenkins Multibranch Pipeline with Jenkinsfile and Github
- Docker : Jenkins Master and Slave
- Docker - ELK : ElasticSearch, Logstash, and Kibana
- Docker - ELK 7.6 : Elasticsearch on Centos 7
- Docker - ELK 7.6 : Filebeat on Centos 7
- Docker - ELK 7.6 : Logstash on Centos 7
- Docker - ELK 7.6 : Kibana on Centos 7
- Docker - ELK 7.6 : Elastic Stack with Docker Compose
- Docker - Deploy Elastic Cloud on Kubernetes (ECK) via Elasticsearch operator on minikube
- Docker - Deploy Elastic Stack via Helm on minikube
- Docker Compose - A gentle introduction with WordPress
- Docker Compose - MySQL
- MEAN Stack app on Docker containers : micro services
- MEAN Stack app on Docker containers : micro services via docker-compose
- Docker Compose - Hashicorp's Vault and Consul Part A (install vault, unsealing, static secrets, and policies)
- Docker Compose - Hashicorp's Vault and Consul Part B (EaaS, dynamic secrets, leases, and revocation)
- Docker Compose - Hashicorp's Vault and Consul Part C (Consul)
- Docker Compose with two containers - Flask REST API service container and an Apache server container
- Docker compose : Nginx reverse proxy with multiple containers
- Docker & Kubernetes : Envoy - Getting started
- Docker & Kubernetes : Envoy - Front Proxy
- Docker & Kubernetes : Ambassador - Envoy API Gateway on Kubernetes
- Docker Packer
- Docker Cheat Sheet
- Docker Q & A #1
- Kubernetes Q & A - Part I
- Kubernetes Q & A - Part II
- Docker - Run a React app in a docker
- Docker - Run a React app in a docker II (snapshot app with nginx)
- Docker - NodeJS and MySQL app with React in a docker
- Docker - Step by Step NodeJS and MySQL app with React - I
- Installing LAMP via puppet on Docker
- Docker install via Puppet
- Nginx Docker install via Ansible
- Apache Hadoop CDH 5.8 Install with QuickStarts Docker
- Docker - Deploying Flask app to ECS
- Docker Compose - Deploying WordPress to AWS
- Docker - WordPress Deploy to ECS with Docker-Compose (ECS-CLI EC2 type)
- Docker - WordPress Deploy to ECS with Docker-Compose (ECS-CLI Fargate type)
- Docker - ECS Fargate
- Docker - AWS ECS service discovery with Flask and Redis
- Docker & Kubernetes : minikube
- Docker & Kubernetes 2 : minikube Django with Postgres - persistent volume
- Docker & Kubernetes 3 : minikube Django with Redis and Celery
- Docker & Kubernetes 4 : Django with RDS via AWS Kops
- Docker & Kubernetes : Kops on AWS
- Docker & Kubernetes : Ingress controller on AWS with Kops
- Docker & Kubernetes : HashiCorp's Vault and Consul on minikube
- Docker & Kubernetes : HashiCorp's Vault and Consul - Auto-unseal using Transit Secrets Engine
- Docker & Kubernetes : Persistent Volumes & Persistent Volumes Claims - hostPath and annotations
- Docker & Kubernetes : Persistent Volumes - Dynamic volume provisioning
- Docker & Kubernetes : DaemonSet
- Docker & Kubernetes : Secrets
- Docker & Kubernetes : kubectl command
- Docker & Kubernetes : Assign a Kubernetes Pod to a particular node in a Kubernetes cluster
- Docker & Kubernetes : Configure a Pod to Use a ConfigMap
- AWS : EKS (Elastic Container Service for Kubernetes)
- Docker & Kubernetes : Run a React app in a minikube
- Docker & Kubernetes : Minikube install on AWS EC2
- Docker & Kubernetes : Cassandra with a StatefulSet
- Docker & Kubernetes : Terraform and AWS EKS
- Docker & Kubernetes : Pods and Service definitions
- Docker & Kubernetes : Service IP and the Service Type
- Docker & Kubernetes : Kubernetes DNS with Pods and Services
- Docker & Kubernetes : Headless service and discovering pods
- Docker & Kubernetes : Scaling and Updating application
- Docker & Kubernetes : Horizontal pod autoscaler on minikubes
- Docker & Kubernetes : From a monolithic app to micro services on GCP Kubernetes
- Docker & Kubernetes : Rolling updates
- Docker & Kubernetes : Deployments to GKE (Rolling update, Canary and Blue-green deployments)
- Docker & Kubernetes : Slack Chat Bot with NodeJS on GCP Kubernetes
- Docker & Kubernetes : Continuous Delivery with Jenkins Multibranch Pipeline for Dev, Canary, and Production Environments on GCP Kubernetes
- Docker & Kubernetes : NodePort vs LoadBalancer vs Ingress
- Docker & Kubernetes : MongoDB / MongoExpress on Minikube
- Docker & Kubernetes : Load Testing with Locust on GCP Kubernetes
- Docker & Kubernetes : MongoDB with StatefulSets on GCP Kubernetes Engine
- Docker & Kubernetes : Nginx Ingress Controller on Minikube
- Docker & Kubernetes : Setting up Ingress with NGINX Controller on Minikube (Mac)
- Docker & Kubernetes : Nginx Ingress Controller for Dashboard service on Minikube
- Docker & Kubernetes : Nginx Ingress Controller on GCP Kubernetes
- Docker & Kubernetes : Kubernetes Ingress with AWS ALB Ingress Controller in EKS
- Docker & Kubernetes : Setting up a private cluster on GCP Kubernetes
- Docker & Kubernetes : Kubernetes Namespaces (default, kube-public, kube-system) and switching namespaces (kubens)
- Docker & Kubernetes : StatefulSets on minikube
- Docker & Kubernetes : RBAC
- Docker & Kubernetes Service Account, RBAC, and IAM
- Docker & Kubernetes - Kubernetes Service Account, RBAC, IAM with EKS ALB, Part 1
- Docker & Kubernetes : Helm Chart
- Docker & Kubernetes : My first Helm deploy
- Docker & Kubernetes : Readiness and Liveness Probes
- Docker & Kubernetes : Helm chart repository with Github pages
- Docker & Kubernetes : Deploying WordPress and MariaDB with Ingress to Minikube using Helm Chart
- Docker & Kubernetes : Deploying WordPress and MariaDB to AWS using Helm 2 Chart
- Docker & Kubernetes : Deploying WordPress and MariaDB to AWS using Helm 3 Chart
- Docker & Kubernetes : Helm Chart for Node/Express and MySQL with Ingress
- Docker & Kubernetes : Deploy Prometheus and Grafana using Helm and Prometheus Operator - Monitoring Kubernetes node resources out of the box
- Docker & Kubernetes : Deploy Prometheus and Grafana using kube-prometheus-stack Helm Chart
- Docker & Kubernetes : Istio (service mesh) sidecar proxy on GCP Kubernetes
- Docker & Kubernetes : Istio on EKS
- Docker & Kubernetes : Istio on Minikube with AWS EC2 for Bookinfo Application
- Docker & Kubernetes : Deploying .NET Core app to Kubernetes Engine and configuring its traffic managed by Istio (Part I)
- Docker & Kubernetes : Deploying .NET Core app to Kubernetes Engine and configuring its traffic managed by Istio (Part II - Prometheus, Grafana, pin a service, split traffic, and inject faults)
- Docker & Kubernetes : Helm Package Manager with MySQL on GCP Kubernetes Engine
- Docker & Kubernetes : Deploying Memcached on Kubernetes Engine
- Docker & Kubernetes : EKS Control Plane (API server) Metrics with Prometheus
- Docker & Kubernetes : Spinnaker on EKS with Halyard
- Docker & Kubernetes : Continuous Delivery Pipelines with Spinnaker and Kubernetes Engine
- Docker & Kubernetes : Multi-node Local Kubernetes cluster : Kubeadm-dind (docker-in-docker)
- Docker & Kubernetes : Multi-node Local Kubernetes cluster : Kubeadm-kind (k8s-in-docker)
- Docker & Kubernetes : nodeSelector, nodeAffinity, taints/tolerations, pod affinity and anti-affinity - Assigning Pods to Nodes
- Docker & Kubernetes : Jenkins-X on EKS
- Docker & Kubernetes : ArgoCD App of Apps with Heml on Kubernetes
- Docker & Kubernetes : ArgoCD on Kubernetes cluster
- Docker & Kubernetes : GitOps with ArgoCD for Continuous Delivery to Kubernetes clusters (minikube) - guestbook
Ph.D. / Golden Gate Ave, San Francisco / Seoul National Univ / Carnegie Mellon / UC Berkeley / DevOps / Deep Learning / Visualization