Terraform Tutorial - AWS ECS using Fargate : Part I
In this blog (Part I), we first deploy our app to ECS using Fargate and then we will deploy it via Terraform (later in Part II).
Let's create a folder Home and make our flask app, home.py:
# home.py
from flask import Flask
app = Flask(__name__)

@app.route("/")
def home():
    return "Flask 1.0.2 Home page"

if __name__ == '__main__':
    app.run(threaded=True,host='0.0.0.0',port=5000)
And requirements.txt:
Flask==1.0.2
Here is our Dockerfile in Home folder:
FROM ubuntu:18.04
RUN apt-get update -y
RUN apt-get install -y python-pip python-dev build-essential
COPY . /app
WORKDIR /app
RUN pip install -r requirements.txt
ENTRYPOINT ["python"]
CMD ["home.py"]
Let's build an image and run the container:
$ docker build -t bogo-home-image .

$ docker run -d -p 80:5000 bogo-home-image
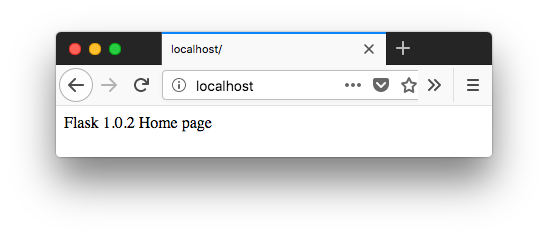
Go to our browser and see the app:
Let's create a repository in ECR to push our image:
$ aws ecr create-repository --repository-name ecs-flask/home
{
    "repository": {
        "repositoryArn": "arn:aws:ecr:us-east-1:526262051452:repository/ecs-flask/home",
        "registryId": "526262051452",
        "repositoryName": "ecs-flask/home",
        "repositoryUri": "526262051452.dkr.ecr.us-east-1.amazonaws.com/ecs-flask/home",
        "createdAt": 1540676427.0
    }
}
Let's push the images. First, we retrieve docker login output by using the command below. This will show a long command that will help us login to the registry:
$ aws ecr get-login --region us-east-1 --no-include-email
Then run docker login command:
$ docker login -u AWS -p eyJwYXlsb2FkIjoiOC9BNmg3ckVPVm5UakVvSGtTVlhzT3ZQZTYzTmwxSkNGRTV6YjJ4ZjFPNFRHdFdsd0NFYk1sdTk0eWNYa1AzanlJYzNXTi9QY0xJUEZKZFhyOU1WR2lNejQvT0ZRV0UyUHRSbjJKcTRRbFoxZkZrOFVSUkh5TWFHaUwvNU9CS2dNQ0kvZk1hVlovbCtCelEvZEpCRlhaVHE3cDB4bXNsLzJPYUxjRGlDUWZOcU9tV1RDNGZacVlwYVZ6a1dFZnA1ZWhGdmVPTjlDWXZkREFONEthZHZqNHhNTGJUeUdZc2RxUkMzTU1rcEt1MjVEbjU4ZVZ4RWdJY2lFK042Tk04KzVwNVh4cWNqdHE3YS9jUWtxczhrSWpjUTNGYSsvbXorWTM4dlQ3THVvMGxQWGxUSWFaYTRPaDljRkVBWWV2ZW15aFFJcmRvaTMvclZQalowclhWTFRnM2F6SzBQR0tiV1dLWmhLS0JqNlV6T2NPSG1IVnRkbEI1dzd6c3REcFRrVXNXd0tsSEF4am1PQ2tDWWN1R2NlT3pwZWlxNnR6QXZveDhrbms4Q1djdnU3ZS83MTYxZjRqQ3ZFL2p4ZWFVTGVPenR4NmVWcWpwS09JRlRBdWNGUW5zZjNPRWN2Y0c5K3llejVSZEtHUk5JYXpJNTJEeHpER0VUcFRVL293Z3QxcGdPSWgrRGdLbDJ3bWpTdldQVTlkSDNycmFMNDR2UDZzcmFZVlNDUlA2OW5Iajh6WXlORCt6NnZkYjQ5UGVTaXRvaWd2VTZOTFUyUGs1d2Ricm01TXBoNDB6RzdvMitCRnZpc3hJeDZmcUNQN2FSQWNaSyttajR6V2ltNU9icFc4OHZHK1NvZFRueklFamV6UDZJOHl6YzVTMVVHNnFnR2k5V28rQ0xBVHUyOXFRWDZPWGVpSGo1NHhibEZvazMvN2UvWUlYSFl3eUdJTWdQekFsYkxSQ3VFaW1JV2Z2Tll2cTdvNFVTdWUrUG9tTnRpV1JRVHZKK0t5b1d3WnNYSjd6clNHOXlNbTJIc3dBeW4wK1FXbDhZQzZmM1RUNU9DVDBRK2RVQ3JDRTNrekNmZk5OZ2tKUlhpRDMwWWtNQ1I4R3JKNmpWZlJ1VWpnZmRPQUdrNCtOVlpqS3lQOHIxLzFPNDN1blJWMGRlVld1ZHo0SURWbWExUDVvRVdvT0UrVjJ3bTRTMDd3dmhCSUNad2hXWmNZNUtPYmR5RFVYd00wei90dHI1R3R1VTdCc2lHcUI5akx0SzcvaDFRRUV0N256a01LeVdiTFFtK3o2RjF4ZDNCWVp6NDMwaWNhT2FaN25EaTNDbG4yUEtkVmt3QWpQTHhqaUdTMjdCWkkwdVQwRVJuRmIyazVyb2lZMnZrcnIwd1Y5dFpZRFBCM0I5d1NoL2pWUncvaFNxcFB4T29ETStjUXZualhNU2RyczVZRDRSdHVjNXUyMzh5TjROYjN6N0N6ZFpzNnJQTWc9PSIsImRhdGFrZXkiOiJBUUVCQUhod20wWWFJU0plUnRKbTVuMUc2dXFlZWtYdW9YWFBlNVVGY2U5UnE4LzE0d0FBQUg0d2ZBWUpLb1pJaHZjTkFRY0dvRzh3YlFJQkFEQm9CZ2txaGtpRzl3MEJCd0V3SGdZSllJWklBV1VEQkFFdU1CRUVERGVnMFQ3aWhFVEt4V1lhQ2dJQkVJQTc2TWFvbVg4ZWZxZWthL1pzRU1SaGF5bGRmNGI5STF1WUNoWVBSVWNnNFpkc3NZNFczN3dXYWxFR2pWWlpuM1p2NjMwd1c2b2JMMWtDOHdVPSIsInZlcnNpb24iOiIyIiwidHlwZSI6IkRBVEFfS0VZIiwiZXhwaXJhdGlvbiI6MTU0MDcyMTY2OX0= https://526262051452.dkr.ecr.us-east-1.amazonaws.com
WARNING! Using --password via the CLI is insecure. Use --password-stdin.
WARNING! Your password will be stored unencrypted in /Users/kihyuckhong/.docker/config.json.
Configure a credential helper to remove this warning. See
https://docs.docker.com/engine/reference/commandline/login/#credentials-store

Login Succeeded
Tag our image using docker tag command to:
$ docker tag bogo-home-image:latest 526262051452.dkr.ecr.us-east-1.amazonaws.com/ecs-flask/home:latest

$ docker images
REPOSITORY                                                    TAG     IMAGE ID      CREATED             SIZE
526262051452.dkr.ecr.us-east-1.amazonaws.com/ecs-flask/home   latest  a968f3603373  About an hour ago   453MB
Then, finally we can push the image to ECR:
$ docker push 526262051452.dkr.ecr.us-east-1.amazonaws.com/ecs-flask/home
The push refers to repository [526262051452.dkr.ecr.us-east-1.amazonaws.com/ecs-flask/home]
274c0ee0ed20: Pushed
729ca13aabc8: Pushed
164f34e676a7: Pushed
56653e708c2c: Pushed
76c033092e10: Pushed
2146d867acf3: Pushed
ae1f631f14b7: Pushed
102645f1cf72: Pushed
latest: digest: sha256:dd6c3ef0f89511c67bd61bdb91c46282d52895e7abff6339e379333225ceac79 size: 1993
Now let's create our tasks and services. Go to the ECS console. Click on "Get Started" which should be right in the middle of the page. If we already have clusters within ECS then it will be in grey next to "Create Cluster."
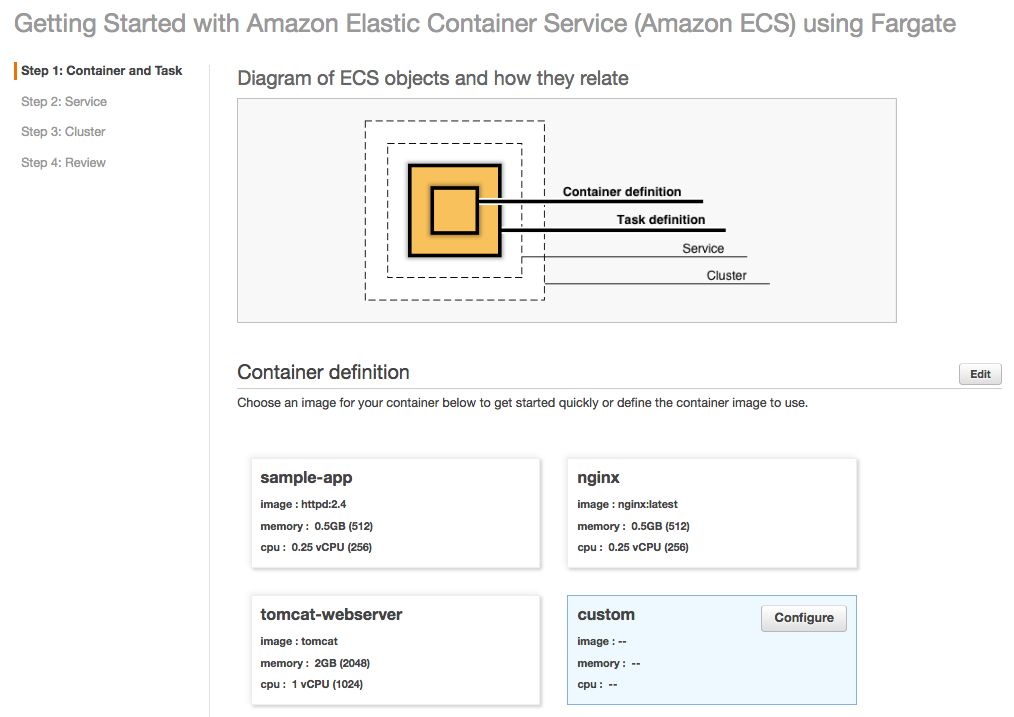
Our Flask app is a small web app that listens on port 5000.
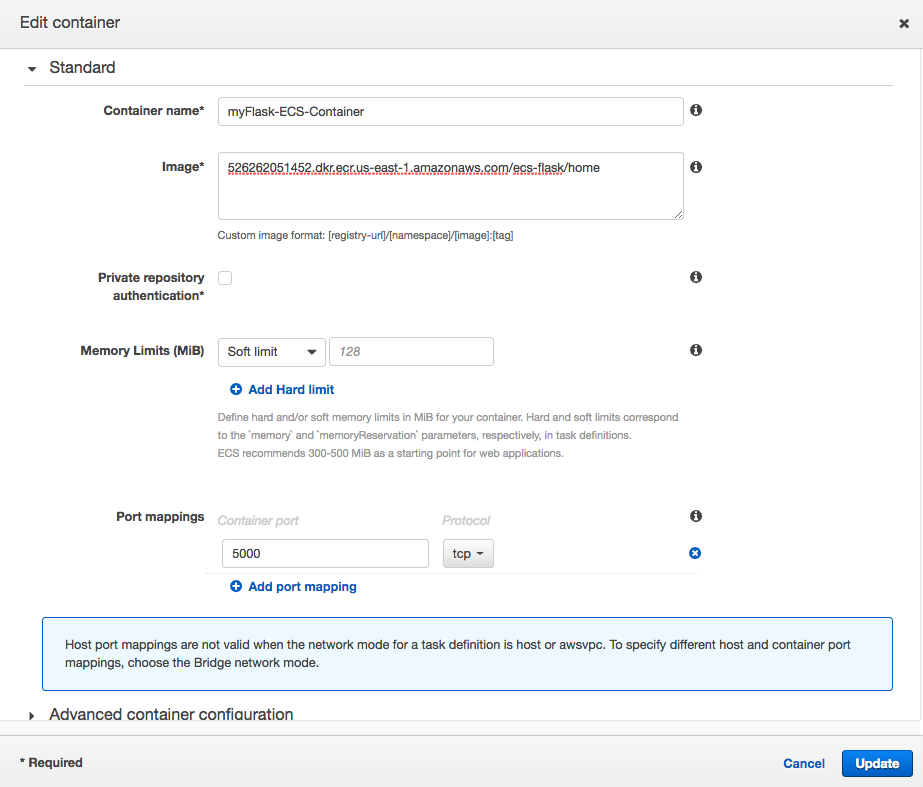
First we may want to name the container, give it the image, and map it to port 5000. For the image name, we will need to host it on ECR (Amazon's Elastic Container Registry) for it to work. We'll skip adding any soft/hard memory limits for now.
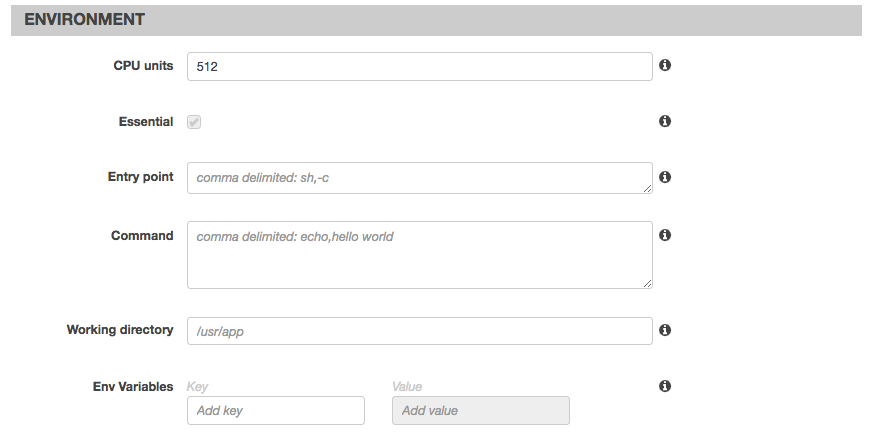
Next in the "Advanced container configuration" add 512 CPU units in the environment section:
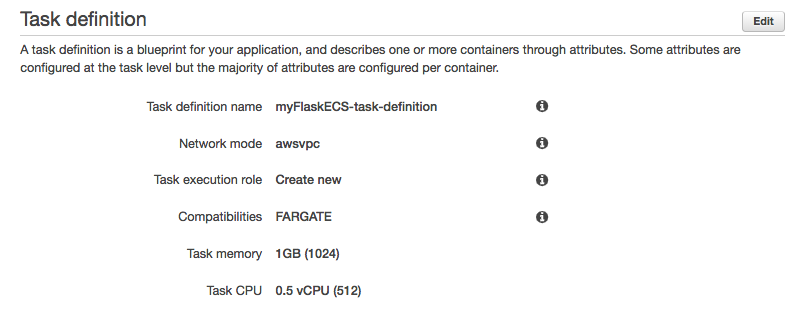
Finally, in storage and logging, change the awslogs-group value to /ecs/myFlaskApp-task-definition.
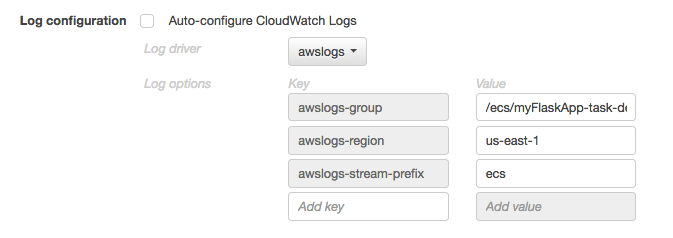
Click "Update". We also need a task execution role as this is what authorizes ECS to pull images and publish logs for your task. This takes the place of the EC2 Instance role when running Fargate tasks. If we don't already have an "ecsTaskExecutionRole", then select the option to create one:
Save that and click Next.
For our service we may want to select "Application Load Balancer" and we can leave the rest untouched.
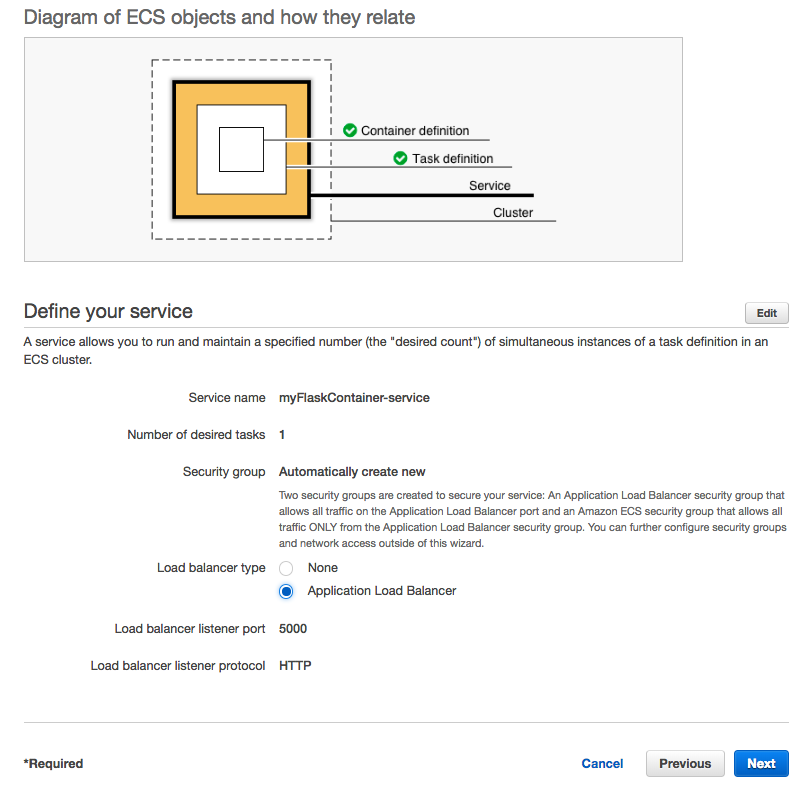
It will by default be set to create a new VPC and new subnets:
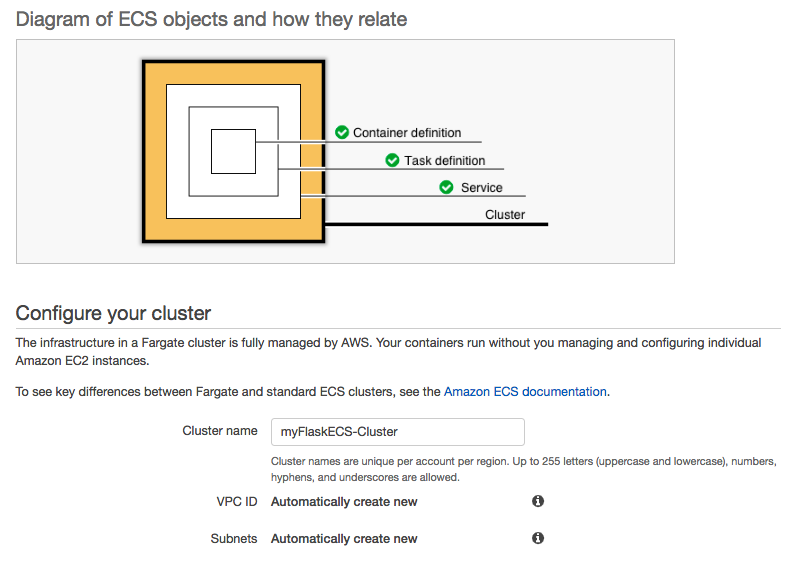
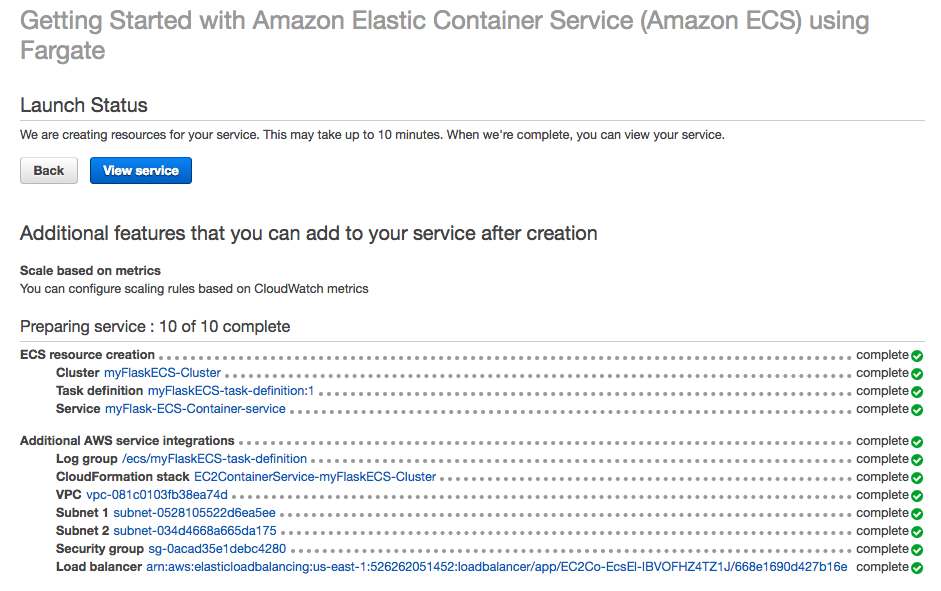
The picture below shows "Launch Status" screen and we can see our resources being created.
To get the load balancer url go back into the details tab of the service and click on the target group name under Load Balancing:
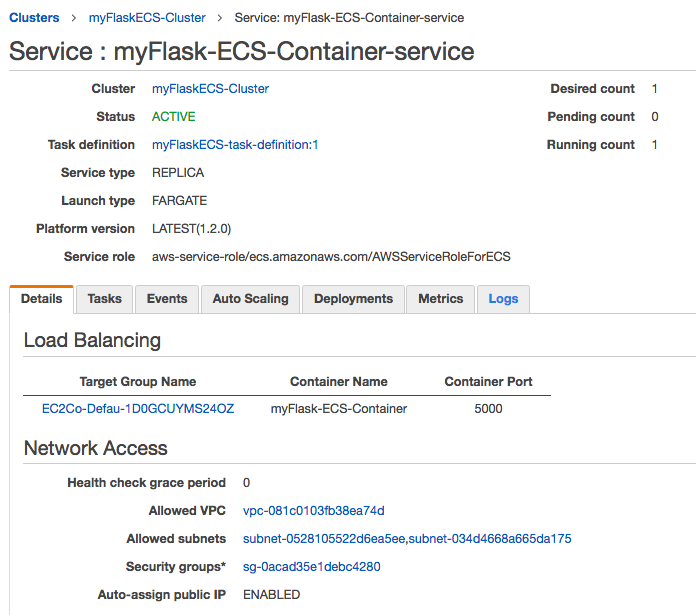
We'll then be inside our EC2 management console in the Target Groups section. Scroll down into the description tab and click on the load balancer associated with this target group, and scroll down into the description and we will see the "DNS name."

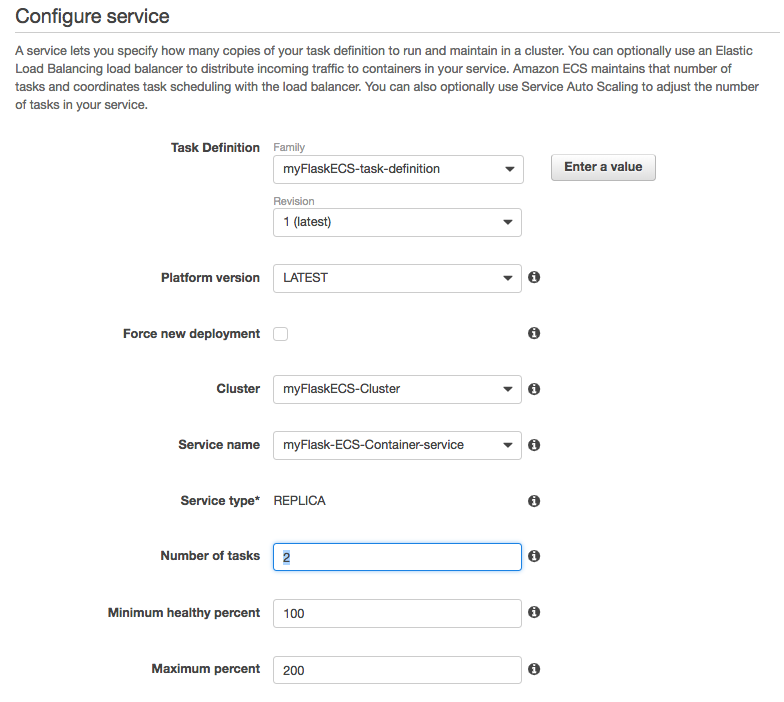
Configure service: we want to change the "Number of tasks" to 3:
Configure network: leave it untouched.
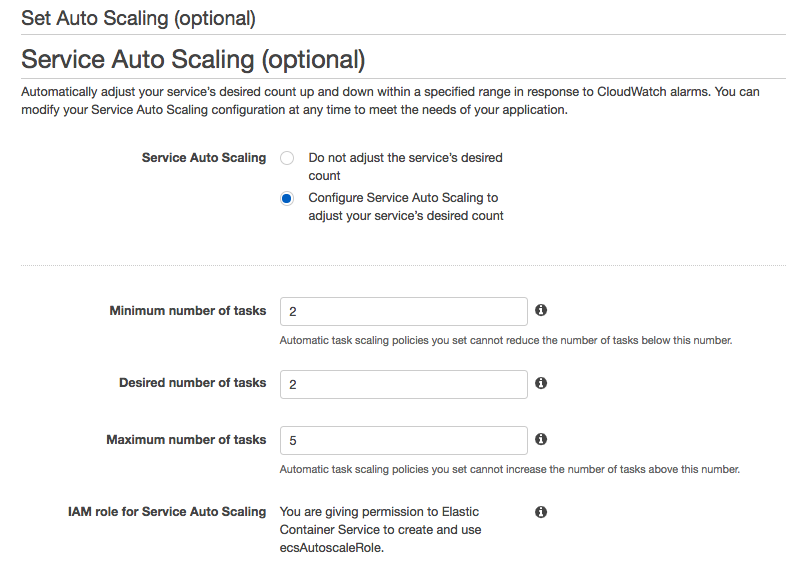
Configure service: set up auto scaling to see how it works. Click the "Configure Service Auto Scaling" radio button and more content will be displayed. We'll set the minimum number of tasks to 2 so that our application will always run at least 2 tasks. We can also set the desired number to 2 which is the number of tasks the service will start with before any scaling begins. For maximum number of tasks we set it to 5:
Click on "Add scaling policy" and select "Step scaling." Here, we define a policy based around a CloudWatch alarm: if the CPU utilization rises above or equal to 85% for over 5 minutes one time, run this policy:
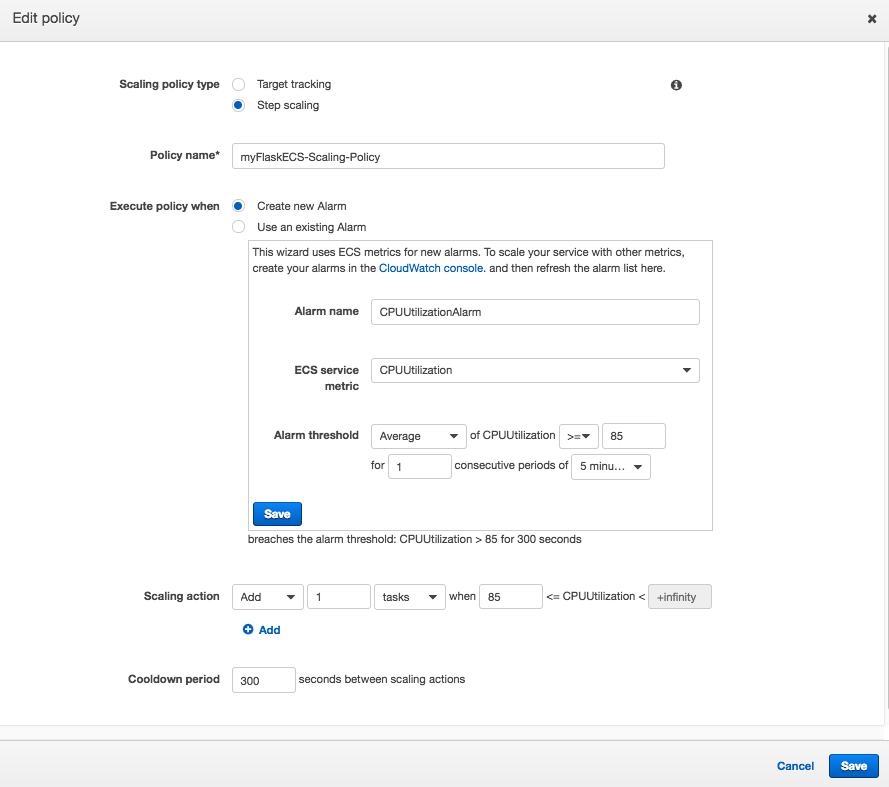

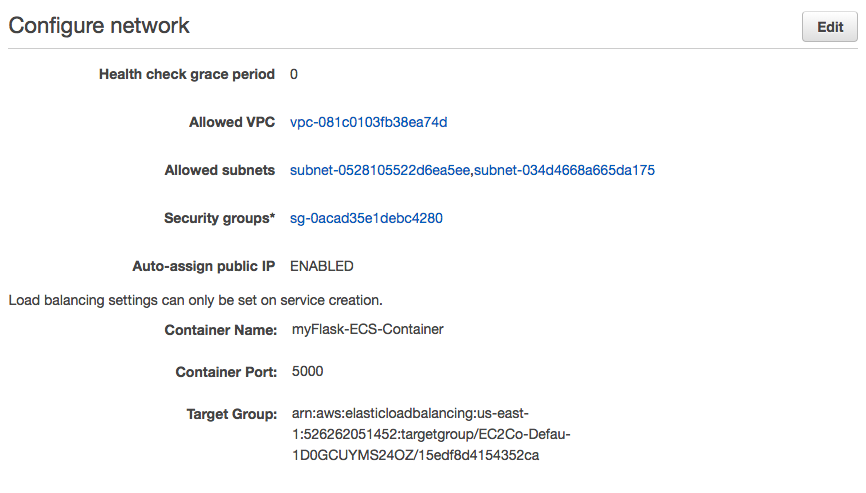
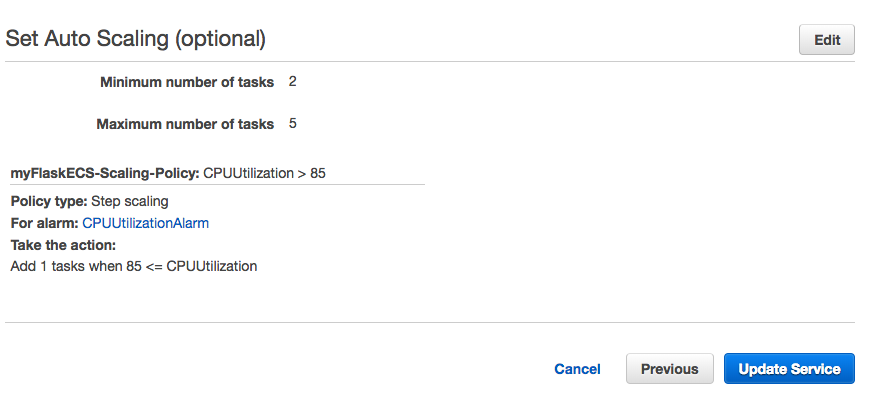
Click "Update Service". It should go through and give us green check marks on our updates. Now if we click on the "Tasks" tab in our service we should see 2. They may be spinning up and in a pending state but give it a few minutes.

Then, we will see them all running.
One more time, visit our browser with alb's url and don't forget to tag on port :5000.

To clean up the resources we created, we can just delete the cluster.
Terraform
Ph.D. / Golden Gate Ave, San Francisco / Seoul National Univ / Carnegie Mellon / UC Berkeley / DevOps / Deep Learning / Visualization