Docker : From a monolithic app to micro services on GCP Kubernetes
In this post, we'll learn more about GCP Kubernetes while we're deploying monolithic service to micro services. We'll start with kelseyhightower/app which is hosted on GitHub and provides an example 12-Factor application.
We will be playing with the following DockerHub images:
- kelseyhightower/monolith - Monolith includes auth and hello services.
- kelseyhightower/auth - Auth microservice. Generates JWT tokens for authenticated users.
- kelseyhightower/hello - Hello microservice. Greets authenticated users.
- ngnix - Frontend to the auth and hello services.
Setup the zone in Cloud Shell:
$ gcloud config set compute/zone us-central1-b
Updated property [compute/zone].
Then, start up our cluster setup. This may take a while:
$ gcloud container clusters create mono-to-micro
...
NAME           LOCATION       MASTER_VERSION  MASTER_IP      MACHINE_TYPE   NODE_VERSION  NUM_NODES  STATUS
mono-to-micro  us-central1-b  1.11.6-gke.2    35.192.226.25  n1-standard-1  1.11.6-gke.2  3          RUNNING
$ gcloud compute instances list
NAME                                          ZONE           MACHINE_TYPE   PREEMPTIBLE  INTERNAL_IP  EXTERNAL_IP     STATUS
gke-mono-to-micro-default-pool-59b917e5-8qmh  us-central1-b  n1-standard-1               10.128.0.7   199.223.233.44  RUNNING
gke-mono-to-micro-default-pool-59b917e5-hqhm  us-central1-b  n1-standard-1               10.128.0.6   35.226.231.26   RUNNING
gke-mono-to-micro-default-pool-59b917e5-mbd3  us-central1-b  n1-standard-1               10.128.0.8   35.226.241.245  RUNNING
Clone the GitHub repository:
$ git clone https://github.com/Einsteinish/MonolithicToMicroServices-GKE.git
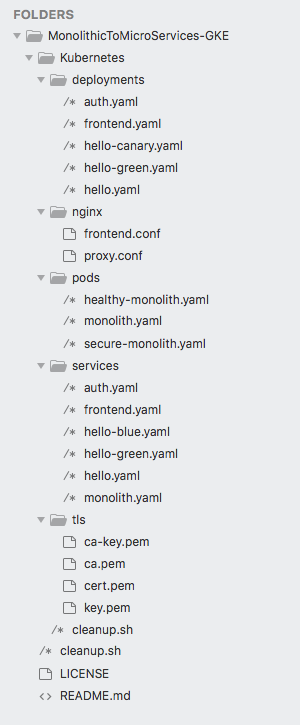
Let's start with kubectl run. Similar to docker run, this will launch an instance of container based on the nginx image.
$ kubectl run nginx --image=nginx:1.10.0 --replicas=1
Surprisingly, Kubernetes has created a deployment for us:
$ kubectl get deployments
NAME      DESIRED   CURRENT   UP-TO-DATE   AVAILABLE   AGE
nginx     1         1         1            1           1m
We'll have a chance to talk about the deployment later.
As we already know, in Kubernetes, all containers run in a pod. We can use the kubectl get pods command to view the running nginx container:
$ kubectl get pods
NAME                    READY     STATUS    RESTARTS   AGE
nginx-b7689d6cb-pr2lk   1/1       Running   0          5m
Now, nginx is running. More precisely, the nginx pod is running in a node.
How can we access and open a web page?
http://<node-ip> or http://<pod-ip>?
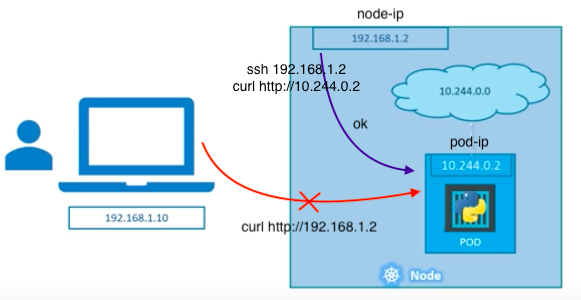
If we are in the same network as the node, we can talk with the pod via curl http://10.244.0.2, which is not useful. But outside the cluster, we cannot access the pod. When they get restarted they might have a different IP address! The services will take care of that transient nature of the Pods for us.
That's where the services come in. Services expose our Pods to the worlds! Services provide stable endpoints for Pods. Services use labels to determine what Pods they operate on. If Pods have the correct labels, they are automatically picked up and exposed by our services even though Pods aren't meant to be persistent because they can be stopped or started for many reasons.
The picture below explains one of the approach (using NodePort). In this method, the service sits in-between a request and our pod, and just forwarding the request on the node-ip:node-port to the pod.
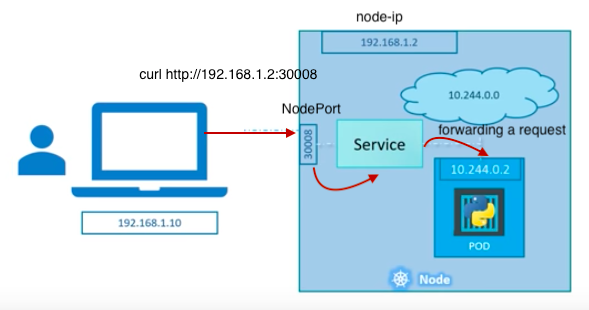
For multiple Pods in a Nodes, the service selector finds the labels of a pod:
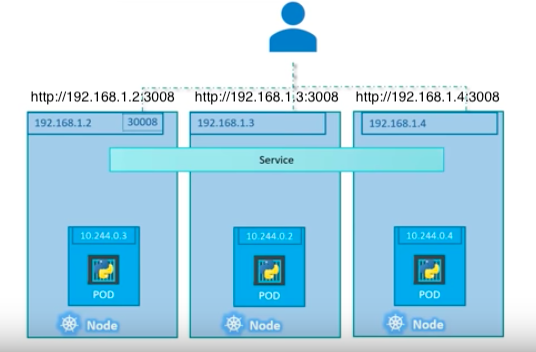
For Pods on multiple Nodes, the service can use the same NodePort on each of NodeIP:

Actually, it's a bit confusing because there are three ports: NodePort, Port, Target Port. But if we think ourselves as services, the terminology beginning to make sense: NodePort is the port on a Node, the Port is the service Port, and the Target port is the port where services do forwarding the request to.
This NodePort is one of the ways for exposing our pods to outside of our cluster.
Let's see if there is any service running:
$ kubectl get svc
NAME         TYPE        CLUSTER-IP    EXTERNAL-IP   PORT(S)   AGE
kubernetes   ClusterIP   10.43.240.1   <none>        443/TCP   39m
As we can see from the output, we do not have any services running other than Kubernetes with CLUSTER-IP. But this is the IP generated by Kubernetes for inter-service communication within the cluster. For example, when we run Jenkins (master and executors) within Cluster, we expose the Jenkins web UI and builder/agent registration ports within the Kubernetes cluster. Additionally, the jenkins-ui services are exposed using a ClusterIP so that it is not accessible from outside the cluster.
However, for now, there is no EXTERNAL-IP is available to communicate with outside world.

In this post, we'll use a service via LoadBalancer (the 3rd one in the picture above).
The level of access a service provides to a set of pods depends on the Service's type. Currently there are three types:
- ClusterIP (internal) - this default type is only visible inside of the cluster.
- NodePort - gives each node in the cluster an externally accessible IP.
- LoadBalancer - adds a load balancer from the cloud provider which forwards traffic from the service to Nodes within it.
After we deployed the nginx container, we digressed a bit. But it was necessary. In the section, we realized that we don not have an access to the nginx server. Now it's time to EXPOSE that nginx container(actually, pod):
$ kubectl get pods
NAME                    READY     STATUS    RESTARTS   AGE
nginx-b7689d6cb-pr2lk   1/1       Running   0          3h
Since the nginx container is running we can expose it outside of Kubernetes using the kubectl expose command:
$ kubectl expose deployment nginx --port 80 --type LoadBalancer
service "nginx" exposed
With the command, Kubernetes created an external Load Balancer with a public IP address attached to it. Any client who hits that public IP address will be routed to the pods behind the service. In this case that would be the nginx pod.
List our services now using the kubectl get services command:
$ kubectl get svc
NAME         TYPE           CLUSTER-IP     EXTERNAL-IP      PORT(S)        AGE
kubernetes   ClusterIP      10.43.240.1    <none>           443/TCP        3h
nginx        LoadBalancer   10.43.250.26   35.225.214.129   80:31871/TCP   4m
Let's hit the nginx container remotely via External IP:
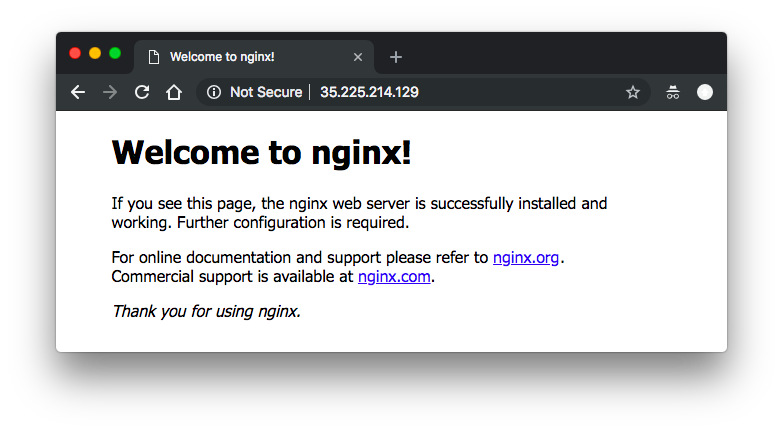
Here we used to simple commands to make the nginx server to work: kubectl run and kubectl expose commands.
Clean up our nginx resources:
$ kubectl delete services nginx
service "nginx" deleted

$ kubectl delete deployments nginx
deployment.extensions "nginx" deleted
In this section, we'll create a pod that contains the monolith (auth and greetings) and nginx containers using the code from github repo - MonolithicToMicroServices-GKE that we cloned earlier.
Note that Pods share namespace which makes the two containers inside of our example pod can communicate with each other. Pods also share a network namespace, which means there is one IP Address per pod.
Pods can be created using a pod configuration file (pods/monolith.yaml):
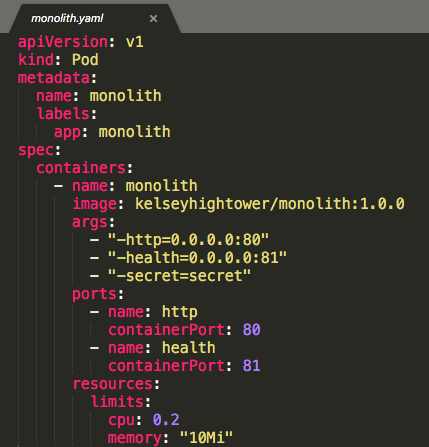
Note that we're using just one container for the monolith.
Let's create the monolith pod:
$ cd MonolithicToMicroServices-GKE/Kubernetes

$ kubectl create -f pods/monolith.yaml
pod "monolith" created
Review the monolith pod:
$ kubectl get pods
NAME                    READY     STATUS    RESTARTS   AGE
monolith                1/1       Running   0          1m
to get more information about the monolith pod include events, we can use:
$ kubectl describe pods monolith
As mentioned earlier, Pods are, by default, allocated a private IP address and cannot be reached outside of the cluster.
To interact with the Pods, we'll use the kubectl port-forward command to map a local port of a node to a port inside the monolith pod.
For the mapping, we may want to use the 2nd shell:
$ kubectl port-forward monolith 10080:80
Forwarding from 127.0.0.1:10080 -> 80
Back to our main shell, start talking to the monolith pod using curl:
$ curl http://127.0.0.1:10080
{"message":"Hello"}
Ok, we got a response from the container.
Let's try another endpoint, "secure":
$ curl http://127.0.0.1:10080/secure
authorization failed
Note that our pod is monolith and it consists of two parts: auth & hello.
To access the "secure" endpoint, we need a JWT token. We may want to set an environment variable for it with a "password" for password.
$ TOKEN=$(curl http://127.0.0.1:10080/login -u user|jq -r '.token')
Enter host password for user 'user':
  % Total    % Received % Xferd  Average Speed   Time    Time     Time  Current
                                 Dload  Upload   Total   Spent    Left  Speed
100   222  100   222    0     0    300      0 --:--:-- --:--:-- --:--:--   300
Now we can access:
$ curl -H "Authorization: Bearer $TOKEN" http://127.0.0.1:10080/secure
{"message":"Hello"}
We've been in the cluster network. How about the communication with outside world?
We can ping to google.com inside the pods.
Much like docker exec, we can use kubectl exec to enter into the pod:
$ kubectl exec monolith --stdin --tty -c monolith /bin/sh

/ # ping -c 3 google.com
PING google.com (74.125.129.101): 56 data bytes
64 bytes from 74.125.129.101: seq=0 ttl=51 time=0.870 ms
64 bytes from 74.125.129.101: seq=1 ttl=51 time=0.430 ms
64 bytes from 74.125.129.101: seq=2 ttl=51 time=0.389 ms
--- google.com ping statistics ---
3 packets transmitted, 3 packets received, 0% packet loss
round-trip min/avg/max = 0.389/0.563/0.870 ms
/ #
/ # exit
$
Cleanup the resources:
$ kubectl get pods
NAME       READY     STATUS    RESTARTS   AGE
monolith   1/1       Running   0          1h

$ kubectl delete pods monolith
pod "monolith" deleted
Note that we do not have any services for the monoloth:
$ kubectl get services
NAME         TYPE        CLUSTER-IP    EXTERNAL-IP   PORT(S)   AGE
kubernetes   ClusterIP   10.43.240.1   <none>        443/TCP   5h
In the next section, we'll start creating a service for "secure-monolith" that works with "https".
Let's create a secure pod that can handle https traffic. Create the secure-monolith pods and their configuration data:
$ kubectl create secret generic tls-certs --from-file tls/
secret "tls-certs" created

$ kubectl create configmap nginx-proxy-conf --from-file nginx/proxy.conf
configmap "nginx-proxy-conf" created

$ kubectl create -f pods/secure-monolith.yaml
pod "secure-monolith" created

$ kubectl get pods
NAME              READY     STATUS    RESTARTS   AGE
secure-monolith   2/2       Running   0          22m
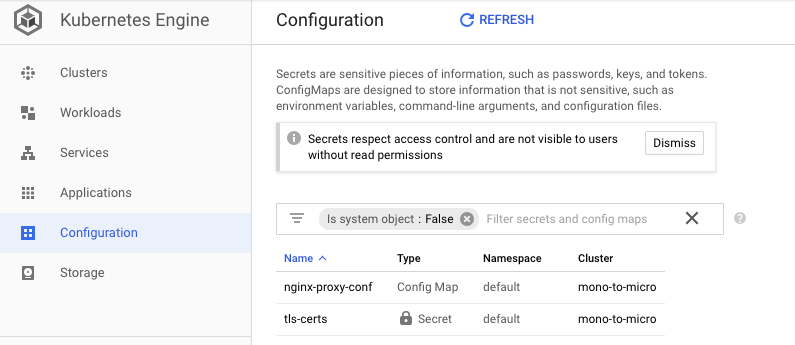
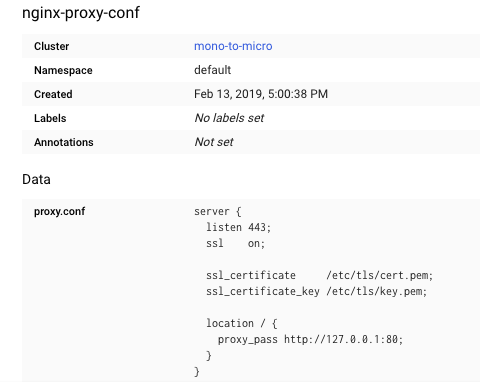
Now that we have a secure pod, it's time to expose the secure-monolith Pod externally by creating a Kubernetes service using services/monolith.yaml:
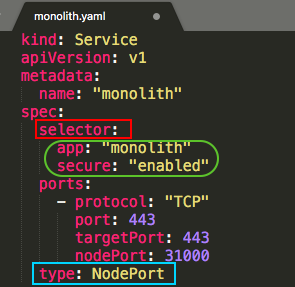
Note two things in the configuration:
- As mentioned earlier, there's a selector which is used to automatically find and expose any pods with the labels "app=monolith" and "secure=enabled".
- We want to expose the NodePort here because this is how we'll forward external traffic from port 31000 to nginx listening on port 443.
Use the kubectl create command to create the monolith service from the monolith service configuration file:
$ kubectl create -f services/monolith.yaml
service "monolith" created

$ kubectl get svc
NAME         TYPE        CLUSTER-IP      EXTERNAL-IP   PORT(S)         AGE
kubernetes   ClusterIP   10.43.240.1     <none>        443/TCP         5h
monolith     NodePort    10.43.240.112   <none>        443:31000/TCP   39s
Note that we're using a port to expose the service. This means that it's possible to have port collisions if another app tries to bind to port 31000 on one of our servers.
Normally, Kubernetes would handle this port assignment. In this post we chose a port so that it's easier to configure health checks later on.
Use the gcloud compute firewall-rules command to allow traffic to the monolith service on the exposed NodePort:
$ gcloud compute firewall-rules create allow-monolith-nodeport --allow=tcp:31000
...
Creating firewall...done.
NAME                     NETWORK  DIRECTION  PRIORITY  ALLOW      DENY  DISABLED
allow-monolith-nodeport  default  INGRESS    1000      tcp:31000        False
Now we should be able to hit the secure-monolith service from outside the cluster without using port forwarding.
But we need to get an external IP address for one of the nodes:
$ gcloud compute instances list
NAME                                          ZONE           MACHINE_TYPE   PREEMPTIBLE  INTERNAL_IP  EXTERNAL_IP     STATUS
gke-mono-to-micro-default-pool-59b917e5-8qmh  us-central1-b  n1-standard-1               10.128.0.7   199.223.233.44  RUNNING
gke-mono-to-micro-default-pool-59b917e5-hqhm  us-central1-b  n1-standard-1               10.128.0.6   35.226.231.26   RUNNING
gke-mono-to-micro-default-pool-59b917e5-mbd3  us-central1-b  n1-standard-1               10.128.0.8   35.226.241.245  RUNNING
Now try to hit the secure-monolith service using curl:
# curl -k https://<EXTERNAL_IP<:31000

$ font color="blue"curl -k https://199.223.233.44:31000
curl: (7) Failed to connect to 199.223.233.44 port 31000: Connection refused
Something is wrong.
When we carefully compare the pod yaml file, pods/secure-monolith.yaml, especially, labels:
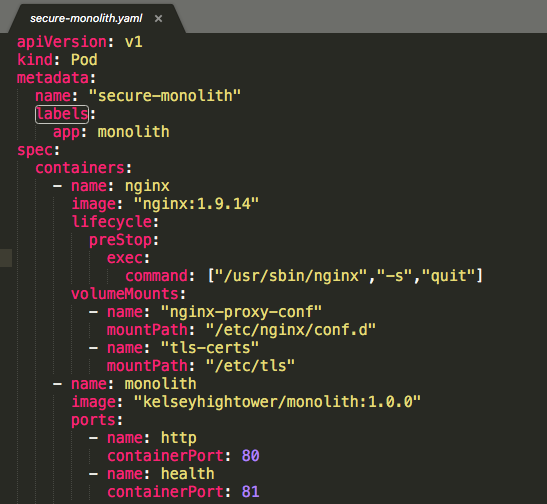
with the service configuration file (service/monolith.yaml)'s selector:
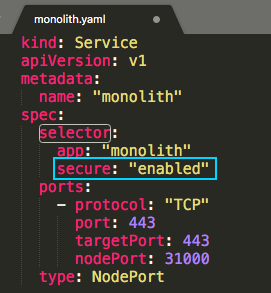
The service is actually looking for a pods with labels of "app=monolith,secure=enabled" but not just "app=monolith". Notice that our secure-monolith pod has only one label, "app=monolith". As a result, our service could not find the pod to connect. We can see it using kubectl get pods with labels option, -l:
$ kubectl get pods -l "app=monolith"
NAME              READY     STATUS    RESTARTS   AGE
secure-monolith   2/2       Running   0          1h

$ kubectl get pods -l "app=monolith,secure=enabled"
No resources found.
$ kubectl describe services monolith
Name:                     monolith
Namespace:                default
Labels:                   <none>
Annotations:              <none>
Selector:                 app=monolith,secure=enabled
Type:                     NodePort
IP:                       10.43.240.112
Port:                     <unset>  443/TCP
TargetPort:               443/TCP
NodePort:                 <unset>  31000/TCP
Endpoints:                <none>
Session Affinity:         None
External Traffic Policy:  Cluster
Events:                   <none>
Using the kubectl label command, we can add the missing "secure=enabled" label to the secure-monolith Pod. Afterwards, we can check and see that our labels have been updated.
$ kubectl label pods secure-monolith 'secure=enabled'
pod "secure-monolith" labeled

$ kubectl get pods secure-monolith --show-labels
NAME              READY     STATUS    RESTARTS   AGE       LABELS
secure-monolith   2/2       Running   0          2h        app=monolith,secure=enabled
Now that our pods are correctly labeled, let's view the list of endpoints on the monolith service:
$ kubectl describe services monolith
...
Endpoints:                10.40.1.8:443
...
Yes, we now have endpoints which was <none> before we adding additional label.
Let's see if curl is working:
$ gcloud compute instances list
NAME                                          ZONE           MACHINE_TYPE   PREEMPTIBLE  INTERNAL_IP  EXTERNAL_IP     STATUS
gke-mono-to-micro-default-pool-59b917e5-8qmh  us-central1-b  n1-standard-1               10.128.0.7   199.223.233.44  RUNNING
gke-mono-to-micro-default-pool-59b917e5-hqhm  us-central1-b  n1-standard-1               10.128.0.6   35.226.231.26   RUNNING
gke-mono-to-micro-default-pool-59b917e5-mbd3  us-central1-b  n1-standard-1               10.128.0.8   35.226.241.245  RUNNING

$ curl -k https://199.223.233.44:31000
{"message":"Hello"}
Yes, the issue of service not finding a pod is now fixed.
So far, we created a secure-monolith pod and exposed it using a service type of NodePort. Note that we're still dealing with a monolithic app.
Let's cleanup our resources created in this section:
$ kubectl delete pods secure-monolith
pod "secure-monolith" deleted

$ kubectl delete services monolith
service "monolith" deleted

$ kubectl get pods
No resources found.

$ kubectl get svc
NAME         TYPE        CLUSTER-IP    EXTERNAL-IP   PORT(S)   AGE
kubernetes   ClusterIP   10.43.240.1   <none>        443/TCP   8h

$ kubectl get deployments
No resources found.
In the next section, we'll start deploying micro services and will use LoadBalancer service type.
Deployments use Replica Sets to manage starting and stopping the Pods. If Pods need to be updated or scaled, the Deployment will handle that. Deployment handles the low level details of managing Pods.
We will break the monolith app into three pieces:
- auth (deployments/auth.yaml, services/auth.yaml) - Generates JWT tokens for authenticated users.
- hello (deployments/hello.yaml, services/hello.yaml) - Greet authenticated users.
- frontend (deployments/frontend.yaml, services/frontend.yaml) - Routes traffic to the auth and hello services.
We are ready to create deployments, one for each service. After that, we'll define internal services for the auth and hello deployments and an external service for the frontend deployment.
Once finished we'll be able to interact with the microservices just like with Monolith.
The major benefit is that we now each service will be able to be scaled and deployed, independently!
We'll use kubectl create command to create the deployments. It will make one pod that conforms to the data in the Deployment manifest. This means we can scale the number of Pods by changing the number specified in the Replicas field.
Let's create our deployment object, "auth":
$ kubectl create -f deployments/auth.yaml
deployment.extensions "auth" created

$ kubectl get pods
NAME                    READY     STATUS    RESTARTS   AGE
auth-6bf74975b7-85jb8   1/1       Running   0          28s

$ kubectl get deployments
NAME      DESIRED   CURRENT   UP-TO-DATE   AVAILABLE   AGE
auth      1         1         1            1           37s

$ kubectl get services
NAME         TYPE        CLUSTER-IP    EXTERNAL-IP   PORT(S)   AGE
kubernetes   ClusterIP   10.43.240.1   <none>        443/TCP   9h
We can see we don't have "auth" service, so let's create one:
$ kubectl create -f services/auth.yaml
service "auth" created

$ kubectl get services
NAME         TYPE        CLUSTER-IP    EXTERNAL-IP   PORT(S)   AGE
auth         ClusterIP   10.43.251.0   <none>        80/TCP    1m
kubernetes   ClusterIP   10.43.240.1   <none>        443/TCP   9h
Let's create and expose the "hello" deployment:
$ kubectl create -f deployments/hello.yaml
deployment.extensions "hello" created

$ kubectl create -f services/hello.yaml
service "hello" created
Next, "frontend" Deployment. To create the "frontend", we need one more step which is to store some configuration data with the container:
$ kubectl create configmap nginx-frontend-conf --from-file=nginx/frontend.conf
configmap "nginx-frontend-conf" created

$ kubectl create -f deployments/frontend.yaml
deployment.extensions "frontend" created

$ kubectl create -f services/frontend.yaml
service "frontend" created
Let's grab EXTERNAL-IP from "frontend" service:
$ kubectl get services
NAME         TYPE           CLUSTER-IP      EXTERNAL-IP    PORT(S)         AGE
auth         ClusterIP      10.43.251.0     <none>         80/TCP          12m
frontend     LoadBalancer   10.43.255.62    35.184.64.57   443:30775/TCP   59s
hello        ClusterIP      10.43.249.142   <none>         80/TCP          7m
kubernetes   ClusterIP      10.43.240.1     <none>         443/TCP         9h
Let's access our micro-services via the "frontend" service which uses LoadBalancer:
$ curl -k https://35.184.64.57
{"message":"Hello"}
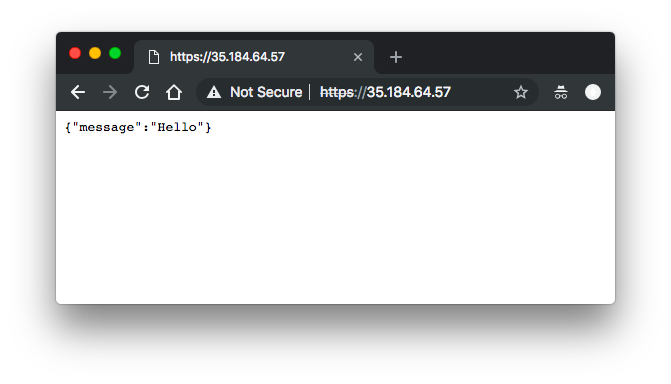
Congratulations! We managed to deploy our micro-services to GKE.
Clean up:
$ kubectl delete services auth hello frontend
$ kubectl delete deployments auth hello frontend
Docker & K8s
- Docker install on Amazon Linux AMI
- Docker install on EC2 Ubuntu 14.04
- Docker container vs Virtual Machine
- Docker install on Ubuntu 14.04
- Docker Hello World Application
- Nginx image - share/copy files, Dockerfile
- Working with Docker images : brief introduction
- Docker image and container via docker commands (search, pull, run, ps, restart, attach, and rm)
- More on docker run command (docker run -it, docker run --rm, etc.)
- Docker Networks - Bridge Driver Network
- Docker Persistent Storage
- File sharing between host and container (docker run -d -p -v)
- Linking containers and volume for datastore
- Dockerfile - Build Docker images automatically I - FROM, MAINTAINER, and build context
- Dockerfile - Build Docker images automatically II - revisiting FROM, MAINTAINER, build context, and caching
- Dockerfile - Build Docker images automatically III - RUN
- Dockerfile - Build Docker images automatically IV - CMD
- Dockerfile - Build Docker images automatically V - WORKDIR, ENV, ADD, and ENTRYPOINT
- Docker - Apache Tomcat
- Docker - NodeJS
- Docker - NodeJS with hostname
- Docker Compose - NodeJS with MongoDB
- Docker - Prometheus and Grafana with Docker-compose
- Docker - StatsD/Graphite/Grafana
- Docker - Deploying a Java EE JBoss/WildFly Application on AWS Elastic Beanstalk Using Docker Containers
- Docker : NodeJS with GCP Kubernetes Engine
- Docker : Jenkins Multibranch Pipeline with Jenkinsfile and Github
- Docker : Jenkins Master and Slave
- Docker - ELK : ElasticSearch, Logstash, and Kibana
- Docker - ELK 7.6 : Elasticsearch on Centos 7
- Docker - ELK 7.6 : Filebeat on Centos 7
- Docker - ELK 7.6 : Logstash on Centos 7
- Docker - ELK 7.6 : Kibana on Centos 7
- Docker - ELK 7.6 : Elastic Stack with Docker Compose
- Docker - Deploy Elastic Cloud on Kubernetes (ECK) via Elasticsearch operator on minikube
- Docker - Deploy Elastic Stack via Helm on minikube
- Docker Compose - A gentle introduction with WordPress
- Docker Compose - MySQL
- MEAN Stack app on Docker containers : micro services
- MEAN Stack app on Docker containers : micro services via docker-compose
- Docker Compose - Hashicorp's Vault and Consul Part A (install vault, unsealing, static secrets, and policies)
- Docker Compose - Hashicorp's Vault and Consul Part B (EaaS, dynamic secrets, leases, and revocation)
- Docker Compose - Hashicorp's Vault and Consul Part C (Consul)
- Docker Compose with two containers - Flask REST API service container and an Apache server container
- Docker compose : Nginx reverse proxy with multiple containers
- Docker & Kubernetes : Envoy - Getting started
- Docker & Kubernetes : Envoy - Front Proxy
- Docker & Kubernetes : Ambassador - Envoy API Gateway on Kubernetes
- Docker Packer
- Docker Cheat Sheet
- Docker Q & A #1
- Kubernetes Q & A - Part I
- Kubernetes Q & A - Part II
- Docker - Run a React app in a docker
- Docker - Run a React app in a docker II (snapshot app with nginx)
- Docker - NodeJS and MySQL app with React in a docker
- Docker - Step by Step NodeJS and MySQL app with React - I
- Installing LAMP via puppet on Docker
- Docker install via Puppet
- Nginx Docker install via Ansible
- Apache Hadoop CDH 5.8 Install with QuickStarts Docker
- Docker - Deploying Flask app to ECS
- Docker Compose - Deploying WordPress to AWS
- Docker - WordPress Deploy to ECS with Docker-Compose (ECS-CLI EC2 type)
- Docker - WordPress Deploy to ECS with Docker-Compose (ECS-CLI Fargate type)
- Docker - ECS Fargate
- Docker - AWS ECS service discovery with Flask and Redis
- Docker & Kubernetes : minikube
- Docker & Kubernetes 2 : minikube Django with Postgres - persistent volume
- Docker & Kubernetes 3 : minikube Django with Redis and Celery
- Docker & Kubernetes 4 : Django with RDS via AWS Kops
- Docker & Kubernetes : Kops on AWS
- Docker & Kubernetes : Ingress controller on AWS with Kops
- Docker & Kubernetes : HashiCorp's Vault and Consul on minikube
- Docker & Kubernetes : HashiCorp's Vault and Consul - Auto-unseal using Transit Secrets Engine
- Docker & Kubernetes : Persistent Volumes & Persistent Volumes Claims - hostPath and annotations
- Docker & Kubernetes : Persistent Volumes - Dynamic volume provisioning
- Docker & Kubernetes : DaemonSet
- Docker & Kubernetes : Secrets
- Docker & Kubernetes : kubectl command
- Docker & Kubernetes : Assign a Kubernetes Pod to a particular node in a Kubernetes cluster
- Docker & Kubernetes : Configure a Pod to Use a ConfigMap
- AWS : EKS (Elastic Container Service for Kubernetes)
- Docker & Kubernetes : Run a React app in a minikube
- Docker & Kubernetes : Minikube install on AWS EC2
- Docker & Kubernetes : Cassandra with a StatefulSet
- Docker & Kubernetes : Terraform and AWS EKS
- Docker & Kubernetes : Pods and Service definitions
- Docker & Kubernetes : Service IP and the Service Type
- Docker & Kubernetes : Kubernetes DNS with Pods and Services
- Docker & Kubernetes : Headless service and discovering pods
- Docker & Kubernetes : Scaling and Updating application
- Docker & Kubernetes : Horizontal pod autoscaler on minikubes
- Docker & Kubernetes : From a monolithic app to micro services on GCP Kubernetes
- Docker & Kubernetes : Rolling updates
- Docker & Kubernetes : Deployments to GKE (Rolling update, Canary and Blue-green deployments)
- Docker & Kubernetes : Slack Chat Bot with NodeJS on GCP Kubernetes
- Docker & Kubernetes : Continuous Delivery with Jenkins Multibranch Pipeline for Dev, Canary, and Production Environments on GCP Kubernetes
- Docker & Kubernetes : NodePort vs LoadBalancer vs Ingress
- Docker & Kubernetes : MongoDB / MongoExpress on Minikube
- Docker & Kubernetes : Load Testing with Locust on GCP Kubernetes
- Docker & Kubernetes : MongoDB with StatefulSets on GCP Kubernetes Engine
- Docker & Kubernetes : Nginx Ingress Controller on Minikube
- Docker & Kubernetes : Setting up Ingress with NGINX Controller on Minikube (Mac)
- Docker & Kubernetes : Nginx Ingress Controller for Dashboard service on Minikube
- Docker & Kubernetes : Nginx Ingress Controller on GCP Kubernetes
- Docker & Kubernetes : Kubernetes Ingress with AWS ALB Ingress Controller in EKS
- Docker & Kubernetes : Setting up a private cluster on GCP Kubernetes
- Docker & Kubernetes : Kubernetes Namespaces (default, kube-public, kube-system) and switching namespaces (kubens)
- Docker & Kubernetes : StatefulSets on minikube
- Docker & Kubernetes : RBAC
- Docker & Kubernetes Service Account, RBAC, and IAM
- Docker & Kubernetes - Kubernetes Service Account, RBAC, IAM with EKS ALB, Part 1
- Docker & Kubernetes : Helm Chart
- Docker & Kubernetes : My first Helm deploy
- Docker & Kubernetes : Readiness and Liveness Probes
- Docker & Kubernetes : Helm chart repository with Github pages
- Docker & Kubernetes : Deploying WordPress and MariaDB with Ingress to Minikube using Helm Chart
- Docker & Kubernetes : Deploying WordPress and MariaDB to AWS using Helm 2 Chart
- Docker & Kubernetes : Deploying WordPress and MariaDB to AWS using Helm 3 Chart
- Docker & Kubernetes : Helm Chart for Node/Express and MySQL with Ingress
- Docker & Kubernetes : Deploy Prometheus and Grafana using Helm and Prometheus Operator - Monitoring Kubernetes node resources out of the box
- Docker & Kubernetes : Deploy Prometheus and Grafana using kube-prometheus-stack Helm Chart
- Docker & Kubernetes : Istio (service mesh) sidecar proxy on GCP Kubernetes
- Docker & Kubernetes : Istio on EKS
- Docker & Kubernetes : Istio on Minikube with AWS EC2 for Bookinfo Application
- Docker & Kubernetes : Deploying .NET Core app to Kubernetes Engine and configuring its traffic managed by Istio (Part I)
- Docker & Kubernetes : Deploying .NET Core app to Kubernetes Engine and configuring its traffic managed by Istio (Part II - Prometheus, Grafana, pin a service, split traffic, and inject faults)
- Docker & Kubernetes : Helm Package Manager with MySQL on GCP Kubernetes Engine
- Docker & Kubernetes : Deploying Memcached on Kubernetes Engine
- Docker & Kubernetes : EKS Control Plane (API server) Metrics with Prometheus
- Docker & Kubernetes : Spinnaker on EKS with Halyard
- Docker & Kubernetes : Continuous Delivery Pipelines with Spinnaker and Kubernetes Engine
- Docker & Kubernetes : Multi-node Local Kubernetes cluster : Kubeadm-dind (docker-in-docker)
- Docker & Kubernetes : Multi-node Local Kubernetes cluster : Kubeadm-kind (k8s-in-docker)
- Docker & Kubernetes : nodeSelector, nodeAffinity, taints/tolerations, pod affinity and anti-affinity - Assigning Pods to Nodes
- Docker & Kubernetes : Jenkins-X on EKS
- Docker & Kubernetes : ArgoCD App of Apps with Heml on Kubernetes
- Docker & Kubernetes : ArgoCD on Kubernetes cluster
- Docker & Kubernetes : GitOps with ArgoCD for Continuous Delivery to Kubernetes clusters (minikube) - guestbook
Ph.D. / Golden Gate Ave, San Francisco / Seoul National Univ / Carnegie Mellon / UC Berkeley / DevOps / Deep Learning / Visualization