Amazon EC2 Container Service (ECS) II
Continued from the introductory post (AWS Amazon EC2 Container Service (ECS)), in this post, we'll create a simple app using json file.
Before following this post, we may need to create an ECS cluster and NLB as pre-requisites.
From this post, we'll learn how to create a task definition and a service. Also, we'll see how to make a revision for an existing application.
In the AWS Management Console, on the "Services" menu, click ECS.
In the left navigation pane, click Task Definitions.
Click "Create new Task Definition"
On the Select launch type compatibility page,
Click EC2, and then click "Next step"
- Scroll to the bottom of the screen, then click "Configure via JSON".
This option allows us to load a Task Definition from a configuration file rather than manually creating the definition.
- Delete the code in the JSON panel.
The following task definition JSON file specifies two containers that are pulled from the Docker Hub repository.
- Copy and paste the following task definition into the JSON panel:
- Click "Save".
We will notice that the configuration screen has been populated based upon the template.
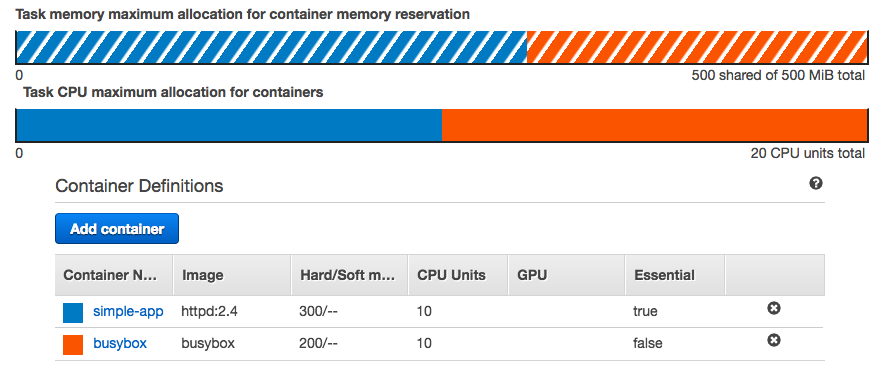
- Scroll to the bottom of the screen, then click "Create"
This will register the Task Definition in the ECS-demo family.
{
  "family": "ECS-demo",
  "containerDefinitions": [
    {
      "volumesFrom": [],
      "portMappings": [
        {
          "hostPort": 80,
          "containerPort": 80
        }
      ],
      "command": null,
      "environment": [],
      "essential": true,
      "entryPoint": null,
      "links": [],
      "mountPoints": [
        {
          "containerPath": "/usr/local/apache2/htdocs",
          "sourceVolume": "my-vol",
          "readOnly": null
        }
      ],
      "memory": 300,
      "name": "simple-app",
      "cpu": 10,
      "image": "httpd:2.4"
    },
    {
      "volumesFrom": [
        {
          "readOnly": null,
          "sourceContainer": "simple-app"
        }
      ],
      "portMappings": [],
      "command": [
        "/bin/sh -c \"while true; do echo '<html> <head> <title>Amazon ECS Sample App</title> <style>body {margin-top: 40px; background-color: #333;} </style> </head><body> <div style=color:white;text-align:center> <h1>Amazon ECS Sample App</h1> <h2>Congratulations!</h2> <p>Your application is now running on a container in Amazon ECS.</p>' > top; /bin/date > date ; echo '</div></body></html>' > bottom; cat top date bottom > /usr/local/apache2/htdocs/index.html ; sleep 1; done\""
      ],
      "environment": [],
      "essential": false,
      "entryPoint": [
        "sh",
        "-c"
      ],
      "links": [],
      "mountPoints": [],
      "memory": 200,
      "name": "busybox",
      "cpu": 10,
      "image": "busybox"
    }
  ],
  "volumes": [
    {
      "host": {
        "sourcePath": null
      },
      "name": "my-vol"
    }
  ]
}
In this section, we'll create a service definition.
- In the left navigation pane, Click Clusters.
In this post, we assume an "ECS-demo-Cluster" has already been created for us (with 3 t2-medium instances).

Click "ECS-demo-Cluster".
On the Services tab, click "Create" then configure:
- Launch type: EC2
- Service name: "myService"
- Number of tasks: "2"
This is the number of tasks that will be launched and maintained on our cluster.
Scroll to the bottom of the screen, then click "Next step"
In the Load balancing section, configure:
- Load balancer type: Network Load Balancer
- Service IAM role: ecsServiceRole.
This role allows Amazon ECS to register and deregister container instances on the load balancer as tasks are placed on them.
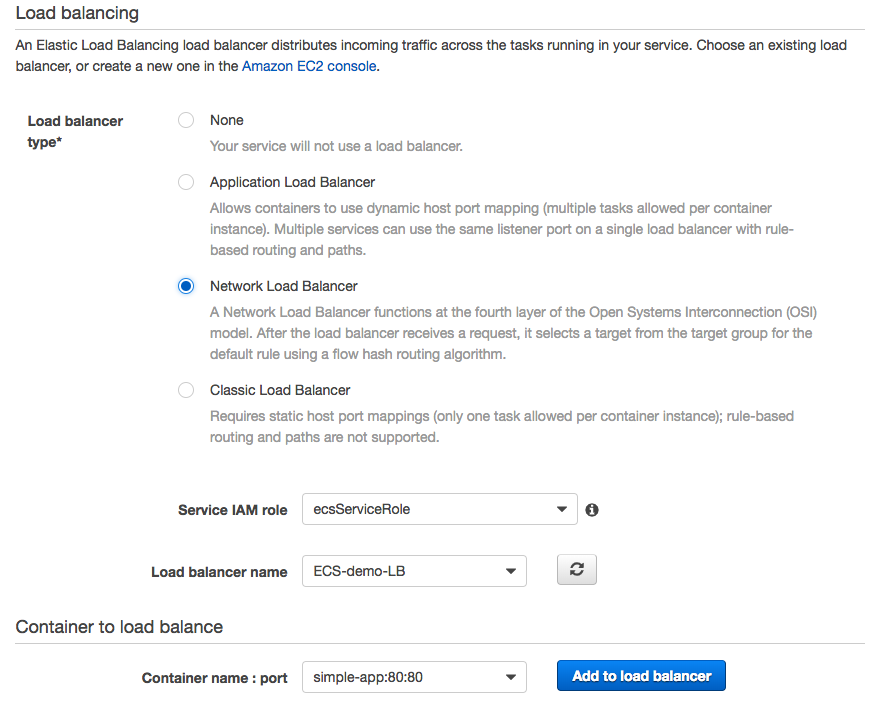
- Click "Add to load balancer" then configure:
-
Producer listener port: 80:TCP
- Target group name: myTargetGroup
-
Producer listener port: 80:TCP
In the Service discover (optional) section, for Namespace select MyPrivateDnsNamespace
Scroll to the bottom of the screen, then click "Next step"
For Set Auto Scaling (optional), click "Next step"
note: actually, an "AutoScaling group" will be created for us, for example, "EC2ContainerService-ECS-demo-Cluster-EcsInstanceAsg" and of course with a "launch configuration", for example, "EC2ContainerService-ECS-demo-Cluster-EcsInstanceLc".
Review our information, then click "Create Service"
Click "View Service", then the details of the service we just created will be displayed.
Click refresh every 30 seconds until the status for each task displays as RUNNING.
Click the Events tab. This shows the progress of the various tasks associated with our service creation request.
- Click the Refresh button till we get an event indicating that our service has reached a steady state.
This may take anywhere from 3-5 minutes.
Click Details tab.
In the Details tab, click the Target Group Name. myTargetGroup should be selected.
- Click the Targets tab.
In the Targets tab, we can see all of the registered targets.
Click the Description tab.
On the Description tab click our load balancer name.
It should be ECS-demo-LB.Copy the DNS name of our load balancer to our clipboard.
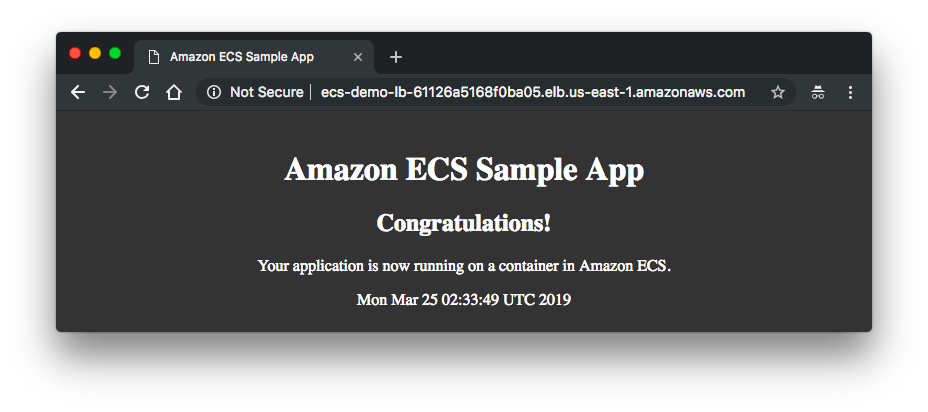
Open a new browser tab, then paste the load balancer DNS name and press Enter. If everything has been configured correctly we will see the sample app displayed as shown below:

Whenever we update the Docker image of an application, we can create a new task definition with that image and deploy it to our service, one task at a time. The service scheduler creates a task with the new task definition (provided there is an available container instance to place it on), and after it reaches the RUNNING state, a task that is using the old task definition is drained and stopped. This process continues until all of the desired tasks in our service are using the new task definition.
Keep the sample application browser tab open. We will use it again later.
In the AWS Management Console, on the "Services" menu, click ECS.
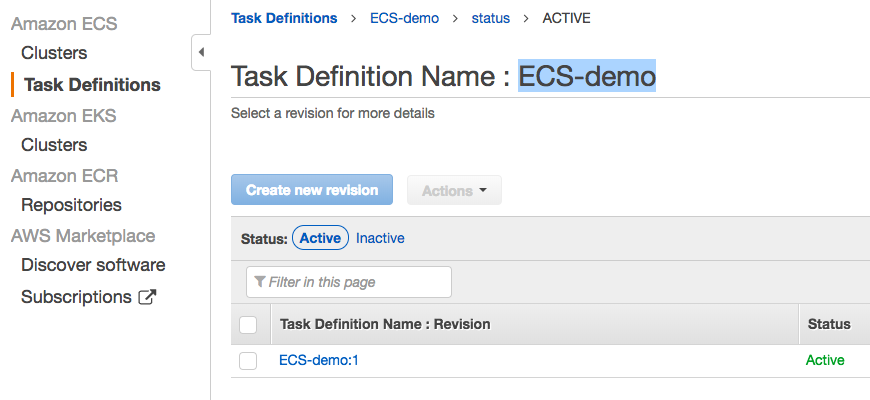
In the left navigation pane, click Task Definitions.
Select ECS-demo.
Click "Create new revision"
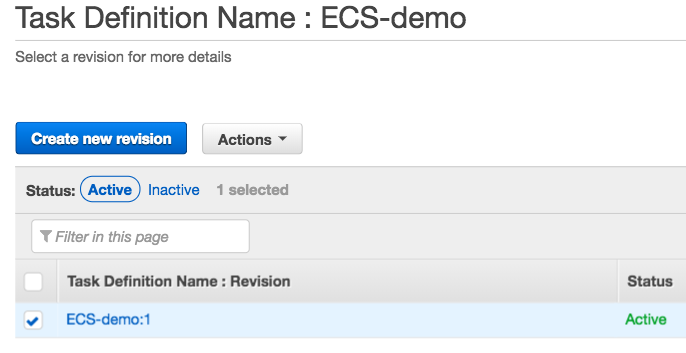
Scroll to the bottom of the screen, then click "Configure via JSON"
Delete the code in the JSON pane.
Copy and paste the code below into the JSON pane:
{
  "family": "ECS-demo",
  "containerDefinitions": [
    {
      "volumesFrom": [],
      "portMappings": [
        {
          "hostPort": 80,
          "containerPort": 80
        }
      ],
      "command": null,
      "environment": [],
      "essential": true,
      "entryPoint": null,
      "links": [],
      "mountPoints": [
        {
          "containerPath": "/usr/local/apache2/htdocs",
          "sourceVolume": "my-vol",
          "readOnly": null
        }
      ],
      "memory": 300,
      "name": "simple-app",
      "cpu": 10,
      "image": "httpd:2.4"
    },
    {
      "volumesFrom": [
        {
          "readOnly": null,
          "sourceContainer": "simple-app"
        }
      ],
      "portMappings": [],
      "command": [
        "/bin/sh -c \"while true; do echo '<html> <head> <title>Amazon ECS Sample App</title> <style>body {margin-top: 40px; background-color: #333;} </style> </head><body> <div style=color:white;text-align:center> <h1>Amazon ECS Sample App</h1> <h2>Thank You!</h2> <p>Your application is now running on a container in Amazon ECS.</p>' > top; /bin/date > date ; echo '</div></body></html>' > bottom; cat top date bottom > /usr/local/apache2/htdocs/index.html ; sleep 1; done\""
      ],
      "environment": [],
      "essential": false,
      "entryPoint": [
        "sh",
        "-c"
      ],
      "links": [],
      "mountPoints": [],
      "memory": 200,
      "name": "busybox",
      "cpu": 10,
      "image": "busybox"
    }
  ],
  "volumes": [
    {
      "host": {
        "sourcePath": null
      },
      "name": "my-vol"
    }
  ]
}
Click "Save"
Click "Create"

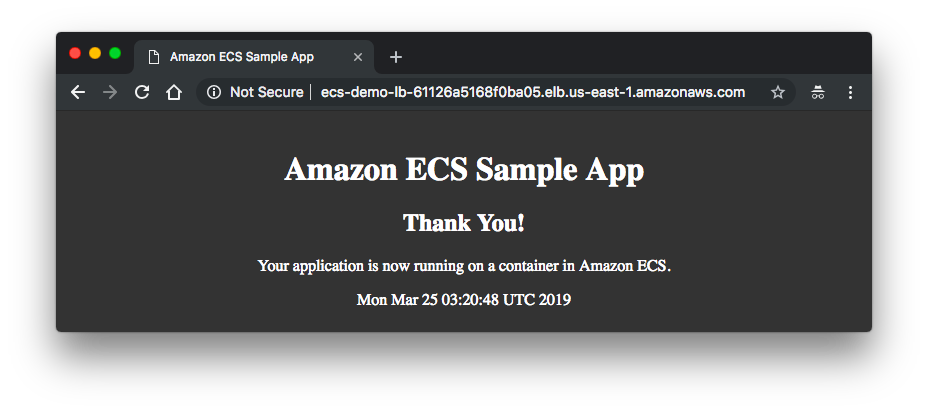
This will change the message displayed from Congratulations! to Thank you!.
In the left navigation pane, click Clusters.
Click "ECS-demo-Cluster".
On the Services tab, select "myService".
Click "Update" then configure:
Revision: Select the latest revision
Click "Next Step"
On Step 2, click "Next step"
On Step 3, click "Next step"
Click "Update Service"

Click "View Service", and this will deploy a new version of the application.
Click the Events tab.
Monitor the process of draining connections and stopping tasks.
We can refresh the events by clicking refresh.
We might see the message: service myService was unable to place a task because no container instance met all of its requirements.
Because there are only four instances available this is the expected behavior. The system needs to stop the task on each instance before it can start a new one on each instance.
Continue to refresh occasionally until we see service myService has reached a steady state at the top of the Event list.
Click the Deployments tab. The Running Count should be the same as the Desired count.
- Return to our web browser and refresh the Load Balancer's URL (DNS name).
We should see the new version of the app that says Thank You! changed from the previous message, Congratulations!.
In the left navigation pane, click Clusters.
Click "ECS-demo-Cluster".
On the Services tab, select "myService"
Click "Update" then configure:
Number of Tasks "3"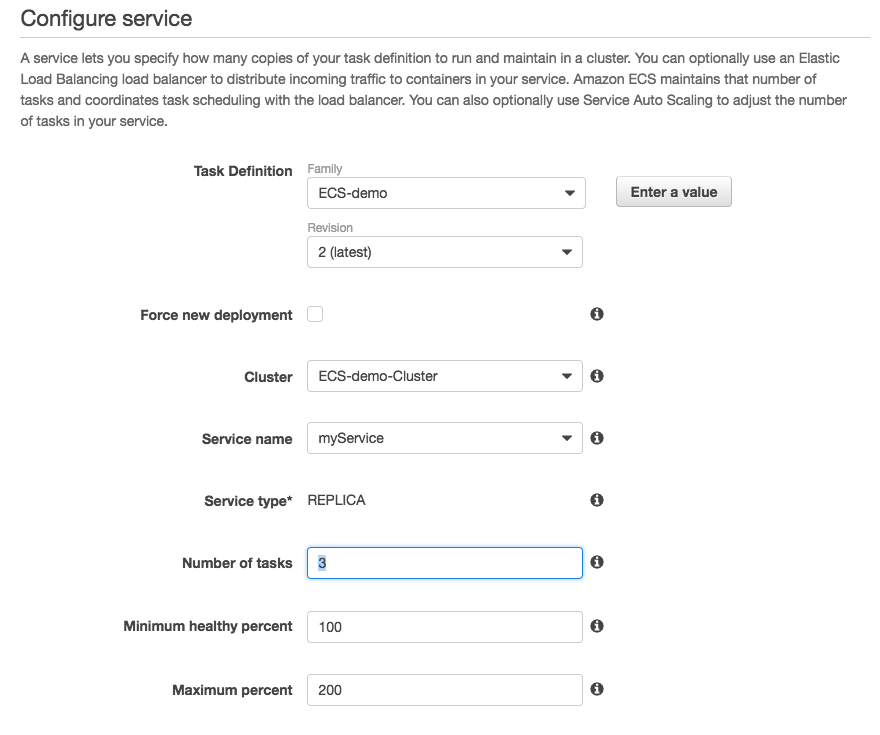
Click "Next step"
On Step 2, click "Next step"
On Step 3, click "Next step"
Review the changes and then click "Update Service"
Click "View Service", then the service will add an additional task.
Click refresh every 30 seconds until the Running count matches the Desired count.
Click the Events tab, then we will see an event that an additional instance was registered to myService.
- Click the Tasks tab, we should now see 3 tasks lists.

CLI samples for LB and TGIn this case, I have a NLB listening on 6514 on TLS protocol and at the backend a logstash fargate container is running with target group TCP protocol:

Pic source: Target groups for your Network Load Balancers
Client --> TLS connection (1st connection) --> NLB (TLS offloading done) --> TCP (2nd connection) --> Target Server
Unlike CLB and ALB, NLB with TCP listeners forwards all packets directly to its targets by rewriting the packet's destination IP address. This means that performing a telnet on the NLB listener IP address will actually telnet directly to the target.
For TLS listener with NLB, unlike TCP, we have two two connections. This is because TLS termination on the NLB terminates a TCP connection, a new TCP connection is established between our load balancer and your targets. So, there are two separate connections (client <-> NLB, NLB <-> target) instead of a single connection seen in case of TCP listeners.
Hence, for TCP listener with NLB, NLB will not manipulate traffic. It just acts as a pass-through.
To get NLB's atrributes:
$ aws elbv2 describe-listeners --region us-west-2 \
--load-balancer-arn "arn:aws:elasticloadbalancing:us-west-2:876028479052:loadbalancer/net/my-nlb/6dd61c17af2c6324"
{
    "Listeners": [
        {
            "ListenerArn": "arn:aws:elasticloadbalancing:us-west-2:876028479052:listener/net/my-nlb/6dd61c17af2c6324/c4eba7b60257d00c",
            "LoadBalancerArn": "arn:aws:elasticloadbalancing:us-west-2:876028479052:loadbalancer/net/my-nlb/6dd61c17af2c6324",
            "Port": 6514,
            "Protocol": "TLS",
            "Certificates": [
                {
                    "CertificateArn": "arn:aws:acm:us-west-2:876028479052:certificate/c999d58e-80cc-4154-9d98-031411fb84f8"
                }
            ],
            "SslPolicy": "ELBSecurityPolicy-2016-08",
            "DefaultActions": [
                {
                    "Type": "forward",
                    "TargetGroupArn": "arn:aws:elasticloadbalancing:us-west-2:876028479052:targetgroup/my-nlb-TG-tcp/87t7f60bb66ce235",
                    "Order": 1,
                    "ForwardConfig": {
                        "TargetGroups": [
                            {
                                "TargetGroupArn": "arn:aws:elasticloadbalancing:us-west-2:876028479052:targetgroup/my-nlb-TG-tcp/87t7f60bb66ce235"
                            }
                        ]
                    }
                }
            ]
        }
    ]
}
To get the listener's protocol specifically:
$ aws elbv2 describe-listeners --region us-west-2 --load-balancer-arn "arn:aws:elasticloadbalancing:us-west-2:876028479052:loadbalancer/net/my-nlb/6dd61c17af2c6324" --query 'Listeners[*].Protocol'
[
    "TLS"
]
To get the attributes of a target group:
$ aws elbv2 describe-target-groups \
--target-group-arns arn:aws:elasticloadbalancing:us-west-2:876028479052:targetgroup/my-nlb-TG-tcp/87t7f60bb66ce235
{
    "TargetGroups": [
        {
            "TargetGroupArn": "arn:aws:elasticloadbalancing:us-west-2:876028479052:targetgroup/my-nlb-TG-tcp/87t7f60bb66ce235",
            "TargetGroupName": "my-nlb-TG-tcp",
            "Protocol": "TCP",
            "Port": 6514,
            "VpcId": "vpc-0f0d9f8si777d89",
            "HealthCheckProtocol": "TCP",
            "HealthCheckPort": "traffic-port",
            "HealthCheckEnabled": true,
            "HealthCheckIntervalSeconds": 30,
            "HealthCheckTimeoutSeconds": 10,
            "HealthyThresholdCount": 3,
            "UnhealthyThresholdCount": 3,
            "LoadBalancerArns": [
                "arn:aws:elasticloadbalancing:us-west-2:876028479052:loadbalancer/net/my-nlb/6dd61c17af2c6324"
            ],
            "TargetType": "ip"
        }
    ]
}
To get all NLB in a region:
$ aws elbv2 describe-load-balancers
        --region us-west-2
        --query 'LoadBalancers[?(Type == `network`)].LoadBalancerArn | []'
What we get from NLB logs?I have two logs from two different sources: one is working but the other one which we're trying to degug shows the received bytes are zero.
An app that's working:
tls 2.0 2021-07-02T18:13:43 net/my-nlb/6dd61c17af2c6324 c4eba7b60257d00c
4.53.137.4:59997 10.9.1.178:6514 350077 33 57 0
- arn:aws:acm:us-west-2:876028479052:certificate/c999d58e-80cc-4154-9d98-031411fb84f8
- ECDHE-RSA-AES128-GCM-SHA256 tlsv12 - - - - -
Another app that needs to debugging:
tls 2.0 2021-07-02T18:06:49 net/sl-nlb/6dd61c17af2c6324 c4eba7b60257d00c
34.67.106.79:1214 10.9.1.178:6514 231 166 57 0
- arn:aws:acm:us-west-2:377028479240:certificate/c999d58e-80cc-4154-9d98-031411fb84f8
- ECDHE-RSA-AES128-GCM-SHA256 tlsv12 - sub.mydomain.com - - -
Please check Access logs for your Network Load Balancer for access log entries.
AWS (Amazon Web Services)
- AWS : EKS (Elastic Container Service for Kubernetes)
- AWS : Creating a snapshot (cloning an image)
- AWS : Attaching Amazon EBS volume to an instance
- AWS : Adding swap space to an attached volume via mkswap and swapon
- AWS : Creating an EC2 instance and attaching Amazon EBS volume to the instance using Python boto module with User data
- AWS : Creating an instance to a new region by copying an AMI
- AWS : S3 (Simple Storage Service) 1
- AWS : S3 (Simple Storage Service) 2 - Creating and Deleting a Bucket
- AWS : S3 (Simple Storage Service) 3 - Bucket Versioning
- AWS : S3 (Simple Storage Service) 4 - Uploading a large file
- AWS : S3 (Simple Storage Service) 5 - Uploading folders/files recursively
- AWS : S3 (Simple Storage Service) 6 - Bucket Policy for File/Folder View/Download
- AWS : S3 (Simple Storage Service) 7 - How to Copy or Move Objects from one region to another
- AWS : S3 (Simple Storage Service) 8 - Archiving S3 Data to Glacier
- AWS : Creating a CloudFront distribution with an Amazon S3 origin
- AWS : Creating VPC with CloudFormation
- AWS : WAF (Web Application Firewall) with preconfigured CloudFormation template and Web ACL for CloudFront distribution
- AWS : CloudWatch & Logs with Lambda Function / S3
- AWS : Lambda Serverless Computing with EC2, CloudWatch Alarm, SNS
- AWS : Lambda and SNS - cross account
- AWS : CLI (Command Line Interface)
- AWS : CLI (ECS with ALB & autoscaling)
- AWS : ECS with cloudformation and json task definition
- AWS Application Load Balancer (ALB) and ECS with Flask app
- AWS : Load Balancing with HAProxy (High Availability Proxy)
- AWS : VirtualBox on EC2
- AWS : NTP setup on EC2
- AWS: jq with AWS
- AWS & OpenSSL : Creating / Installing a Server SSL Certificate
- AWS : OpenVPN Access Server 2 Install
- AWS : VPC (Virtual Private Cloud) 1 - netmask, subnets, default gateway, and CIDR
- AWS : VPC (Virtual Private Cloud) 2 - VPC Wizard
- AWS : VPC (Virtual Private Cloud) 3 - VPC Wizard with NAT
- DevOps / Sys Admin Q & A (VI) - AWS VPC setup (public/private subnets with NAT)
- AWS - OpenVPN Protocols : PPTP, L2TP/IPsec, and OpenVPN
- AWS : Autoscaling group (ASG)
- AWS : Setting up Autoscaling Alarms and Notifications via CLI and Cloudformation
- AWS : Adding a SSH User Account on Linux Instance
- AWS : Windows Servers - Remote Desktop Connections using RDP
- AWS : Scheduled stopping and starting an instance - python & cron
- AWS : Detecting stopped instance and sending an alert email using Mandrill smtp
- AWS : Elastic Beanstalk with NodeJS
- AWS : Elastic Beanstalk Inplace/Rolling Blue/Green Deploy
- AWS : Identity and Access Management (IAM) Roles for Amazon EC2
- AWS : Identity and Access Management (IAM) Policies, sts AssumeRole, and delegate access across AWS accounts
- AWS : Identity and Access Management (IAM) sts assume role via aws cli2
- AWS : Creating IAM Roles and associating them with EC2 Instances in CloudFormation
- AWS Identity and Access Management (IAM) Roles, SSO(Single Sign On), SAML(Security Assertion Markup Language), IdP(identity provider), STS(Security Token Service), and ADFS(Active Directory Federation Services)
- AWS : Amazon Route 53
- AWS : Amazon Route 53 - DNS (Domain Name Server) setup
- AWS : Amazon Route 53 - subdomain setup and virtual host on Nginx
- AWS Amazon Route 53 : Private Hosted Zone
- AWS : SNS (Simple Notification Service) example with ELB and CloudWatch
- AWS : Lambda with AWS CloudTrail
- AWS : SQS (Simple Queue Service) with NodeJS and AWS SDK
- AWS : Redshift data warehouse
- AWS : CloudFormation
- AWS : CloudFormation Bootstrap UserData/Metadata
- AWS : CloudFormation - Creating an ASG with rolling update
- AWS : Cloudformation Cross-stack reference
- AWS : OpsWorks
- AWS : Network Load Balancer (NLB) with Autoscaling group (ASG)
- AWS CodeDeploy : Deploy an Application from GitHub
- AWS EC2 Container Service (ECS)
- AWS EC2 Container Service (ECS) II
- AWS Hello World Lambda Function
- AWS Lambda Function Q & A
- AWS Node.js Lambda Function & API Gateway
- AWS API Gateway endpoint invoking Lambda function
- AWS API Gateway invoking Lambda function with Terraform
- AWS API Gateway invoking Lambda function with Terraform - Lambda Container
- Amazon Kinesis Streams
- AWS: Kinesis Data Firehose with Lambda and ElasticSearch
- Amazon DynamoDB
- Amazon DynamoDB with Lambda and CloudWatch
- Loading DynamoDB stream to AWS Elasticsearch service with Lambda
- Amazon ML (Machine Learning)
- Simple Systems Manager (SSM)
- AWS : RDS Connecting to a DB Instance Running the SQL Server Database Engine
- AWS : RDS Importing and Exporting SQL Server Data
- AWS : RDS PostgreSQL & pgAdmin III
- AWS : RDS PostgreSQL 2 - Creating/Deleting a Table
- AWS : MySQL Replication : Master-slave
- AWS : MySQL backup & restore
- AWS RDS : Cross-Region Read Replicas for MySQL and Snapshots for PostgreSQL
- AWS : Restoring Postgres on EC2 instance from S3 backup
- AWS : Q & A
- AWS : Security
- AWS : Security groups vs. network ACLs
- AWS : Scaling-Up
- AWS : Networking
- AWS : Single Sign-on (SSO) with Okta
- AWS : JIT (Just-in-Time) with Okta
We can update a running service to change the number of tasks that are maintained by the service or which task definition is used by the tasks. If we have an application that needs more capacity, we can scale-up the service to use more of our container instances (if they are available). If we have unused capacity that we would like to scale-down, we can reduce the number of desired tasks in your service and free up resources.
Ph.D. / Golden Gate Ave, San Francisco / Seoul National Univ / Carnegie Mellon / UC Berkeley / DevOps / Deep Learning / Visualization