Puppet with Amazon AWS on CentOS 7 (I) - Master setup on EC2

Puppet
We want to use agent/master Puppet, even though it requires a central server, it's more convenient when updating configurations and can more easily take advantage of reporting and external data sources.
In agent/master Puppet, we run a central puppet master server (or servers) that hosts and compiles all of our configuration data. Other nodes run the puppet agent service, which periodically pulls their configurations from the master. Each agent will only get its own configuration, and will be unable to see how other nodes are configured.
We should completely install and configure Puppet on any puppet masters before installing on any agent nodes. A puppet master should be a dedicated machine with a fast processor, lots of RAM, and a fast disk. It must also be reachable at a reliable hostname. We can reduce setup time on our agents by making sure the master is available at the default hostname of puppet.
Login to the AWS CENTOS 7 instance using the key-pair as a user centos:
$ ssh -i bogo.pem centos@52.8.47.59

[centos@ip-172-31-27-23 ~]$ cat /etc/redhat-release
CentOS Linux release 7.0.1406 (Core)
Current hostname:
[centos@ip-172-31-27-23 ~]$ hostname
ip-172-31-27-23
We want to change it to puppet.localdomain:
[centos@ip-172-31-27-23 ~]$ sudo hostnamectl --static set-hostname puppet.localdomain
We can check if it's been changed:
[centos@ip-172-31-27-23 ~]$ hostnamectl
   Static hostname: puppet.localdomain
         Icon name: computer
           Chassis: n/a
        Machine ID: f9afeb75a5a382dce8269887a67fbf58
           Boot ID: a02b04e69e104b87a063b3a482d8544f
  Operating System: CentOS Linux 7 (Core)
       CPE OS Name: cpe:/o:centos:centos:7
            Kernel: Linux 3.10.0-123.8.1.el7.x86_64
      Architecture: x86_64
If we want the shell prompt to reflect the new hostname, we can edit /etc/bashrc:
PS1="[\u@\h:\W]\\$ "
Then, open a new shell, we get:
[centos@puppet:~]$
To get a FQDN hostname, we can switch the 'h' to 'H':
PS1="[\u@\H:\W]\\$ "
Our new prompt:
[centos@puppet.localdomain:~]$
To reflect the new hostname, we may want to modify /etc/sysconfig/network file:
NETWORKING=yes
NOZEROCONF=yes
HOSTNAME=puppet.localdomain
Also, /etc/hosts:
127.0.0.1 puppet.localdomain puppet localhost localhost.localdomain ...
The puppet master server that will be acting as the certificate authority should have its system time set accurately.
So, we need to synchronize the System Clock. We can easily install NTP (Network Time Protocol) which transmits time signals over a computer network.
[centos@ip-172-31-27-23 sysconfig]$ sudo yum install ntp
The puppet master server must allow incoming connections on port 8140, and agent nodes must be able to connect to the master on that port.
Let's reboot the machine so that the changes we've made reflected to our system.
[centos@ip-172-31-27-23 ~]$ sudo reboot
When we reboot, the hostname may be back to what it was, and it may remain not updated. This is because the cloud init overwrites what we did with hostname. So, we should tell it keep hostname. Add the following line to the end of /etc/cloud/cloud.cfg file:
preserve_hostname: true
For more information about cloud init, check ~cloud-init-dev/cloud-init/trunk.
We can get the puppet from Installing Puppet: Red Hat Enterprise Linux (and Derivatives).
The newest versions of Puppet can be installed from the yum.puppetlabs.com package repository, in our case, we want to get it from "Enterprise Linux 7" repository:[centos@puppet:~]$ sudo rpm -ivh https://yum.puppetlabs.com/puppetlabs-release-el-7.noarch.rpm ... Updating / installing... 1:puppetlabs-release-7-11 ################################# [100%]
After installing the repos, open /etc/yum.repos.d/puppetlabs.repo file for editing.
Locate the [puppetlabs-devel], and change the value of the enabled key from 0 to 1:
...
[puppetlabs-devel]
name=Puppet Labs Devel El 7 - $basearch
baseurl=http://yum.puppetlabs.com/el/7/devel/$basearch
gpgkey=file:///etc/pki/rpm-gpg/RPM-GPG-KEY-puppetlabs
enabled=1
gpgcheck=1
...
Clean up:
[centos@puppet:~]$ sudo yum clean all
On our puppet master node, run sudo yum install puppet-server:
[centos@puppet:~]$ sudo yum install puppet-server
This will install Puppet and an init script (/etc/init.d/puppetmaster) for running a test-quality puppet master server. However, we do not want to start the puppet master service yet.
Let's open up /etc/puppet/puppet.conf file. In the [main] section of the master's puppet.conf file, set the dns_alt_names setting to a comma-separated list of each hostname the master should be allowed to use:
[main]
    ...
    # Setup DNS names that puppet server will respond to
    dns_alt_names = puppet, puppet.localdomain

[agent]
    ...
Since this is the only puppet master in our deployment and it will be acting as the CA server, we should now run:
[centos@puppet:puppet]$ sudo puppet master --verbose --no-daemonize
This will create the CA certificate and the puppet master certificate, with the appropriate DNS names included.
[centos@puppet:puppet]$ sudo puppet master --verbose --no-daemonize
Info: Creating a new SSL key for ca
Info: Creating a new SSL certificate request for ca
Info: Certificate Request fingerprint (SHA256): B9:D9:EA:BF:7D:E9:F7:DB:CA:5A:A5:43:02:78:57:8D:AB:F1:FC:60:8E:7F:8F:67:DD:D8:81:11:E8:63:ED:0B
Notice: Signed certificate request for ca
Info: Creating a new certificate revocation list
Info: Creating a new SSL key for puppet.us-west-1.compute.internal
Info: csr_attributes file loading from /etc/puppet/csr_attributes.yaml
Info: Creating a new SSL certificate request for puppet.us-west-1.compute.internal
Info: Certificate Request fingerprint (SHA256): C3:28:61:09:72:36:E3:8A:61:95:5D:06:0C:E5:B0:F2:1F:D5:59:91:CD:8C:85:CD:89:A3:E7:A2:5E:92:11:05
Notice: puppet.us-west-1.compute.internal has a waiting certificate request
Notice: Signed certificate request for puppet.us-west-1.compute.internal
Notice: Removing file Puppet::SSL::CertificateRequest puppet.us-west-1.compute.internal at '/var/lib/puppet/ssl/ca/requests/puppet.us-west-1.compute.internal.pem'
Notice: Removing file Puppet::SSL::CertificateRequest puppet.us-west-1.compute.internal at '/var/lib/puppet/ssl/certificate_requests/puppet.us-west-1.compute.internal.pem'
Notice: Starting Puppet master version 3.8.2
^CNotice: Caught INT; storing stop
Notice: Processing stop
[centos@puppet:puppet]$
Once it says "Notice: Starting Puppet master version <VERSION>", we may want to type ctrl-C to kill the process as shown above. We're not ready to start the server yet.
Environments are isolated groups of Puppet agent nodes. A Puppet master server can serve each environment with completely different main manifests and modulepaths.
There are two ways to set up environments on a Puppet master: directory environments, and config file environments. We'll use directory environments since they are easier to use and they will become the only way to manage environments in Puppet 4.0
Directory environments let us add a new environment by simply adding a new directory of config data.
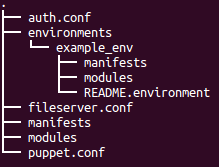
Let's look into the files under /etc/puppet:

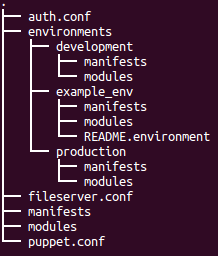
Let's create env directories under environments:
[centos@puppet:puppet]$ cd environments

[centos@puppet:environments]$ sudo mkdir -p production/manifests
[centos@puppet:environments]$ sudo mkdir -p production/modules
[centos@puppet:environments]$ sudo mkdir -p development/manifests
[centos@puppet:environments]$ sudo mkdir -p development/modules

A directory environment is just a directory and the directory name is the environment name. It must be located on the Puppet master server(s) in one of the environmentpath directories, usually $confdir/environments. Let's modify /etc/puppet/puppet.conf file:
[main]
    ...
    # Setup DNS names that puppet server will respond to
    dns_alt_names = puppet,puppet.localdomain

    # Let puppet know the env directories
    environmentpath = $confdir/environments

[agent]
    ...
Let's test if the installed puppet master is working.
[centos@puppet:puppet]$ sudo systemctl start puppetmaster.service

[centos@puppet:puppet]$ ps -ef|grep puppet
puppet    1636     1 23 23:09 ?        00:00:01 /usr/bin/ruby /usr/bin/puppet master --no-daemonize
No error from the master. We can stop it now.
[centos@puppet:puppet]$ sudo systemctl stop puppetmaster.service
Will be continued to Configuring a Puppet Master Server with Passenger and Apache.
Puppet
Ph.D. / Golden Gate Ave, San Francisco / Seoul National Univ / Carnegie Mellon / UC Berkeley / DevOps / Deep Learning / Visualization