Puppet Forge modules

Puppet
IN this chapter, we'll try two new things:
- We'll use Puppet Forge module to install lamp.
- Instead of using new hostnames, we'll use DNS names given by EC2.
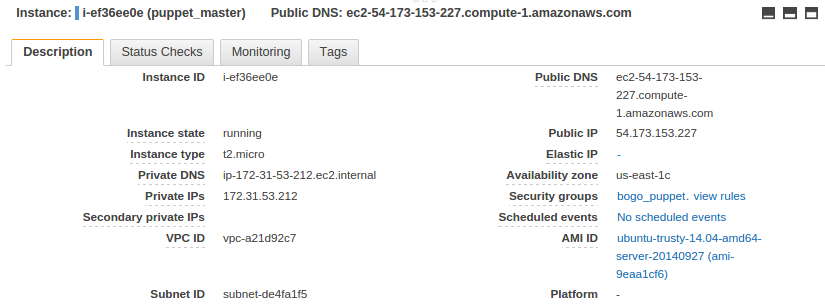
Master node:

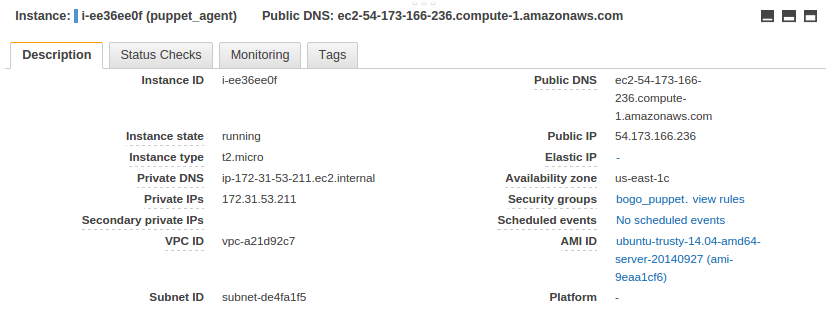
Agent node:

Start from the directory where *.pem file is located, we need to login using ssh to our ec2 nodes.
Master node:
$ ssh -i bogo_puppet.pem ubuntu@ec2-54-173-153-227.compute-1.amazonaws.com
The authenticity of host 'ec2-54-173-153-227.compute-1.amazonaws.com (54.173.153.227)' can't be established.
ECDSA key fingerprint is 13:43:76:05:aa:3b:ef:20:d1:2c:0d:c8:9d:c2:45:d9.
Are you sure you want to continue connecting (yes/no)? yes
Warning: Permanently added 'ec2-54-173-153-227.compute-1.amazonaws.com,54.173.153.227' (ECDSA) to the list of known hosts.
Welcome to Ubuntu 14.04.1 LTS (GNU/Linux 3.13.0-36-generic x86_64)

$ hostname
ip-172-31-53-212
Agent node:
$ ssh -i bogo_puppet.pem ubuntu@ec2-54-173-166-236.compute-1.amazonaws.com
The authenticity of host 'ec2-54-173-166-236.compute-1.amazonaws.com (54.173.166.236)' can't be established.
ECDSA key fingerprint is c0:e2:64:2c:66:ed:bb:5c:b1:a3:f4:d7:26:c7:cd:86.
Are you sure you want to continue connecting (yes/no)? yes
Warning: Permanently added 'ec2-54-173-166-236.compute-1.amazonaws.com,54.173.166.236' (ECDSA) to the list of known hosts.
Welcome to Ubuntu 14.04.1 LTS (GNU/Linux 3.13.0-36-generic x86_64)

$ hostname
ip-172-31-53-211
Download the "puppetlabs-release" package:
$ cd ~
$ wget https://apt.puppetlabs.com/puppetlabs-release-trusty.deb
Install the package by running:
$ sudo dpkg -i puppetlabs-release-trusty.deb
Run
$ sudo apt-get update
to get the new list of available packages.
On our puppet master node, run:
$ sudo apt-get install puppetmaster
Download the "puppetlabs-release" package:
$ cd ~
$ wget https://apt.puppetlabs.com/puppetlabs-release-trusty.deb
Install the package by running:
$ sudo dpkg -i puppetlabs-release-trusty.deb
Run
$ sudo apt-get update
to get the new list of available packages.
To install puppet agent, run:
$ sudo apt-get install puppet
Add the following two lines to /etc/hosts file on Puppet master and agent:
172.31.53.211 ip-172-31-53-211
172.31.53.212 ip-172-31-53-212
The main puppet configuration file, puppet.conf, consists of three sections: [main], [master], and [agent].
- [main] - contains global configuration.
- [master] - specific to the puppet master.
- [agent] - used to configure the puppet agent.
The configuration file has many options which might be relevant to our own setup. A full description of the file is available at Puppet Labs: Main Config File (/etc/puppet/puppet.conf).
Puppet uses a domain-specific language to describe system configurations, and these descriptions are saved to files called "manifests", which have a *.pp file extension. The default main manifest file is located at /etc/puppet/manifests/site.pp.
We'll add more into this file later in this tutorial.
Before running the agent, we must make a few configuration changes.
Edit the agent's puppet.conf:
$ sudo vi /etc/puppet/puppet.conf
It looks exactly like the Puppet master's initial configuration file.
We may want to delete the 'templatedir' line. Then delete the [master] section, and all of the lines below it.
Assuming that the Puppet master is reachable at puppet, the agent should be able to connect to the master.
[agent]
server=ip-172-31-53-212.ec2.internal
The puppet agent is disabled by default. To change this, update its default file:
$ sudo vi /etc/default/puppet
And change value of START to "yes":
# Defaults for puppet - sourced by /etc/init.d/puppet

# Enable puppet agent service?
# Setting this to "yes" allows the puppet agent service to run.
# Setting this to "no" keeps the puppet agent service from running.
START=yes

# Startup options
DAEMON_OPTS=""
Now, the Puppet agent is ready to run. Do so by running the following command:
$ sudo service puppet start
 * Starting puppet agent

$ ps aux |grep puppet
root      2743  0.0  3.4 195176 35500 ?        Ssl  06:53   0:00 /usr/bin/ruby /usr/bin/puppet agent
If everything is configured properly, we should not see any output. The first time we run the Puppet agent, it generates an SSL certificate and sends a signing request to the Puppet master. After the Puppet master signs the agent's certificate, it will be able to communicate with the agent node.
Puppet uses SSL certificates to authenticate communication between master and agent nodes. The Puppet master acts as a certificate authority (CA), and must generate its own certificates which is used to sign agent certificate requests. We will setup the master's certificates now.
Let's delete any existing SSL certificates that were created during the package install. The default location of Puppand sign et's SSL certificates is /var/lib/puppet/ssl:
$ sudo rm -rf /var/lib/puppet/ssl
If this is the only puppet master in our deployment, or if it will be acting as the CA server for a multi-master site, let's create new CA certificates by running the following command:
$ sudo puppet master --verbose --no-daemonize
Info: Creating a new SSL key for ca
Info: Creating a new SSL certificate request for ca
Info: Certificate Request fingerprint (SHA256): 67:A3:53:E8:E9:0D:22:1F:CD:C3:91:A1:F0:F4:95:B1:3C:28:4C:AD:C3:5E:AC:62:D6:A0:05:D6:58:36:EB:6A
Notice: Signed certificate request for ca
Info: Creating a new certificate revocation list
Info: Creating a new SSL key for ip-172-31-53-212.ec2.internal
Info: csr_attributes file loading from /etc/puppet/csr_attributes.yaml
Info: Creating a new SSL certificate request for ip-172-31-53-212.ec2.internal
Info: Certificate Request fingerprint (SHA256): AD:0E:D8:3C:F3:CA:B3:F5:35:D3:E2:FE:16:07:A6:62:32:BF:A0:CE:9D:06:65:9F:11:12:C7:56:E5:1A:FC:16
Notice: ip-172-31-53-212.ec2.internal has a waiting certificate request
Notice: Signed certificate request for ip-172-31-53-212.ec2.internal
Notice: Removing file Puppet::SSL::CertificateRequest ip-172-31-53-212.ec2.internal at '/var/lib/puppet/ssl/ca/requests/ip-172-31-53-212.ec2.internal.pem'
Notice: Removing file Puppet::SSL::CertificateRequest ip-172-31-53-212.ec2.internal at '/var/lib/puppet/ssl/certificate_requests/ip-172-31-53-212.ec2.internal.pem'
Notice: Starting Puppet master version 3.7.3
This is a non-daemonized WEBrick puppet master instance, and we need to wait for it to generate and sign a new certifacate. We will see several lines of output saying that SSL keys and certificates are being created. Once we see Notice: Starting Puppet master version 3.7.3, the certificate setup is complete. Press CTRL-C to stop the temporary puppet master and return to the shell.
^CNotice: Caught INT; calling stop
If we want to check what ports are being used:
$ sudo netstat -ltnp
If we want to look at the cert info of the certificate that was just created, type in the following:
$ sudo puppet cert list -all
+ "ip-172-31-53-212.ec2.internal" (SHA256) 25:BC:80:63:85:23:95:0B:90:32:42:75:BB:91:CB:BF:42:65:A5:6E:F4:1D:EA:23:47:D5:72:8B:F3:55:59:45 (alt names: "DNS:ip-172-31-53-212.ec2.internal", "DNS:puppet", "DNS:puppet.ec2.internal")
The previous command actually lists all of the signed certificates and unsigned certificate requests.
To see the puppet master's certified hostnames, we can run the following command on the puppet master server:
$ sudo puppet master --configprint certname
ip-172-31-53-212.ec2.internal
To see the puppet master's certified hostnames, we can run the following command on the puppet master server:
$ sudo puppet master --verbose

$ ps -ef |grep puppet
puppet    7039     1  0 00:49 ?        00:00:00 /usr/bin/ruby /usr/bin/puppet master --verbose
The Puppet agent is ready to run:
$ sudo service puppet start
 * Starting puppet agent                                                                                     [ OK ]
If everything is configured properly, we should not see any output. The first time we run the Puppet agent, it generates an SSL certificate and sends a signing request to the Puppet master. After the Puppet master signs the agent's certificate, it will be able to communicate with the agent node.
Not in this chapter but it is also possible initiate the check for a particular agent node manually, by running the following command (on the agent node in question):
$ sudo puppet agent --test
$ sudo puppet cert list -all
  "ip-172-31-53-211.ec2.internal" (SHA256) 13:2E:06:C1:D8:51:E6:34:61:85:3C:B5:82:99:F4:FB:96:04:B3:CB:6F:05:67:AD:D6:93:E7:C7:E4:2E:BB:A0
+ "ip-172-31-53-212.ec2.internal" (SHA256) 07:C0:0E:C0:B0:30:51:89:02:AE:1B:AF:3C:C5:40:1D:5A:E5:DF:BE:00:18:23:22:2E:FA:8B:6A:7B:E3:89:60 (alt names: "DNS:ip-172-31-53-212.ec2.internal", "DNS:puppet", "DNS:puppet.ec2.internal")
As mentioned in previous sections, in an agent/master deployment, an admin must approve a certificate request for each agent node before that node can fetch configurations. Agent nodes will request certificates the first time they attempt to run.
To sign a certificate request, use the puppet cert sign command, with the hostname of the certificate we want to sign. For example, to sign 'puppet_agent.example.com', we would use the following command:
$ sudo puppet cert sign ip-172-31-53-211.ec2.internal
Notice: Signed certificate request for ip-172-31-53-211.ec2.internal
Notice: Removing file Puppet::SSL::CertificateRequest ip-172-31-53-211.ec2.internal at '/var/lib/puppet/ssl/ca/requests/ip-172-31-53-211.ec2.internal.pem'
Once Puppet agent has been signed, the Puppet master can now communicate and control the node that the signed certificate belongs to.
The modules in the Puppet Forge repository is publically-available modules, and they can be useful when we develop our own infrastructure. The Puppet Forge modules can be quickly installed with built-in puppet module command.
Since Apache and MySQL are available via Puppet Forge, we will demonstrate how they can be used to help us set up our lamp stack.
On our Puppet master, install the puppetlabs-apache module:
$ sudo puppet module install puppetlabs-apache
We will see the following output, which indicates the modules installed correctly:
Notice: Preparing to install into /etc/puppet/modules ...
Notice: Downloading from https://forgeapi.puppetlabs.com ...
Notice: Installing -- do not interrupt ...
/etc/puppet/modules
--- puppetlabs-apache (v1.1.1)
   --- puppetlabs-concat (v1.1.2)
   --- puppetlabs-stdlib (v4.3.2)
Also, we need to install the puppetlabs-mysql module:
$ sudo puppet module install puppetlabs-mysql
Notice: Preparing to install into /etc/puppet/modules ...
Notice: Downloading from https://forgeapi.puppetlabs.com ...
Notice: Installing -- do not interrupt ...
/etc/puppet/modules
--- puppetlabs-mysql (v2.3.1)
   --- puppetlabs-stdlib (v4.3.2)
Now, the apache and mysql modules are available.
Now let's edit our main manifest so it uses the new modules to install our lamp stack. On the Puppet master, edit the main manifest (/etc/puppet/manifests/site.pp):
node default { }

node 'ip-172-31-53-211' {

  class { 'apache':                # use the "apache" module
    default_vhost => false,        # don't use the default vhost
    default_mods => false,         # don't load default mods
    mpm_module => 'prefork',       # use the "prefork" mpm_module
  }

  include apache::mod::php         # include mod php
  apache::vhost { 'example.com':   # create a vhost called "example.com"
    port    => '80',               # use port 80
    docroot => '/var/www/html',    # set the docroot to the /var/www/html
  }

  class { 'mysql::server':
    root_password => 'password',
  }

  file { 'info.php':                                # file resource name
    path => '/var/www/html/info.php',               # destination path
    ensure => file,
    require => Class['apache'],                     # require apache class be used
    source => 'puppet:///modules/apache/info.php',  # specify location of file to be copied
  }
}
The apache module can be passed parameters that override the default behavior of the module. We are passing in some basic settings that disable the default virtual host that the module creates, and make sure we create a virtual host that can use php.
Using the MySQL module is similar to using the Apache module. We will keep it simple since we are not actually using the database this time.
The file resource ensures info.php gets copied to the proper location. This time, we will use the source parameter to specify a file to copy. This file resource declaration is slightly different from the one we used in our previous example. The main difference is that we are specifying the source parameter instead of the content parameter. Source tells puppet to copy a file over, instead of simply specifying the file's contents. The specified source, puppet:///modules/apache/info.php gets interpreted by Puppet into /etc/puppet/modules/apache/files/info.php, so we must create the source file in order for this resource declaration to work properly.
Let's create the info.php file with the following command:
sudo sh -c 'echo "<?php phpinfo(); ?>" > /etc/puppet/modules/apache/files/info.php'
The next time our 'ip-172-31-53-211' Puppet agent node pulls its configuration from the master ('ip-172-31-53-212'), it will evaluate the main manifest and apply the module that specifies a lamp stack setup.
But if we want to try it out immediately, run the following command on the 'ip-172-31-53-211' Puppet agent node:
$ sudo puppet agent --test
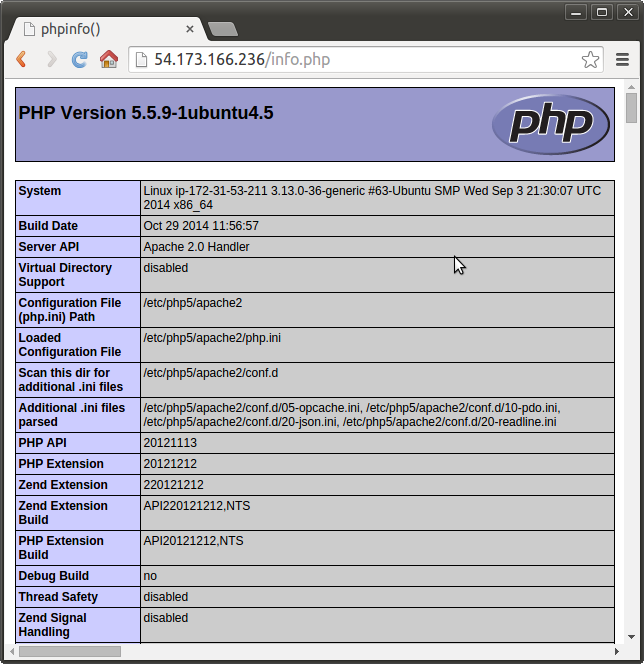
Once it completes, we can see that a basic lamp stack is set up:
Master node:

Puppet
Ph.D. / Golden Gate Ave, San Francisco / Seoul National Univ / Carnegie Mellon / UC Berkeley / DevOps / Deep Learning / Visualization