Docker & Kubernetes - Istio on EKS
The idea of Istio is that services are running in microservices architecture, and we want them to talk to each other.

source: TGI Kubernetes 003: Istio
The architecture of Istio service mesh is split between two disparate parts: the data plane and the control plane.
The data plane is a "proxy service" that handles communications between services. The data plane is deployed as a sidecar proxy, a supporting service added to the primary application. In Kubernetes, proxies are deployed in the same pod as an application with a shared network namespace. Note that we usually have 1 container per pods. But this sidecar container in Istio is one of the exceptional cases when we run two containers side by side in a pod because they are really tied together and need to talk each other efficiently.
Among NGINX, Envoy, and HAProxy, the Envoy has become a wildly popular proxy because it's designed specifically for microservice architectures.
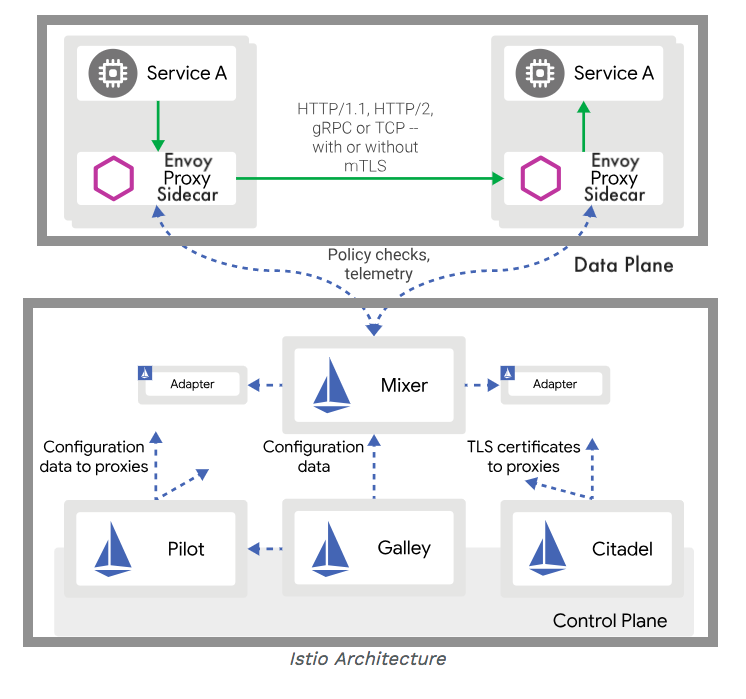
The control plane, while not handling ay data, oversees policies and configurations for the data plane.
First, let's creaate an EKS cluster with eksctl cli.
Install eksctl with Homebrew for macOS:
$ brew install weaveworks/tap/eksctl
Create EKS cluster with cluster name "attractive-gopher":
$ eksctl create cluster --name=istio-on-eks \
--node-type=t2.medium --nodes-min=2 --nodes-max=2 \
--region=us-east-1 --zones=us-east-1a,us-east-1b,us-east-1c,us-east-1d
[ℹ]  using region us-east-1
[ℹ]  subnets for us-east-1a - public:192.168.0.0/19 private:192.168.128.0/19
[ℹ]  subnets for us-east-1b - public:192.168.32.0/19 private:192.168.160.0/19
[ℹ]  subnets for us-east-1c - public:192.168.64.0/19 private:192.168.192.0/19
[ℹ]  subnets for us-east-1d - public:192.168.96.0/19 private:192.168.224.0/19
[ℹ]  nodegroup "ng-85e700a6" will use "ami-0abcb9f9190e867ab" [AmazonLinux2/1.12]
[ℹ]  creating EKS cluster "istio-on-eks" in "us-east-1" region
[ℹ]  will create 2 separate CloudFormation stacks for cluster itself and the initial nodegroup
[ℹ]  if you encounter any issues, check CloudFormation console or try 'eksctl utils describe-stacks --region=us-east-1 --name=istio-on-eks'
[ℹ]  2 sequential tasks: { create cluster control plane "istio-on-eks", create nodegroup "ng-85e700a6" }
[ℹ]  building cluster stack "eksctl-istio-on-eks-cluster"
[ℹ]  deploying stack "eksctl-istio-on-eks-cluster"
[ℹ]  buildings nodegroup stack "eksctl-istio-on-eks-nodegroup-ng-85e700a6"
[ℹ]  deploying stack "eksctl-istio-on-eks-nodegroup-ng-85e700a6"
[✔]  all EKS cluster resource for "istio-on-eks" had been created
[✔]  saved kubeconfig as "/Users/kihyuckhong/.kube/config"
[ℹ]  adding role "arn:aws:iam::526262051452:role/eksctl-istio-on-eks-nodegroup-ng-NodeInstanceRole-1U2Z6IRXVF5YA" to auth ConfigMap
[ℹ]  nodegroup "ng-85e700a6" has 0 node(s)
[ℹ]  waiting for at least 2 node(s) to become ready in "ng-85e700a6"
[ℹ]  nodegroup "ng-85e700a6" has 2 node(s)
[ℹ]  node "ip-192-168-116-147.ec2.internal" is ready
[ℹ]  node "ip-192-168-13-10.ec2.internal" is ready
[ℹ]  kubectl command should work with "/Users/kihyuckhong/.kube/config", try 'kubectl get nodes'
[✔]  EKS cluster "istio-on-eks" in "us-east-1" region is ready
Note that this will create not only the "Control Plane"
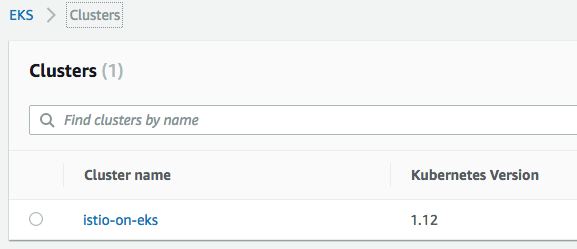
but also "Data Plane". So, we'll have 2 worker nodes with instance type of "t2.small" in "us-east-1" region with the AZs (a,b,c,d, and f).

Control Plane:
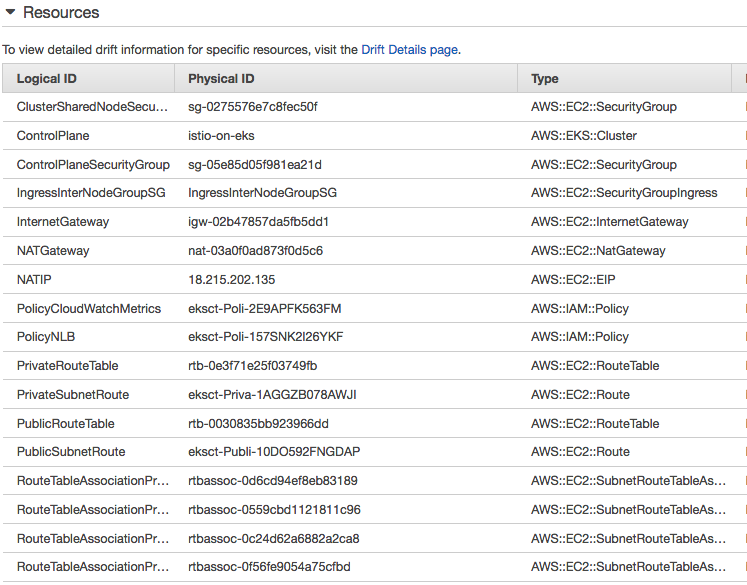
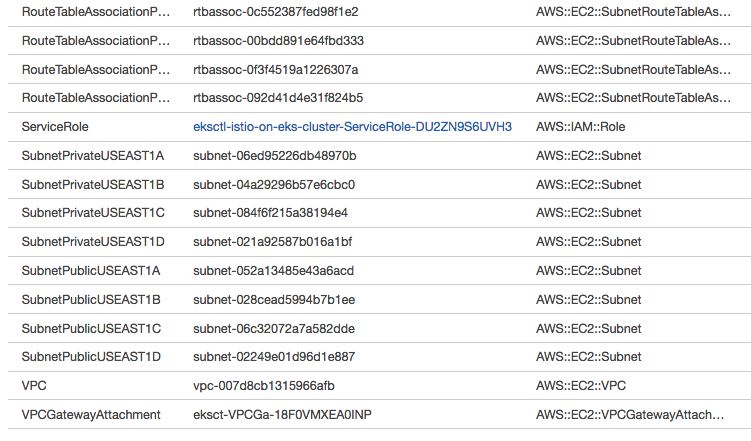
Data Plane worker nodes:
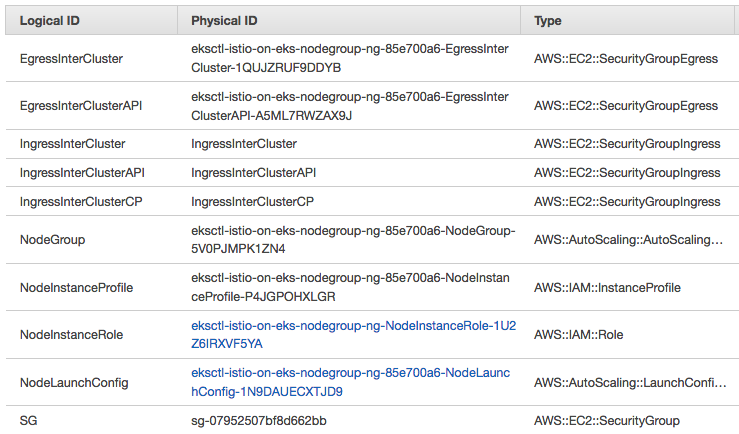
Worker nodes:

Autoscaling Group:

Install helm
Before we can get started configuring helm we'll need to first install the command line tools that we will interact with. To do this run the following (Amazon EKS Workshop > Helm > Install Helm CLI):
$ cd ~/environment

$ curl https://raw.githubusercontent.com/kubernetes/helm/master/scripts/get > get_helm.sh

$ chmod +x get_helm.sh

$ ./get_helm.sh
Helm v2.13.1 is available. Changing from version v2.12.1.
Downloading https://kubernetes-helm.storage.googleapis.com/helm-v2.13.1-darwin-amd64.tar.gz
Preparing to install helm and tiller into /usr/local/bin
Password:
helm installed into /usr/local/bin/helm
tiller installed into /usr/local/bin/tiller
Run 'helm init' to configure helm.
Note: Once we install helm, the command will prompt us to run 'helm init'. Do not run 'helm init'. Follow the instructions to configure helm using Kubernetes RBAC and then install tiller as specified below If accidentally run 'helm init, we can safely uninstall tiller by running 'helm reset –force'
Configure Helm access with RBAC
Helm relies on a service called tiller that requires special permission on the kubernetes cluster, so we need to build a Service Account for tiller to use. We'll then apply this to the cluster. We'll do this while we install istio to EKS cluster.
Install eksctl
We'll run Istio on EKS cluster using eksctl which a tool that makes spinning up clusters simple (eksctl makes it easy to run Istio on EKS).
$ brew install weaveworks/tap/eksctl
Download the Istio chart and samples from and unzip.
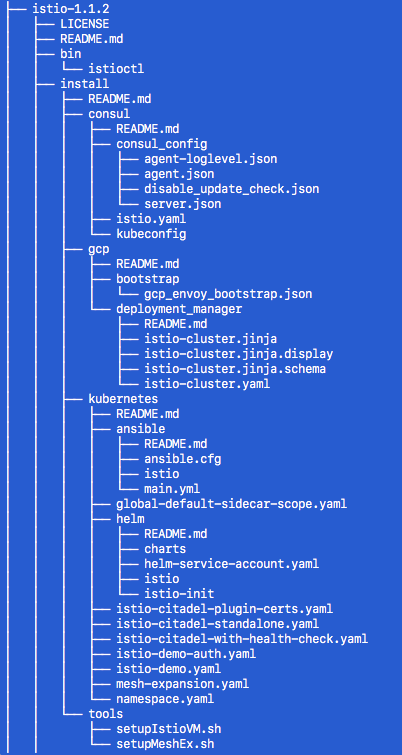
Helm relies on tiller that requires special permission on the kubernetes cluster, so we need to build a Service Account for tiller to use. We'll then apply this to the cluster.
We'll be using the following service account manifest (./install/kubernetes/helm/helm-service-account.yaml):
---
apiVersion: v1
kind: ServiceAccount
metadata:
  name: tiller
  namespace: kube-system
---
apiVersion: rbac.authorization.k8s.io/v1beta1
kind: ClusterRoleBinding
metadata:
  name: tiller
roleRef:
  apiGroup: rbac.authorization.k8s.io
  kind: ClusterRole
  name: cluster-admin
subjects:
  - kind: ServiceAccount
    name: tiller
    namespace: kube-system
Let's install Tiller on the EKS cluster using the manifest. We want to make sure we have a service account with the cluster-admin role defined for Tiller.
$ cd istio-${istio_version}/

$ kubectl create --filename=./install/kubernetes/helm/helm-service-account.yaml
serviceaccount/tiller created
clusterrolebinding.rbac.authorization.k8s.io/tiller created

$ helm init --wait --service-account=tiller
$HELM_HOME has been configured at /Users/kihyuckhong/.helm.

Tiller (the Helm server-side component) has been installed into your Kubernetes Cluster.

Please note: by default, Tiller is deployed with an insecure 'allow unauthenticated users' policy.
To prevent this, run `helm init` with the --tiller-tls-verify flag.
For more information on securing your installation see: https://docs.helm.sh/using_helm/#securing-your-helm-installation
Happy Helming!
The helm init will install tiller into our running cluster which gives it access to manage resources in our cluster. It will also set up any necessary local configuration.
Common actions from this point include:
- helm search: search for charts
- helm fetch: download a chart to our local directory to view
- helm install: upload the chart to Kubernetes
- helm list: list releases of charts
Let's see what we have now:
$ kubectl get svc --all-namespaces
NAMESPACE     NAME            TYPE        CLUSTER-IP      EXTERNAL-IP   PORT(S)         AGE
default       kubernetes      ClusterIP   10.100.0.1      <none>        443/TCP         15m
kube-system   kube-dns        ClusterIP   10.100.0.10     <none>        53/UDP,53/TCP   15m
kube-system   tiller-deploy   ClusterIP   10.100.191.223   <none>        44134/TCP       2m26s

$ kubectl get pods -n kube-system
NAME                             READY     STATUS    RESTARTS   AGE
aws-node-vvt56                   1/1       Running   2          3m6s
aws-node-ztzht                   1/1       Running   0          3m7s
coredns-66bb8d6fdc-g5p7z         1/1       Running   0          9m44s
coredns-66bb8d6fdc-qkgwb         1/1       Running   0          9m44s
kube-proxy-6fhd2                 1/1       Running   0          3m7s
kube-proxy-v98lm                 1/1       Running   0          3m6s
tiller-deploy-7b65c7bff9-nxx7k   1/1       Running   0          84s
Install the istio-init chart to bootstrap all the Istio's CRDs:
$ helm install install/kubernetes/helm/istio-init --name istio-init --namespace istio-system
NAME:   istio-init
LAST DEPLOYED: Sun Apr 14 14:22:38 2019
NAMESPACE: istio-system
STATUS: DEPLOYED

RESOURCES:
==> v1/ClusterRole
NAME                     AGE
istio-init-istio-system  0s

==> v1/ClusterRoleBinding
NAME                                        AGE
istio-init-admin-role-binding-istio-system  0s

==> v1/ConfigMap
NAME          DATA  AGE
istio-crd-10  1     0s
istio-crd-11  1     0s

==> v1/Job
NAME               COMPLETIONS  DURATION  AGE
istio-init-crd-10  0/1          0s        0s
istio-init-crd-11  0/1          0s        0s

==> v1/Pod(related)
NAME                     READY  STATUS             RESTARTS  AGE
istio-init-crd-10-lmzkk  0/1    ContainerCreating  0         0s
istio-init-crd-11-w98f6  0/1    ContainerCreating  0         0s

==> v1/ServiceAccount
NAME                        SECRETS  AGE
istio-init-service-account  1        0s
Verify that all 53 Istio CRDs were committed to the Kubernetes api-server using the following command:
$ kubectl get crds | grep 'istio.io\|certmanager.k8s.io' | wc -l
53
Install the istio chart:
$ helm install install/kubernetes/helm/istio --name istio --namespace istio-system NAME: istio LAST DEPLOYED: Sun Apr 14 14:34:40 2019 NAMESPACE: istio-system STATUS: DEPLOYED RESOURCES: ==> v1/ClusterRole NAME AGE istio-citadel-istio-system 12s istio-galley-istio-system 12s istio-ingressgateway-istio-system 12s istio-mixer-istio-system 12s istio-pilot-istio-system 12s istio-reader 12s istio-sidecar-injector-istio-system 12s prometheus-istio-system 12s ==> v1/ClusterRoleBinding NAME AGE istio-citadel-istio-system 12s istio-galley-admin-role-binding-istio-system 12s istio-ingressgateway-istio-system 12s istio-mixer-admin-role-binding-istio-system 12s istio-multi 12s istio-pilot-istio-system 12s istio-sidecar-injector-admin-role-binding-istio-system 12s prometheus-istio-system 12s ==> v1/ConfigMap NAME DATA AGE istio 2 12s istio-galley-configuration 1 12s istio-security-custom-resources 2 12s istio-sidecar-injector 1 12s prometheus 1 12s ==> v1/Pod(related) NAME READY STATUS RESTARTS AGE istio-citadel-5bbc997554-cvzgl 1/1 Running 0 12s istio-galley-64f64687c8-j2kwc 0/1 ContainerCreating 0 12s istio-ingressgateway-5f577bbbcd-5gx7r 0/1 ContainerCreating 0 12s istio-pilot-78f7d6645f-79bb9 0/2 Pending 0 12s istio-policy-5fd9989f74-2whxz 0/2 ContainerCreating 0 12s istio-sidecar-injector-549585c8d9-nrtbq 0/1 ContainerCreating 0 12s istio-telemetry-5b47cf5b9b-wn96q 0/2 Pending 0 12s prometheus-8647cf4bc7-j55qv 0/1 Init:0/1 0 12s ==> v1/Role NAME AGE istio-ingressgateway-sds 12s ==> v1/RoleBinding NAME AGE istio-ingressgateway-sds 12s ==> v1/Service NAME TYPE CLUSTER-IP EXTERNAL-IP PORT(S) AGE istio-citadel ClusterIP 10.100.221.226 <none> 8060/TCP,15014/TCP 12s istio-galley ClusterIP 10.100.156.84 <none> 443/TCP,15014/TCP,9901/TCP 12s istio-ingressgateway LoadBalancer 10.100.244.93 a1cb269d45efd... 80:31380/TCP,443:31390/TCP,31400:31400/TCP,15029:32280/TCP,15030:30749/TCP,15031:32647/TCP,15032:30233/TCP,15443:32065/TCP,15020:31782/TCP 12s istio-pilot ClusterIP 10.100.108.54 <none> 15010/TCP,15011/TCP,8080/TCP,15014/TCP 12s istio-policy ClusterIP 10.100.153.182 <none> 9091/TCP,15004/TCP,15014/TCP 12s istio-sidecar-injector ClusterIP 10.100.81.207 <none> 443/TCP 12s istio-telemetry ClusterIP 10.100.163.254 <none> 9091/TCP,15004/TCP,15014/TCP,42422/TCP 12s prometheus ClusterIP 10.100.133.145 <none> 9090/TCP 12s ==> v1/ServiceAccount NAME SECRETS AGE istio-citadel-service-account 1 12s istio-galley-service-account 1 12s istio-ingressgateway-service-account 1 12s istio-mixer-service-account 1 12s istio-multi 1 12s istio-pilot-service-account 1 12s istio-security-post-install-account 1 12s istio-sidecar-injector-service-account 1 12s prometheus 1 12s ==> v1alpha2/attributemanifest NAME AGE istioproxy 12s kubernetes 12s ==> v1alpha2/handler NAME AGE kubernetesenv 12s prometheus 12s ==> v1alpha2/kubernetes NAME AGE attributes 12s ==> v1alpha2/metric NAME AGE requestcount 12s requestduration 12s requestsize 12s responsesize 12s tcpbytereceived 12s tcpbytesent 12s tcpconnectionsclosed 12s tcpconnectionsopened 12s ==> v1alpha2/rule NAME AGE kubeattrgenrulerule 12s promhttp 12s promtcp 12s promtcpconnectionclosed 12s promtcpconnectionopen 12s tcpkubeattrgenrulerule 12s ==> v1alpha3/DestinationRule NAME AGE istio-policy 12s istio-telemetry 12s ==> v1beta1/ClusterRole NAME AGE istio-security-post-install-istio-system 12s ==> v1beta1/ClusterRoleBinding NAME AGE istio-security-post-install-role-binding-istio-system 12s ==> v1beta1/Deployment NAME READY UP-TO-DATE AVAILABLE AGE istio-citadel 1/1 1 1 12s istio-galley 0/1 1 0 12s istio-ingressgateway 0/1 1 0 12s istio-pilot 0/1 1 0 12s istio-policy 0/1 1 0 12s istio-sidecar-injector 0/1 1 0 12s istio-telemetry 0/1 1 0 12s prometheus 0/1 1 0 12s ==> v1beta1/MutatingWebhookConfiguration NAME AGE istio-sidecar-injector 12s ==> v1beta1/PodDisruptionBudget NAME MIN AVAILABLE MAX UNAVAILABLE ALLOWED DISRUPTIONS AGE istio-galley 1 N/A 0 13s istio-ingressgateway 1 N/A 0 13s istio-pilot 1 N/A 0 13s istio-policy 1 N/A 0 13s istio-telemetry 1 N/A 0 13s ==> v2beta1/HorizontalPodAutoscaler NAME REFERENCE TARGETS MINPODS MAXPODS REPLICAS AGE istio-ingressgateway Deployment/istio-ingressgateway <unknown>/80% 1 5 0 12s istio-pilot Deployment/istio-pilot <unknown>/80% 1 5 0 12s istio-policy Deployment/istio-policy <unknown>/80% 1 5 0 12s istio-telemetry Deployment/istio-telemetry <unknown>/80% 1 5 0 12s NOTES: Thank you for installing istio. Your release is named istio. To get started running application with Istio, execute the following steps: 1. Label namespace that application object will be deployed to by the following command (take default namespace as an example) $ kubectl label namespace default istio-injection=enabled $ kubectl get namespace -L istio-injection 2. Deploy your applications $ kubectl apply -f.yaml For more information on running Istio, visit: https://istio.io/
To get started running application with Istio, we need to label namespace that application object will be deployed to by the following command (take default namespace as an example):
$ kubectl label namespace default istio-injection=enabled
namespace/default labeled

$ kubectl get namespace -L istio-injection
NAME           STATUS    AGE       ISTIO-INJECTION
default        Active    40m       enabled
istio-system   Active    22m
kube-public    Active    40m
kube-system    Active    40m
We can check the installation by running:
$ kubectl get crds | grep 'istio.io'
adapters.config.istio.io ...
We can verify that the services have been deployed using:
$ kubectl get svc -n istio-system
NAME                     TYPE           CLUSTER-IP       EXTERNAL-IP                                                               PORT(S)                                                                                                                                      AGE
istio-citadel            ClusterIP      10.100.221.226   <none>                                                                    8060/TCP,15014/TCP                                                                                                                           4m51s
istio-galley             ClusterIP      10.100.156.84    <none>                                                                    443/TCP,15014/TCP,9901/TCP                                                                                                                   4m51s
istio-ingressgateway     LoadBalancer   10.100.244.93    a1cb269d45efd11e997e212fecec7a03-1712362488.us-east-1.elb.amazonaws.com   80:31380/TCP,443:31390/TCP,31400:31400/TCP,15029:32280/TCP,15030:30749/TCP,15031:32647/TCP,15032:30233/TCP,15443:32065/TCP,15020:31782/TCP   4m51s
istio-pilot              ClusterIP      10.100.108.54    <none>                                                                    15010/TCP,15011/TCP,8080/TCP,15014/TCP                                                                                                       4m51s
istio-policy             ClusterIP      10.100.153.182   <none>                                                                    9091/TCP,15004/TCP,15014/TCP                                                                                                                 4m51s
istio-sidecar-injector   ClusterIP      10.100.81.207    <none>                                                                    443/TCP                                                                                                                                      4m51s
istio-telemetry          ClusterIP      10.100.163.254   <none>                                                                    9091/TCP,15004/TCP,15014/TCP,42422/TCP                                                                                                       4m51s
prometheus               ClusterIP      10.100.133.145   <none>                                                                    9090/TCP                                                                                                                                     4m51s
and check the corresponding pods with:
$ kubectl get pods -n istio-system
NAME                                      READY     STATUS      RESTARTS   AGE
istio-citadel-5bbc997554-cvzgl            1/1       Running     0          6m10s
istio-galley-64f64687c8-j2kwc             1/1       Running     0          6m10s
istio-ingressgateway-5f577bbbcd-5gx7r     0/1       Running     0          6m10s
istio-init-crd-10-lmzkk                   0/1       Completed   0          18m
istio-init-crd-11-w98f6                   0/1       Completed   0          18m
istio-pilot-78f7d6645f-79bb9              0/2       Pending     0          6m10s
istio-policy-5fd9989f74-2whxz             2/2       Running     1          6m10s
istio-sidecar-injector-549585c8d9-nrtbq   1/1       Running     0          6m10s
istio-telemetry-5b47cf5b9b-wn96q          0/2       Pending     0          6m10s
prometheus-8647cf4bc7-j55qv               1/1       Running     0          6m10s
Now that Istio is running, in the next section, we'll be installing the Bookinfo app.
Now that we have all the resources installed for Istio, we will use sample application called "BookInfo" to review key capabilities of the service mesh such as intelligent routing, and review telemetry data using Prometheus & Grafana.
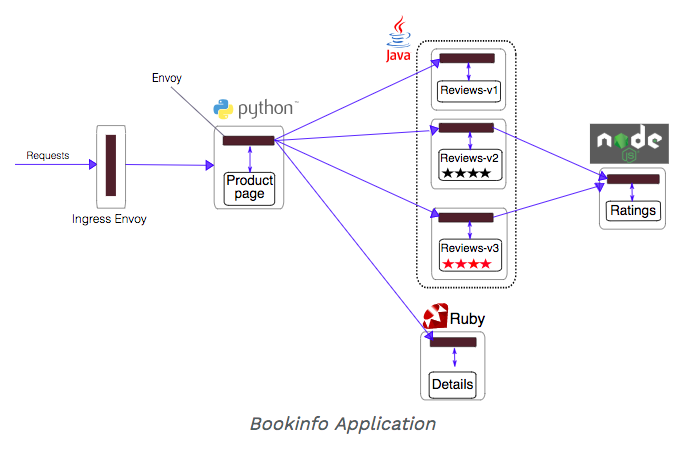
source: Bookinfo Application
Change directory to the root of the Istio installation. Under "istio-1.0.2" folder.
The default Istio installation uses automatic sidecar injection. Label the namespace that will host the application with istio-injection=enabled:
$  kubectl apply -f \
<(istioctl kube-inject -f samples/bookinfo/platform/kube/bookinfo.yaml)
service/details created
deployment.extensions/details-v1 created
service/ratings created
deployment.extensions/ratings-v1 created
service/reviews created
deployment.extensions/reviews-v1 created
deployment.extensions/reviews-v2 created
deployment.extensions/reviews-v3 created
service/productpage created
deployment.extensions/productpage-v1 created
Confirm all services and pods are correctly defined and running:
$ kubectl get services
NAME          TYPE        CLUSTER-IP       EXTERNAL-IP   PORT(S)    AGE
details       ClusterIP   10.100.83.248    <none>        9080/TCP   5m55s
kubernetes    ClusterIP   10.100.0.1       <none>        443/TCP    43m
productpage   ClusterIP   10.100.45.21     <none>        9080/TCP   5m54s
ratings       ClusterIP   10.100.117.218   <none>        9080/TCP   5m55s
reviews       ClusterIP   10.100.132.55    <none>        9080/TCP   5m54s

$ kubectl get pods
NAME                              READY     STATUS    RESTARTS   AGE
details-v1-bc557b7fc-88tz4        2/2       Running   0          46s
productpage-v1-6597cb5df9-5xnj5   2/2       Running   0          47s
ratings-v1-5c46fc6f85-v28vl       2/2       Running   0          49s
reviews-v1-69dcdb544-sm79l        2/2       Running   0          47s
reviews-v2-65fbdc9f88-7lt6v       2/2       Running   0          47s
reviews-v3-bd8855bdd-z5z5k        2/2       Running   0          47s
To confirm that the bookinfo application is running, send a request to it by a curl command from some pod, for example from ratings:
$ kubectl exec -it $(kubectl get pod -l app=ratings -o jsonpath='{.items[0].metadata.name}') -c ratings -- curl productpage:9080/productpage | grep -o ".* "
...
<title>Simple Bookstore App</title>
...
It actually went into a ratings pod and then curled to productpage with port 9080 and output the page. So, our app is not still accessible from outside yet.
Now that the bookinfo services are up and running, we need to make the application accessible from outside of our Kubernetes cluster, e.g., from a browser. An Istio Gateway is used for this purpose.
Define the ingress gateway for the application:
$ kubectl apply -f samples/bookinfo/networking/bookinfo-gateway.yaml
gateway.networking.istio.io/bookinfo-gateway created
virtualservice.networking.istio.io/bookinfo created
Confirm the gateway has been created:
$ kubectl get gateway
NAME               AGE
bookinfo-gateway   28s
Let's set the INGRESS_HOST and INGRESS_PORT variables for accessing the gateway:
$ export INGRESS_HOST=$(kubectl -n istio-system \
get service istio-ingressgateway \
-o jsonpath='{.status.loadBalancer.ingress[0].hostname}')

$ export INGRESS_PORT=$(kubectl -n istio-system \
get service istio-ingressgateway \
-o jsonpath='{.spec.ports[?(@.name=="http2")].port}')
Set GATEWAY_URL:
$ export GATEWAY_URL=$INGRESS_HOST:$INGRESS_PORT

$ echo $GATEWAY_URL
a1cb269d45efd11e997e212fecec7a03-1712362488.us-east-1.elb.amazonaws.com:80
To confirm that the Bookinfo application is accessible from outside the cluster, point our browser to http://$GATEWAY_URL/productpage to view the Bookinfo web page.
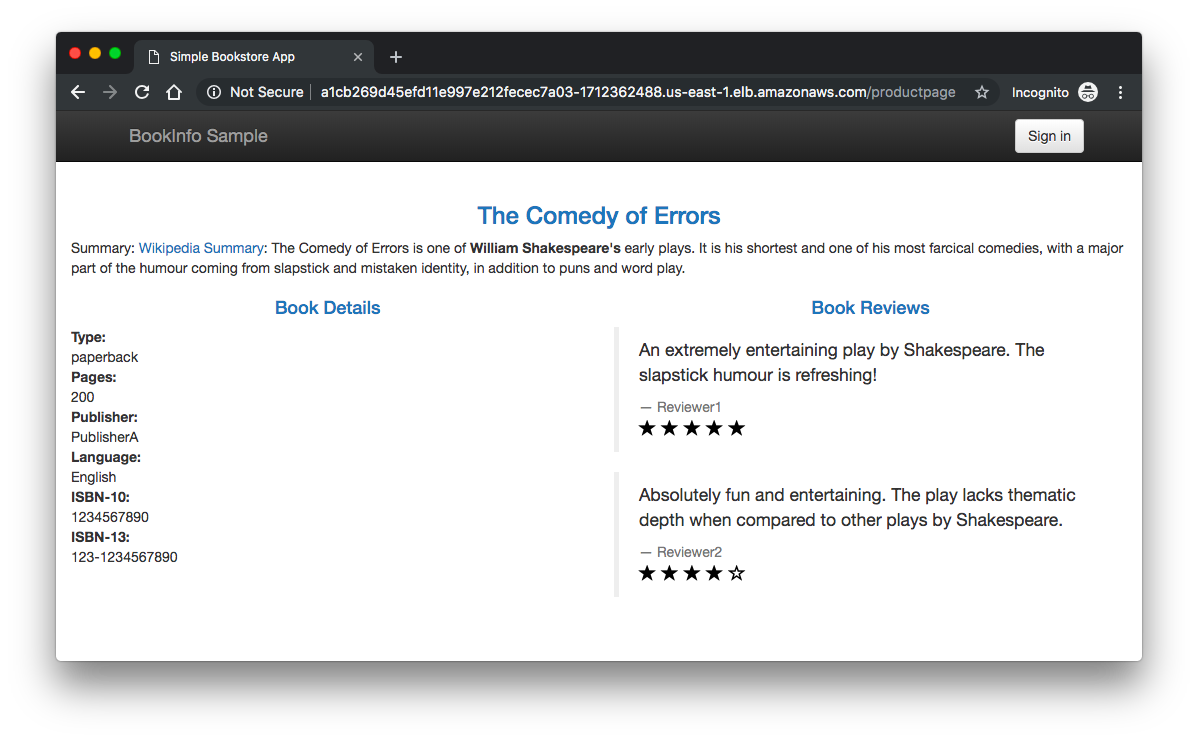
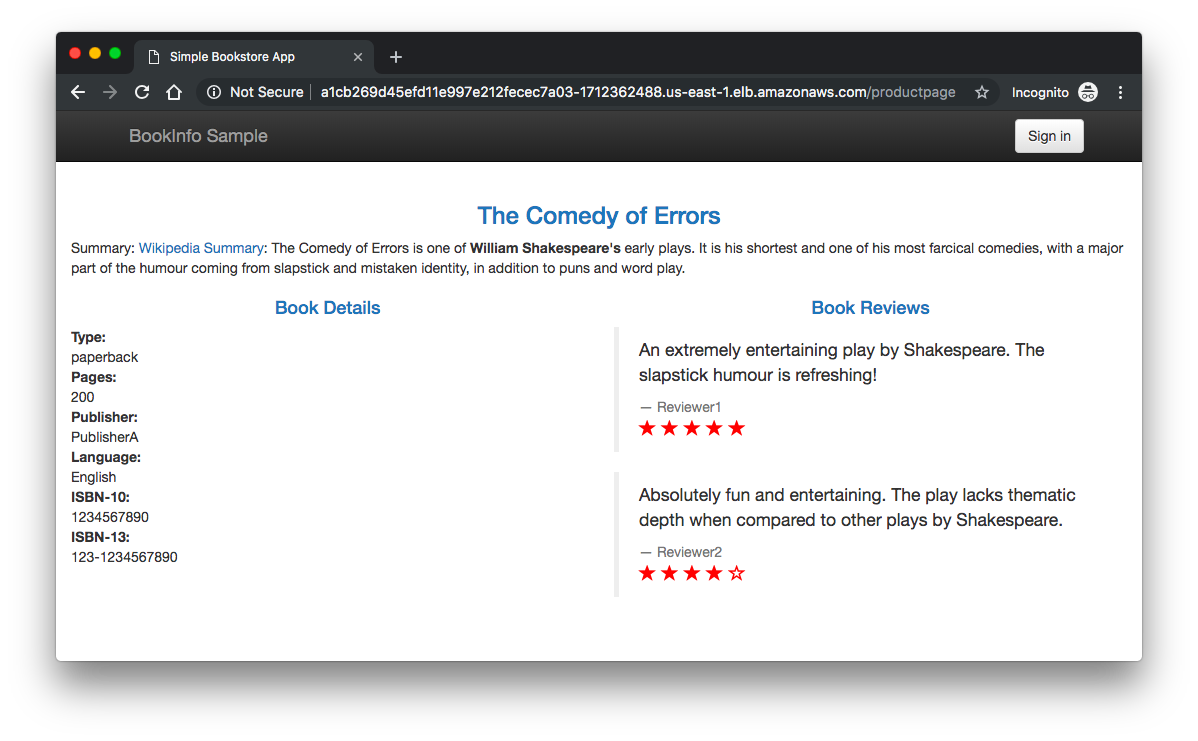
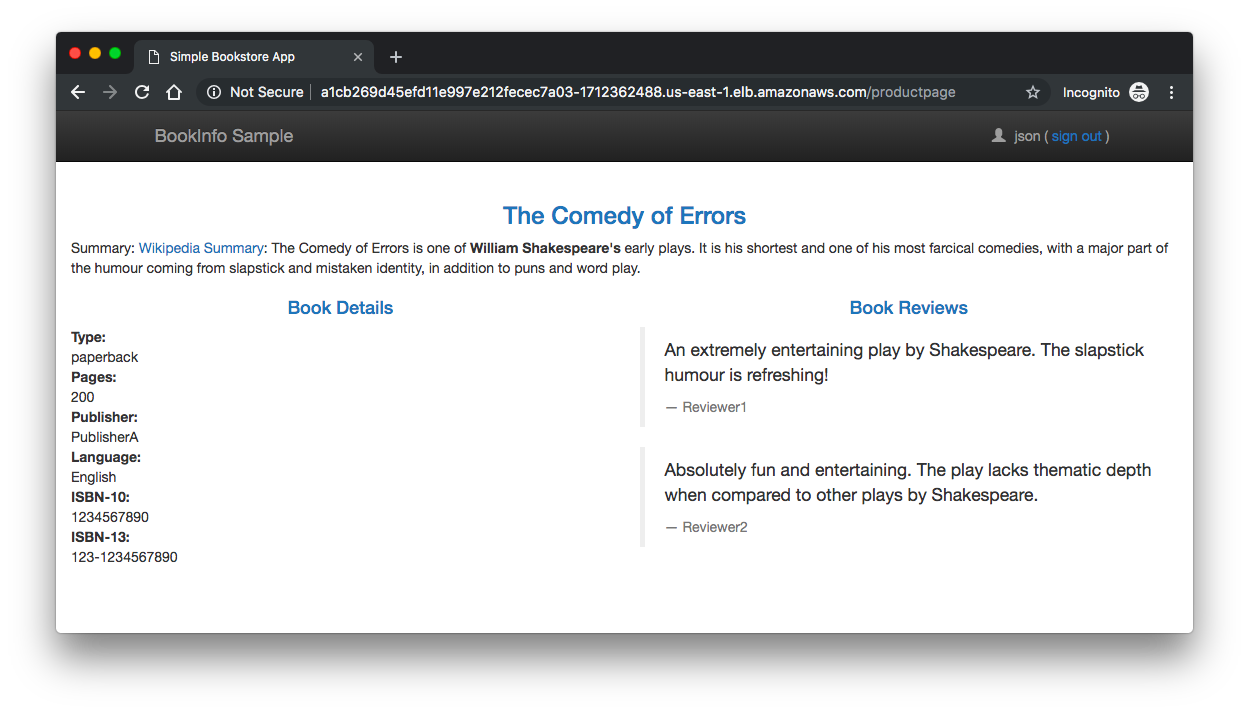
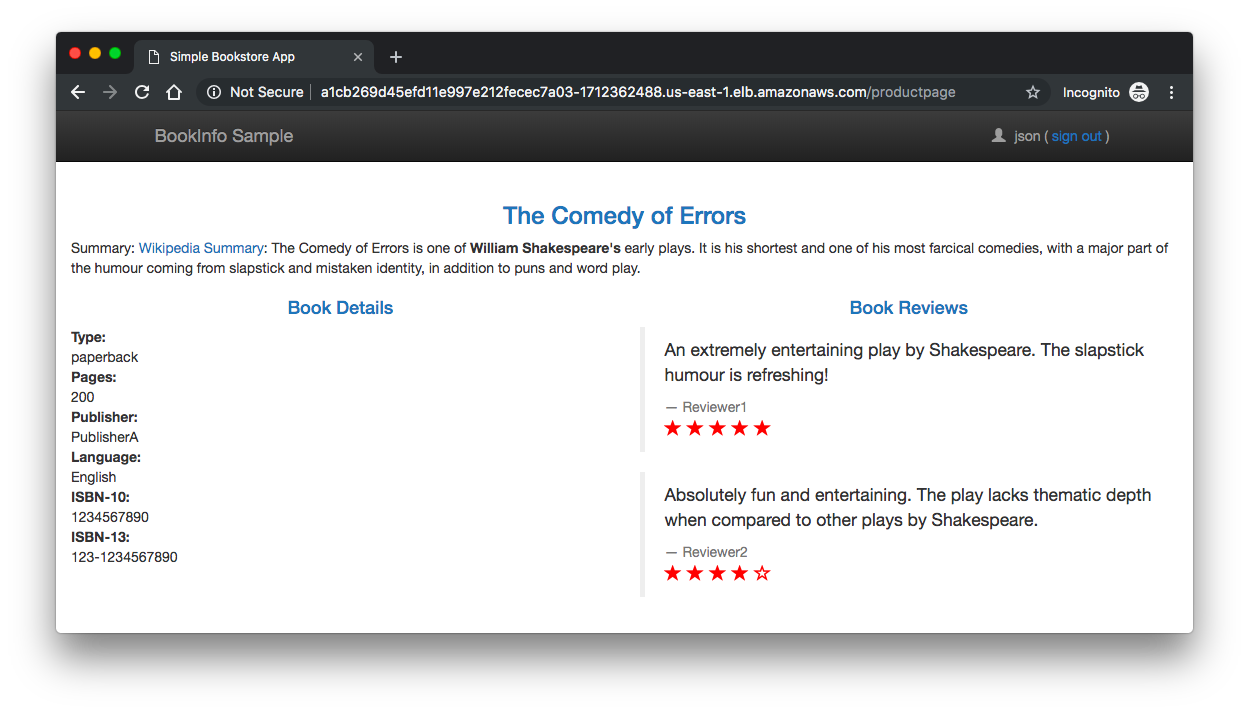
If we refresh the page several times, we should see different versions of reviews shown in productpage, presented in a round robin style (red stars, black stars, no stars), since we haven't yet used Istio to control the version routing.
Before we can use Istio to control the Bookinfo version routing, we'll need to define the available versions, called subsets, in destination rules.
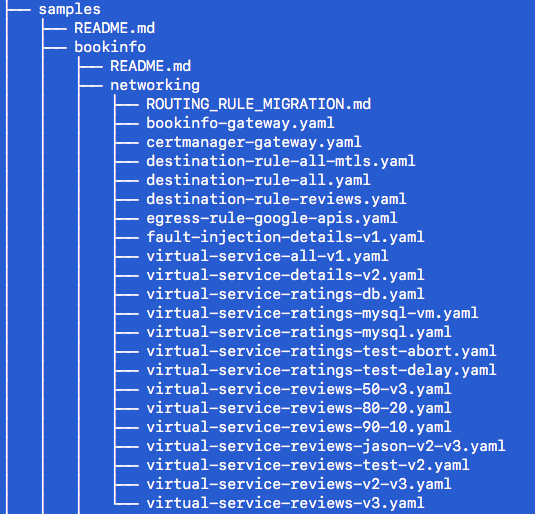
The following DestinationRule configures policies and subsets for the reviews service:
apiVersion: networking.istio.io/v1alpha3
kind: DestinationRule
metadata:
  name: reviews
spec:
  host: reviews
  trafficPolicy:
    loadBalancer:
      simple: RANDOM
  subsets:
  - name: v1
    labels:
      version: v1
  - name: v2
    labels:
      version: v2
    trafficPolicy:
      loadBalancer:
        simple: ROUND_ROBIN
  - name: v3
    labels:
      version: v3
Notice that multiple policies, default (RANDOM) and v2-specific (ROUND_ROBIN) in this example, can be specified in a single DestinationRule configuration.
To route to all:
$ kubectl apply -f samples/bookinfo/networking/destination-rule-all.yaml
destinationrule.networking.istio.io/productpage created
destinationrule.networking.istio.io/reviews created
destinationrule.networking.istio.io/ratings created
destinationrule.networking.istio.io/details created

$ kubectl get destinationrules -o yaml
apiVersion: v1
items:
- apiVersion: networking.istio.io/v1alpha3
  kind: DestinationRule
  metadata:
    annotations:
      kubectl.kubernetes.io/last-applied-configuration: |
        {"apiVersion":"networking.istio.io/v1alpha3","kind":"DestinationRule","metadata":{"annotations":{},"name":"details","namespace":"default"},"spec":{"host":"details","subsets":[{"labels":{"version":"v1"},"name":"v1"},{"labels":{"version":"v2"},"name":"v2"}]}}
    creationTimestamp: 2019-04-14T22:42:09Z
    generation: 1
    name: details
    namespace: default
    resourceVersion: "42051"
    selfLink: /apis/networking.istio.io/v1alpha3/namespaces/default/destinationrules/details
    uid: 898b36b7-5f06-11e9-b7b0-0e9e3b2d1a56
  spec:
    host: details
    subsets:
    - labels:
        version: v1
      name: v1
    - labels:
        version: v2
      name: v2
- apiVersion: networking.istio.io/v1alpha3
  kind: DestinationRule
  metadata:
    annotations:
      kubectl.kubernetes.io/last-applied-configuration: |
        {"apiVersion":"networking.istio.io/v1alpha3","kind":"DestinationRule","metadata":{"annotations":{},"name":"productpage","namespace":"default"},"spec":{"host":"productpage","subsets":[{"labels":{"version":"v1"},"name":"v1"}]}}
    creationTimestamp: 2019-04-14T22:42:08Z
    generation: 1
    name: productpage
    namespace: default
    resourceVersion: "42042"
    selfLink: /apis/networking.istio.io/v1alpha3/namespaces/default/destinationrules/productpage
    uid: 893a8c6c-5f06-11e9-b7b0-0e9e3b2d1a56
  spec:
    host: productpage
    subsets:
    - labels:
        version: v1
      name: v1
...
To route to one version only, we apply virtual services that set the default version for the microservices. In this case, the virtual services will route all traffic to reviews:v1 of microservice:
$ kubectl apply -f samples/bookinfo/networking/virtual-service-all-v1.yaml
virtualservice.networking.istio.io/productpage created
virtualservice.networking.istio.io/reviews created
virtualservice.networking.istio.io/ratings created
virtualservice.networking.istio.io/details created

$ kubectl get virtualservices reviews -o yaml
The subset is set to v1 for all reviews request:
spec:
  hosts:
  - reviews
  http:
  - route:
    - destination:
        host: reviews
        subset: v1
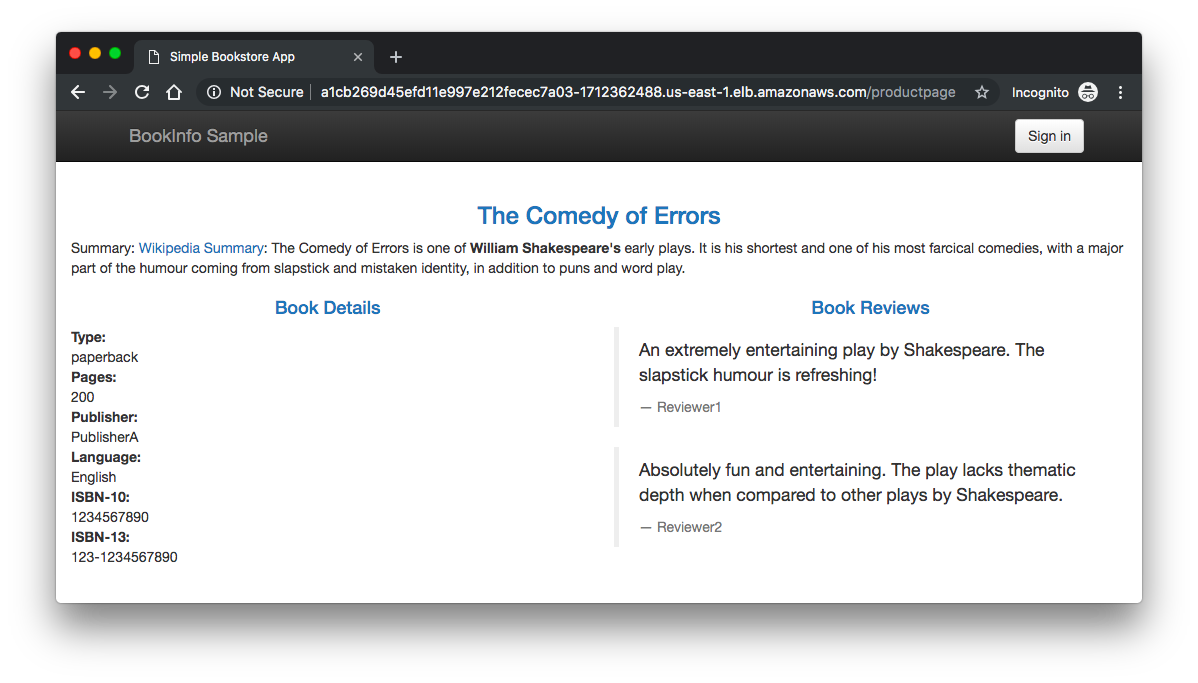
Try now to reload the page multiple times, and note how only version 1 of reviews is displayed each time.
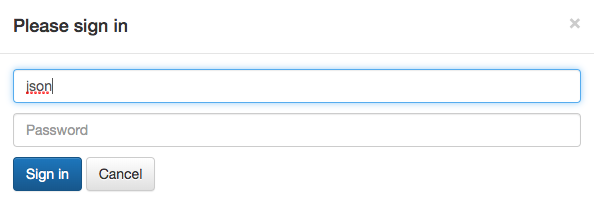
Next, we'll change the route configuration so that all traffic from a specific user is routed to a specific service version. In this case, all traffic from a user named 'jason' will be routed to the service reviews:v2.
$ kubectl apply -f samples/bookinfo/networking/virtual-service-reviews-test-v2.yaml
virtualservice.networking.istio.io/reviews configured

$ kubectl get virtualservices reviews -o yaml
The subset is set to v1 in default and route v2 if the logged user is match with 'jason' for reviews request:
apiVersion: networking.istio.io/v1alpha3
kind: VirtualService
...
spec:
  hosts:
  - reviews
  http:
  - match:
    - headers:
        end-user:
          exact: jason
    route:
    - destination:
        host: reviews
        subset: v2
  - route:
    - destination:
        host: reviews
        subset: v1
To test, click Sign in from the top right corner of the page, and login using 'jason' as user name with a blank password.
We will only see reviews:v2 all the time. Others will see reviews:v1.
Next, we'll demonstrate how to gradually migrate traffic from one version of a microservice to another. In our example, we'll send 50% of traffic to reviews:v1 and 50% to reviews:v3.
$ kubectl apply -f samples/bookinfo/networking/virtual-service-all-v1.yaml
virtualservice.networking.istio.io/productpage unchanged
virtualservice.networking.istio.io/reviews configured
virtualservice.networking.istio.io/ratings configured
virtualservice.networking.istio.io/details unchanged

$ kubectl apply -f samples/bookinfo/networking/virtual-service-reviews-50-v3.yaml
virtualservice.networking.istio.io/reviews configured

$ kubectl get virtualservice reviews -o yaml
The subset is set to 50% of traffic to v1 and 50% of traffic to v3 for all reviews request:
spec:
  hosts:
  - reviews
  http:
  - route:
    - destination:
        host: reviews
        subset: v1
      weight: 50
    - destination:
        host: reviews
        subset: v3
      weight: 50
To test it, refresh our browser over and over, and we'll see only reviews:v1 and reviews:v3.
To delete the cluster:
$ eksctl delete cluster istio-on-eks
References:
- What is Istio?
- Service Mesh With Istio
- Getting Started with Istio on Amazon EKS
- eksctl makes it easy to run Istio on EKS
- Monitor your Istio service mesh with Datadog
- If you are running on Kubernetes
- TGI Kubernetes 003: Istio
Docker & K8s
- Docker install on Amazon Linux AMI
- Docker install on EC2 Ubuntu 14.04
- Docker container vs Virtual Machine
- Docker install on Ubuntu 14.04
- Docker Hello World Application
- Nginx image - share/copy files, Dockerfile
- Working with Docker images : brief introduction
- Docker image and container via docker commands (search, pull, run, ps, restart, attach, and rm)
- More on docker run command (docker run -it, docker run --rm, etc.)
- Docker Networks - Bridge Driver Network
- Docker Persistent Storage
- File sharing between host and container (docker run -d -p -v)
- Linking containers and volume for datastore
- Dockerfile - Build Docker images automatically I - FROM, MAINTAINER, and build context
- Dockerfile - Build Docker images automatically II - revisiting FROM, MAINTAINER, build context, and caching
- Dockerfile - Build Docker images automatically III - RUN
- Dockerfile - Build Docker images automatically IV - CMD
- Dockerfile - Build Docker images automatically V - WORKDIR, ENV, ADD, and ENTRYPOINT
- Docker - Apache Tomcat
- Docker - NodeJS
- Docker - NodeJS with hostname
- Docker Compose - NodeJS with MongoDB
- Docker - Prometheus and Grafana with Docker-compose
- Docker - StatsD/Graphite/Grafana
- Docker - Deploying a Java EE JBoss/WildFly Application on AWS Elastic Beanstalk Using Docker Containers
- Docker : NodeJS with GCP Kubernetes Engine
- Docker : Jenkins Multibranch Pipeline with Jenkinsfile and Github
- Docker : Jenkins Master and Slave
- Docker - ELK : ElasticSearch, Logstash, and Kibana
- Docker - ELK 7.6 : Elasticsearch on Centos 7
- Docker - ELK 7.6 : Filebeat on Centos 7
- Docker - ELK 7.6 : Logstash on Centos 7
- Docker - ELK 7.6 : Kibana on Centos 7
- Docker - ELK 7.6 : Elastic Stack with Docker Compose
- Docker - Deploy Elastic Cloud on Kubernetes (ECK) via Elasticsearch operator on minikube
- Docker - Deploy Elastic Stack via Helm on minikube
- Docker Compose - A gentle introduction with WordPress
- Docker Compose - MySQL
- MEAN Stack app on Docker containers : micro services
- MEAN Stack app on Docker containers : micro services via docker-compose
- Docker Compose - Hashicorp's Vault and Consul Part A (install vault, unsealing, static secrets, and policies)
- Docker Compose - Hashicorp's Vault and Consul Part B (EaaS, dynamic secrets, leases, and revocation)
- Docker Compose - Hashicorp's Vault and Consul Part C (Consul)
- Docker Compose with two containers - Flask REST API service container and an Apache server container
- Docker compose : Nginx reverse proxy with multiple containers
- Docker & Kubernetes : Envoy - Getting started
- Docker & Kubernetes : Envoy - Front Proxy
- Docker & Kubernetes : Ambassador - Envoy API Gateway on Kubernetes
- Docker Packer
- Docker Cheat Sheet
- Docker Q & A #1
- Kubernetes Q & A - Part I
- Kubernetes Q & A - Part II
- Docker - Run a React app in a docker
- Docker - Run a React app in a docker II (snapshot app with nginx)
- Docker - NodeJS and MySQL app with React in a docker
- Docker - Step by Step NodeJS and MySQL app with React - I
- Installing LAMP via puppet on Docker
- Docker install via Puppet
- Nginx Docker install via Ansible
- Apache Hadoop CDH 5.8 Install with QuickStarts Docker
- Docker - Deploying Flask app to ECS
- Docker Compose - Deploying WordPress to AWS
- Docker - WordPress Deploy to ECS with Docker-Compose (ECS-CLI EC2 type)
- Docker - WordPress Deploy to ECS with Docker-Compose (ECS-CLI Fargate type)
- Docker - ECS Fargate
- Docker - AWS ECS service discovery with Flask and Redis
- Docker & Kubernetes : minikube
- Docker & Kubernetes 2 : minikube Django with Postgres - persistent volume
- Docker & Kubernetes 3 : minikube Django with Redis and Celery
- Docker & Kubernetes 4 : Django with RDS via AWS Kops
- Docker & Kubernetes : Kops on AWS
- Docker & Kubernetes : Ingress controller on AWS with Kops
- Docker & Kubernetes : HashiCorp's Vault and Consul on minikube
- Docker & Kubernetes : HashiCorp's Vault and Consul - Auto-unseal using Transit Secrets Engine
- Docker & Kubernetes : Persistent Volumes & Persistent Volumes Claims - hostPath and annotations
- Docker & Kubernetes : Persistent Volumes - Dynamic volume provisioning
- Docker & Kubernetes : DaemonSet
- Docker & Kubernetes : Secrets
- Docker & Kubernetes : kubectl command
- Docker & Kubernetes : Assign a Kubernetes Pod to a particular node in a Kubernetes cluster
- Docker & Kubernetes : Configure a Pod to Use a ConfigMap
- AWS : EKS (Elastic Container Service for Kubernetes)
- Docker & Kubernetes : Run a React app in a minikube
- Docker & Kubernetes : Minikube install on AWS EC2
- Docker & Kubernetes : Cassandra with a StatefulSet
- Docker & Kubernetes : Terraform and AWS EKS
- Docker & Kubernetes : Pods and Service definitions
- Docker & Kubernetes : Service IP and the Service Type
- Docker & Kubernetes : Kubernetes DNS with Pods and Services
- Docker & Kubernetes : Headless service and discovering pods
- Docker & Kubernetes : Scaling and Updating application
- Docker & Kubernetes : Horizontal pod autoscaler on minikubes
- Docker & Kubernetes : From a monolithic app to micro services on GCP Kubernetes
- Docker & Kubernetes : Rolling updates
- Docker & Kubernetes : Deployments to GKE (Rolling update, Canary and Blue-green deployments)
- Docker & Kubernetes : Slack Chat Bot with NodeJS on GCP Kubernetes
- Docker & Kubernetes : Continuous Delivery with Jenkins Multibranch Pipeline for Dev, Canary, and Production Environments on GCP Kubernetes
- Docker & Kubernetes : NodePort vs LoadBalancer vs Ingress
- Docker & Kubernetes : MongoDB / MongoExpress on Minikube
- Docker & Kubernetes : Load Testing with Locust on GCP Kubernetes
- Docker & Kubernetes : MongoDB with StatefulSets on GCP Kubernetes Engine
- Docker & Kubernetes : Nginx Ingress Controller on Minikube
- Docker & Kubernetes : Setting up Ingress with NGINX Controller on Minikube (Mac)
- Docker & Kubernetes : Nginx Ingress Controller for Dashboard service on Minikube
- Docker & Kubernetes : Nginx Ingress Controller on GCP Kubernetes
- Docker & Kubernetes : Kubernetes Ingress with AWS ALB Ingress Controller in EKS
- Docker & Kubernetes : Setting up a private cluster on GCP Kubernetes
- Docker & Kubernetes : Kubernetes Namespaces (default, kube-public, kube-system) and switching namespaces (kubens)
- Docker & Kubernetes : StatefulSets on minikube
- Docker & Kubernetes : RBAC
- Docker & Kubernetes Service Account, RBAC, and IAM
- Docker & Kubernetes - Kubernetes Service Account, RBAC, IAM with EKS ALB, Part 1
- Docker & Kubernetes : Helm Chart
- Docker & Kubernetes : My first Helm deploy
- Docker & Kubernetes : Readiness and Liveness Probes
- Docker & Kubernetes : Helm chart repository with Github pages
- Docker & Kubernetes : Deploying WordPress and MariaDB with Ingress to Minikube using Helm Chart
- Docker & Kubernetes : Deploying WordPress and MariaDB to AWS using Helm 2 Chart
- Docker & Kubernetes : Deploying WordPress and MariaDB to AWS using Helm 3 Chart
- Docker & Kubernetes : Helm Chart for Node/Express and MySQL with Ingress
- Docker & Kubernetes : Deploy Prometheus and Grafana using Helm and Prometheus Operator - Monitoring Kubernetes node resources out of the box
- Docker & Kubernetes : Deploy Prometheus and Grafana using kube-prometheus-stack Helm Chart
- Docker & Kubernetes : Istio (service mesh) sidecar proxy on GCP Kubernetes
- Docker & Kubernetes : Istio on EKS
- Docker & Kubernetes : Istio on Minikube with AWS EC2 for Bookinfo Application
- Docker & Kubernetes : Deploying .NET Core app to Kubernetes Engine and configuring its traffic managed by Istio (Part I)
- Docker & Kubernetes : Deploying .NET Core app to Kubernetes Engine and configuring its traffic managed by Istio (Part II - Prometheus, Grafana, pin a service, split traffic, and inject faults)
- Docker & Kubernetes : Helm Package Manager with MySQL on GCP Kubernetes Engine
- Docker & Kubernetes : Deploying Memcached on Kubernetes Engine
- Docker & Kubernetes : EKS Control Plane (API server) Metrics with Prometheus
- Docker & Kubernetes : Spinnaker on EKS with Halyard
- Docker & Kubernetes : Continuous Delivery Pipelines with Spinnaker and Kubernetes Engine
- Docker & Kubernetes : Multi-node Local Kubernetes cluster : Kubeadm-dind (docker-in-docker)
- Docker & Kubernetes : Multi-node Local Kubernetes cluster : Kubeadm-kind (k8s-in-docker)
- Docker & Kubernetes : nodeSelector, nodeAffinity, taints/tolerations, pod affinity and anti-affinity - Assigning Pods to Nodes
- Docker & Kubernetes : Jenkins-X on EKS
- Docker & Kubernetes : ArgoCD App of Apps with Heml on Kubernetes
- Docker & Kubernetes : ArgoCD on Kubernetes cluster
- Docker & Kubernetes : GitOps with ArgoCD for Continuous Delivery to Kubernetes clusters (minikube) - guestbook
Ph.D. / Golden Gate Ave, San Francisco / Seoul National Univ / Carnegie Mellon / UC Berkeley / DevOps / Deep Learning / Visualization