How to Make a Self-Signed SSL Certificate - 2020

Linux - system, cmds & shell
- Linux Tips - links, vmstats, rsync
- Linux Tips 2 - ctrl a, curl r, tail -f, umask
- Linux - bash I
- Linux - bash II
- Linux - Uncompressing 7z file
- Linux - sed I (substitution: sed 's///', sed -i)
- Linux - sed II (file spacing, numbering, text conversion and substitution)
- Linux - sed III (selective printing of certain lines, selective definition of certain lines)
- Linux - 7 File types : Regular, Directory, Block file, Character device file, Pipe file, Symbolic link file, and Socket file
- Linux shell programming - introduction
- Linux shell programming - variables and functions (readonly, unset, and functions)
- Linux shell programming - special shell variables
- Linux shell programming : arrays - three different ways of declaring arrays & looping with $*/$@
- Linux shell programming : operations on array
- Linux shell programming : variables & commands substitution
- Linux shell programming : metacharacters & quotes
- Linux shell programming : input/output redirection & here document
- Linux shell programming : loop control - for, while, break, and break n
- Linux shell programming : string
- Linux shell programming : for-loop
- Linux shell programming : if/elif/else/fi
- Linux shell programming : Test
- Managing User Account - useradd, usermod, and userdel
- Linux Secure Shell (SSH) I : key generation, private key and public key
- Linux Secure Shell (SSH) II : ssh-agent & scp
- Linux Secure Shell (SSH) III : SSH Tunnel as Proxy - Dynamic Port Forwarding (SOCKS Proxy)
- Linux Secure Shell (SSH) IV : Local port forwarding (outgoing ssh tunnel)
- Linux Secure Shell (SSH) V : Reverse SSH Tunnel (remote port forwarding / incoming ssh tunnel) /)
- Linux Processes and Signals
- Linux Drivers 1
- tcpdump
- Linux Debugging using gdb
- Embedded Systems Programming I - Introduction
- Embedded Systems Programming II - gcc ARM Toolchain and Simple Code on Ubuntu/Fedora
- LXC (Linux Container) Install and Run
- Linux IPTables
- Hadoop - 1. Setting up on Ubuntu for Single-Node Cluster
- Hadoop - 2. Runing on Ubuntu for Single-Node Cluster
- ownCloud 7 install
- Ubuntu 14.04 guest on Mac OSX host using VirtualBox I
- Ubuntu 14.04 guest on Mac OSX host using VirtualBox II
- Windows 8 guest on Mac OSX host using VirtualBox I
- Ubuntu Package Management System (apt-get vs dpkg)
- RPM Packaging
- How to Make a Self-Signed SSL Certificate
- Linux Q & A
- DevOps / Sys Admin questions
In this tutorial, we'll see how we can create and use a self-signed ssl certificate on Apache.
Actually, this tutorial is for 22. Django 1.8 Server Build - CentOS 7 hosted (VPS) on Linode - Facebook open graph API timeline fan page custom tab 1.
Before proceed further, we have a better option for installing real certs : https://certbot.eff.org/. By using the certbot, we can not only create certs but also install them on our serve!
This tutorial explains the creation of a self-signed SSL certificate, suitable for personal use or for applications used internally in an organization. The end product may be used with SSL-capable software such as web servers, email servers, or other server systems. We will see how to set up a self-signed SSL certificate for use with an Apache web server on a CentOS 7 VPS.
self-signed certificate has nothing to do with the identity of the person or organization that actually performed the signing procedure. In technical terms a self-signed certificate is one signed with its own private key.
In typical public key infrastructure (PKI) arrangements, a digital signature from a certificate authority (CA) attests that a particular public key certificate is valid (i.e., contains correct information). Users, or their software on their behalf, check that the private key used to sign some certificate matches the public key in the CA's certificate. Since CA certificates are often signed by other. - from Self-signed certificate - wiki
Issue the following command to install required packages for OpenSSL, the open source SSL toolkit.
- Debian/Ubuntu users:
$ sudo apt-get update
$ sudo apt-get upgrade
$ sudo apt-get install openssl
$ mkdir /etc/ssl/localcerts
-
CentOS/Fedora users:
$ sudo yum install openssl
$ sudo mkdir /etc/ssl/localcerts
Note that we needed to create a new directory where we will store the server key and certificate.
As an example, we'll create a certificate that might be used to secure a personal website that's hosted with Apache.
The example will create a certificate valid for 365 days; we may wish to increase this value. We've specified the FQDN (fully qualified domain name) of the VPS for the "Common Name" entry, as this certificate will be used for generic SSL service.
$ sudo openssl req -new -x509 -sha256 -days 365 -nodes -out /etc/ssl/localcerts/apache.pem -keyout /etc/ssl/localcerts/apache.key
Generating a 2048 bit RSA private key
.............................+++
.........................................................+++
writing new private key to '/etc/ssl/localcerts/apache.key'
-----
You are about to be asked to enter information that will be incorporated
into your certificate request.
What you are about to enter is what is called a Distinguished Name or a DN.
There are quite a few fields but you can leave some blank
For some fields there will be a default value,
If you enter '.', the field will be left blank.
-----
Country Name (2 letter code) [XX]:US
State or Province Name (full name) []:
Locality Name (eg, city) [Default City]:
Organization Name (eg, company) [Default Company Ltd]:
Organizational Unit Name (eg, section) []:
Common Name (eg, your name or your server's hostname) []:djangotest.com
Email Address []:
$ sudo chmod 600 /etc/ssl/localcerts/apache*
After we enter the request, we were taken to a prompt where we can enter information about our website. Before we go over that, let's take a look at what is happening in the command we are issuing:
- openssl: This is the basic command line tool for creating and managing OpenSSL certificates, keys, and other files. req -x509: This specifies that we want to use X.509 certificate signing request (CSR) management. The "X.509" is a public key infrastructure standard that SSL and TLS adhere to for key and certificate management.
- nodes: This tells OpenSSL to skip the option to secure our certificate with a passphrase. We need Apache to be able to read the file, without user intervention, when the server starts up. A passphrase would prevent this from happening, since we would have to enter it after every restart.
- days 365: This option sets the length of time that the certificate will be considered valid. We set it for one year here.
- newkey rsa:2048: This specifies that we want to generate a new certificate and a new key at the same time. We did not create the key that is required to sign the certificate in a previous step, so we need to create it along with the certificate. The rsa:2048 portion tells it to make an RSA key that is 2048 bits long.
- keyout: This line tells OpenSSL where to place the generated private key file that we are creating.
- out: This tells OpenSSL where to place the certificate that we are creating.
The most important line is the one that requests the Common Name. We need to enter the domain name that we want to be associated with our server. We can enter the public IP address instead if we do not have a domain name.
We can check what's in our directory:
$ pwd
/etc/ssl/localcerts

$ ls
apache.crt  apache.key
Once our certificate has been generated, we will need to configure our web server to utilize the new certificate.
mod_ssl is an Apache Interface to OpenSSL, and it provides strong cryptography for the Apache v1.3 and v2 webserver via the Secure Sockets Layer (SSL v2/v3) and Transport Layer Security (TLS v1) cryptographic protocols by the help of the Open Source SSL/TLS toolkit OpenSSL.
It is possible to provide HTTP and HTTPS with a single server machine, because HTTP and HTTPS use different server ports, so there is no direct conflict between them. It is either the maintainer would run two separate Apache server instances (one binds to port 80, the other to port 443) or even use Apache's virtual hosting facility where the maintainer can create two virtual servers which Apache dispatches: one responding to port 80 and speaking HTTP and one responding to port 443 speaking HTTPS.
In order to set up the self-signed certificate, we want to be sure that mod_ssl is installed on our VPS. We can install mod_ssl with the yum command:
$ sudo yum install mod_ssl
...
Installed:
  mod_ssl.x86_64 1:2.4.6-31.el7.centos

Complete!
The module will automatically be enabled during installation, and Apache will be able to start using an SSL certificate after it is restarted.
If we're using a self-signed certificate, we may want to skip this step.
Download the root certificate for the provider that issued commercial certificate before we can begin using it. We may obtain the root certs for various providers from these sites:
Most providers will provide a root certificate file as either a .cer or .pem file. Save the provided root certificate in /etc/httpd/ssl/.
We now have all of the required components of the finished interface. The next thing to do is to set up the virtual hosts to display the new certificate, /etc/httpd/conf.d/djangotest.sfvue.com.conf:
<VirtualHost *:443>
    SSLEngine On
    SSLCertificateFile /etc/ssl/localcerts/apache.pem
    SSLCertificateKeyFile /etc/ssl/localcerts/apache.key

    ServerAdmin webmaster@sfvue.com
    ServerName djangotest.sfvue.com
    DocumentRoot /srv/www/djangotest.sfvue.com/public_html/
    ErrorLog /srv/www/djangotest.sfvue.com/logs/error.log
    CustomLog /srv/www/djangotest.sfvue.com/logs/access.log combined
    WSGIScriptAlias / /srv/www/django/djangotest/djangotest/wsgi.py
    Alias /static/ /srv/www/djangotest.sfvue.com/public_html/static/
    <Directory "/srv/www/djangotest.sfvue.com/">
        Options Indexes FollowSymLinks
        AllowOverride None
        Require all granted
    </Directory>
</VirtualHost>

WSGIPythonPath /srv/www/django/djangotest/
<Directory "/srv/www/django/djangotest/djangotest">
    <Files wsgi.py>
        Require all granted
    </Files>
</Directory>
Now, we have created an SSL certificate and configured our web server to apply it to our site. To apply all of these changes and start using our SSL encryption, we can restart the Apache server to reload its configurations and modules:
$ sudo apachectl restart

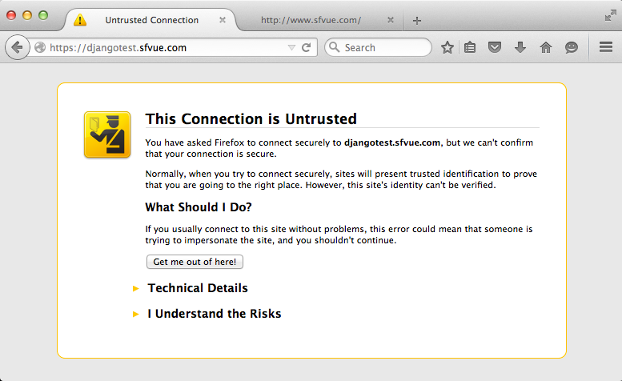
Click "I understand the Risks":

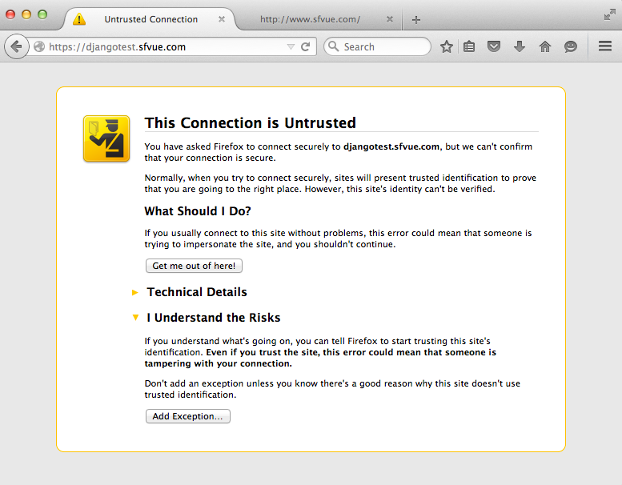
Hit "Add Exception...":

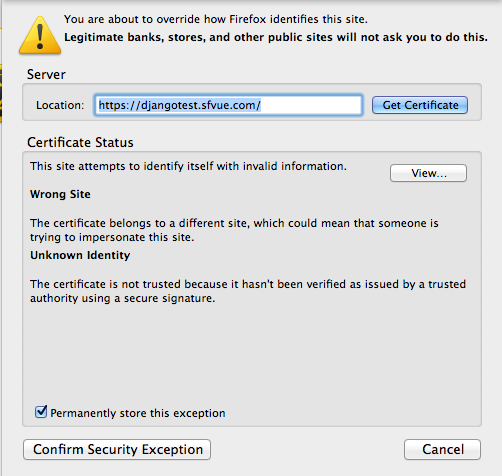
Confirm Security Exception":
Now, we are able to use https://:

Linux - system, cmds & shell
- Linux Tips - links, vmstats, rsync
- Linux Tips 2 - ctrl a, curl r, tail -f, umask
- Linux - bash I
- Linux - bash II
- Linux - Uncompressing 7z file
- Linux - sed I (substitution: sed 's///', sed -i)
- Linux - sed II (file spacing, numbering, text conversion and substitution)
- Linux - sed III (selective printing of certain lines, selective definition of certain lines)
- Linux - 7 File types : Regular, Directory, Block file, Character device file, Pipe file, Symbolic link file, and Socket file
- Linux shell programming - introduction
- Linux shell programming - variables and functions (readonly, unset, and functions)
- Linux shell programming - special shell variables
- Linux shell programming : arrays - three different ways of declaring arrays & looping with $*/$@
- Linux shell programming : operations on array
- Linux shell programming : variables & commands substitution
- Linux shell programming : metacharacters & quotes
- Linux shell programming : input/output redirection & here document
- Linux shell programming : loop control - for, while, break, and break n
- Linux shell programming : string
- Linux shell programming : for-loop
- Linux shell programming : if/elif/else/fi
- Linux shell programming : Test
- Managing User Account - useradd, usermod, and userdel
- Linux Secure Shell (SSH) I : key generation, private key and public key
- Linux Secure Shell (SSH) II : ssh-agent & scp
- Linux Secure Shell (SSH) III : SSH Tunnel as Proxy - Dynamic Port Forwarding (SOCKS Proxy)
- Linux Secure Shell (SSH) IV : Local port forwarding (outgoing ssh tunnel)
- Linux Secure Shell (SSH) V : Reverse SSH Tunnel (remote port forwarding / incoming ssh tunnel) /)
- Linux Processes and Signals
- Linux Drivers 1
- tcpdump
- Linux Debugging using gdb
- Embedded Systems Programming I - Introduction
- Embedded Systems Programming II - gcc ARM Toolchain and Simple Code on Ubuntu/Fedora
- LXC (Linux Container) Install and Run
- Linux IPTables
- Hadoop - 1. Setting up on Ubuntu for Single-Node Cluster
- Hadoop - 2. Runing on Ubuntu for Single-Node Cluster
- ownCloud 7 install
- Ubuntu 14.04 guest on Mac OSX host using VirtualBox I
- Ubuntu 14.04 guest on Mac OSX host using VirtualBox II
- Windows 8 guest on Mac OSX host using VirtualBox I
- Ubuntu Package Management System (apt-get vs dpkg)
- RPM Packaging
- How to Make a Self-Signed SSL Certificate
- Linux Q & A
- DevOps / Sys Admin questions
Ph.D. / Golden Gate Ave, San Francisco / Seoul National Univ / Carnegie Mellon / UC Berkeley / DevOps / Deep Learning / Visualization