Android 4
3. Back to Hello World: Part A

This chapter
- 3.0 Back To Hello World Again
- 3.1 Eclipse IDE
- 3.2 Creating an AVD
- 3.3 Creating a New Android project
- 3.4 Constructing UI
- 3.5 Running the Application
- 3.6 Upgrade the UI to an XML Layout
- 3.7 R Class
- 3.8 Debugging a Project
- 3.9 Creating a Project without Eclipse
What are we doing here?
Moving backwards?
Have we learned something about Android out of previous two sections listed below?
Let us check with couple of simple questions.
- What's AVD?
- What's activity?
How did we use it? - Did we setup any layout?
- What argument can we pass to SetContentView()?
- Do we know about View object?
- We had some xml files like main.xml.
What is it? - Do we know what's in R.java?
- Why should we use resources?
- Do we know how to use debugger?
- Was Eclipse necessary?
For me, at this stage of learning, some of them are tough to answer.
Probably, I could redo the previous sections, especially the Hello World section. But I decided to write one more Hello World section instead because that section wasn't simple pure Hello World. This time, I borrowed some from developer.android.com and reorganized it just enough to answer the questions above.
So, we could go there or we can stick to this site.
If we're using Eclipse as our IDE, writing "Hello, World" is pretty easy because we've been provided a great plugin that handles our project creation and management to greatly speed-up our development cycles.
If we're not using Eclipse, that's okay. We should be familiar with Developing in Other IDEs. We can then return to this tutorial and ignore anything about Eclipse.
Before we start, we should already have the very latest SDK installed, and if we're using Eclipse, we should have installed the ADT plugin as well. If not installed these, see
What do we need to develop Android applications and return here after the installation.
We need to run our application in the Android Emulator and before we can launch the emulator, we must create an Android Virtual Device (AVD). An AVD defines the system image and device settings used by the emulator.
To see a list of system image targets, we use android list target command:
C:\apps\android-sdk-windows>android list target
Available Android targets:
----------
id: 1 or "android-3"
     Name: Android 1.5
     Type: Platform
     API level: 3
     Revision: 4
     Skins: HVGA (default), HVGA-L, HVGA-P, QVGA-L, QVGA-P
     ABIs : armeabi
----------
id: 2 or "android-4"
     Name: Android 1.6
     Type: Platform
     API level: 4
     Revision: 3
     Skins: HVGA, QVGA, WVGA800 (default), WVGA854
     ABIs : armeabi
----------
id: 3 or "android-7"
     Name: Android 2.1
     Type: Platform
     API level: 7
     Revision: 3
     Skins: HVGA, QVGA, WQVGA400, WQVGA432, WVGA800 (default), WVGA854
     ABIs : armeabi
----------
id: 4 or "android-8"
     Name: Android 2.2
     Type: Platform
     API level: 8
     Revision: 3
     Skins: HVGA, QVGA, WQVGA400, WQVGA432, WVGA800 (default), WVGA854
     ABIs : armeabi
----------
id: 5 or "android-10"
     Name: Android 2.3.3
     Type: Platform
     API level: 10
     Revision: 2
     Skins: HVGA, QVGA, WQVGA400, WQVGA432, WVGA800 (default), WVGA854
     ABIs : armeabi
----------
id: 6 or "android-11"
     Name: Android 3.0
     Type: Platform
     API level: 11
     Revision: 2
     Skins: WXGA (default)
     ABIs : armeabi
----------
id: 7 or "android-12"
     Name: Android 3.1
     Type: Platform
     API level: 12
     Revision: 3
     Skins: WXGA (default)
     ABIs : armeabi
----------
id: 8 or "android-13"
     Name: Android 3.2
     Type: Platform
     API level: 13
     Revision: 1
     Skins: WXGA (default)
     ABIs : armeabi
----------
id: 9 or "android-14"
     Name: Android 4.0
     Type: Platform
     API level: 14
     Revision: 3
     Skins: HVGA, QVGA, WQVGA400, WQVGA432, WSVGA, WVGA800 (default), WVGA854, WXGA720, WXGA800
     ABIs : armeabi-v7a
----------
id: 10 or "android-15"
     Name: Android 4.0.3
     Type: Platform
     API level: 15
     Revision: 1
     Skins: HVGA, QVGA, WQVGA400, WQVGA432, WSVGA, WVGA800 (default), WVGA854, WXGA720, WXGA800
     ABIs : armeabi-v7a
To create an AVD, use the "android" tool provided in the Android SDK. Open a command prompt or terminal, navigate to the <sdk>/tools/ directory in the SDK package
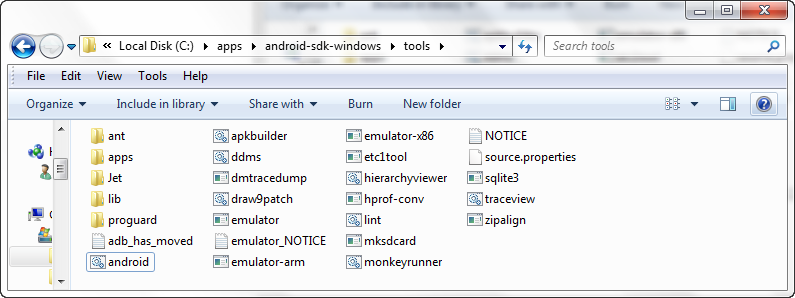
or we can put the path into the system so that we can issue "android" command anywhere.
Then execute: android move avd -n <name> [-<option> <value>] ...
C:\apps\android-sdk-windows>android create avd -n MyAVD2.2 -t 4
Auto-selecting single ABI armeabi
Android 2.2 is a basic Android platform.
Do you wish to create a custom hardware profile [no]
Created AVD 'MyAVD2.2' based on Android 2.2, ARM (armeabi) processor,
with the following hardware config:
hw.lcd.density=240
vm.heapSize=24
Don't like it and want to delete the AVD we've just created?
Then, execute: android delete avd -n <name>
C:\apps\android-sdk-windows>android delete avd -n MyAVD2.2
Deleting file C:\Users\KihyuckHong\.android\avd\MyAVD2.2.ini
Deleting folder C:\Users\KihyuckHong\.android\avd\MyAVD2.2.avd

AVD 'MyAVD2.2' deleted.
Let's create AVD for different target:

The tool now asks if we would like to create a custom hardware profile. For the time being, press Return to skip it ("no" is the default response). That's it. This configures an AVD named MyAVD4.0 that uses the Android 4.0 platform. The AVD is now ready for use in the emulator.
In the above command, the -t(arget) option is required and specifies the deployment target to run on the emulator. The -n(ame) option is also required and defines the name for the new AVD
Actually, if Android SDK with Android Development Tools (ADT) has been installed, we can use SDK and AVD Manager instead of using the command "android ...." above.
Select Window -> Android SDK and AVD Manager from the menu or by issuing command C:\apps\android-sdk-windows>android avd.
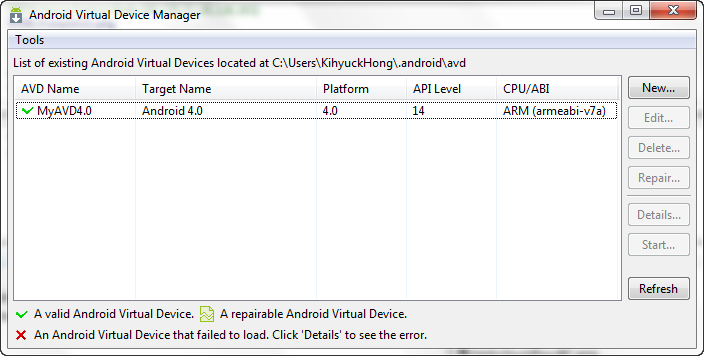
Then we can see the AVD we've just made. As I said, we could have made it using this AVD manager by clicking the New... button of this window.
After creating an AVD, the next step is to start a new Android project in Eclipse.
- From Eclipse, select File > New > Project.
If the ADT Plugin for Eclipse has been successfully installed, the resulting dialog should have a folder labeled "Android" which should contain "Android Project". (After we create one or more Android projects, an entry for "Android XML File" will also be available.) - Select "Android Project" and click Next.
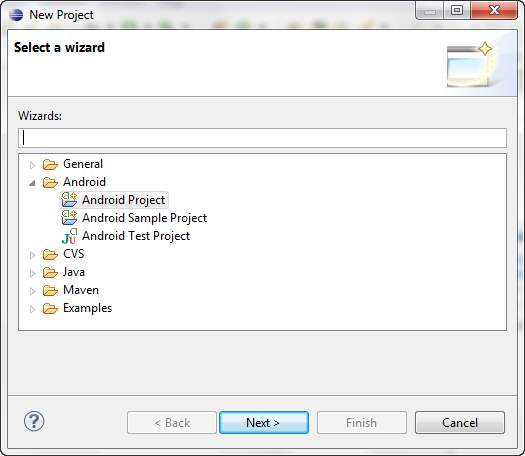
- Fill in the project details with the following values:
- Project name: HelloAndroid
- Application name: HelloAndroid
- Package name: com.bogotobogo.android.first (or our own private namespace)
- Create Activity: HelloAndroid
- Min SDK Version: 3
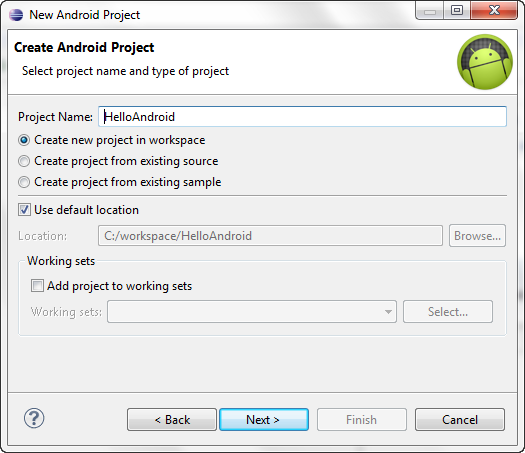
Click Next.
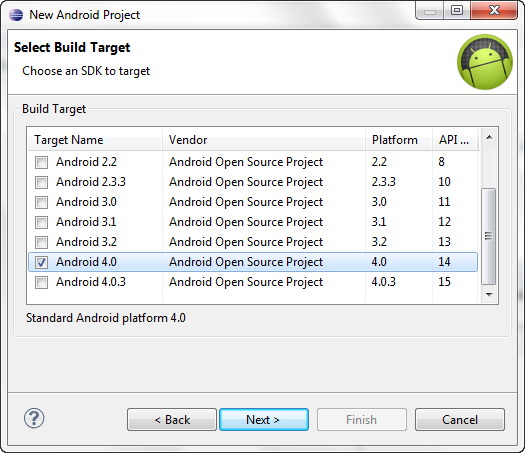
Click Next.
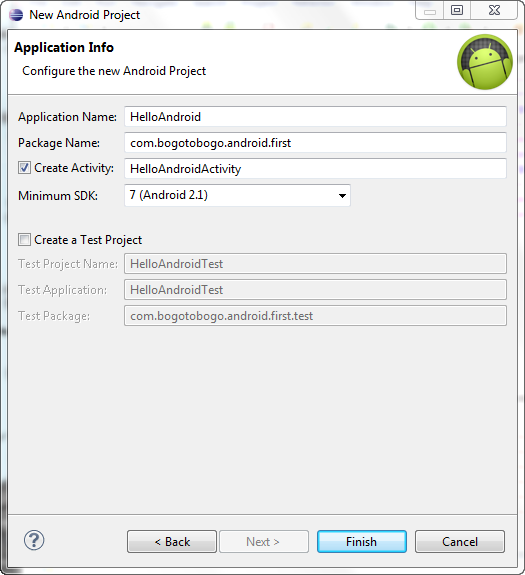
Click Finish.
Here is a description of each field:
-
Project Name
This is the Eclipse Project name - the name of the directory that will contain the project files. -
Application Name
This is the human-readable title for our application - the name that will appear on the Android device. -
Package Name
This is the package namespace (following the same rules as for packages in the Java programming language) that we want all our source code to reside under. This also sets the package name under which the stub Activity will be generated.
Our package name must be unique across all packages installed on the Android system; for this reason, it's very important to use a standard domain-style package for our applications. The example above uses the "com.example" namespace, which is a namespace reserved for example documentation - when we develop our own applications, we should use a namespace that's appropriate to our organization or entity. -
Create Activity
This is the name for the class stub that will be generated by the plugin. This will be a subclass of Android's Activity class. An Activity is simply a class that can run and do work. It can create a UI if it chooses, but it doesn't need to. As the checkbox suggests, this is optional, but an Activity is almost always used as the basis for an application.
-
Min SDK Version
This value specifies the minimum API Level required by our application. If the API Level entered here matches the API Level provided by one of the available targets, then that Build Target will be automatically selected (in this case, entering "2" as the API Level will select the Android 1.1 target). With each new version of the Android system image and Android SDK, there have likely been additions or changes made to the APIs. When this occurs, a new API Level is assigned to the system image to regulate which applications are allowed to be run. If an application requires an API Level that is higher than the level supported by the device, then the application will not be installed.
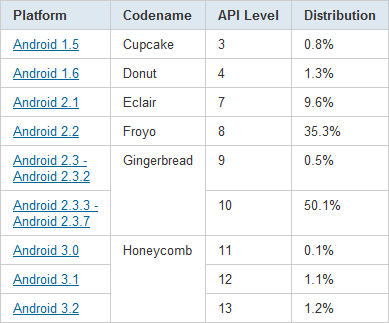
-
Other fields
The checkbox for "Use default location" allows us to change the location on disk where the project's files will be generated and stored. "Build Target" is the platform target that our application will be compiled against (this should be selected automatically, based on our Min SDK Version).
Our Android project is now ready. It should be visible in the Package Explorer on the left. Open the HelloAndroid.java file, located inside HelloAndroid > src > com.bogotobogo.android.first.
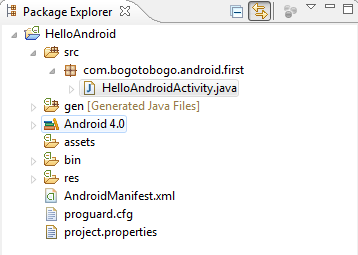
It should look like this:
package com.bogotobogo.android.first;

import android.app.Activity;
import android.os.Bundle;

public class HelloAndroidActivity extends Activity {
    /** Called when the activity is first created. */
    @Override
    public void onCreate(Bundle savedInstanceState) {
        super.onCreate(savedInstanceState);
        setContentView(R.layout.main);
    }
}
Notice that the class is based on the Activity class. An Activity is a single application entity that is used to perform actions. An application may have many separate activities, but the user interacts with them one at a time:
Almost all activities interact with the user, so the Activity class takes care of creating a window for us in which you can place our UI with setContentView(View). While activities are often presented to the user as full-screen windows, they can also be used in other ways: as floating windows (via a theme with windowIsFloating set) or embedded inside of another activity (using ActivityGroup). There are two methods almost all subclasses of Activity will implement:
- onCreate(Bundle) is where you initialize your activity. Most importantly, here you will usually call setContentView(int) with a layout resource defining your UI, and using findViewById(int) to retrieve the widgets in that UI that you need to interact with programmatically.
- onPause() is where you deal with the user leaving your activity. Most importantly, any changes made by the user should at this point be committed (usually to the ContentProvider holding the data).
The onCreate() method will be called by the Android system when our Activity starts - it is where we should perform all initialization and UI setup:
void android.app.Activity.onCreate(Bundle savedInstanceState)
An activity is not required to have a user interface, but usually will.
Now let us modify some code!
Take a look at the revised code below and then make the same changes to our HelloAndroid class.
package com.bogotobogo.android.first;

import android.app.Activity;
import android.os.Bundle;
import android.widget.TextView;

public class HelloAndroidActivity extends Activity {
    /** Called when the activity is first created. */
    @Override
    public void onCreate(Bundle savedInstanceState) {
        super.onCreate(savedInstanceState);
        TextView tv = new TextView(this);
        tv.setText("Hello, Android");
        setContentView(tv);
    }
}
Tip: An easy way to add import packages to our project is to press Ctrl-Shift-O (Cmd-Shift-O, on Mac). This is an Eclipse shortcut that identifies missing packages based on our code and adds them for us.
An Android user interface is composed of hierarchies of objects called Views. A View is a drawable object used as an element in our UI layout, such as a button, image, or (in this case) a text label. Each of these objects is a subclass of the View class and the subclass that handles text is TextView.
In this change, we create a TextView with the class constructor, which accepts an Android Context instance as its parameter. A Context is a handle to the system; it provides services like resolving resources, obtaining access to databases and preferences, and so on. The Activity class inherits from Context, and because our HelloAndroid class is a subclass of Activity, it is also a Context. So, we can pass this as our Context reference to the TextView:
android.widget.TextView.TextView(Context context)
Next, we define the text content with setText(CharSequence):
public final void setText (CharSequence text)
Finally, we pass the TextView to setContentView() in order to display it as the content for the Activity UI. If our Activity doesn't call this method, then no UI is present and the system will display a blank screen:
void android.app.Activity.setContentView(View view)
There it is - "Hello, World" in Android! The next step, of course, is to see it running.
The Eclipse plugin makes it very easy to run our applications:
Select Run > Run.
Select "Android Application".
The Eclipse ADT will automatically create a new run configuration for our project and the Android Emulator will automatically launch. Once the emulator is booted up, our application will appear after a moment. We should now see something like this:
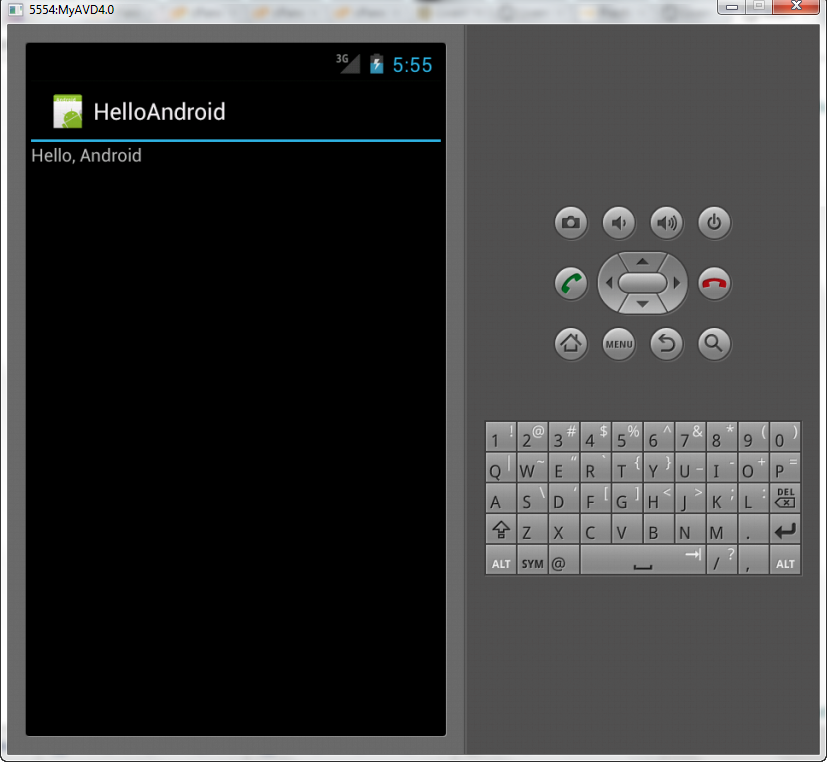
The "Hello, Android" we see in the grey bar is actually the application title. The Eclipse plugin creates this automatically (the string is defined in the res/values/strings.xml file and referenced by our AndroidManifest.xml file). The text below the title is the actual text that we have created in the TextView object.
That concludes the basic "Hello World" tutorial, but we should continue reading for some more valuable information about developing Android applications.
Next sections:
- 3.6 Upgrade the UI to an XML Layout
- 3.7 R Class
- 3.8 Debugging a Project
- 3.9 Creating a Project without Eclipse
Ph.D. / Golden Gate Ave, San Francisco / Seoul National Univ / Carnegie Mellon / UC Berkeley / DevOps / Deep Learning / Visualization