Android 4
17. Map View

This chapter
Using the Google Maps library, we can create our own map-viewing Activity. In this tutorial, we'll create a simple map application in two parts. In Part 1, we'll create an app that shows a map the user can pan and zoom. In Part 2, we'll add overlay items that mark points of interest.
Let's create a new project named HelloGoogleMaps. Remember, we must have an AVD configured to use the Google APIs target, or be using a development device that includes the Maps library.
First, look at the file, AndroidManifest.xml.
<?xml version="1.0" encoding="utf-8"?>
<manifest xmlns:android="http://schemas.android.com/apk/res/android"
	package="com.bogotobogo.hellogooglemaps"
	android:versionCode="1"
	android:versionName="1.0">
	<application android:icon="@drawable/icon" android:label="@string/app_name">
		<activity android:name=".HelloGoogleMaps"
			android:label="@string/app_name"
			android:theme="@android:style/Theme.NoTitleBar">
			<intent-filter>
				<action android:name="android.intent.action.MAIN" />
				<category android:name="android.intent.category.LAUNCHER" />
			</intent-filter>
		</activity>
		<uses-library android:name="com.google.android.maps" />
	</application>
	<uses-sdk android:minSdkVersion="7" />
	<uses-permission android:name="android.permission.INTERNET" />
</manifest>
Because the Maps library is not a part of the standard Android library, we must declare it in the Android Manifest.
<uses-library android:name="com.google.android.maps" />
We also need access to the Internet in order to retrieve map tiles, so we must also request the INTERNET permission.
<uses-permission android:name="android.permission.INTERNET" />
Let's give the map some more space by getting rid of the title bar with the "NoTitleBar" theme:
	<activity android:name=".HelloGoogleMaps"
		android:label="@string/app_name"
		android:theme="@android:style/Theme.NoTitleBar">
Next, res/layout/main.xml file:
<?xml version="1.0" encoding="utf-8"?>
<com.google.android.maps.MapView
	xmlns:android="http://schemas.android.com/apk/res/android"
		android:id="@+id/mapview"
		android:layout_width="fill_parent"
		android:layout_height="fill_parent"
		android:clickable="true"
		android:apiKey="Our key should be inserted here!"
/>
The android:clickable attribute defines whether we want to allow user-interaction with the map. If this is "false" then touching the map does nothing.
The android:apiKey attribute holds the Maps API Key for our application, which proves our application and signer certificate has been registered with the Maps service. This is required in order to receive the map data, even while we are developing. Registration to the service is free and it only takes a couple minutes to register our certificate and get a Maps API Key.
Go now to get a key. We need to register with the SDK debug certificate, which will only be valid while our application is signed with the debug key (once we sign with our private key, we will need a new API key). When we get our key, we should insert it for the value of android:apiKey.
Get API keyNow let's look at HelloGoogleMaps.java file.
package com.bogotobogo.hellogooglemaps;

import com.google.android.maps.MapActivity;
import com.google.android.maps.MapView;

import android.os.Bundle;

public class HelloGoogleMaps extends MapActivity {
    /** Called when the activity is first created. */
    @Override
    public void onCreate(Bundle savedInstanceState) {
        super.onCreate(savedInstanceState);
        setContentView(R.layout.main);
        MapView mapView = (MapView) findViewById(R.id.mapview);
        mapView.setBuiltInZoomControls(true);
    }

    @Override
    protected boolean isRouteDisplayed() {
    	return false;
    }
}
Note that the class extends MapActivity instead of android.app.Activity
public class HelloGoogleMaps extends MapActivity {
This is a special sub-class of Activity, provided by the Maps library, which provides important map capabilities.
Inside every MapActivity, the isRouteDisplayed() method is required, so we overrides this method. This method is required for some accounting from the Maps service to see if we're currently displaying any route information. In this case, we're not, so return false.
	@Override
	protected boolean isRouteDisplayed() {
    		return false;
	}
Now the standard onCreate() callback method:
	@Override
	public void onCreate(Bundle savedInstanceState) {
    		super.onCreate(savedInstanceState);
    		setContentView(R.layout.main);
	}
This loads the layout file created above. In fact, this is now a workable application that will display map tiles and allow the user to pan around the map. But there's no ability to zoom. Fortunately, there's a very simple zoom feature built into the MapView class, which we can summon with setBuiltInZoomControls(boolean). Look at the end of the onCreate() method:
		MapView mapView = (MapView) findViewById(R.id.mapview);
		mapView.setBuiltInZoomControls(true);
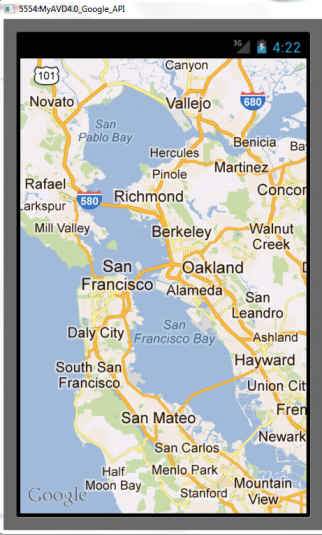
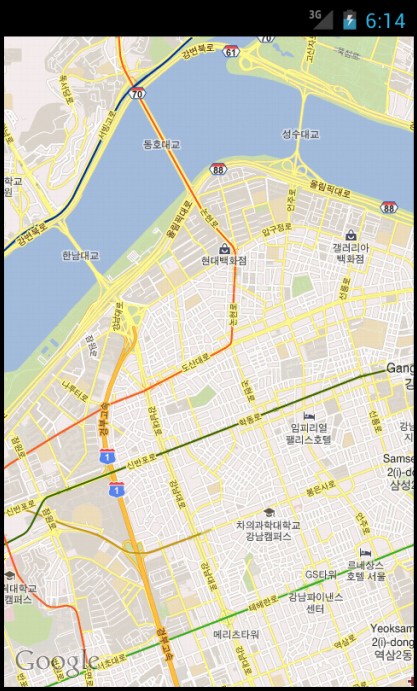
Time to run!
We got a map!
Files used in HelloGoogleMaps example, HelloGoogleMaps.zip
If you get one of the following errors while you're trying to run Map example:
- Android InstallException: EOF Google MapsView âHelloGoogleMapsâ
- ERROR: the user data image is used by another emulator. aborting..
- Failed to install HelloGoogleMaps.apk on device
Try following:
- Make sure that no emulator process is running in the background.
- Restart eclipse.
- Clean the projects.
- Restart your project.
- Remove the app from the emulator and try to start it again.
- Delete the AVD and create a new one.
So, now we have a map, but in many cases we'll also want to create our own map markers and lay-overs. That's what we'll do now. In order to do so, we must implement the ItemizedOverlay class, which can manage a whole set of Overlay (which are the individual items placed on the map).
We need to set Build Target as Google API as we've done in the previous example:
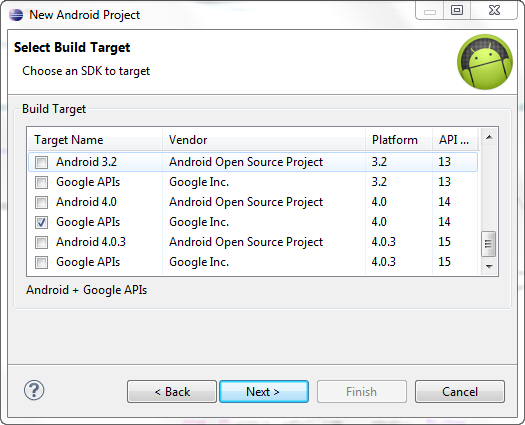
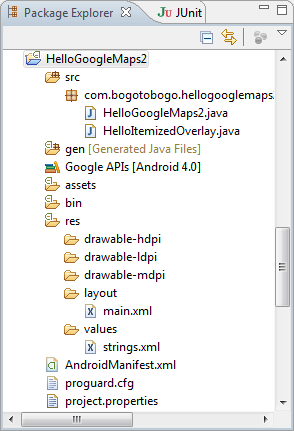
Here are newly created Java class named HelloItemizedOverlay.java that implements ItemizedOverlay.
package com.bogotobogo.hellogooglemaps2;

import java.util.ArrayList;

import android.app.AlertDialog;
import android.content.Context;
import android.graphics.drawable.Drawable;

import com.google.android.maps.ItemizedOverlay;
import com.google.android.maps.OverlayItem;


public class HelloItemizedOverlay extends ItemizedOverlay<OverlayItem> {

	Context mContext;

	public HelloItemizedOverlay(Drawable defaultMarker) {
		super(boundCenterBottom(defaultMarker));
	}

	public HelloItemizedOverlay(Drawable defaultMarker, Context context) {
		super(defaultMarker);
		mContext = context;
	}

	private ArrayList<OverlayItem> mOverlays = new ArrayList<OverlayItem>();

	public void addOverlay(OverlayItem overlay) {
		mOverlays.add(overlay);
		populate();
	}

	@Override
	protected OverlayItem createItem(int i) {
		return mOverlays.get(i);
	}

	@Override
	public int size() {
		return mOverlays.size();
	}

	@Override
	protected boolean onTap(int index) {
		OverlayItem item = mOverlays.get(index);
		AlertDialog.Builder dialog = new AlertDialog.Builder(mContext);
		dialog.setTitle(item.getTitle());
		dialog.setMessage(item.getSnippet());
		dialog.show();
		return true;
	}
}
First, we need an OverlayItem ArrayList, in which we'll put each of the OverlayItem objects we want on the map.
private ArrayList<OverlayItem> mOverlays = new ArrayList<OverlayItem>();
Now define the HelloItemizedOverlay constructors. The constructor must define the default marker for each of the OverlayItems. In order for the Drawable to actually get drawn, it must have its bounds defined. Most commonly, we want the center-point at the bottom of the image to be the point at which it's attached to the map coordinates. This is handled for us with the boundCenterBottom() method. Wrap this around our defaultMarker, so the super constructor call looks like this:
	public HelloItemizedOverlay(Drawable defaultMarker) {
		super(boundCenterBottom(defaultMarker));
	}
In order to add new OverlayItems to the ArrayList, we need a new method:
	public void addOverlay(OverlayItem overlay) {
		mOverlays.add(overlay);
		populate();
	}
Each time we add a new OverlayItems to the ArrayList, we must call populate() for the ItemizedOverlay, which will read each of the OverlayItems and prepare them to be drawn.
When the populate() method executes, it will call createItem(int) in the ItemizedOverlay to retrieve each OverlayItem. We must override this method to properly read from the ArrayList and return the OverlayItem from the position specified by the given integer. Our override method should look like this:
	@Override
	protected OverlayItem createItem(int i) {
		return mOverlays.get(i);
	}
We must also override the size() method to return the current number of items in the ArrayList:
	@Override
	public int size() {
		return mOverlays.size();
	}
Now, set up the ability to handle touch events on the overlay items. First, we're going to need a reference to the application Context as a member of this class. So we add Context mContext as a class member, then initialize it with a new class constructor:
	public HelloItemizedOverlay(Drawable defaultMarker, Context context)
	{
		super(defaultMarker);
		mContext = context;
	}
This passes the defaultMarker up to the default constructor to bound its coordinates and then initialize mContext with the given Context.
Then override the onTap(int) callback method, which will handle the event when an item is tapped by the user:
	@Override
	protected boolean onTap(int index) {
		OverlayItem item = mOverlays.get(index);
		AlertDialog.Builder dialog = new AlertDialog.Builder(mContext);
		dialog.setTitle(item.getTitle());
		dialog.setMessage(item.getSnippet())
		dialog.show();
		return true;
	}
This uses the member android.content.Context to create a new AlertDialog.Builder and uses the tapped OverlayItem's title and snippet for the dialog's title and message text. (We'll see the OverlayItem title and snippet defined when we create it below.)
We're now done with the HelloItemizedOverlay class and can start using it to add items on the map.
Let's look at HelloGoogleMaps2 class.
package com.bogotobogo.hellogooglemaps2;

import java.util.List;

import com.google.android.maps.GeoPoint;
import com.google.android.maps.MapActivity;
import com.google.android.maps.MapView;
import com.google.android.maps.Overlay;
import com.google.android.maps.OverlayItem;

import android.graphics.drawable.Drawable;
import android.os.Bundle;

public class HelloGoogleMaps2 extends MapActivity {
    /** Called when the activity is first created. */
    @Override
    public void onCreate(Bundle savedInstanceState) {
        super.onCreate(savedInstanceState);
        setContentView(R.layout.main);

        MapView mapView = (MapView) findViewById(R.id.mapview);
        mapView.setBuiltInZoomControls(true);

        List<Overlay> mapOverlays = mapView.getOverlays();
        Drawable drawable = this.getResources().getDrawable(R.drawable.androidmarker);
        HelloItemizedOverlay itemizedoverlay = new HelloItemizedOverlay(drawable);

	GeoPoint point = new GeoPoint(19240000,-99120000);
	OverlayItem overlayitem = new OverlayItem(point, "Hola, Mundo!", "I'm in Mexico City!");
	GeoPoint point2 = new GeoPoint(37300000, 127300000);
	OverlayItem overlayitem2 = new OverlayItem(point2, "Sesang, Annyeong!", "I'm in Seoul!");

	itemizedoverlay.addOverlay(overlayitem);
	itemizedoverlay.addOverlay(overlayitem2);
	mapOverlays.add(itemizedoverlay);
    }

    @Override
    protected boolean isRouteDisplayed() {
    	return false;
    }
}
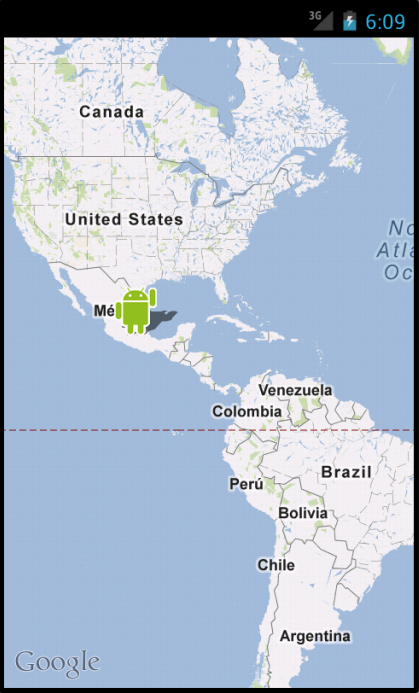
We create an OverlayItem and add it to an instance of the HelloItemizedOverlay class, then add the HelloItemizedOverlay to the MapView using a GeoPoint to define its coordinates on the map.
First, we need the image for the map overlay. We drag this image  into the res/drawable/ directory of our project.
At the end of our existing onCreate() method, instantiate :
	List<Overlay> mapOverlays = mapView.getOverlays();
	Drawable drawable = this.getResources().getDrawable(R.drawable.androidmarker);
	HelloItemizedOverlay itemizedoverlay = new HelloItemizedOverlay(drawable);
All overlay elements on a map are held by the MapView, so when we want to add some, we have to get a list from the getOverlays() method. Then instantiate the Drawable used for the map marker, which was saved in the res/drawable/ directory. The constructor for HelloItemizedOverlay (our custom ItemizedOverlay) takes the Drawable in order to set the default marker for all overlay items.
Now create a GeoPoint that defines the map coordinates for the first overlay item, and pass it to a new OverlayItem:
	GeoPoint point = new GeoPoint(19240000,-99120000);
	OverlayItem overlayitem = new OverlayItem(point, "Hola, Mundo!", "I'm in Mexico City!");
GeoPoint coordinates are specified in microdegrees (degrees * 1e6). The OverlayItem constructor accepts the GeoPoint location, a string for the item's title, and a string for the item's snippet text, respectively.
All that's left is to add this OverlayItem to our collection in the HelloItemizedOverlay instance, then add the HelloItemizedOverlay to the MapView:
	itemizedoverlay.addOverlay(overlayitem);
	mapOverlays.add(itemizedoverlay);
Now run the application.
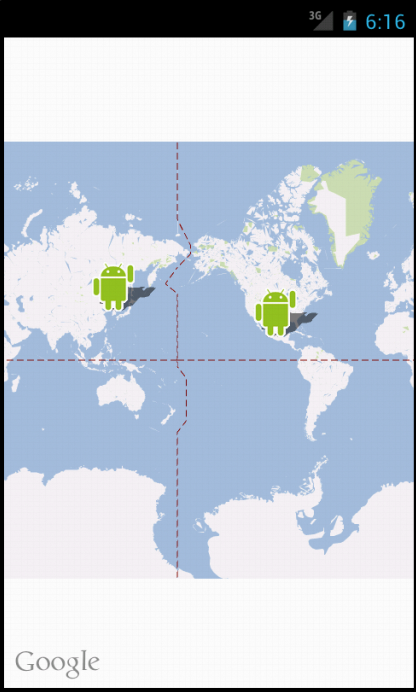
Files used in HelloGoogleMaps example, HelloGoogleMaps2.zip
Here is another example of Google Maps.
Let's look at the Java code, HelloGoogleMaps3.java
package com.bogotobogo.hellogooglemaps3;

import android.graphics.drawable.Drawable;
import android.graphics.Canvas;
import android.os.Bundle;
import android.view.KeyEvent;
import android.widget.Toast;
import com.google.android.maps.GeoPoint;
import com.google.android.maps.ItemizedOverlay;
import com.google.android.maps.MapActivity;
import com.google.android.maps.MapView;
import com.google.android.maps.MyLocationOverlay;
import com.google.android.maps.OverlayItem;
import java.util.ArrayList;
import java.util.List;

public class HelloGoogleMaps3 extends MapActivity {
	private MapView map=null;
	private MyLocationOverlay me=null;

	@Override
	public void onCreate(Bundle savedInstanceState) {
		super.onCreate(savedInstanceState);
		setContentView(R.layout.main);

		map=(MapView)findViewById(R.id.map);

		map.getController().setCenter(getPoint
				(40.76793169992044,-73.98180484771729));
		map.getController().setZoom(17);
		map.setBuiltInZoomControls(true);

		Drawable marker=getResources().getDrawable(R.drawable.marker);
		marker.setBounds(0, 0, marker.getIntrinsicWidth(),
						marker.getIntrinsicHeight());
		map.getOverlays().add(new SitesOverlay(marker));
		me=new MyLocationOverlay(this, map);
		map.getOverlays().add(me);
	}

	@Override
	public void onResume() {
		super.onResume();
		me.enableCompass();
	}

	@Override
	public void onPause() {
		super.onPause();
		me.disableCompass();
	}

 	@Override
	protected boolean isRouteDisplayed() {
		return(false);
	}

 	@Override
	public boolean onKeyDown(int keyCode, KeyEvent event) {
		if (keyCode == KeyEvent.KEYCODE_S) {
			map.setSatellite(!map.isSatellite());
			return(true);
		}
		else if (keyCode == KeyEvent.KEYCODE_Z) {
			map.displayZoomControls(true);
			return(true);
		}

		return(super.onKeyDown(keyCode, event));
	}

	private GeoPoint getPoint(double lat, double lon) {
		return(new GeoPoint((int)(lat*1000000.0),
					(int)(lon*1000000.0)));
	}

	private class SitesOverlay extends ItemizedOverlay<OverlayItem> {
		private List<OverlayItem> items=new ArrayList<OverlayItem>();
		private Drawable marker=null;

		public SitesOverlay(Drawable marker) {
			super(marker);
			this.marker=marker;

			items.add(new OverlayItem(getPoint
					(40.748963847316034,-73.96807193756104),
						"UN", "United Nations"));
			items.add(new OverlayItem(getPoint
					(40.76866299974387,-73.98268461227417),
						"Lincoln Center",
						"Home of Jazz at Lincoln Center"));
			items.add(new OverlayItem(getPoint
					(40.765136435316755,-73.97989511489868),
						"Carnegie Hall",
						"Where you go with practice, practice, practice"));
			items.add(new OverlayItem(getPoint
					(40.70686417491799,-74.01572942733765),
						"The Downtown Club",
						"Original home of the Heisman Trophy"));
			populate();
		}

		@Override
		protected OverlayItem createItem(int i) {
			return(items.get(i));
		}

		@Override
		public void draw(Canvas canvas, MapView mapView,
					boolean shadow) {
			super.draw(canvas, mapView, shadow);
			boundCenterBottom(marker);
		}

		@Override
		protected boolean onTap(int i) {
			Toast.makeText(HelloGoogleMaps3.this,
				items.get(i).getSnippet(),
				Toast.LENGTH_SHORT).show();
			return(true);
		}

		@Override
		public int size() {
			return(items.size());
		}
	}
}
We can fine our MapView widget by findViewById(), just as with any other widget. The widget itself offers a getMapController() method. Between the MapView and MapController, we have a fair bit of capability to determine what the map shows and how it behaves. The following sections cover zoom and center, the features we will most likely want to use.
	map=(MapView)findViewById(R.id.map);
	map.getController().setCenter(getPoint
			(40.76793169992044,-73.98180484771729));
We can control the zoom level directly via the setZoom() method on the MapController.
map.getController().setZoom(17);
We wish to allow users to change the zoom level, call setBuiltZoomControls(true); and the user will be able to zoom in and out of the map via zoom controls found at the bottom center of the map.
map.setBuiltInZoomControls(true);
MapView offers toggleSatellite(), which, as the name suggests, toggle on and off the satellite perspective on the area being viewed. We can have the user trigger these via an options menu or, in this example, via key presses:
 	@Override
	public boolean onKeyDown(int keyCode, KeyEvent event) {
		if (keyCode == KeyEvent.KEYCODE_S) {
			map.setSatellite(!map.isSatellite());
			return(true);
		}
		else if (keyCode == KeyEvent.KEYCODE_Z) {
			map.displayZoomControls(true);
			return(true);
		}
		return(super.onKeyDown(keyCode, event));
	}
Any overlay we want to add to our map needs to be implemented as a subclass of Overlay. There is an ItemizedOverlay subclass available if we are looking to add pushpins; ItemizedOverlay simplifies this process.
To attach an overlay class to our map, just call getOverlays() on our MapView and add() our overlay instance to it, as we do here with a custom SiteSOverlay:
		marker.setBounds(0, 0, marker.getIntrinsicWidth(),
						marker.getIntrinsicHeight());
		map.getOverlays().add(new SitesOverlay(marker));
As the name suggests, ItemizedOverlay allows us to supply a list of points of interest to be displayed on the map-specifically, instance of OverlayItem. The overlay handles much of the drawing logic for us. Here are the minimum steps to make this work:
- Override ItemizedOverlay<OverlayItem> as our own subclass, SitesOverlay
private class SitesOverlay extends ItemizedOverlay { - In the constructor, build our roster of OverlayItem instances, and call populate() when they are ready for use by the overlay.
public SitesOverlay(Drawable marker) { super(marker); this.marker=marker; items.add(new OverlayItem(getPoint (40.748963847316034,-73.96807193756104), "UN", "United Nations")); .... populate(); } - Implement size() to return the number of items to be handled by the overlay.
@Override public int size() { return(items.size()); } - Override createItem() to return OverlayItem instances given an index.
@Override protected OverlayItem createItem(int i) { return(items.get(i)); } - When we instantiate our ItemizedOverlay subclass, provide it with a Drawable that represents the default icon to display for each item.
private class SitesOverlay extends ItemizedOverlay<OverlayItem> {
		private List<OverlayItem> items=new ArrayList<OverlayItem>();
		private Drawable marker=null;
		public SitesOverlay(Drawable marker) {
Let's look at the AndroidManifest.xml.
<?xml version="1.0" encoding="utf-8"?>
<manifest xmlns:android="http://schemas.android.com/apk/res/android"
	package="com.bogotobogo.hellogooglemaps3">
	<uses-permission android:name="android.permission.INTERNET" />
	<uses-permission android:name="android.permission.ACCESS_COARSE_LOCATION" />

	<application android:label="@string/app_name"
		android:icon="@drawable/cw">
		<uses-library android:name="com.google.android.maps" />
		<activity android:name=".HelloGoogleMaps3" android:label="@string/app_name">
			<intent-filter>
				<action android:name="android.intent.action.MAIN" />
				<category android:name="android.intent.category.LAUNCHER" />
			</intent-filter>
		</activity>
	</application>
</manifest>
Note the followings from the xml file:
- The INTERNET and ACCESS_COARSE_LOCATION permissions.
- Inside our <application>, a <uses-library> element with android:name="com.google.android.maps", to indicate we are using one of the optional Android APIs.
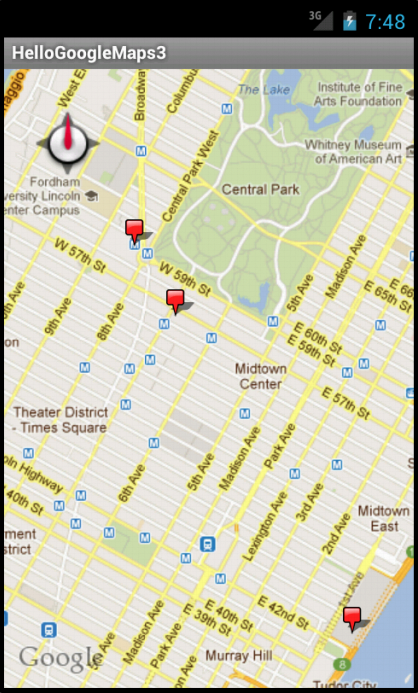
Files used in HelloGoogleMaps example, HelloGoogleMaps3.zip
From http://code.google.com/android/add-ons/google-apis/mapkey.html.
The MapView class in the Maps external library is a very useful class that lets us easily integrate Google Maps into our application. It provides built-in map downloading, rendering, and caching of Maps tiles, as well as a variety of display options and controls. It provides a wrapper around the Google Maps API that lets our application request and manipulate Google Maps data through class methods, and it lets us work with Maps data as we would other types of Views.
Because MapView gives us access to Google Maps data, we need to register with the Google Maps service and agree to the applicable Terms of Service before our MapView will be able to obtain data from Google Maps. This will apply whether we are developing our application on the emulator or preparing our application for deployment to mobile devices.
Registering for a Maps API Key is simple, free, and has two parts:
- Registering the MD5 fingerprint of the certificate that we will use to sign our application. The Maps registration service then provides us a Maps API Key that is associated with your application's signer certificate.
- Adding a reference to the Maps API Key in each MapView, whether declared in XML or instantiated directly from code. We can use the same Maps API Key for any MapView in any Android application, provided that the application is signed with the certificate whose fingerprint we registered with the service.
During registration, we also need to agree to the Maps API Terms of Service, which describe how our application can use the Maps data. In general, the terms of service are permissive and place few restrictions on how we can use the data. For example, the terms allow us to build "friend finder" type applications.
The sections below describe how to obtain our Maps API Key and how to reference it from our MapView elements.
While we are developing and debugging our application, we will likely be signing our application in debug mode - that is, the SDK build tools will automatically sign our application using the debug certificate. To let our MapView elements properly display Maps data during this period, we should obtain a temporary Maps API Key registered to the debug certificate. To do so, you first need to get the MD5 fingerprint of the debug certificate. When we are ready to release our application, we must register our release certificate with the Google Maps service and obtain a new Maps API Key. We must then change the MapView elements in our application to reference the new API key.
To generate an MD5 fingerprint of the debug certificate, first locate the debug keystore. By default, build tools create the debug keystore in the active AVD directory. The location of the AVD directories varies by platform:
- Windows Vista: C:\Users\
\.android\debug.keystore - Windows XP: C:\Documents and Settings\
\.android\debug.keystore - OS X and Linux: ~/.android/debug.keystore
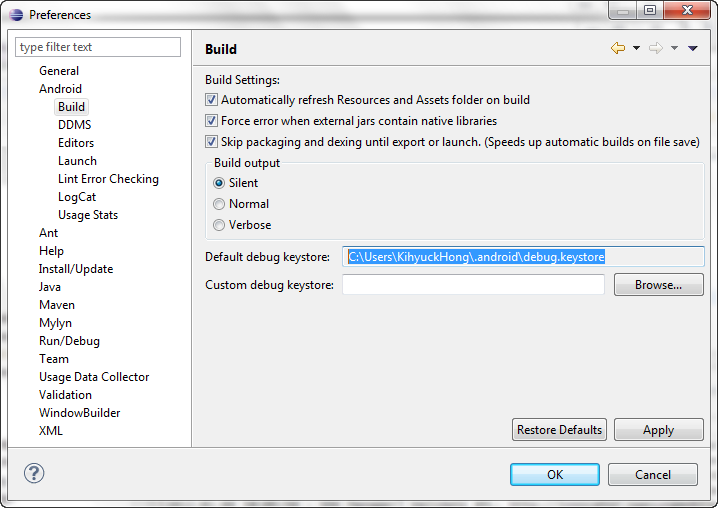
If we are using Eclipse/ADT and are unsure where the debug keystore is located, we can select Windows > Prefs > Android > Build to check the full path, which we can then paste into a file explorer to locate the directory containing the keystore:
Once we have located the keystore, use this Keytool command to get the MD5 fingerprint of the debug certificate:
Here is the command:
$ keytool -list -alias androiddebugkey -keystore.keystore
As an example of actual run of the keytool command:
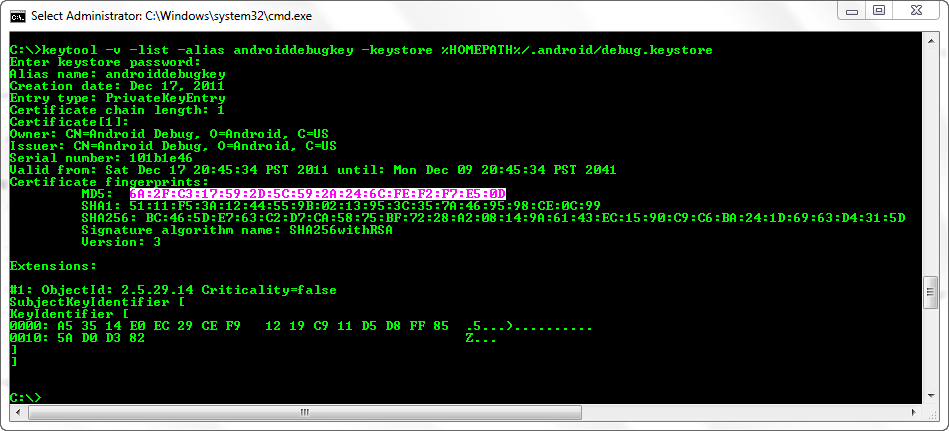
The default password is adnroid.
Note that we used -v for the keytool command. Otherwise, we may end up typing in SHA1 not MD5 fingetprint, and get the message saying "fingerprint you entered is not valid. Please press the Back button on your browser and enter a valid certificate fingerprint."
When we are ready to register for a Maps API Key, load this page in a browser:
http://code.google.com/android/maps-api-signup.htmlTo register for a Maps API Key, follow these steps:
- If we don't have a Google account, use the link on the page to set one up.
- Read the Android Maps API Terms of Service carefully. If we agree to the terms, indicate so using the checkbox on the screen.
- Paste the MD5 certificate fingerprint of the certificate that we are registering into the appropriate form field.
Put the MD5 fingerprint into the box.
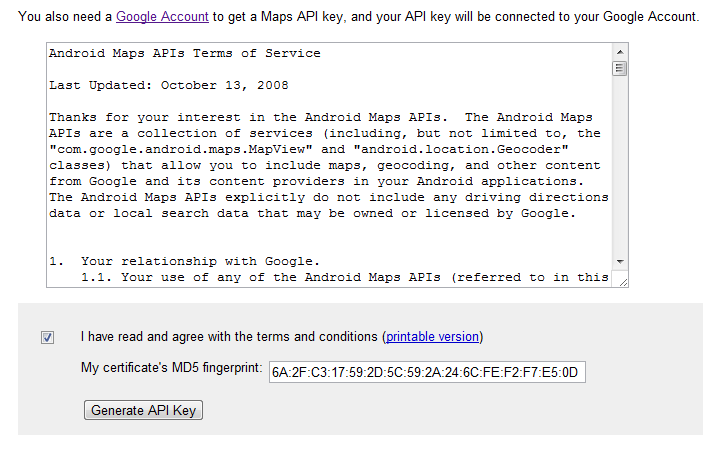
- Click "Generate API Key"
The server will handle our request, associating the fingerprint with our developer identity and generating a unique Maps API Key, and then will return a results page that gives us our Key string.
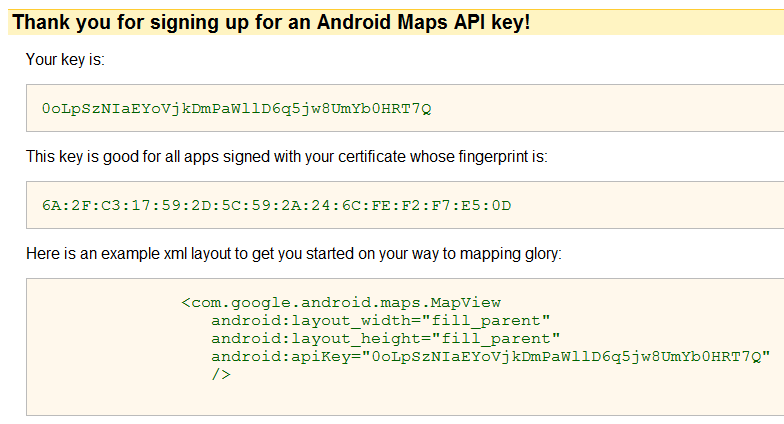
To use the Maps API Key string, copy and paste it into our code.
We got a map with a marker!
Ph.D. / Golden Gate Ave, San Francisco / Seoul National Univ / Carnegie Mellon / UC Berkeley / DevOps / Deep Learning / Visualization