Android 4
6. ListView, Spinner, GridView, and Gallery
- Part A - 2020

This chapter
- 6.0 Selection Widgets
- 6.1 ListView
- 6.2 Spinner
- 6.3 AutocompleteTextView
- 6.4 GridView
- 6.5 Gallery
- 6.6 ImageView
- 6.7 Image Switcher View
Android adapters provide a common interface to the data model behind the selection widgets. They are responsible for providing the data for a selection widget, as well as for converting individual elements of data into specific views to be displayed inside the widgets.
The easies adapter to use is ArrayAdapter. All we need to do is wrap around a Java array or java.util.List instance. Then, we have a fully functional adapter:
String[] arr = {"My", "first", "Android", "list"};
new ArrayAdapter<String>
      (this,android.R.layout.simple_list_item_1, arr);
The ArrayAdapter constructor takes following three parameters:
- The Context to use, typically, this will be our activity instance.
- The resource ID of a view to use, for example, built in resource ID.
- The actual array or list.
The ArrayAdapter will invoke toString() on the objects in the list and wrap each of those strings in the view designated by the supplied resource.
android.R.layout.simple_list_item_1 simply turns those strings into TextView objects. And those TextView widgets, in turn, will be shown in the list, spinner, etc.
Displaying lists is a very common. The user gets a list of items that can be scrolled. Then, the user select one item. Android provides the view ListView for this.
ListView is a ViewGroup that creates a list of scrollable items. The list items are automatically inserted to the list using a ListAdapter, and we use attached listener via setOnItemSelectedListener() to find out when the selection has changed.
But, if our activity is dominated by a single list, we might consider creating our activity as a subclass of ListActivity, rather than the regular Activity class. If main view is just the list, we do not even need to supply a layout; ListActivity will construct a full-screen list for us. If we want to customize the layout, ListActivity knows which widget is the main list for the activity as long as we identify our ListView as @android:id/list.
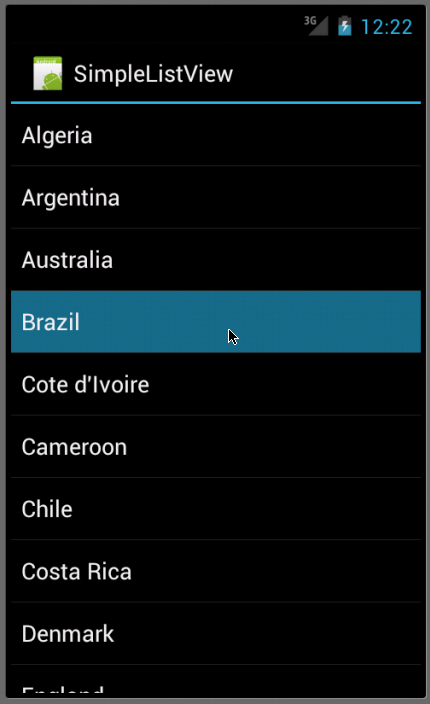
Now, let's work on real list example. We'll create a scrollable list of country names that are read from a string array. We make the class extend ListActivity instead of Activity. ListActivity is an activity that displays a list of items by binding to a data source such as an array or Cursor, and exposes event handlers when the user selects an item. ListActivity hosts a ListView object that can be bound to different data sources, typically either an array or a Cursor holding query results.
Notice that we don't need to load a layout because we're using the whole screen for our list. ListActivity has a default layout that consists of a single, full-screen list in the center of the screen.
We call setListAdapter() which automatically adds a ListView to the ListActivity, and provide it with an ArrayAdapter that binds a simple_list_item_1 layout item to each entry in the WORLDCUP2010 array.
The ListAdapter manages a ListView backed by an array of arbitrary objects. By default this class expects that the provided resource id references a single TextView.
Android provides some standard row layout resources. These are in the R.layout class, and have names such as simple_list_item_1, simple_list_item_2, and two_line_list_item.
The setTextFilterEnabled(boolean) method turns on text filtering for the ListView, so that when the user begins typing, the list will be filtered.
package com.bogotobogo.SimpleListView;

import android.app.ListActivity;
import android.os.Bundle;
import android.widget.ArrayAdapter;

public class SimpleListViewActivity extends ListActivity {
    /** Called when the activity is first created. */
	@Override
	public void onCreate(Bundle savedInstanceState) {
		super.onCreate(savedInstanceState);
		setListAdapter(new ArrayAdapter<String>(this,
			android.R.layout.simple_list_item_1, WORLDCUP2010));
		getListView().setTextFilterEnabled(true);
	}

	static final String[] WORLDCUP2010 = new String[] {
		"Algeria",  "Argentina", "Australia",
		"Brazil", "Cote d'Ivoire", "Cameroon",
		"Chile", "Costa Rica", "Denmark",
		"England", "France", "Germany",
		"Ghana",  "Greece", "Honduras",
		"Italy",  "Japan", "Netherlands",
		"New Zealand", "Nigeria", "North Korea",
		"Paraguay", "Portugal","Serbia",
		"Slovakia", "Slovenia", "South Africa",
		"South Korea",  "Spain", "Switzerland",
		"United States", "Uruguay" };
}
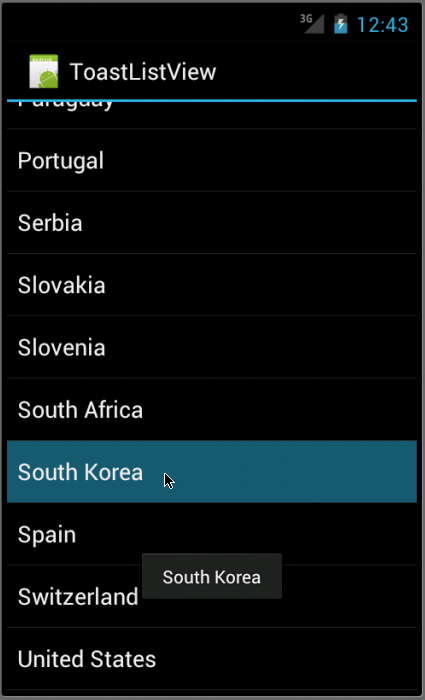
Here is a little bit different version showing selection. The setOnItemClickListener(OnItemClickListener) method defines the on-click listener for each item. When an item in the ListView is clicked, the onItemClick() method is called and a Toast message is displayed, using the text from the clicked item.
A toast is a view containing a quick little message for the user. The toast class helps you create and show those. When the view is shown to the user, appears as a floating view over the application. It will never receive focus. The user will probably be in the middle of typing something else. The idea is to be as unobtrusive as possible, while still showing the user the information you want them to see. Two examples are the volume control, and the brief message saying that your settings have been saved.
package com.bogotobogo.ToastListView;

import android.app.ListActivity;
import android.os.Bundle;
import android.view.View;
import android.widget.AdapterView;
import android.widget.ArrayAdapter;
import android.widget.ListView;
import android.widget.TextView;
import android.widget.Toast;
import android.widget.AdapterView.OnItemClickListener;

	public class ToastListViewActivity extends ListActivity {
	    /** Called when the activity is first created. */
		@Override
		public void onCreate(Bundle savedInstanceState) {
			super.onCreate(savedInstanceState);
			setListAdapter(new ArrayAdapter<String>(this,
					android.R.layout.simple_list_item_1, WORLDCUP2010));
			ListView lv = getListView();
			lv.setTextFilterEnabled(true);
			lv.setOnItemClickListener(new OnItemClickListener() {
				public void onItemClick(AdapterView<?> parent, View v,
						int position, long id) {
				      // When clicked, show a toast with the TextView text
					Toast.makeText(getApplicationContext(), ((TextView) v).getText(),
					Toast.LENGTH_SHORT).show();
				}
			});
		}

		static final String[] WORLDCUP2010 = new String[] {
			"Algeria",  "Argentina", "Australia",
			"Brazil", "Cote d'Ivoire", "Cameroon",
			"Chile", "Costa Rica", "Denmark",
			"England", "France", "Germany",
			"Ghana",  "Greece", "Honduras",
			"Italy",  "Japan", "Netherlands",
			"New Zealand", "Nigeria", "North Korea",
			"Paraguay", "Portugal","Serbia",
			"Slovakia", "Slovenia", "South Africa",
			"South Korea",  "Spain", "Switzerland",
			"United States", "Uruguay" };
	}
And with the user defined layout file:
<?xml version="1.0" encoding="utf-8"?>
<LinearLayout xmlns:android="http://schemas.android.com/apk/res/android"
    android:layout_width="fill_parent"
    android:layout_height="fill_parent"
    android:orientation="vertical" >

    <TextView
        android:layout_width="fill_parent"
        android:layout_height="wrap_content"
        android:padding="10dp"
        android:textSize="16sp" />

</LinearLayout>
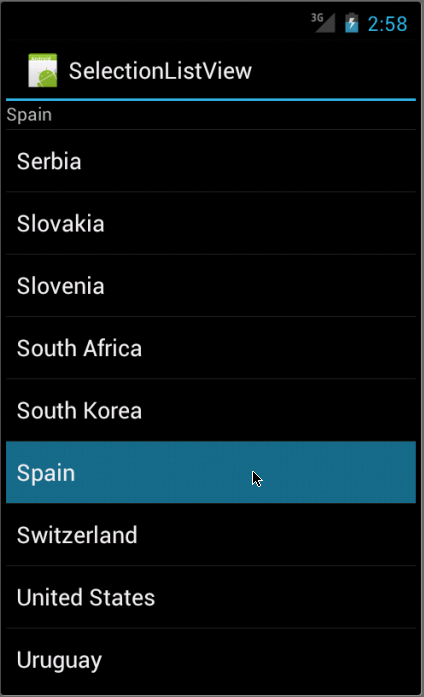
The following ListView displays the selection at the top
package com.bogotobogo.SelectionListView;

import android.os.Bundle;
import android.app.ListActivity;
import android.view.View;
import android.widget.ArrayAdapter;
import android.widget.ListView;
import android.widget.TextView;

public class SelectionListViewActivity extends ListActivity {
	TextView selection;
    /** Called when the activity is first created. */
	@Override
	public void onCreate(Bundle icicle) {
		super.onCreate(icicle);
		setContentView(R.layout.main);
		setListAdapter(new ArrayAdapter<String>(this,
				android.R.layout.simple_list_item_1,
					WORLDCUP2010));
		selection=(TextView)findViewById(R.id.selection);
	}

	public void onListItemClick(ListView parent, View v,
			int position,long id) {
	 	selection.setText(WORLDCUP2010[position]);
	}

	static final String[] WORLDCUP2010 = new String[] {
		"Algeria",  "Argentina", "Australia",
		"Brazil", "Cote d'Ivoire", "Cameroon",
		"Chile", "Costa Rica", "Denmark",
		"England", "France", "Germany",
		"Ghana",  "Greece", "Honduras",
		"Italy",  "Japan", "Netherlands",
		"New Zealand", "Nigeria", "North Korea",
		"Paraguay", "Portugal","Serbia",
		"Slovakia", "Slovenia", "South Africa",
		"South Korea",  "Spain", "Switzerland",
		"United States", "Uruguay" };
}
The main.xml:
<?xml version="1.0" encoding="utf-8"?>
<LinearLayout xmlns:android="http://schemas.android.com/apk/res/android"
    android:layout_width="fill_parent"
    android:layout_height="fill_parent"
    android:orientation="vertical" >

    <TextView android:id="@+id/selection"
        android:layout_width="fill_parent"
        android:layout_height="wrap_content" />

    <ListView android:id="@android:id/list"
        android:layout_width="fill_parent"
        android:layout_height="wrap_content"
        android:drawSelectorOnTop="false" />

</LinearLayout>
and the strings.xml:
<?xml version="1.0" encoding="utf-8"?>
<resources>

    <string name="hello">Hello World, SelectionListViewActivity!</string>
    <string name="app_name">SelectionListView</string>

</resources>
If we modify onCreate() method of the previous example, we can get multiple choice list.
Modify the line:
        setListAdapter(new ArrayAdapter<String>(this,
			android.R.layout.simple_list_item_1,
				WORLDCUP2010));
To:
	setListAdapter(new ArrayAdapter<String>(this,
		android.R.layout.simple_list_item_multiple_choice,
		WORLDCUP2010));
And add the following three linse at the end of the method:
	final ListView listView = getListView();
	listView.setItemsCanFocus(false);
	listView.setChoiceMode(ListView.CHOICE_MODE_MULTIPLE);
The new method onCreate() is:
@Override
public void onCreate(Bundle icicle) {
	super.onCreate(icicle);
	setContentView(R.layout.main);
	setListAdapter(new ArrayAdapter<String>(this,
		android.R.layout.simple_list_item_multiple_choice,
		WORLDCUP2010));
	selection=(TextView)findViewById(R.id.selection);
	final ListView listView = getListView();
	listView.setItemsCanFocus(false);
	listView.setChoiceMode(ListView.CHOICE_MODE_MULTIPLE);
}
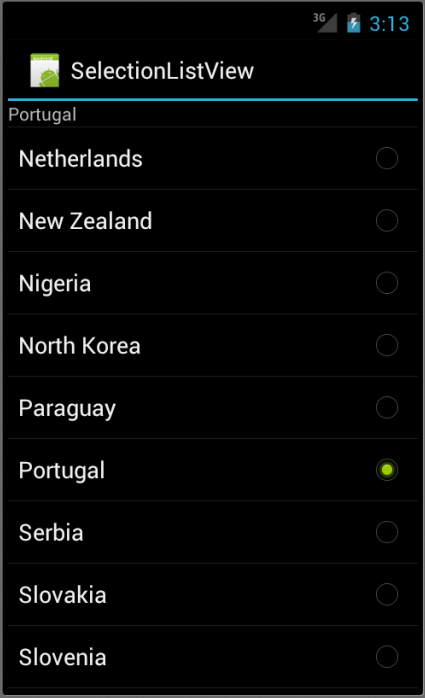
We converted the previous single choice list to multiple choice list.
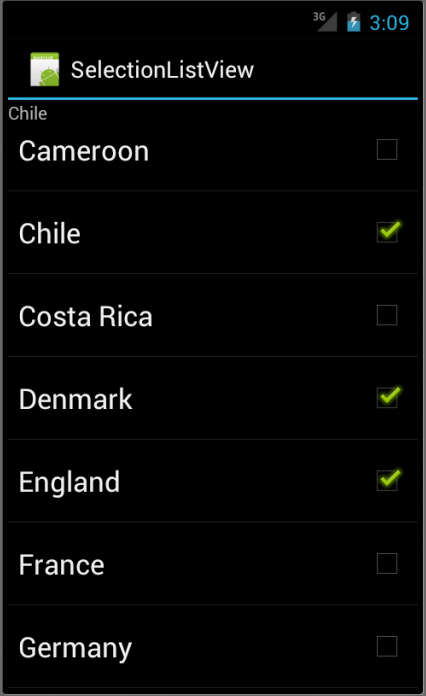
Of course, we can do single choice, too.
Change
android.R.layout.simple_list_item_multiple_choice,
->
android.R.layout.simple_list_item_single_choice,
and
listView.setChoiceMode(ListView.CHOICE_MODE_MULTIPLE);
->
listView.setChoiceMode(ListView.CHOICE_MODE_SINGLE);
Then, we get:
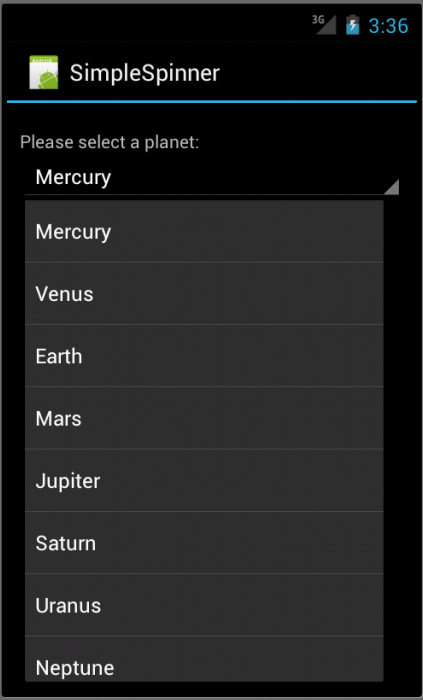
A Spinner is a widget that allows the user to select an item from a group. It displays one child at a time and lets the user pick among them. The items in the Spinner come from the Adapter associated with this view. It is similar to a dropdown list and will allow scrolling when the list exceeds the available vertical space on the screen.
Here is the layout file, main.xml:
<?xml version="1.0" encoding="utf-8"?>
<LinearLayout xmlns:android="http://schemas.android.com/apk/res/android"
	android:orientation="vertical"
	android:padding="10dip"
	android:layout_width="fill_parent"
	android:layout_height="wrap_content">

	<TextView android:id="@+id/select"
		android:layout_width="fill_parent"
		android:layout_height="wrap_content"
		android:layout_marginTop="10dip"
		android:text="@string/select" />

	<Spinner
		android:id="@+id/spinner"
		android:layout_width="fill_parent"
		android:layout_height="wrap_content"
		android:drawSelectorOnTop="true"
		android:prompt="@string/planet_prompt"/>

</LinearLayout>
Because the Spinner's android:prompt is a string resource and Android does not allow it to be a string, it must be a reference to a resource.
So we need to add
<string name="planet_prompt">Choose a planet</string>
Then, create a new XML file in res/values/ called arrays.xml. Insert the following list of planet items that the user can select from in the Spinner widget.
<resources>
	<string-array name="planets">
		<item>Mercury</item>
		<item>Venus</item>
		<item>Earth</item>
		<item>Mars</item>
		<item>Jupiter</item>
		<item>Saturn</item>
		<item>Uranus</item>
		<item>Neptune</item>
	</string-array>
</resources>
with strings.xml:
<?xml version="1>0" encoding="utf-8"?>
<resources>

    <string name="hello">Hello World, SimpleSpinnerActivity!</string>
    <string name="app_name">SimpleSpinner</string>
    <string name="planet_prompt">Choose a planet</string>
    <string name="select">Please select a planet:</string>

</resources>
And our Java code: SimpleSpinner.java
package com.bogotobogo.SimpleSpinner;

import android.app.Activity;
import android.os.Bundle;
import android.widget.ArrayAdapter;
import android.widget.Spinner;

public class SimpleSpinnerActivity extends Activity {
    /** Called when the activity is first created. */
    @Override
    public void onCreate(Bundle savedInstanceState) {
    	super.onCreate(savedInstanceState);
    	setContentView(R.layout.main);
    	Spinner s = (Spinner) findViewById(R.id.spinner);
    	ArrayAdapter adapter = ArrayAdapter.createFromResource(
    			this, R.array.planets, android.R.layout.simple_spinner_item);
    	adapter.setDropDownViewResource(android.R.layout.simple_spinner_dropdown_item);
    	s.setAdapter(adapter);
    }
}
We start by creating a Spinner from our layout.
Spinner s = (Spinner) findViewById(R.id.spinner);
Recall we defined id in main.xml as:
android:id="@+id/spinner"
We then create an ArrayAdapter that binds each element of our string array to a layout view, we pass createFromResource our Context, the array of selectable items and the type of layout we'd like each one bound to.
ArrayAdapter adapter = ArrayAdapter.createFromResource(
	this, R.array.planets, android.R.layout.simple_spinner_item);
We then call setDropDownViewResource() to define the type of layout in which to present the entire collection.
adapter.setDropDownViewResource(android.R.layout.simple_spinner_dropdown_item);
Finally, we set this Adapter to associate with our Spinner, so the string items have a place to go.
s.setAdapter(adapter);
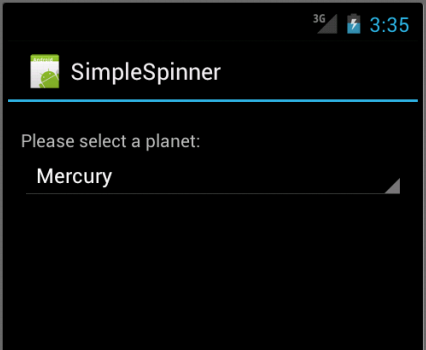
If we run it, we should get something like this:
Here is another example code for spinner.
Java code is:
package com.bogotobogo.SimpleSpinnerB;

import android.app.Activity;
import android.os.Bundle;
import android.view.View;
import android.widget.AdapterView;
import android.widget.ArrayAdapter;
import android.widget.Spinner;
import android.widget.TextView;

public class SimpleSpinnerBActivity extends Activity
	implements AdapterView.OnItemSelectedListener {
	TextView selection;
    /** Called when the activity is first created. */
	@Override
	public void onCreate(Bundle icicle) {
		super.onCreate(icicle);
		setContentView(R.layout.main);
		selection=(TextView)findViewById(R.id.selection);

		Spinner spin=(Spinner)findViewById(R.id.spinner);
		spin.setOnItemSelectedListener(this);

		ArrayAdapter<String> adapter=new ArrayAdapter<String>(this,
			android.R.layout.simple_spinner_item, WORLDCUP2010);
		adapter.setDropDownViewResource(
			android.R.layout.simple_spinner_dropdown_item);
		spin.setAdapter(adapter);
	}

	public void onItemSelected(AdapterView<?> parent,
						View v, int position, long id) {
		selection.setText(WORLDCUP2010[position]);
	}

	public void onNothingSelected(AdapterView<?> parent) {
		selection.setText("");
	}

	static final String[] WORLDCUP2010 = new String[] {
		"Algeria",  "Argentina", "Australia",
		"Brazil", "Cote d'Ivoire", "Cameroon",
		"Chile", "Costa Rica", "Denmark",
		"England", "France", "Germany",
		"Ghana",  "Greece", "Honduras",
		"Italy",  "Japan", "Netherlands",
		"New Zealand", "Nigeria", "North Korea",
		"Paraguay", "Portugal","Serbia",
		"Slovakia", "Slovenia", "South Africa",
		"South Korea",  "Spain", "Switzerland",
		"United States", "Uruguay" };
}
Here, we attach the activity itself as the selection listener.
spin.setOnItemSelectedListener(this);
This works because the activity implements the OnItemSelectedListener. We configure the adapter the adapter not only with the list but also with a specific resource to use for the drop-down view via adapter.setDropDownViewResource(). Notice the use of android.R.layout.simple_spinner_item as the built-in View for showing items in the spinner itself.
We implement the callbacks required by OnItemSelectedListener to adjust the selection label based on user input.
Layout file:
<?xml version="1.0" encoding="utf-8"?>
<LinearLayout
	xmlns:android="http://schemas.android.com/apk/res/android"
	android:orientation="vertical"
	android:layout_width="fill_parent"
	android:layout_height="fill_parent" >
	<TextView
		android:id="@+id/selection"
		android:layout_width="fill_parent"
		android:layout_height="wrap_content" />
	<Spinner android:id="@+id/spinner"
		android:layout_width="fill_parent"
		android:layout_height="wrap_content"
		android:drawSelectorOnTop="true" />
</LinearLayout>
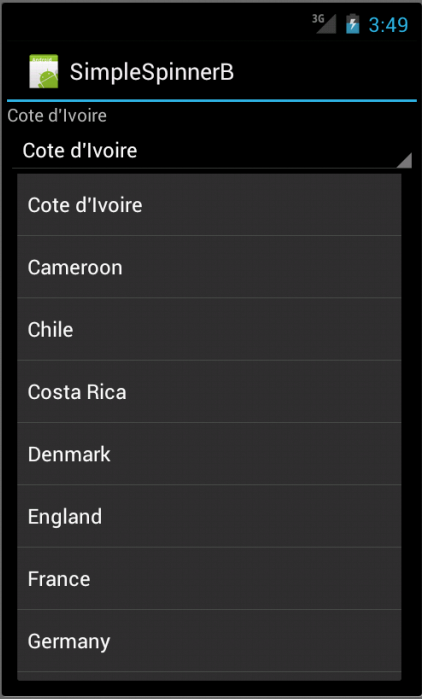
The Spinner property android:drawSelectorOnTop controls whether the arrow is drawn on the selector button on the right side of the Spinner UI.
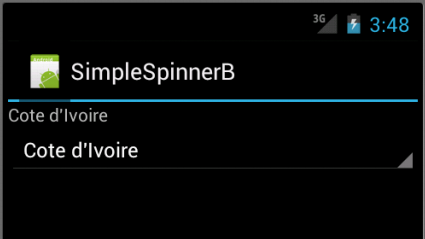
Run it, then we will get almost the same results.
AutoCompleteTextView is an implementation of the EditText widget that will provide auto-complete suggestions as the user types. The suggestions are extracted from a collection of strings.
package com.bogotobogo.AutoComplete;

import android.app.Activity;
import android.os.Bundle;
import android.widget.ArrayAdapter;
import android.widget.AutoCompleteTextView;

public class AutoCompleteActivity extends Activity {
    /** Called when the activity is first created. */
	@Override
	protected void onCreate(Bundle savedInstanceState) {
	super.onCreate(savedInstanceState);
	setContentView(R.layout.main);

	AutoCompleteTextView textView = (AutoCompleteTextView) findViewById(R.id.edit);
	ArrayAdapter<String> adapter = new ArrayAdapter<String>(this,
	android.R.layout.simple_dropdown_item_1line, WORLDCUP2010);
	textView.setAdapter(adapter);
	}

	static final String[] WORLDCUP2010 = new String[] {
		"Algeria",  "Argentina", "Australia",
		"Brazil", "Cote d'Ivoire", "Cameroon",
		"Chile", "Costa Rica", "Denmark",
		"England", "France", "Germany",
		"Ghana",  "Greece", "Honduras",
		"Italy",  "Japan", "Netherlands",
		"New Zealand", "Nigeria", "North Korea",
		"Paraguay", "Portugal","Serbia",
		"Slovakia", "Slovenia", "South Africa",
		"South Korea",  "Spain", "Switzerland",
		"United States", "Uruguay" };
}
Here, we create an AutoCompleteTextView from our layout. We then create an ArrayAdapter that binds a simple_dropdown_item_1line layout item to each entry in the WORLDCUP2010 array (which we'll add next).
	setListAdapter(new ArrayAdapter(this,
		android.R.layout.simple_list_item_1, WORLDCUP2010));
The last part sets the ArrayAdapter to associate with our AutoCompleteTextView.
textView.setAdapter(adapter);
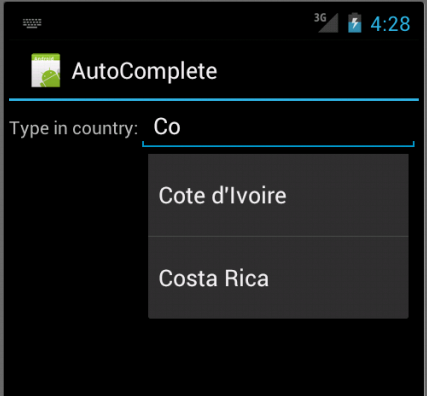
If we run it with following layout:
<?xml version="1.0" encoding="utf-8"?>
<LinearLayout xmlns:android="http://schemas.android.com/apk/res/android"
	android:orientation="horizontal"
	android:layout_width="fill_parent"
	android:layout_height="wrap_content">

	<TextView android:id="@+id/country"
		android:layout_width="wrap_content"
		android:layout_height="wrap_content"
		android:text="@string/country" />

	<AutoCompleteTextView android:id="@+id/edit"
		android:layout_width="fill_parent"
		android:layout_height="wrap_content"/>

</LinearLayout>
with strings.xml:
<?xml version="1.0" encoding="utf-8"?>
<resources>

    <string name="hello">Hello World, AutoCompleteActivity!</string>
    <string name="app_name">AutoComplete</string>
    <string name="country">Type in country: </string>

</resources>
we get the result as in the picture below.
Here is another version for AutoCompleteViewText.
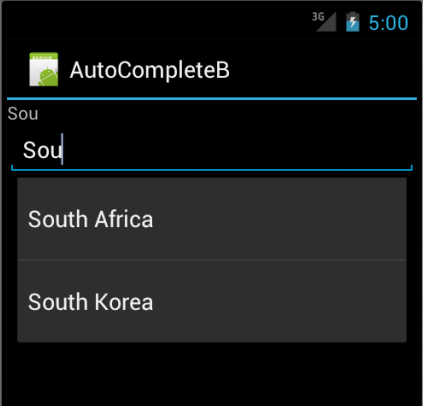
We can give AutoCompleteTextView an adapter containing the list of candidate values via setAdapter(). Because the user could type something that is not in the list, however, it does not support selection listeners. Instead, we can register TextWatcher, as we can with any EditText widget, to be notified when the text changes. These events will occur either because of typing or from a selection from the drop-down list.
Java code is:
package com.bogotobogo.AutoCompleteB;

import android.app.Activity;
import android.os.Bundle;
import android.text.Editable;
import android.text.TextWatcher;
import android.widget.ArrayAdapter;
import android.widget.AutoCompleteTextView;
import android.widget.TextView;

public class AutoCompleteBActivity extends Activity
	implements TextWatcher {
		TextView selection;
		AutoCompleteTextView edit;
    /** Called when the activity is first created. */
	@Override
	public void onCreate(Bundle icicle) {
		super.onCreate(icicle);
		setContentView(R.layout.main);
		selection=(TextView)findViewById(R.id.selection);
		edit=(AutoCompleteTextView)findViewById(R.id.edit);
		edit.addTextChangedListener(this);

		edit.setAdapter(new ArrayAdapter<String>(this,
				android.R.layout.simple_dropdown_item_1line,
									WORLDCUP2010));
	}

	public void onTextChanged(CharSequence s, int start, int before,
				int count) {
		selection.setText(edit.getText());
	}

	public void beforeTextChanged(CharSequence s, int start,
				int count, int after) {
		// needed for interface, but not used
	}

	public void afterTextChanged(Editable s) {
		// needed for interface, but not used
	}
	static final String[] WORLDCUP2010 = new String[] {
		"Algeria",  "Argentina", "Australia",
		"Brazil", "Cote d'Ivoire", "Cameroon",
		"Chile", "Costa Rica", "Denmark",
		"England", "France", "Germany",
		"Ghana",  "Greece", "Honduras",
		"Italy",  "Japan", "Netherlands",
		"New Zealand", "Nigeria", "North Korea",
		"Paraguay", "Portugal","Serbia",
		"Slovakia", "Slovenia", "South Africa",
		"South Korea",  "Spain", "Switzerland",
		"United States", "Uruguay" };
}
This time, our activity implements TextWatcher, which means our callbacks are onTextChanged() and we update the selection label to match the AutoCompleteTextView's current contents.
With layout file:
<?xml version="1.0" encoding="utf-8"?>
<LinearLayout
	xmlns:android="http://schemas.android.com/apk/res/android"
	android:orientation="vertical"
	android:layout_width="fill_parent"
	android:layout_height="fill_parent">
	<TextView
		android:id="@+id/selection"
		android:layout_width="fill_parent"
		android:layout_height="wrap_content" />
	<AutoCompleteTextView android:id="@+id/edit"
			android:layout_width="fill_parent"
			android:layout_height="wrap_content"
			android:completionThreshold="3"/>
</LinearLayout>
Next sections:
Ph.D. / Golden Gate Ave, San Francisco / Seoul National Univ / Carnegie Mellon / UC Berkeley / DevOps / Deep Learning / Visualization