Apache Tomcat 7 Ubuntu 14.04 install on Amazon EC2 instance - 2020
The Apache Tomcat server is an open source, Java-based web server and servlet container. It was created to run servlet and JavaServer Pages (JSP) web applications. Though created under the Apache-Jakarta subproject, due to its popularity, it is now hosted as a separate Apache project, where it is supported and enhanced by a group of volunteers from the open source Java community.
Tomcat implements several Java EE specifications including Java Servlet, JavaServer Pages (JSP), Java EL, and WebSocket, and provides a "pure Java" HTTP web server environment for Java code to run in.
Major versions on Apache Tomcat coincide with versions of the Java Servlet specification, or Java Servlet API, released. So, Tomcat 5.5X supports Servlet API 2.3, Tomcat 6.0X supports Servlet API 2.4, and the latest Tomcat 7.0 is a reference implementation of current Servlet.
The following table shows Tomcat versions and supported API and JDK versions:
| Apache Tomcat | Servlet API | JSP API | JDK |
|---|---|---|---|
| 9.0 | 4.0 | 2.4 | 1.8+ |
| 8.0 | 3.1 | 2.3 | 1.7+ |
| 7.0 | 3.0 | 2.2 | 1.6+ |
| 6.0 | 2.5 | 2.1 | 1.5+ |
| 5.5 | 2.4 | 2.0 | 1.4 |
"A Tomcat instance, or server, is the top-level component in Tomcat's container hierarchy. Only one
Tomcat instance can live in a single Java Virtual Machine (JVM). This approach makes all other Java
applications, running on the same physical machine as Tomcat server, safe in case Tomcat and/or its
JVM crashes." - Apache Tomcat 7 by Aleksa Vukotic & James Goodwill
In this article, we'll learn basic installation and configuration of Tomcat 7 on Ubuntu 14.04.
Please visit Spring Boot : Deploying War file to Tomcat 8's webappsfor more information about installing Tomcat 7 and Tomcat 8 as well as deploying a war file to Tomcat server.
Our ec2 account is: ec2-54-173-97-70.compute-1.amazonaws.com
$ chmod 600 ~/Downloads/Tomcat7.pem
ssh to ec2:
$ ssh -i ~/Downloads/Tomcat7.pem ubuntu@ec2-54-173-97-70.compute-1.amazonaws.com
...
ubuntu@ip-172-31-21-148:~$
Update our apt-get package lists:
$ sudo apt-get update
Install Tomcat:
$ sudo apt-get install tomcat7
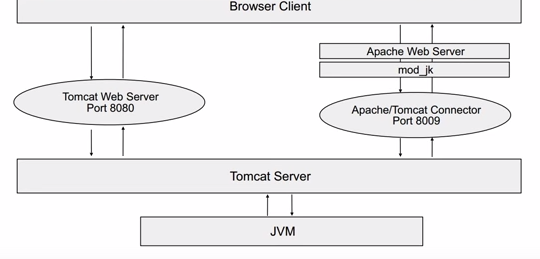
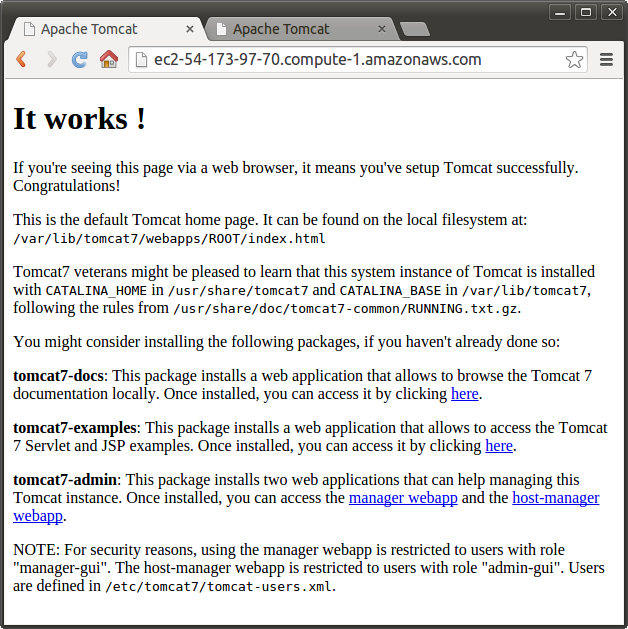
This will install Tomcat, and it will also create the tomcat7 user with default settings. Tomcat is not completely set up yet, but we can access the default splash page with port 8080 in a browser.
But for EC2, the firewall blocks 8080, so we need to redirect the request from port 80 to port 8080. We'll do it using proxy setup via Apache:
ubuntu@ip-172-31-21-148:~$ sudo apt-get install apache2
ubuntu@ip-172-31-21-148:~$ sudo a2enmod proxy
ubuntu@ip-172-31-21-148:~$ sudo a2enmod proxy_http
Now we need to configure Apache to actually proxy the request from port 80 to port 8080.
ubuntu@ip-172-31-21-148:~$ vi /etc/apache2/sites-available/000-default.conf

<VirtualHost *:80>
        ...

        ServerAdmin ec2-54-173-97-70.compute-1.amazonaws.com
        ProxyRequests Off
        <Proxy *>
            Order deny,allow
            Allow from all
        </Proxy>
        ProxyPreserveHost on
        ProxyPass / http://localhost:8080/
        DocumentRoot /var/www/html

        ...
</VirtualHost>
We will install the Tomcat online documentation, the web interface (manager webapp), and a few example webapps:
$ sudo apt-get install tomcat7-docs tomcat7-admin tomcat7-examples
The Java Development Kit (JDK) enables us to develop Java applications to run in our Tomcat server. Running the following command will install openjdk-7-jdk:
$ sudo apt-get install default-jdk
the Tomcat documentation suggests also installing Apache Ant, which is used to build Java applications, and a source control system, such as git. Let's install both of those with the following command:
$ sudo apt-get install ant git
In order to use the manager webapp installed in the previous section, we must add a login to our Tomcat server. We will do this by editing the tomcat-users.xml file:
$ sudo vi /etc/tomcat7/tomcat-users.xml
This file is filled with comments which describe how to configure the file. We may want to delete all the comments between the following two lines, or we may leave them if we want to reference the examples:
<tomcat-users>
</tomcat-users>
We will want to add a user who can access the manager-gui and admin-gui. We can do so by defining a user similar to the example below. Be sure to change the password and username if we want:
<tomcat-users>
    <user username="admin" password="password" roles="manager-gui,admin-gui"/>
</tomcat-users>
Save and quit the tomcat-users.xml file. To put our changes into effect, restart the Tomcat service:
$ sudo service tomcat7 restart
ip-address/manager/html/:
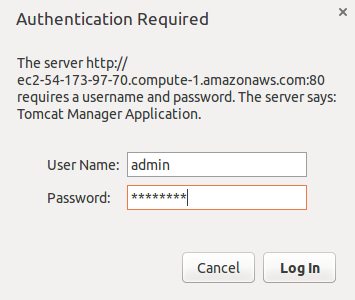
After login in to manager-gui, we get:
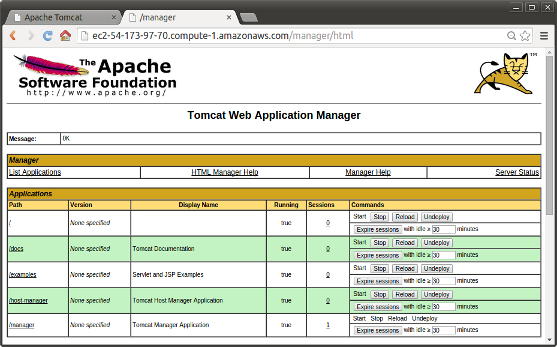
The Web Application Manager is used to manage our Java applications. We can Start, Stop, Reload, Deploy, and Undeploy here. We can also run some diagnostics on our apps (i.e. find memory leaks). Lastly, information about our server is available at the very bottom of this page.
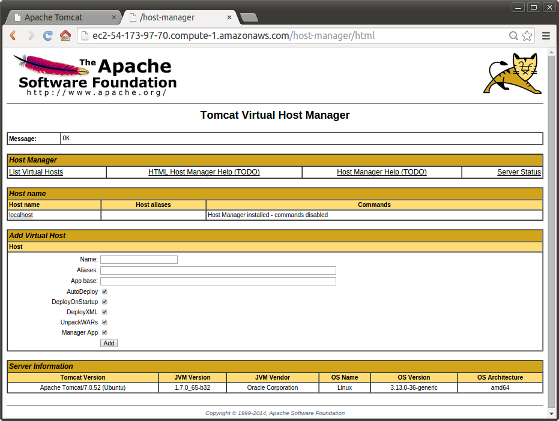
From the Virtual Host Manager page, we can add virtual hosts to serve our applications.
ip-address/host-manager/html:
Please visit Spring Boot : Deploying War file to Tomcat 8's webapps
for more information about installing Tomcat 7 and Tomcat 8 as well as deploying a war file to Tomcat server.
Ph.D. / Golden Gate Ave, San Francisco / Seoul National Univ / Carnegie Mellon / UC Berkeley / DevOps / Deep Learning / Visualization