BogoToBogo
  • Home
  • About
  • Big Data
  • Machine Learning
  • AngularJS
  • Python
  • C++
  • go
  • DevOps
  • Kubernetes
  • Algorithms
  • More...
    • Qt 5
    • Linux
    • FFmpeg
    • Matlab
    • Django 1.8
    • Ruby On Rails
    • HTML5 & CSS

JUnit 4 Tutorial: Eclipse Luna plugin - 2020

Duke 512


Bookmark and Share


bogotobogo.com site search:


Eclipse setup

Create a project "JUnitTest". Now we can write our first test. We implement the test in a subclass of TestCase. We can do so either using the standard Class wizard or the specialized Test Case wizard.

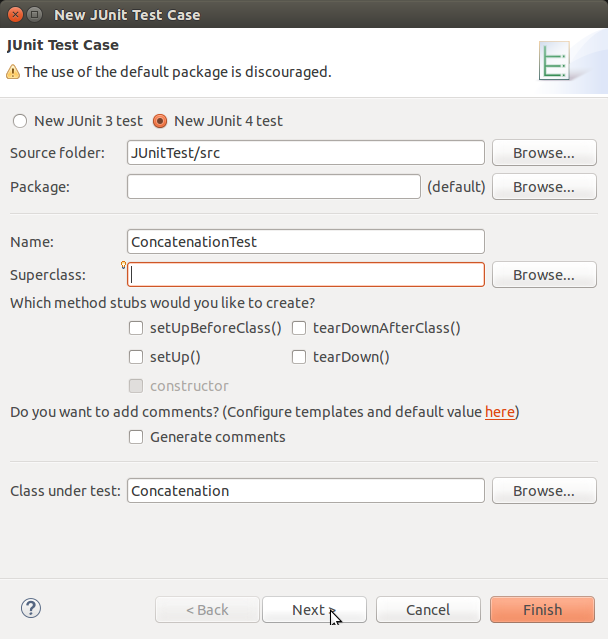
  1. Open the New wizard (File > New > JUnit Test Case).
  2. Select New JUnit 4 test:

    JUnitTestCase.png
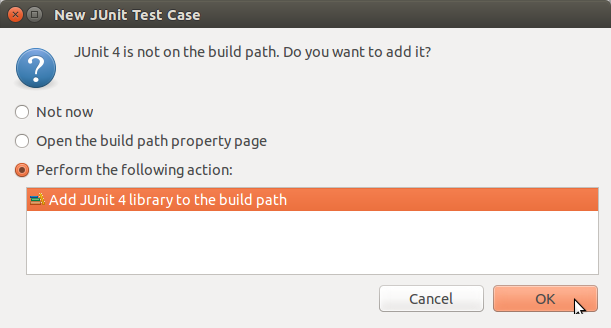
  3. We will see a warning message asking us to add the
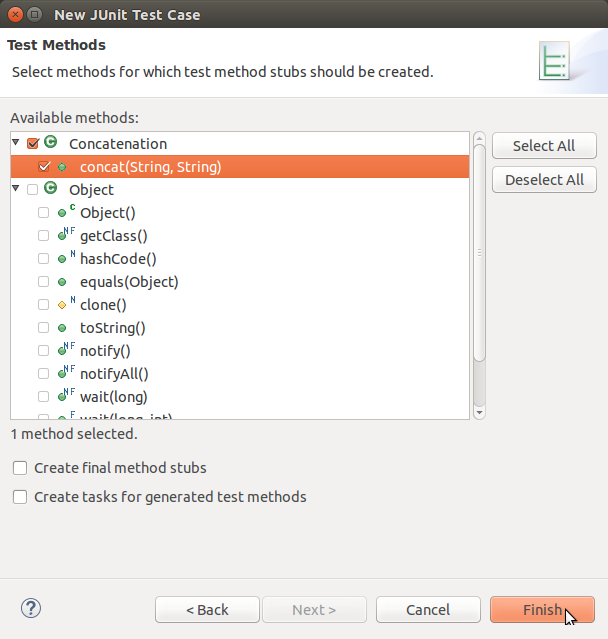
 junit library to the build path. Use the Click here link to add the junit library automatically.
  4. Click "Next" to select methods for which test method stubs should be created.

    JUnitTestCase_Finish.png
  5. Click "Finish" to create the test class.
  6. At this point, if we missed the "step 3. add the junit library to the build path", we may get the following:

    JUnit4BuildPath.png
  7. At OK, Eclipse will give us the following code (ConcatenationTest.java):
    import static org.junit.Assert.*;
    
    import org.junit.Test;
    
    public class ConcatenationTest {
    
        @Test
        public void testConcat() {
            fail("Not yet implemented");
        }
    
    }
    
    Package_and_ConcatenationTest_java.png


Writing test

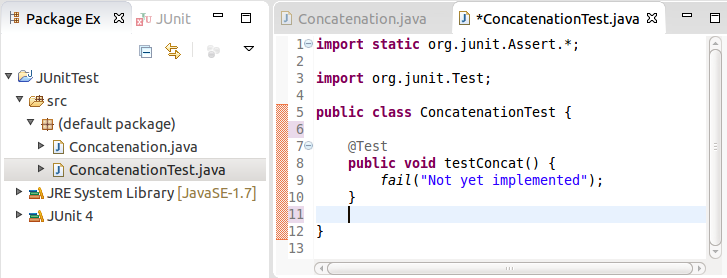
Unit tests are implemented as classes with test methods. Each test method usually tests a single method of the target class.

Here is our target class:

public class Concatenation {
    public String concat(String s1, String s2) {
	return s1 + s2;
    }
}

We need to complete a test method of the class ConcatenationTest that Eclipse's template:

import static org.junit.Assert.*;

import org.junit.Test;

public class ConcatenationTest {
	
    @Test
    public void testConcat() {
	Concatenation myConcat = new Concatenation();
        String result = myConcat.concat("Hello", "World");
        assertEquals("HelloWorld", result);
    }
	
}

The unit test class is an ordinary class, with one method, testConcat(). Notice how this method is annotated with the JUnit annotation @Test. This is done to signal to the unit test runner, that this is method represents a unit test, that should be executed. Methods that are not annotated with @Test are not executed by the test runner.

Inside the testConcat() method an instance of myConcat is created. Then it's concat() method is called with two string values.

Finally, the assertEquals() method is called. It is this method that does the actual testing. In this method we compare the output of the called method (concat()) with the expected output. In other words, we compare "HelloWorld" (expected output) with the value returned by the concat() method, which is kept in the variable result.

If the two values are equal, nothing happens. The assertEquals() method returns normally. If the two values are not equal, an exception is thrown, and the test method stops executing here.

The assertEquals() method is a statically imported method, which normally resides in the org.junit.Assert class. Notice the static import of this class at the top of Concatenation.


Running test case

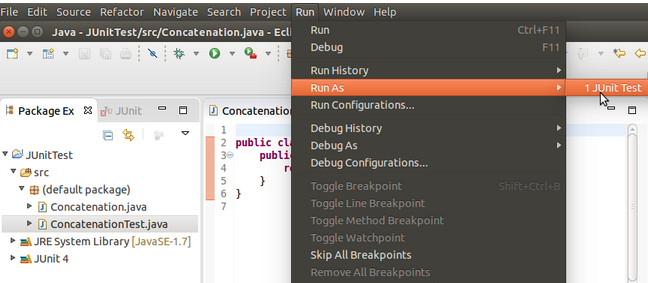
Once we have written our test methods, we want to run our JUnit test case:

RunAsJUnitTest.png


JUnitTestResults.png

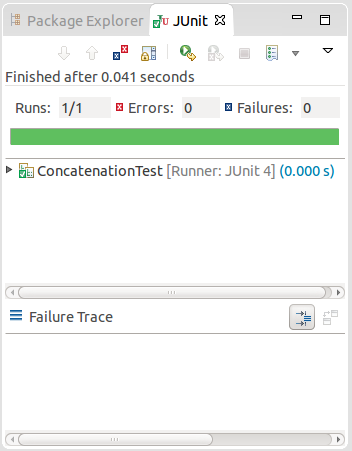
A new pane will appear showing the test results for each method. We should see a green bar if all of the tests passed, or a red bar if any of the tests failed. If any tests fail, we can view the details about the failure by clicking on the failed test's name/icon and looking at the details in the pane below.

In our case, we passed the test.


JUnit & Maven Tutorial

  • JUnit 4 Introduction (Hello World)
  • JUnit 4 Test with Eclipse Luna (Hello World)
  • JUnit 4 Test with Maven (Hello World)


  • Ph.D. / Golden Gate Ave, San Francisco / Seoul National Univ / Carnegie Mellon / UC Berkeley / DevOps / Deep Learning / Visualization

    YouTubeMy YouTube channel

    Sponsor Open Source development activities and free contents for everyone.

    Thank you.

    - K Hong


    JUnit & Maven Tutorial


    JUnit 4 Introduction (Hello World)

    JUnit 4 Test with Eclipse Luna (Hello World)

    JUnit 4 Test with Maven (Hello World)


    Sponsor Open Source development activities and free contents for everyone.

    Thank you.

    - K Hong


    Scala Play!


    Scala/Java Play app with Angular


    Spring Boot


    Spring Boot : Hello world with Mavan 3

    Spring Boot : Hello world with Gradle 2

    Spring Boot (Gradle 2) : Hello world with Authentication

    Spring Boot : Deploying War file to Tomcat 8's webapps

    How to Setup Apache as Reverse Proxy for Tomcat Server using mod proxy

    Maven : mvn command cheat sheet

    Spring-Boot REST API with CORS App Maven war file deploy to Tomcat

    Spring-Boot / Spring Security with AngularJS - Part I (Introduction)

    Spring-Boot / Spring Security with AngularJS - Part II (Dynamic resource load from Angular)

    Spring-Boot / Spring Security with AngularJS : Part III (Form-based Authentication)


    Java Tutorials


    Java Tutorial Home

    Basics - Compiling and Launching

    Inner Classes

    Constructor

    Enums

    Static & Finally

    Default and Protected

    Polymorphism

    Exception Handling

    Exception Handling II

    String Class

    Threads

    Threads II - State Transition

    Threads III - Synchronization

    Object Class

    File I/O

    Serialization

    ArrayList

    Autoboxing

    Java Graphics Interface I - Basics

    Java Graphics Interface II - Labels, Text Fields, Layouts

    Java Graphics Interface III - paintComponent

    TCP Sockets Server/Client

    Scala - Functional Java Programming

    Apache CXF install

    Tomcat 7 Ubuntu 14 Install on Amazon EC2 instance

    What is Apache Maven?

    Maven life cycle

    Eclipse Maven 3 plugin on Ubuntu 14.04

    Apache Maven 3 - Setting up and creating a project

    Apache Maven 3 - Compile, build, and install a Maven project

    Apache Maven 3 - Dependencies

    Apache Maven 3 - Web Application

    Apache Maven 3 - Plugins (compiler)

    Apache Maven 3 - Plugins (Jetty)

    Eclipse CDT / JNI (Java Native Interface) / MinGW


    Spring Framework

    Hello World App with Spring 4 & Maven 3 - Part I


    Contact

    BogoToBogo
    contactus@bogotobogo.com

    Follow Bogotobogo

    About Us

    contactus@bogotobogo.com

    YouTubeMy YouTube channel
    Pacific Ave, San Francisco, CA 94115

    Pacific Ave, San Francisco, CA 94115

    Copyright © 2024, bogotobogo
    Design: Web Master