git and bitbucket 2020
In this lecture we'll talk about Git, which is a distributed version control system that's very popular and widely used in the rails community.
Git provides and means for distributed version control of comparing the differences between the various versions of a project and stores them as snapshots and allows us to merge them accordingly.
Let's create a Git repository for our blog application.
First, let's ensure that Git is installed on our system.
$ git
...
The most commonly used git commands are:
   add        Add file contents to the index
   bisect     Find by binary search the change that introduced a bug
   branch     List, create, or delete branches
   checkout   Checkout a branch or paths to the working tree
   clone      Clone a repository into a new directory
   commit     Record changes to the repository
...
   init       Create an empty Git repository or reinitialize an existing one
...
If we type git, as we see, there's a list of commands available to us.
Then, let's 'cd' to the blog directory, which is the root of the Rails application. This is where we want to create the Git repository.
Now, we're going to use git init command, the 'init' command, to create an empty Git repository:
$ git init
Initialized empty Git repository in /home/k/RAILS/blog/.git/
This will create .git directory.
In order to begin tracking the files in this directory, except for the ones that are going to be ignored, and to add them to the staging area, we type git add .:
$ git add .
Now, if we type git status, we'll see that there now are a number of new files that Git is tracking:
$ git status On branch master Initial commit Changes to be committed: (use "git rm --cached..." to unstage) new file: .gitignore new file: Gemfile new file: Gemfile.lock new file: README.rdoc new file: Rakefile ...
If we type git commit-m in order to make our first commit and the '-m' allows us to add a message on the command line. Let's go ahead and create our first commit:
$ git commit -m "initial commit"
[master (root-commit) fd70ffc] initial commit
 92 files changed, 1489 insertions(+)
 create mode 100644 .gitignore
 create mode 100644 Gemfile
 create mode 100644 Gemfile.lock
 create mode 100644 README.rdoc
 create mode 100644 Rakefile
...
This moves these files into the local Git repository. Now if we type git status, it will tell use that we're on the master branch and there's nothing to commit because we've committed all the files in this directory. It's not until we edit one of these files again that Git will tell us that we need to do another commit.
$ git status
On branch master
nothing to commit, working directory clean
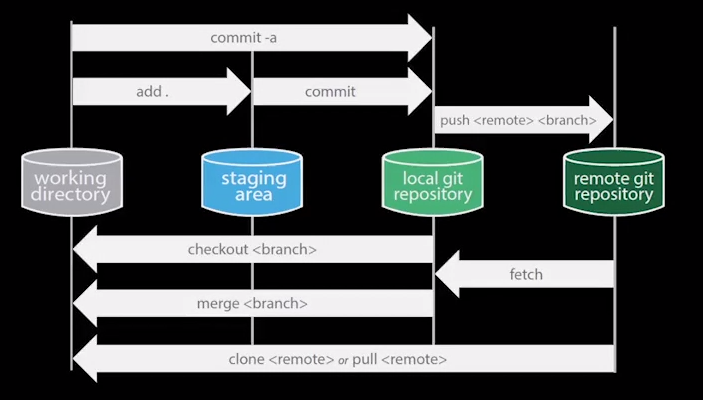
Picture from Coursera.
So far, we've gone through how to add and commit versions within a local repository. Let's look at the case when we have a remote repository to which we want to push our changes. The command to do this is called push. We push to the remote repository and we have to specify which branch we want to push up to that remote repository.
In order to retrieve from a remote repository, we issue the fetch command, and then we have check out a particular branch from that. The fetch command brings that repository into our local repository, including all of the branches, and then we have to specify the branch we want to work on.
Alternatively, we can issue this pull command, and this pull command is a fetch and it checks out the most recent branch and makes that our master.
The clone step is used to create the repository initially on our system. We do that once, and afterwards we can simply use pull commands to pull the remote Git repository onto our machine.
Let's look at how we can work with a remote Git repository.
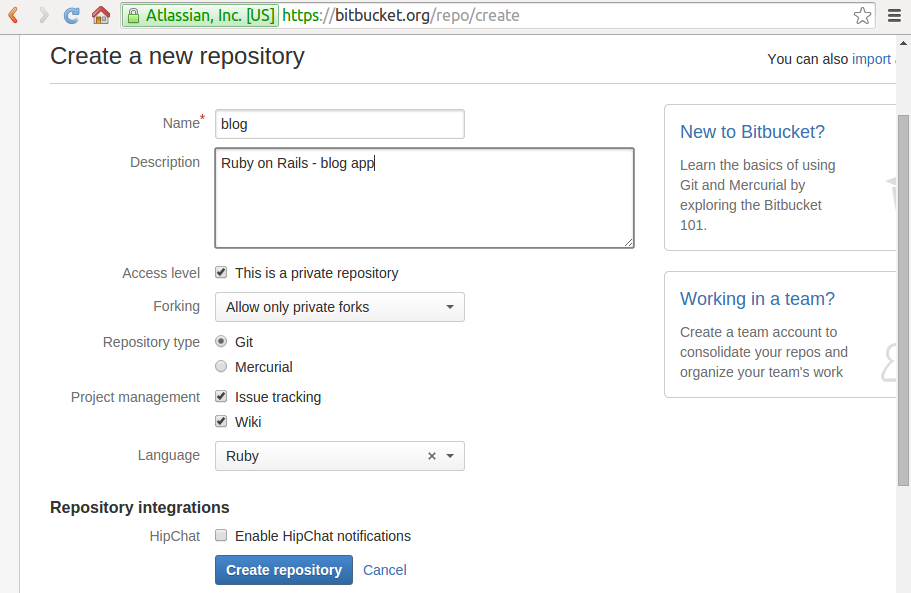
We're going to create a remote repository with Bitbucket.
According to the Bitbucket's instructions on what we should do next:
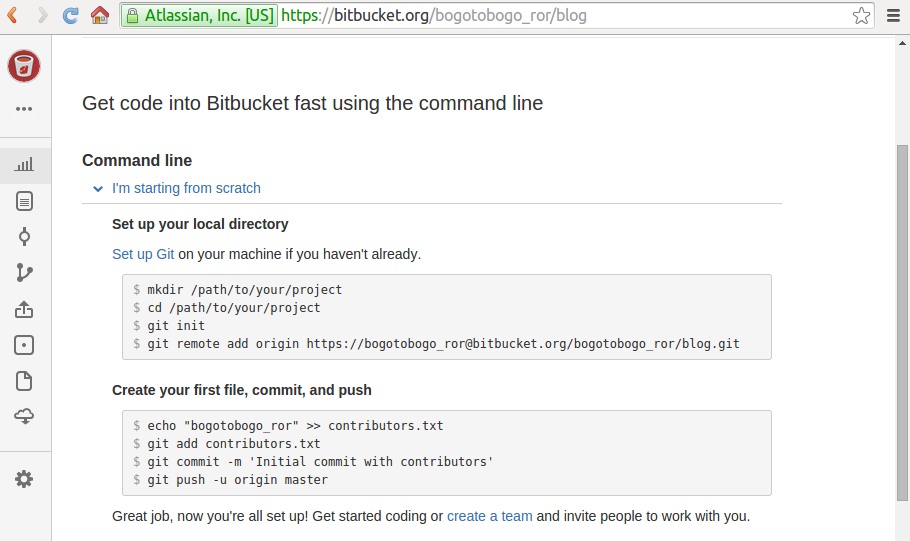
We need to go to the root of our Git repository and we need to add this as an origin, a remote origin. Then, we need to push the application.
Let's sync our local repository with this remote repository that's now on BitBucket. We're in the root directory for the 'blog' application. This is the Rails root for this application and recall that we previously set up a local git repository in this directory in addition we've also set up a remote get repository at BitBucket.
The next step is to link the two. The following git command is specifying that we want to add a remote repository. And we're going to name that repository as origin:
$ git remote add origin https://bogotobogo_ror@bitbucket.org/bogotobogo_ror/blog.git
So when we hit Return, the link is created.
Before we push our blog application up to BitBucket, we need to configure Git a bit more:
$ git config user.name "k"
$ git config user.email "k@bogotobogo.com"
The reason we are doing this is whenever we do a commit to a remote repository, it stores who made the commit, along with their email address.
So let's go ahead and do the push to the remote repository. We type git push origin, this is where we want to push our repository, and the branch we want to push is master
.$ git push origin master Password for 'https://bogotobogo_ror@bitbucket.org': Counting objects: 105, done. Delta compression using up to 2 threads. Compressing objects: 100% (95/95), done. Writing objects: 100% (105/105), 22.25 KiB | 0 bytes/s, done. Total 105 (delta 9), reused 0 (delta 0) To https://bogotobogo_ror@bitbucket.org/bogotobogo_ror/blog.git * [new branch] master -> master
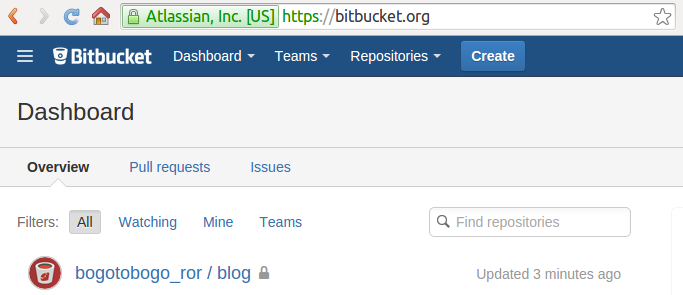
When we hit Return, it's going to push this up to BitBucket and it's done that now and we can check the bit bucket site to see that its actually up there:
Ph.D. / Golden Gate Ave, San Francisco / Seoul National Univ / Carnegie Mellon / UC Berkeley / DevOps / Deep Learning / Visualization