PHP & MySQL Tutorial
File Handling III - Uploading Files

It's a common requirement for a PHP-based site to allow file uploads. A PHP script can be used with an html form to allow users to upload files to the server.
Actually, files are uploaded to a temporary directory, and then relocated to their destination by a PHP script. Information in the phpinfo.php provides the temporary directory which is used for file uploads as upload_tmp_dir, and the maximum file-size allowed that can be uploaded as upload_max_filesize. The default maximum size is 2Mb and the temporary Windows directory is usually C:\temp. These can be modified by editing the php.ini file.
The process of uploading a file can be summarized as following:
- The user opens the page containing an html form which has a text field, a browse button, and a submit button.
- The user clicks the browse button and selects a file to upload from hard drive.
- The full path to the selected file appears in the text field. Then, the user presses submit button.
- The selected file is sent to the temporary director on the server.
- The PHP script which was specified as the form handler in the form's action attribute checks that the file has arrived. Then, copies the file to its destination.
- The PHP script confirms the success to the user.
Access the uploaded file like us access other attribute form submissions, by their name, which in this case is upload_file. The difference is that file upload variables are arrays which can contain various attributes about the upload.
Following table shows the File upload attribute:
| Attribute | Description |
|---|---|
| $HTTP_POST_FILES['upload_file'] | The array; replace upload_file with the name of your upload file submission variable |
| $HTTP_POST_FILES['upload_file']['name'] | The original name of the file |
| $HTTP_POST_FILES['upload_file']['tmp_name'] | The temporary name assigned during the upload process |
| $HTTP_POST_FILES['upload_file']['type'] | The file's MIME type |
| $HTTP_POST_FILES['upload_file']['size'] | The file's size in bytes |
The upload form is similar to the forms we created in previous examples. But there are differences:
- The <form> tag must include an enctype attribute with multipart/form-data assigned as its value because we want to let the server know that a file is coming along with the regular information.
- We must have a form field that sets the maximum size file that can be uploaded.
- We need an input of type file:
<input type="file" name="userfile" id="userfile" size="50" />
We can choose whatever name we want for the file, but we should keep it in mind because we will use this name to access our file from the receiving PHP script. - The form must have an input of the file type, which puts a text field and a browse button on the page.
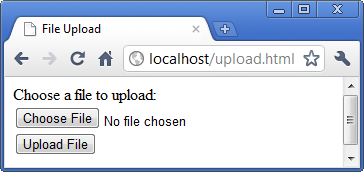
The following html file, upload.html, creates an upload form with all of those requirements.
<html>
<head><title>File Upload</title></head>
<body>
<form action="upload.php" method="post" enctype="multipart/form-data" />
	<div>
	  Choose a file to upload: <br />
	  <input type="hidden" name="MAX_FILE_SIZE" value="2000000"/>
	  <input type="file" name="userfile" id="userfile" size="50" />
	  <br />
	  <input type="submit" value="Upload File" />
	</div>
</form>
</body>
</html>
The create upload forms are a little bit different depending on the browser. But they are basically the same in terms of their functions.


When a file is selected for upload, PHP automatically adds it to the environment variable, $_FILES. This is a 3-dimensional array which is followed by two set of square brackets with the syntax below:
$_FILE['file_name'],'property']
The upload file can be referenced by inserting its name within quotes in the first set of brackets. Various information about that file can be referenced by inserting properties of name, size, type, tmp_name or error with quotes in the second set of brackets as shown in the previous section.
To adapt the possibility that a file transfer may not complete successfully, the die() function can be used to terminate the execution of a script and display a string specified as its argument.
The following example tries to copy a file uploaded by the html form of the previous section to ~/uploads/ (localhost/uploads/). Then, it will display the file's details upon completion.
<html>
<head>
  <title>Uploading...</title>
</head>
<body>
<h1>Uploading file...</h1>
<?php

//Check to see if an error code was generated on the upload attempt
  if ($_FILES['userfile']['error'] > 0)
  {
    echo 'Problem: ';
    switch ($_FILES['userfile']['error'])
    {
      case 1:	echo 'File exceeded upload_max_filesize';
	  			break;
      case 2:	echo 'File exceeded max_file_size';
	  			break;
      case 3:	echo 'File only partially uploaded';
	  			break;
      case 4:	echo 'No file uploaded';
	  			break;
      case 6:   echo 'Cannot upload file: No temp directory specified.';
	  			break;
      case 7:   echo 'Upload failed: Cannot write to disk.';
	  			break;
    }
    exit;
  }

  // put the file where we'd like it
  $upfile = 'uploads/'.$_FILES['userfile']['name'];

  if (is_uploaded_file($_FILES['userfile']['tmp_name']))
  {
     if (!move_uploaded_file($_FILES['userfile']['tmp_name'], $upfile))
     {
        echo 'Problem: Could not move file to destination directory';
        exit;
     }
  }
  else
  {
    echo 'Problem: Possible file upload attack. Filename: ';
    echo $_FILES['userfile']['name'];
    exit;
  }

  echo 'File uploaded successfully<br><br>';

?>
<ul>
	<li>Sent: <?php echo $_FILES['userfile']['name']; ?> </li>
	<li>Size: <?php echo $_FILES['userfile']['size']; ?> </li>
	<li>Type: <?php echo $_FILES['userfile']['type']; ?> </li>
</ul>
	<a href="<?php echo "uploads/".$_FILES['userfile']['name']; ?>">
		Click here to view this file</a>

</body>
</html>

Click Upload File after selected a file to upload, then we get the following window.

We can see what we got by clicking the link.


Ph.D. / Golden Gate Ave, San Francisco / Seoul National Univ / Carnegie Mellon / UC Berkeley / DevOps / Deep Learning / Visualization