Flask blog app tutorial 6 : Dashboard

In the previous part of this series, we implemented the feature of uploading an image file for a blog post.
In this part of the series, we'll implement dashboard.
Here are the files we'll be using in this tutorial part-6:
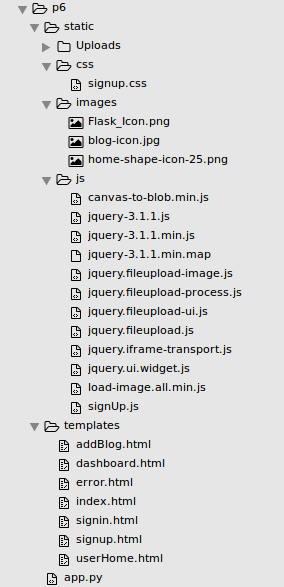
They are available from FlaskApp/p6
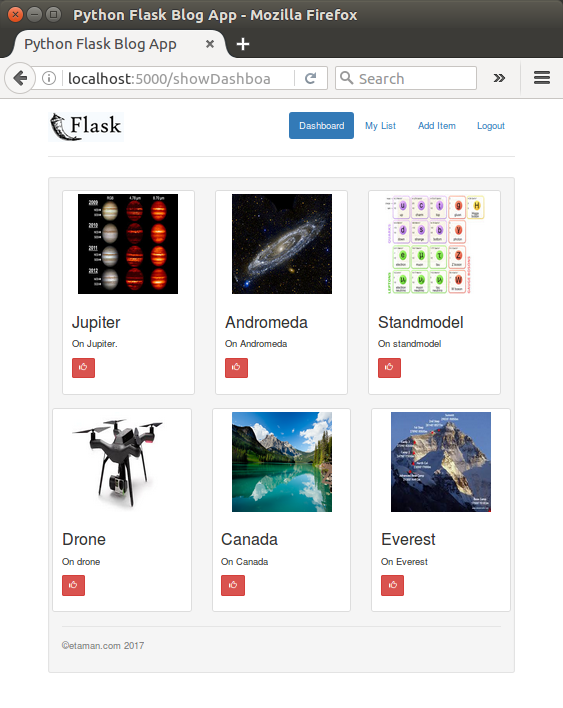
Let's create a new page called dashboard where all the posts from different users will be displayed. Any user can like or comment on the posts displayed in the dashboard. Here is the file templates/dashboard.html:
<!DOCTYPE html>
<html lang="en">

<head>
    <title>Python Flask Blog App</title>

    <link rel="stylesheet" href="https://maxcdn.bootstrapcdn.com/bootstrap/3.3.2/css/bootstrap.min.css">

    <link href="//getbootstrap.com/examples/jumbotron-narrow/jumbotron-narrow.css" rel="stylesheet">
</head>

<body>

    <div class="container">
        <div class="header">
            <nav>
                <ul class="nav nav-pills pull-right">
                    <li role="presentation" class="active"><a href="#">Dashboard</a></li>
                    <li role="presentation"><a href="/userHome">My List</a></li>
                    <li role="presentation"><a href="/showAddBlog">Add Item</a></li>
                    <li role="presentation"><a href="/logout">Logout</a></li>
                </ul>
            </nav>
            <img src="/static/images/Flask_Icon.png" alt="Flask_Icon.png"/ >
        </div>

        <div class="well">
            <div class="row">
                <div class="col-sm-4 col-md-4">
                    <div class="thumbnail">
                        <img alt="100%x200" src="static/Uploads/jupiter.jpeg"  data-holder-rendered="true" style="height: 150px; width: 150px; display: block;">
                        <div class="caption">
                            <h3>Jupiter</h3>
                            <p>On Jupiter.</p>
                            <p>
                                <button type="button" class="btn btn-danger btn-sm">
                                    <span class="glyphicon glyphicon-thumbs-up" aria-hidden="true"></span>
                                </button>
                            </p>
                        </div>
                    </div>
                </div>
                <div class="col-sm-4 col-md-4">
                    <div class="thumbnail">
                        <img alt="100%x200" src="static/Uploads/Andromeda_galaxy.jpg" data-holder-rendered="true" style="height: 150px; width: 150px; display: block;">
                        <div class="caption">
                            <h3>Andromeda</h3>
                            <p>On Andromeda</p>
                            <p>
                                <button type="button" class="btn btn-danger btn-sm">
                                    <span class="glyphicon glyphicon-thumbs-up" aria-hidden="true"></span>
                                </button>
                            </p>
                        </div>
                    </div>
                </div>
                <div class="col-sm-4 col-md-4">
                    <div class="thumbnail">
                        <img alt="100%x200" src="static/Uploads/standmodel.jpeg" data-holder-rendered="true" style="height: 150px; width: 150px; display: block;">
                        <div class="caption">
                            <h3>Standmodel</h3>
                            <p>On standmodel</p>
                            <p>
                                <button type="button" class="btn btn-danger btn-sm">
                                    <span class="glyphicon glyphicon-thumbs-up" aria-hidden="true"></span>
                                </button>
                            </p>
                        </div>
                    </div>
                </div>

                <div class="row">
                    <div class="col-sm-4 col-md-4">
                        <div class="thumbnail">
                            <img alt="100%x200" src="static/Uploads/drone.jpeg" data-holder-rendered="true" style="height: 150px; width: 150px; display: block;">
                            <div class="caption">
                                <h3>Drone</h3>
                                <p>On drone</p>
                                <p>
                                    <button type="button" class="btn btn-danger btn-sm">
                                        <span class="glyphicon glyphicon-thumbs-up" aria-hidden="true"></span>
                                    </button>
                                </p>
                            </div>
                        </div>
                    </div>
                    <div class="col-sm-4 col-md-4">
                        <div class="thumbnail">
                            <img alt="100%x200" src="static/Uploads/canada.jpg" data-holder-rendered="true" style="height: 150px; width: 150px; display: block;">
                            <div class="caption">
                                <h3>Canada</h3>
                                <p>On Canada</p>
                                <p>
                                    <button type="button" class="btn btn-danger btn-sm">
                                        <span class="glyphicon glyphicon-thumbs-up" aria-hidden="true"></span>
                                    </button>
                                </p>
                            </div>
                        </div>
                    </div>
                    <div class="col-sm-4 col-md-4">
                        <div class="thumbnail">
                            <img alt="100%x200" src="static/Uploads/Everest.jpeg" data-holder-rendered="true" style="height: 150px; width: 150px; display: block;">
                            <div class="caption">
                                <h3>Everest</h3>
                                <p>On Everest</p>
                                <p>
                                    <button type="button" class="btn btn-danger btn-sm">
                                        <span class="glyphicon glyphicon-thumbs-up" aria-hidden="true"></span>
                                    </button>
                                </p>
                            </div>
                        </div>
                    </div>
                </div>

            </div>

            <footer class="footer">
                <p>©etaman.com 2017</p>
            </footer>

        </div>
</body>

</html>
We need to create a new route called /showDashboard in app.py and we'll use this route to render the dashboard page:
@app.route('/showDashboard')
def showDashboard():
    return render_template('dashboard.html')
We need to modify the /validateLogin method to redirect the user on successful sign-in to the dashboard page instead of the user home page:
if len(data) > 0:
    if check_password_hash(str(data[0][3]),_password):
        session['user'] = data[0][0]
        #return redirect('/userHome')
        return redirect('/showDashboard')
    else:
        return render_template('error.html',error = 'Wrong Email address or Password.')
else:
    return render_template('error.html',error = 'Wrong Email address or Password.')
After sign-in using a valid email address and password, we should be able to see the dashboard page:
Let's create a stored procedure to get the posts created by users:
USE `FlaskBlogApp`;
DROP procedure IF EXISTS `sp_GetAllBlogs`;

DELIMITER $$
USE `FlaskBlogApp`$$
CREATE DEFINER=`root`@`localhost` PROCEDURE `sp_GetAllBlogs`()
BEGIN
    select blog_id,blog_title,blog_description,blog_file_path from tbl_blog where blog_private = 0;
END$$

DELIMITER ;
The stored procedure will fetch all the blogs from tbl_blog table which are not marked as private.
After setting the stored procedure, we need to create a new method to call the stored procedure sp_GetAllBlogs. Here is the the getAllBlogs() in app.py method:
@app.route('/getAllBlogs')
def getAllBlogs():
    try:
        if session.get('user'):

            conn = mysql.connect()
            cursor = conn.cursor()
            cursor.callproc('sp_GetAllBlogs')
            result = cursor.fetchall()

            blogs_dict = []
            for blog in result:
                blog_dict = {
                        'Id': blog[0],
                        'Title': blog[1],
                        'Description': blog[2],
                        'FilePath': blog[3]}
                blogs_dict.append(blog_dict)

            return json.dumps(blogs_dict)
        else:
            return render_template('error.html', error = 'Unauthorized Access')
    except Exception as e:
        return render_template('error.html',error = str(e))
In the method, first we check for a valid user session and then create a MySQL connection. Using the MySQL connection conn, we use a cursor to call the stored procedure sp_GetAllBlogs to get the required data. After fetching the data, we have parse the result and returns a proper JSON string.
We'll call the /getAllBlogs() method when the dashboard page loads. Open dashboard.html and, using jQuery AJAX, make a call to /getAllBlogs() on document.ready:
<script>
$(function() {
    $.ajax({
        url: '/getAllBlogs',
        type: 'GET',
        success: function(response) {
            console.log(response);
        },
        error: function(error) {
            console.log(error);
        }
    });
})
</script>
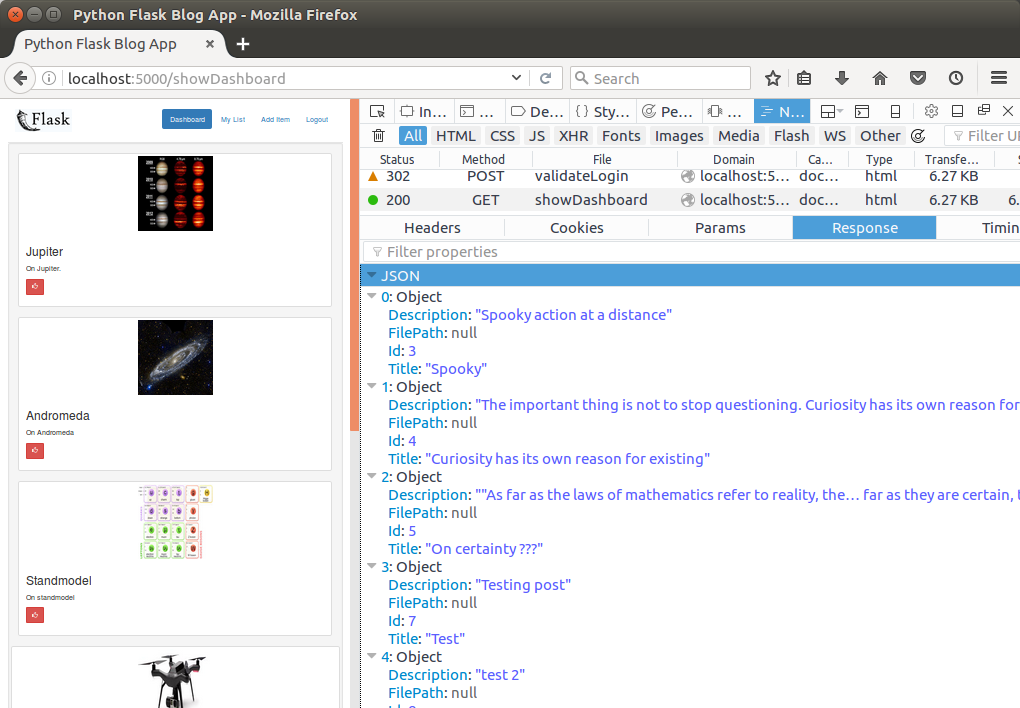
Once logged in to the application, we should be able to view the data fetched from the database on the browser console:
Using the data from the response, we want to populate our dashboard page. First, remove the HTML code between the .well div from dashboard.html:
<div class="well">

<!-- We'll populate this dynamically -->

</div>
In the success callback of the AJAX call, parse the response to a JavaScript object.
var data = JSON.parse(response);
We'll need to create the thumbnail HTML code dynamically using jQuery for each set of three blog posts in a row.
Let's create a JavaScript function to create the HTML code dynamically. Here is the HTML code that we'll be creating dynamically using jQuery:
<div class="col-sm-4 col-md-4">
    <div class="thumbnail"><img src="static/Uploads/de5f8a10-54ea-49f4-80ce-35626277047e.jpg" data-holder-rendered="true" style="height: 150px; width: 150px; display: block">
        <div class="caption">
            <h3>Testing App</h3>
            <p>hello</p>
            <p>
                <button type="button" class="btn btn-danger btn-sm"><span class="glyphicon glyphicon-thumbs-up" aria-hidden="true"></span></button>
            </p>
        </div>
    </div>
</div>
In the JavaScript function, CreateThumb(), we'll create the HTML elements and append them to their parent elements to get the HTML code shown above:
function CreateThumb(id,title,desc,filepath,like){
	var mainDiv = $('<div>').attr('class','col-sm-4 col-md-4');
	var thumbNail = $('<div>').attr('class','thumbnail');
	var img = $('<img>').attr({'src':filepath,'data-holder-rendered':true,'style':'height: 150px; width: 150px; display: block'});
	var caption = $('<div>').attr('class','caption');
	var title = $('<h3>').text(title);
	var desc = $('<p>').text(desc);

	var p = $('<p>');
	var btn = $('<button>').attr({'id':'btn_'+id,'type':'button','class':'btn btn-danger btn-sm'});
	var span = $('<span>').attr({'class':'glyphicon glyphicon-thumbs-up','aria-hidden':'true'});

	p.append(btn.append(span));

	caption.append(title);
	caption.append(desc);
	caption.append(p);
	thumbNail.append(img);
	thumbNail.append(caption);
	mainDiv.append(thumbNail);
	return mainDiv;
}
We're going to create the HTML using the CreateThumb() function while we iterate the parsed JSON response.
We plan to display three blog posts per row. So we'll check for that and create a new row each time for three posts. So, we need to add the following code to the success callback of the AJAX call in dashboard.html:
var itemsPerRow = 0;
var div = $('<div>').attr('class', 'row');
for (var i = 0; i < data.length; i++) {


    if (itemsPerRow < 3) {

        if (i == data.length - 1) {
            div.append(CreateThumb(data[i].Id,data[i].Title, data[i].Description, data[i].FilePath));
            $('.well').append(div);
        } else {
            div.append(CreateThumb(data[i].Id,data[i].Title, data[i].Description, data[i].FilePath));
            itemsPerRow++;
        }
    } else {
        $('.well').append(div);
        div = $('<div>').attr('class', 'row');
        div.append(CreateThumb(data[i].Id,data[i].Title, data[i].Description, data[i].FilePath));
        if (i == data.length - 1) {
            $('.well').append(div);
        }
        itemsPerRow = 1;
    }

}
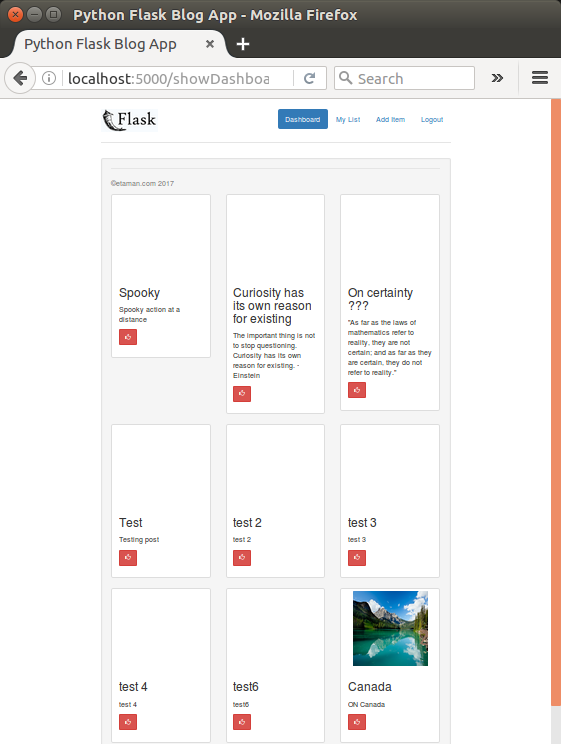
Sign in to the application and when on the dashboard page, we should be able to view the blog posts added by different users, with an option to like them:
Let's add a click event to the like buttons under the blogs thumbnails. Since we have dynamically created the buttons, we'll need to attach the click event to the buttons using the jQuery on method:
$(document).on('click', '[id^="btn_"]', function() {
    // Event function can be added here
});
Let's start by creating a table which will keep track of the likes a particular blo post has garnered. Create a table called tbl_likes:
CREATE TABLE `FlaskBlogApp`.`tbl_likes` (
  `blog_id` INT NOT NULL,
  `like_id` INT NOT NULL AUTO_INCREMENT,
  `user_id` INT NULL,
  `blog_like` INT NULL DEFAULT 0,
  PRIMARY KEY (`like_id`));
Here are the tables created so far:
mysql> show tables;
+------------------------+
| Tables_in_FlaskBlogApp |
+------------------------+
| blog_user              |
| tbl_blog               |
| tbl_likes              |
+------------------------+
3 rows in set (0.01 sec)
Now whenever a user likes or dislikes a particular blog post, we'll update the table. So, we need to create a MySQL stored procedure (sp_AddUpdateLikes) to update the above table:
DELIMITER $$

CREATE DEFINER=`root`@`localhost` PROCEDURE `sp_AddUpdateLikes`(
    p_blog_id int,
    p_user_id int,
    p_like int
)
BEGIN
    if (select exists (select 1 from tbl_likes where blog_id = p_blog_id and user_id = p_user_id)) then

        update tbl_likes set blog_like = p_like where blog_id = p_blog_id and user_id = p_user_id;

    else

        insert into tbl_likes(
            blog_id,
            user_id,
            blog_like
        )
        values(
            p_blog_id,
            p_user_id,
            p_like
        );

    end if;
END$$

DELIMITER ;
Let's create a method to call the above stored procedure in app.py:
@app.route('/addUpdateLike',methods=['POST'])
def addUpdateLike():
    try:
        if session.get('user'):
            _blogId = request.form['blog']
            _like = request.form['like']
            _user = session.get('user')


            conn = mysql.connect()
            cursor = conn.cursor()
            cursor.callproc('sp_AddUpdateLikes',(_blogId,_user,_like))
            data = cursor.fetchall()

            if len(data) is 0:
                conn.commit()
                return json.dumps({'status':'OK'})
            else:
                return render_template('error.html',error = 'An error occurred!')

        else:
            return render_template('error.html',error = 'Unauthorized Access')
    except Exception as e:
        return render_template('error.html',error = str(e))
    finally:
        cursor.close()
        conn.close()
This method will call the stored procedure sp_AddUpdateLikes. In this method we check for a valid user session and then pass the blog ID and like status to the stored procedure for update.
When the user clicks the like button, we need to call the Python method /addUpdateLike. So, we need to add the following code to the like button click event function in dashboard.html:
$(document).on('click','[id^="btn_"]',function(){
    var spId = $(this).attr('id').split('_')[1];
    $.ajax({
        url: '/addUpdateLike',
        method: 'POST',
        data: {blog:$(this).attr('id').split('_')[1],like:1},
        success: function(response){
            console.log(response);
        },
        error: function(error){
            console.log(error);
        }
    });
});
Just for now, we're using a hard-coded the value of like in the above call.
Click on the like button under any blog post thumbnail and check tbl_likes table and we should have an entry in there:
mysql> select * from tbl_likes;
+---------+---------+---------+-----------+
| blog_id | like_id | user_id | blog_like |
+---------+---------+---------+-----------+
|       3 |       1 |       1 |         1 |
+---------+---------+---------+-----------+
1 row in set (0.00 sec)

mysql> select * from tbl_likes;
+---------+---------+---------+-----------+
| blog_id | like_id | user_id | blog_like |
+---------+---------+---------+-----------+
|       3 |       1 |       1 |         1 |
|       5 |       2 |       1 |         1 |
+---------+---------+---------+-----------+
2 rows in set (0.00 sec)
In the next tutorial, we'll see how to toggle the like display and show the total number of likes received by a particular blog post.
Ph.D. / Golden Gate Ave, San Francisco / Seoul National Univ / Carnegie Mellon / UC Berkeley / DevOps / Deep Learning / Visualization