1. Introduction

Ruby on Rails and Django are the competing web frameworks.
There are quite a few debates on which one is better. Here is one of the links on that issue: Ruby vs. Python: Which should I learn: Django or Rails?.
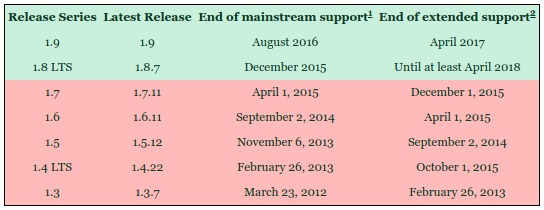
Please check How to get Django.

We can see if Django has already been installed in our system:
$ python -c "import django; print(django.get_version())"
As we can see from the test, since Django is not installed by default when we install python, we need to install it:
# centos
$ yum install django

# ubuntu
$ sudo apt-get install python-django
Or we can use 'pip':
$ sudo apt-get install python-pip
$ sudo pip install Django
After the install, we can check the version:
$ python -c "import django; print(django.get_version())"
1.6.1
Or, we can get the same info:
$ python
Python 2.7.5+
>>> import django
>>> django.get_version()
'1.6.1'
>>>
I have two versions of python: 2.7 and 3.3, so for ver 3.3, we can install Django like this:
$ sudo apt-get install python3-pip
$ sudo pip3 install Django
$ python3 -c "import django; print(django.get_version())"
1.6.5
If we want to use Django 1.6 with Python 2.7, then we need to uninstall Django 1.5 by upgrading it:
$ sudo pip install Django --upgrade
$ python -c "import django; print(django.get_version())"
1.6.5
In this tutorial, we will stick to Python 2.7 and Django 1.6.
Note: We may want to skip this section, and start from Hello World A - urls & views which is a little bit simpler and easier to understand.
A web application is a project and Django comes with a tool to create a project for us:
$ django-admin.py startproject mysite
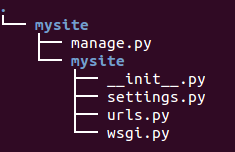
We can see what startproject created:
$ tree -a
Here are the decriptions of each file (see Writing your first Django app, part 1 for more details):
- The outer 'mysite/' root directory is just a container for our project. Its name doesn't matter to Django; we can rename it to anything we like.
- manage.py: A command-line utility that lets us interact with this Django project in various ways. Simply, it's a command runner.
- The inner 'mysite/' directory is the actual Python package for our project. Its name is the Python package name we'll need to use to import anything inside it (e.g. mysite.urls).
- mysite/__init__.py: An empty file that tells Python that this directory should be considered a Python package.
- mysite/settings.py: For configuration. Django settings will tell us all about how settings work.
- mysite/urls.py: The URL declarations for this Django project; a "table of contents" of our Django-powered site.
- mysite/wsgi.py: An entry-point for WSGI-compatible web servers to serve our project. Check the following two articles: 5. Django 1.8 Server Build - CentOS 7 hosted on VPS - Install and Configure Django and Sample production app with virtualenv and Apache)
We can use manage.py to start up a development server to view our web app.
$ cd mysite
$ python manage.py runserver
Validating models...

0 errors found
...
Django version 1.6.5, using settings 'mysite.settings'
Starting development server at http://127.0.0.1:8000/
Quit the server with CONTROL-C.
We've just started the Django development server, a lightweight Web server written purely in Python. We can develop things rapidly, without having to deal with configuring a production server - such as Apache - until we're ready for production.
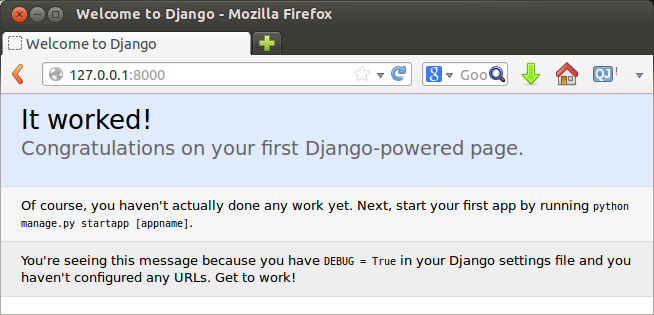
While the server is running, we can type in the url http://127.0.0.1:8000/ into our Web browser. Then, we'll see a "Welcome to Django" page as shown in the picture below:

A project is composed of many application. Django includes many built in apps in django.contrib for authentication, serving static files, security. We need to create our own apps. The start page above helpfully suggests we try:
$ python manage.py startapp [appname]
But not now. We'll create an app called poll in next chapter, and before we do that we may want to setup a database.
We normally need to edit mysite/settings.py which is a Python module with module-level variables representing Django settings.
However, since the configuration uses SQLite by default, and SQLite is included in Python, we don't need to install anything else to support our database.
Here is the DATABASES section of settings.py:
# Database
# https://docs.djangoproject.com/en/1.6/ref/settings/#databases

DATABASES = {
    'default': {
        'ENGINE': 'django.db.backends.sqlite3',
        'NAME': os.path.join(BASE_DIR, 'db.sqlite3'),
    }
}
We may want to set the time zone, in my case, San Francisco (Pacific Time):
TIME_ZONE = 'America/Tijuana'
Let's look at the INSTALLED_APPS which holds the names of all Django applications that are activated in this Django instance. They are included by default as a convenience for the common case.
# Application definition

INSTALLED_APPS = (
    'django.contrib.admin',
    'django.contrib.auth',
    'django.contrib.contenttypes',
    'django.contrib.sessions',
    'django.contrib.messages',
    'django.contrib.staticfiles',
)
Some of these applications makes use of at least one database table, though, so we need to create the tables in the database before we can use them. To do that, run the following command:
$ python manage.py syncdb
Creating tables ...
Creating table django_admin_log
Creating table auth_permission
Creating table auth_group_permissions
Creating table auth_group
Creating table auth_user_groups
Creating table auth_user_user_permissions
Creating table auth_user
Creating table django_content_type
Creating table django_session

You just installed Django's auth system, which means you don't have any superusers defined.
Would you like to create one now? (yes/no): yes
Username (leave blank to use 'root'):
Email address: myemail@bogotobogo.com
Password:
Password (again):
Superuser created successfully.
Installing custom SQL ...
Installing indexes ...
Installed 0 object(s) from 0 fixture(s)
The syncdb command looked at the INSTALLED_APPS setting and created any necessary database tables according to the database settings in our 'mysite/settings.py' file.
Get the IDE from http://www.jetbrains.com/pycharm/download/index.html.
Then, run the pycharm.sh:
$ ~/pycharm-community-3.1/bin/pycharm.sh
Ph.D. / Golden Gate Ave, San Francisco / Seoul National Univ / Carnegie Mellon / UC Berkeley / DevOps / Deep Learning / Visualization