3. Django 1.8 Server Build - CentOS 7 hosted on VPS - Apache Install

In previous two chapters (1. Django 1.8 Server Build - CentOS 7 hosted on VPS and 2. Django 1.8 Server Build - CentOS 7 hosted on VPS - ssh login and firewall):
- We installed CentOS 7 and boot up the machine.
- Then, we setup DNS for newly purchased domain name.
- We setup ssh login and firewall.
In this chapter, we'll install Apache server for a domain, sfvue.com.
We need to have Apache installed in order to configure virtual hosts for it. We can use yum to install Apache through CentOS's default software repositories:
[sfvue@sf sf]$ sudo yum install httpd
...
---> Package httpd.x86_64 0:2.4.6-31.el7.centos will be installed
...
Running transaction
  Installing : apr-1.4.8-3.el7.x86_64                                                            1/5
  Installing : apr-util-1.5.2-6.el7.x86_64                                                       2/5
  Installing : httpd-tools-2.4.6-31.el7.centos.x86_64                                            3/5
  Installing : mailcap-2.1.41-2.el7.noarch                                                       4/5
  Installing : httpd-2.4.6-31.el7.centos.x86_64                                                  5/5
  Verifying  : httpd-tools-2.4.6-31.el7.centos.x86_64                                            1/5
  Verifying  : apr-1.4.8-3.el7.x86_64                                                            2/5
  Verifying  : mailcap-2.1.41-2.el7.noarch                                                       3/5
  Verifying  : httpd-2.4.6-31.el7.centos.x86_64                                                  4/5
  Verifying  : apr-util-1.5.2-6.el7.x86_64                                                       5/5

Installed:
  httpd.x86_64 0:2.4.6-31.el7.centos

Dependency Installed:
  apr.x86_64 0:1.4.8-3.el7                               apr-util.x86_64 0:1.5.2-6.el7
  httpd-tools.x86_64 0:2.4.6-31.el7.centos               mailcap.noarch 0:2.1.41-2.el7

Complete!
[root@li1189-218 ~]#
The configuration for Apache is contained in the httpd.conf file, which is located at: /etc/httpd/conf/httpd.conf. Let's make a backup of this file into our home directory:
cp /etc/httpd/conf/httpd.conf ~/httpd.conf.backup
After installing Apache, we can issue the following commands to enable Apache to start on boot and run for the first time:
$ sudo /bin/systemctl enable httpd.service
$ sudo /bin/systemctl start httpd.service
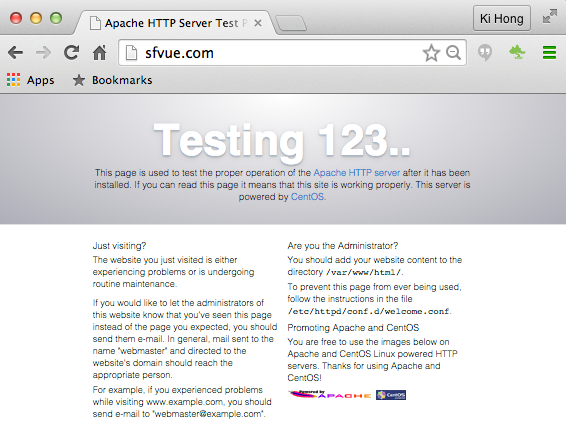
domain (sfvue.com):

To check if Apache is running:
[sfvue@sf ~]$ sudo /bin/systemctl status httpd.service
httpd.service - The Apache HTTP Server
   Loaded: loaded (/usr/lib/systemd/system/httpd.service; enabled)
   Active: active (running) since Wed 2015-06-17 02:51:17 PDT; 14s ago
  Process: 5361 ExecStop=/bin/kill -WINCH ${MAINPID} (code=exited, status=0/SUCCESS)
  Process: 5154 ExecReload=/usr/sbin/httpd $OPTIONS -k graceful (code=exited, status=0/SUCCESS)
 Main PID: 5365 (httpd)
   Status: "Total requests: 0; Current requests/sec: 0; Current traffic:   0 B/sec"
   CGroup: /system.slice/httpd.service
           ├─5365 /usr/sbin/httpd -DFOREGROUND
           ├─5367 /usr/sbin/httpd -DFOREGROUND
           ├─5368 /usr/sbin/httpd -DFOREGROUND
           ├─5369 /usr/sbin/httpd -DFOREGROUND
           ├─5370 /usr/sbin/httpd -DFOREGROUND
           └─5371 /usr/sbin/httpd -DFOREGROUND

Jun 17 02:51:17 sf httpd[5365]: AH00558: httpd: Could not reliably determine the server's fully qualified d...essage
Jun 17 02:51:17 sf systemd[1]: Started The Apache HTTP Server.
Hint: Some lines were ellipsized, use -l to show in full.
And the Apache version:
$ httpd -v
Server version: Apache/2.4.6 (CentOS)
Server built:   Mar 12 2015 15:07:19
First, we need to make a directory structure that will hold the site data to serve to visitors.
Our document root (the top-level directory that Apache looks at to find content to serve) will be set to individual directories in the /var/www directory. We will create a directory here for each of the virtual hosts that we plan on making.
Now we'll configure virtual hosting so that we can host multiple domains (or subdomains) with the server. These websites can be controlled by different users, or by a single user, as we prefer.
Before we get started, we need to combine all configuration on virtual hosting into a single file called vhost.conf located in the /etc/httpd/conf.d/ directory. Open this file, and we'll begin by setting up virtual hosting.
There are different ways to set up virtual hosts, however Name-based Virtual Hosts configuration is recommended. By default, Apache listens on all IP addresses available to it. Now we will create virtual host entries for each site that we need to host with this server. Here are two examples for sites at "sfvue.com".
Let's create a file, /etc/httpd/conf.d/vhost.conf:
[sfvue@sf ~]$ sudo vim /etc/httpd/conf.d/vhost.conf
<VirtualHost *:80>
    ServerAdmin webmaster@sfvue.com
    ServerName sfvue.com
    ServerAlias www.sfvue.com
    DocumentRoot /srv/www/sfvue.com/public_html/
    ErrorLog /srv/www/sfvue.com/logs/error.log
    CustomLog /srv/www/sfvue.com/logs/access.log combined
</VirtualHost>
Note : for Ubuntu, we may want to create a fine /etc/apache2/conf.d/vhost.conf.
Also, we need to comment all lines of /etc/httpd/conf.d/welcome.conf.
All of the files for the sites that we host will be located in directories that exist underneath /srv/www. We can symbolically link these directories into other locations if we need them to exist elsewhere.
Before we can use the above configuration we'll need to create the specified directories. For the above configuration, you can do this by issuing the following commands:
$ sudo mkdir -p /srv/www/sfvue.com/public_html
$ sudo mkdir /srv/www/sfvue.com/logs

The /srv/www/sfvue.com/public_html/index.html looks like this:
<html>
<head>Head</head>
<body>Body - sfvue.com</body>
</html>
After we've set up our virtual hosts, we can issue the following commands to enable Apache to start on boot and run for the first time:
$ sudo /bin/systemctl enable httpd.service
$ sudo /bin/systemctl start httpd.service
For Ubuntu 14:
$ sudo sysv-rc-conf apache2 on
$ sudo service apache2 restart
Assuming that we have configured the DNS for our domain to point to our Linode's IP address, virtual hosting for our domain should now work. Remember that we can create as many virtual hosts as we want.
Any time we change an option in our vhost.conf file, or any other Apache configuration file, remember to reload the configuration with the following command:
$ sudo /bin/systemctl reload httpd.service
$ sudo /bin/systemctl restart httpd.service
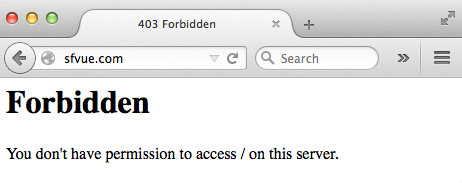
We may get the following error saying:
Forbidden
You don't have permission to access / on this server.:

So, we need to set permission in /etc/httpd/conf.d/vhost.conf:
<VirtualHost *:80>
    ServerAdmin webmaster@sfvue.com
    ServerName sfvue.com
    ServerAlias www.sfvue.com
    DocumentRoot /srv/www/sfvue.com/public_html/
    ErrorLog /srv/www/sfvue.com/logs/error.log
    CustomLog /srv/www/sfvue.com/logs/access.log combined
    <Directory "/srv/www/sfvue.com/">
        Options Indexes FollowSymLinks
        AllowOverride None
        Require all granted
    </Directory>
</VirtualHost>
Here is we've got only after adding the permission:

Now that master domain has been setup, we want to do more: subdomain (pics.sfvue.com).
First, we need to login to Linode and select the server that's hosting sfvue.com website. Click on the DNS Manager tab. We've already set up the parent domain web site, we should have an entry for our website which we are creating a new subdomain for. Click Edit for that domain entry. We should now see lists all DNS records. Find the section that lists A/AAA Records and click Add a new A record.
We should now see a form with 2 text fields (Hostname and IP Address) and 1 select input. For the hostname, enter pics.sfvue.com and, for the IP address, enter the server's IP address. Leave the select input alone. Click Save Changes and we're good to go.

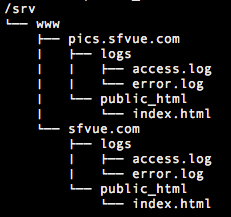
Then, we need to create another file structure:
$ sudo mkdir -p pics.sfvue.com/logs
$ sudo mkdir -p pics.sfvue.com/public_html
It looks like this:

Also, here is the updated /etc/httpd/conf.d/vhost.conf:
<VirtualHost *:80>
    ServerAdmin webmaster@sfvue.com
    ServerName sfvue.com
    ServerAlias www.sfvue.com
    DocumentRoot /srv/www/sfvue.com/public_html/
    ErrorLog /srv/www/sfvue.com/logs/error.log
    CustomLog /srv/www/sfvue.com/logs/access.log combined
    <Directory "/srv/www/sfvue.com/">
        Options Indexes FollowSymLinks
        AllowOverride None
        Require all granted
    </Directory>
</VirtualHost>
<VirtualHost *:80>
    ServerAdmin webmaster@sfvue.com
    ServerName pics.sfvue.com
    ServerAlias www.pics.sfvue.com
    DocumentRoot /srv/www/pics.sfvue.com/public_html/
    ErrorLog /srv/www/pics.sfvue.com/logs/error.log
    CustomLog /srv/www/pics.sfvue.com/logs/access.log combined
    <Directory "/srv/www/pics.sfvue.com/">
        Options Indexes FollowSymLinks
        AllowOverride None
        Require all granted
    </Directory>
</VirtualHost>
$ sudo /bin/systemctl reload httpd.service
$ sudo /bin/systemctl restart httpd.service
Then, we may get the properly rendered subdomain as shown below:

Continue : 4. Install and Configure MariaDB Database server & PHP
Ph.D. / Golden Gate Ave, San Francisco / Seoul National Univ / Carnegie Mellon / UC Berkeley / DevOps / Deep Learning / Visualization