6. Hello World
Models and Database

In short, models are database tables represented in python code.
In modern web applications, the logic that Django's view performs involves interacting with a database. Behind the scenes, a database-driven web site connects to a database server, retrieves some data out of it, and displays that data on a web page. The site might also provide ways for site visitors to populate the database on their own.
In general, each model maps to a single database table.
- Each model is a Python class that subclasses django.db.models.Model.
- Each attribute of the model represents a database field, and it's a column in the table.
- A model class == database table
- A model instance == database row
- Django gives us an automatically-generated database-access API.
- Django automatically takes care of things like primary keys if we do not explicitly manage them.
We normally need to edit settings.py which is a python module with module-level variables representing Django settings.
However, since the configuration uses SQLite by default, and SQLite is included in python, we don't need to install anything else to support our database.
Here is the DATABASES section of settings.py:
# Database
# https://docs.djangoproject.com/en/1.6/ref/settings/#databases

DATABASES = {
    'default': {
        'ENGINE': 'django.db.backends.sqlite3',
        'NAME': os.path.join(BASE_DIR, 'db.sqlite3'),
    }
}
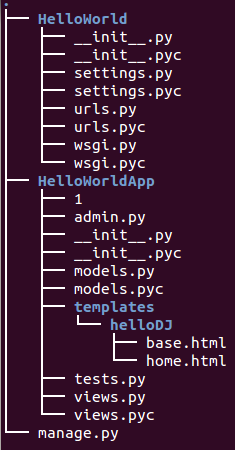
We need to create the tables in the database before we can use them. To do that, run the syncdb command which creates the database tables for all apps in INSTALLED_APPS whose tables have not already been created:
$ python manage.py syncdb
Creating tables ...
Creating table django_admin_log
Creating table auth_permission
Creating table auth_group_permissions
Creating table auth_group
Creating table auth_user_groups
Creating table auth_user_user_permissions
Creating table auth_user
Creating table django_content_type
Creating table django_session
...
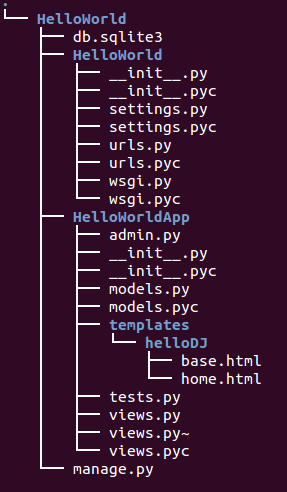
Now we have db.sqlite3 in our project as we can see at the top of the tree.
The first step of writing a database Web application in Django is to define our models - essentially, our database layout, with additional metadata.
Edit the HelloWorldApp/models.py file so that it should look like this:
from django.db import models

class Line(models.Model):                    # model - class    - table
    text = models.CharField(max_length=255)  # field - instance - row
Each model is represented by a class that subclasses django.db.models.Model. Each model has a number of class variables, each of which represents a database field in the model.
Each field is represented by an instance of a Field class - in our model, the CharField for character fields. This tells Django what type of data each field holds.
The name of each Field instance (text) is the field's name, in machine-friendly format. We'll use this value in our python code, and our database will use it as the column name.
Some Field classes have required arguments. CharField, for example, requires that we give it a max_length.
We haven't created the database structure yet. The syncdb will do it for us:
$ python manage.py syncdb
Creating tables ...
Creating table HelloWorldApp_line
Installing custom SQL ...
Installing indexes ...
Installed 0 object(s) from 0 fixture(s)
The syncdb command creates the database tables for all apps in INSTALLED_APPS whose tables have not already been created. In our case, it's HelloWorldApp_line, which was the only new model that hasn't been created.
Now, we've got our model.
Let's play with the model using interactive python shell which allows us to access python module in our App:
$ python manage.py shell
>>> from HelloWorldApp.models import Line
>>> Line.objects.all()
[]
>>> line = Line(text="Annabel Lee")
>>> line.save()
>>> Line
<class 'HelloWorldApp.models.Line'>
>>> Line.objects
<django.db.models.manager.Manager object at 0x24da7d0>
That's it. We've just created a new row in our database. Note that the Line is the class we defined earlier in HelloWorldApp/models.py.
If we want to query:
>>> Line.objects.all()
[<Line: Line object>]
We can see what's in the database using SQLite Database Browser:
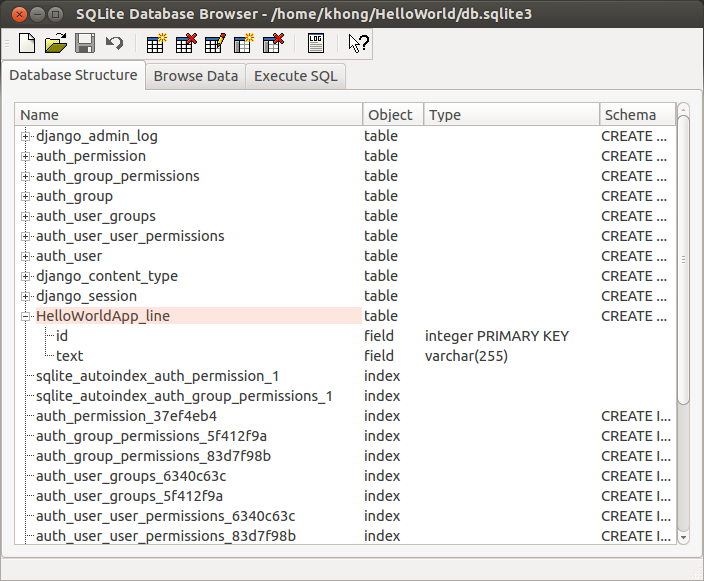
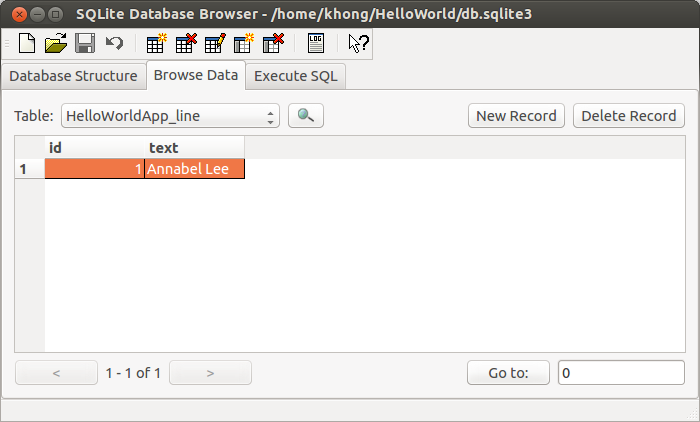
Also, though not always possible and may not be a secure nor correct way, there is a way to see the database:
$ python manage.py sql HelloWorldApp
BEGIN;
CREATE TABLE "HelloWorldApp_line" (
    "id" integer NOT NULL PRIMARY KEY,
    "text" varchar(255) NOT NULL
)
;

COMMIT;
Now that we have a new model, we need to update our view, HelloWorldApp/views.py:
From:
from django.shortcuts import render_to_response

def foo(request,):
    return render_to_response("helloDJ/home.html",
                               {"Testing" : "Django Template Inheritance ",
                               "HelloHello" : "Hello World - Django"})
To:
from django.shortcuts import render_to_response
from models import Line

def foo(request,):
    return render_to_response("helloDJ/home.html",
                               {"lines" : Line.objects.all()})
Also, we need to update our template (home.html) as well:
From:
{% extends "helloDJ/base.html" %}
{% block content %}
{{ Testing }}
{{ HelloHello }}
{% endblock %}
To:
{% extends "helloDJ/base.html" %}

{% block content %}
<ul>
{% for line in lines %}
 <li style="color:{% cycle 'black' 'blue' 'green' %}"> {{ line.text }}</li>
{% endfor %}
</ul>
{% endblock %}
Let's run the server, and see if it works:
$ python manage.py runserver
Type in http://localhost:8000/ or http://localhost:8000/HelloWorldApp/ into url box:

OK! It works.
If we add more lines:
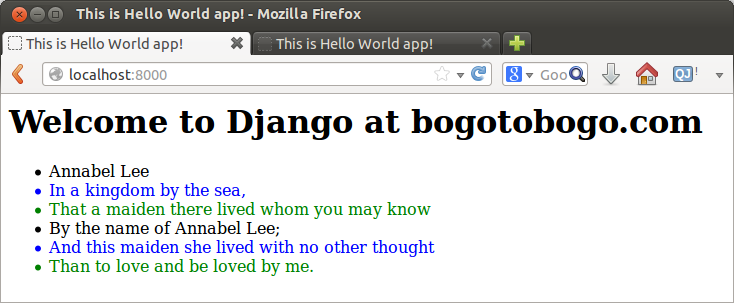
We talked about the url mapping in the previous chapter. Here, we should note that we tried two urls:
- http://localhost:8000/ is mapped by:
url(r'^$', foo, name='home')
- http://localhost:8000/HelloWorldApp/ is mapped by:
url(r'HelloWorldApp/$', foo),
For reference, here is the urls.py we're using:
from django.conf.urls import patterns, include, url
from HelloWorldApp.views import foo

#from django.contrib import admin
#admin.autodiscover()

urlpatterns = patterns('',
    # Examples:

    # url(r'^blog/', include('blog.urls')),

    # url(r'^admin/', include(admin.site.urls)),

    url(r'^$', foo, name='home'),
    url(r'HelloWorldApp/$', foo),
)
Ph.D. / Golden Gate Ave, San Francisco / Seoul National Univ / Carnegie Mellon / UC Berkeley / DevOps / Deep Learning / Visualization