4. Django 1.8 Server Build - CentOS 7 hosted on VPS - Install and Configure MariaDB Database & PHP

In this chapter, we'll install MariaDB Database and PHP.
MariaDB is a relational database management system (RDBMS) and ships by default in CentOS 7. MariaDB is a popular component in contemporary web development tool-chains, and is used to store data for many popular applications, including Wordpress and Drupal.
MariaDB is a community-developed fork of the MySQL relational database management system, and it was forked due to concerns over its acquisition by Oracle.
$ sudo yum install mariadb-server mariadb
...
Dependency Installed:
  libaio.x86_64 0:0.3.109-12.el7                      perl-Compress-Raw-Bzip2.x86_64 0:2.061-3.el7
  perl-Compress-Raw-Zlib.x86_64 1:2.061-4.el7         perl-DBD-MySQL.x86_64 0:4.023-5.el7
  perl-DBI.x86_64 0:1.627-4.el7                       perl-Data-Dumper.x86_64 0:2.145-3.el7
  perl-IO-Compress.noarch 0:2.061-2.el7               perl-Net-Daemon.noarch 0:0.48-5.el7
  perl-PlRPC.noarch 0:0.2020-14.el7

Complete!
CentOS 7 provides version 10.1.1 of MariaDB. Before we can use MariaDB some configuration is required. If we want to run MariaDB by default when the system boots, execute the following command:
$ sudo /bin/systemctl enable mariadb.service
ln -s '/usr/lib/systemd/system/mariadb.service' '/etc/systemd/system/multi-user.target.wants/mariadb.service'
Now you can start the MariaDB daemon (mariadb) with the following command:
$ sudo /bin/systemctl start mariadb.service
At this point, MariaDB should be ready to configure and run. While we shouldn't need to change the configuration file, note that it is located at /etc/my.cnf for future reference. The default values should be fine for a Linode 1GB, but if we decide to adjust them we should first make a backup copy:
$ cp /etc/my.cnf ~/my.cnf.backup
After installing MariaDB, it's recommended that we run mysql_secure_installation, a program that helps secure MariaDB. While running mysql_secure_installation, we will be presented with the opportunity to change the MariaDB root password, remove anonymous user accounts, disable root logins outside of localhost, and remove test databases and reload privileges. It is recommended that we answer yes to these options. Run the following command to execute the program:
$ sudo mysql_secure_installation
/bin/mysql_secure_installation: line 379: find_mysql_client: command not found

NOTE: RUNNING ALL PARTS OF THIS SCRIPT IS RECOMMENDED FOR ALL MariaDB
      SERVERS IN PRODUCTION USE!  PLEASE READ EACH STEP CAREFULLY!

In order to log into MariaDB to secure it, we'll need the current
password for the root user.  If you've just installed MariaDB, and
you haven't set the root password yet, the password will be blank,
so you should just press enter here.

Enter current password for root (enter for none):
OK, successfully used password, moving on...

Setting the root password ensures that nobody can log into the MariaDB
root user without the proper authorisation.

Set root password? [Y/n] Y
New password:
Re-enter new password:
Password updated successfully!
Reloading privilege tables..
 ... Success!


By default, a MariaDB installation has an anonymous user, allowing anyone
to log into MariaDB without having to have a user account created for
them.  This is intended only for testing, and to make the installation
go a bit smoother.  You should remove them before moving into a
production environment.

Remove anonymous users? [Y/n] Y
 ... Success!

Normally, root should only be allowed to connect from 'localhost'.  This
ensures that someone cannot guess at the root password from the network.

Disallow root login remotely? [Y/n] Y
 ... Success!

By default, MariaDB comes with a database named 'test' that anyone can
access.  This is also intended only for testing, and should be removed
before moving into a production environment.

Remove test database and access to it? [Y/n] Y
 - Dropping test database...
 ... Success!
 - Removing privileges on test database...
 ... Success!

Reloading the privilege tables will ensure that all changes made so far
will take effect immediately.

Reload privilege tables now? [Y/n] Y
 ... Success!

Cleaning up...

All done!  If you've completed all of the above steps, your MariaDB
installation should now be secure.

Thanks for using MariaDB!
Next, we'll create a database and grant our users permissions to use databases. First, log in to MariaDB. Enter MariaDB's root password, and we'll be presented with a prompt where we can issue SQL statements to interact with the database.
$ mysql -u root -p
Enter password:
Welcome to the MariaDB monitor.  Commands end with ; or \g.
Your MariaDB connection id is 15
Server version: 5.5.41-MariaDB MariaDB Server

Copyright (c) 2000, 2014, Oracle, MariaDB Corporation Ab and others.

Type 'help;' or '\h' for help. Type '\c' to clear the current input statement.

MariaDB [(none)]>
To check the info about our db:
MariaDB [(none)]> show variables where variable_name like "%dir";
+---------------------------+----------------------------+
| Variable_name             | Value                      |
+---------------------------+----------------------------+
| aria_sync_log_dir         | NEWFILE                    |
| basedir                   | /usr                       |
| character_sets_dir        | /usr/share/mysql/charsets/ |
| datadir                   | /var/lib/mysql/            |
| innodb_data_home_dir      |                            |
| innodb_log_group_home_dir | ./                         |
| lc_messages_dir           |                            |
| plugin_dir                | /usr/lib64/mysql/plugin/   |
| slave_load_tmpdir         | /var/tmp                   |
| tmpdir                    | /var/tmp                   |
+---------------------------+----------------------------+
10 rows in set (0.00 sec)
To exit, ^D:
MariaDB [(none)]> Bye
With Apache and MariaDB installed we are now ready to move on to installing PHP to provide scripting support for our web pages.
PHP makes it possible to produce dynamic and interactive pages using our own scripts and web development frameworks. Furthermore, many popular web applications like WordPress are written in PHP. If we want to be able to develop our websites using PHP, we must first install it.
$ sudo yum install php php-pear php-mysql
...
Installed:
  php.x86_64 0:5.4.16-23.el7_0.3   php-mysql.x86_64 0:5.4.16-23.el7_0.3   php-pear.noarch 1:1.9.4-21.el7
...
Since need support for MariaDB or MySQL in PHP, we installed the php5-mysql package as well.
Once PHP5 is installed we'll need to tune the configuration file located in /etc/php.ini to enable more descriptive errors, logging, and better performance. Make sure that the following values are set, and relevant lines are uncommented (comments are lines beginning with a semi-colon [;]):
$ sudo vim /etc/php.ini
error_log = /var/log/php/error.log
Then, we need to create the log directory for PHP and give the Apache user ownership:
$ sudo mkdir /var/log/php
$ sudo chown apache /var/log/php
After making changes to PHP, restart Apache by issuing the following command:
$ sudo /bin/systemctl restart httpd
We now have a fully functioning LAMP stack on our Linode!
Let's go to our DocumentRoot and create a php page.
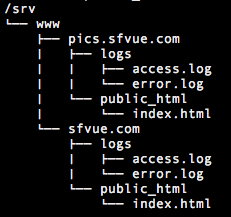
$ cd /srv/www/sfvue.com/public_html/
$ sudo vim info.php
<?php
phpinfo()
?>
Then, restart Apache:
$ sudo apachectl restart
Open a browser and check if the php page is working.

phpMyAdmin is a Web based MySQL browser written in php.
Installing phpMyAdmin requires access to the Fedora Projects EPEL Repositories. So, let's get the latest Extra Packages for Enterprise Linux (EPEL):
$ sudo rpm -iUvh http://mirror.pnl.gov/epel/7/x86_64/e/epel-release-7-5.noarch.rpm
Retrieving http://dl.fedoraproject.org/pub/epel/7/x86_64/e/epel-release-7-5.noarch.rpm
warning: /var/tmp/rpm-tmp.PHe9ED: Header V3 RSA/SHA256 Signature, key ID 352c64e5: NOKEY
Preparing...                          ################################# [100%]
Updating / installing...
   1:epel-release-7-5                 ################################# [100%]
Make sure our package repositories and installed programs are up to date by issuing the following commands:
$ sudo yum update
Now we want to install phpMyAdmin:
$ sudo yum install phpMyAdmin
...
Installed:
  phpMyAdmin.noarch 0:4.4.9-1.el7
...
By default, phpMyAdmin is configured to only permit access from the localhost (127.0.0.1).
If we want to use it remotely (as we'll discuss this in later part of this section), we do not have to do anything. Just make sure php is installed.
Actually, at the bottom of Apache server's main conf file (/etc/httpd/conf/httpd.conf) has the following line that lets Apache include /etc/httpd/conf.d/phpMyAdmin.conf:
IncludeOptional conf.d/*.conf
So, all we need to do is to restart our server:
$ sudo systemctl restart httpd
But if we want to have an access to phpMyAdmin from a specific ip, then we will need to edit the configuration file and add the IP Address of our home or work computer. There are two 127.0.0.1s for each version. The 127.0.0.1 means it allows only local access, and we may want to change it so that we can access it from home or from work.
Let's see if it works:
$ sudo apachectl restart
As mentioned earlier, we probably use phpMyAdmin from our local machine. To do that, we want to do forwarding our local 8080 port to remote 80 port (local port forwarding / outgoing ssh tunnel - Linux Secure Shell (SSH) IV : SSH Tunnel (Local Port Forwarding)):
$ ssh -L 8080:localhost:80 -l sfvue 45.79.90.218
where the -l flag is for user name (in our case, it's sfvue), and the last argument is the host-ip (45.79.90.218).
Let's try to access it via sfvue.com:
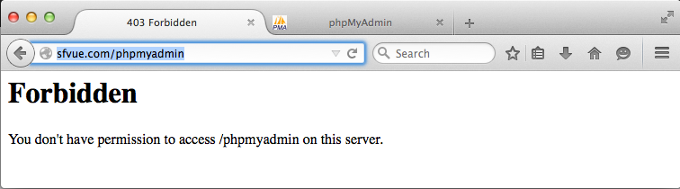
phpMyAdmin allows us to access only through localhost by default. Allowing phpMyAdmin to anyone other than localhost should be considered dangerous unless properly secured by SSL.
So, we may want to access localhost using local port 8080 which is forwarded to remote localhost port 80:
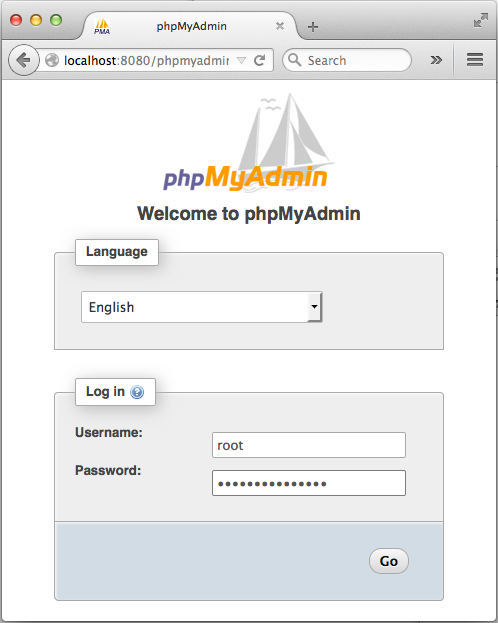
As we can see, we can only login to phpMyAdmin only if we SSH login with port forwarding!

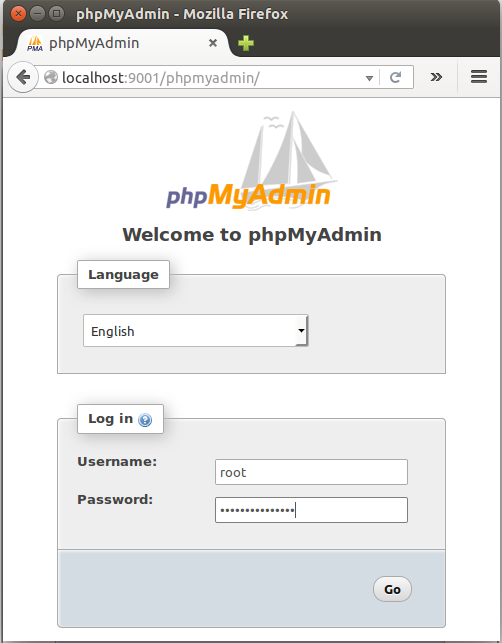
Also note that the port 8080 may have already taken, for example, by Jenkins. If that's the case, we may want to use other port for our port forward setting like this:
$ ssh -4 -L 9001:localhost:80 -l sfvue 45.79.90.218
sfvue@45.79.90.218's password:
Last login: Tue Dec 15 11:22:20 2015 from 108-239-135-40.lightspeed.frokca.sbcglobal.net
where -4 to use ipv4 rather than ipv6.
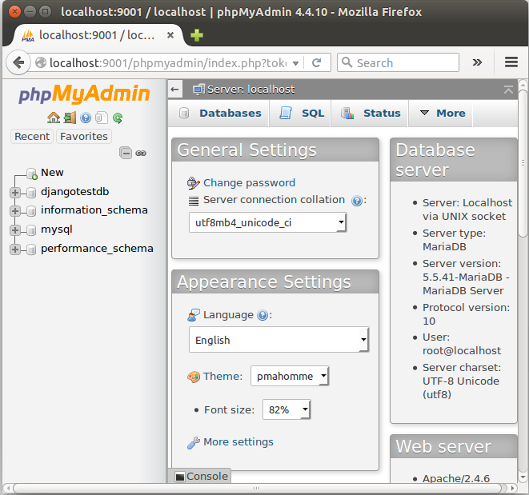
Now, on our local machine, we type http://localhost:9001/phpmyadmin into Browser:
Continue : 5. Install and Configure Django
Ph.D. / Golden Gate Ave, San Francisco / Seoul National Univ / Carnegie Mellon / UC Berkeley / DevOps / Deep Learning / Visualization