Deploy Django app (pytune.com) to AWS using Nginx and uWSGI

We'll deploy Django app (pytune.com) to AWS (we need at least t2-small (2GB of memory) instance to compile scipy) using Nginx and uWSGI on Ubuntu 14.04.
At this time, the deploy will be done manually. But eventually Fabric will do the job.
Let's start by updating the list:
$ sudo apt-get update
First, we need to create a folder where we can place our code:
$ sudo mkdir -p /var/www/django/

$ cd /var/www/django
Let's clone our repo:
$ sudo apt-get install git
$ sudo git clone https://github.com/Einsteinish/PyTune.git
$ cd PyTune
$ $ ls /var/www/django/PyTune
api         docker-compose.yml  LICENSE.md                  node              settings.py       vendor
apps        documents           local_settings.py.template  pytune4-app.ini   sitecustomize.py  wsgi.py
assets.yml  fabfile.py          logs                        r                 templates
config      flask               manage.py                   README.md         urls.py
docker      __init__.py         media                       requirements.txt  utils
We'll install the necessary package in later section of this tutorial.
Install Nginx:
$ sudo apt-get install nginx
Let's create a new file /etc/nginx/sites-available/pytune.com.conf:
server {
    listen 80;
    server_name pytune.com www.pytune.com;

    location / {
        include         uwsgi_params;
        uwsgi_pass      unix:/var/www/django/PyTune/pytune-app.sock;
    }
}
Enable the server configuration we just made by linking it to the sites-enabled directory:
$ sudo ln -s /etc/nginx/sites-available/pytune.com.conf /etc/nginx/sites-enabled
Check the configuration file for any syntax errors:
$ sudo service nginx configtest
 * Testing nginx configuration
If it reports back that no problems were detected, restart the server to implement new changes:
$ sudo service nginx restart
First, we need to install uWSGI into our project directory:
$ cd /var/www/django/PyTune

$ sudo pip install uwsgi
Let's make uWSGI config file (pytune-app.ini) which creates isolated environments, each running their own versions of packages:
[uwsgi]
module = wsgi:application

master = true
processes = 5

socket = pytune-app.sock
chmod-socket = 664
vacuum = true

die-on-term = true
We can use the ini configuration file by the following command:
$ sudo uwsgi --ini pytune-app.ini --uid root --gid www-data
...
*** uWSGI is running in multiple interpreter mode ***
spawned uWSGI master process (pid: 2989)
spawned uWSGI worker 1 (pid: 2990, cores: 1)
spawned uWSGI worker 2 (pid: 2991, cores: 1)
spawned uWSGI worker 3 (pid: 2992, cores: 1)
spawned uWSGI worker 4 (pid: 2993, cores: 1)
spawned uWSGI worker 5 (pid: 2994, cores: 1)
For more information about the ini file, please visit How to use Django with uWSGI.
While the uWSGI workers are there, let's see what's new in our project directory:
$ ls -la /var/www/django/pytune
...
-rw-r--r--  1 root root    142 May 27 03:35 pytune-app.ini
srw-rw-r--  1 root root      0 May 27 03:49 pytune-app.sock
...
As shown above, we can run it interactively. However, we want to launch the uWSGI instance at boot so that our application is always available (/etc/init/pytune-app.conf):
description "uWSGI instance to serve pytune4-app"

start on runlevel [2345]
stop on runlevel [!2345]

setuid root
setgid www-data

script
    cd /var/www/django/PyTune
    . venv/bin/activate
    uwsgi --ini pytune-app.ini
end script
Now that our Upstart script is complete, we can start the service:
(venv)$ sudo start pytune-app
$ ps -ef|grep pytune-app
root     13238 13234  8 16:07 ?        00:00:01 uwsgi --ini pytune4-app.ini
root     13239 13238  0 16:07 ?        00:00:00 uwsgi --ini pytune4-app.ini
root     13240 13238  0 16:07 ?        00:00:00 uwsgi --ini pytune4-app.ini
root     13241 13238  0 16:07 ?        00:00:00 uwsgi --ini pytune4-app.ini
root     13242 13238  0 16:07 ?        00:00:00 uwsgi --ini pytune4-app.ini
root     13243 13238  0 16:07 ?        00:00:00 uwsgi --ini pytune4-app.ini
The app will start automatically on boot.
We can stop the service at any time by typing:
(venv)$ sudo stop pytune-app
Install Java for elasticsearch:
$ sudo apt-add-repository ppa:webupd8team/java
$ sudo apt-get update
$ sudo apt-get install oracle-java8-installer

$ javac -version
javac 1.8.0_91
Official guide : Install Elasticsearch.
Download:
$ wget https://download.elastic.co/elasticsearch/elasticsearch/elasticsearch-1.7.2.deb
Then install it with the dpkg command like this:
$ sudo dpkg -i elasticsearch-1.7.2.deb
This will install Elasticsearch in /usr/share/elasticsearch/:
$ ls /usr/share/elasticsearch/
bin  lib  NOTICE.txt  plugins  README.textile
Its configuration files placed in /etc/elasticsearch:
$ ls /etc/elasticsearch
elasticsearch.yml  logging.yml
The init script of elasticsearch is added in /etc/init.d/elasticsearch:
$ ls /etc/init.d/elasticsearch
/etc/init.d/elasticsearch
To make sure Elasticsearch starts and stops automatically, we should add its init script to the default runlevels with the command:
$ sudo update-rc.d elasticsearch defaults
 Adding system startup for /etc/init.d/elasticsearch ...
   /etc/rc0.d/K20elasticsearch -> ../init.d/elasticsearch
   ...
   /etc/rc5.d/S20elasticsearch -> ../init.d/elasticsearch
We wont't touch anything and use the default settings.
Now, we can start Elasticsearch for the first time with the command:
$ sudo service elasticsearch start
Testing:
$ curl -X GET 'http://localhost:9200'
We should get the following response something like this:
$ curl -X GET 'http://127.0.0.1:9200'
{
  "status" : 200,
  "name" : "Unuscione",
  "cluster_name" : "elasticsearch",
  "version" : {
    "number" : "1.7.2",
    "build_hash" : "e43676b1385b8125d647f593f7202acbd816e8ec",
    "build_timestamp" : "2015-09-14T09:49:53Z",
    "build_snapshot" : false,
    "lucene_version" : "4.10.4"
  },
  "tagline" : "You Know, for Search"
}
Or we can check the health of the cluster:
$ curl -XGET http://localhost:9200/_cluster/health?pretty
{
  "cluster_name" : "elasticsearch",
  "status" : "green",
  "timed_out" : false,
  "number_of_nodes" : 1,
  "number_of_data_nodes" : 1,
  "active_primary_shards" : 0,
  "active_shards" : 0,
  "relocating_shards" : 0,
  "initializing_shards" : 0,
  "unassigned_shards" : 0,
  "delayed_unassigned_shards" : 0,
  "number_of_pending_tasks" : 0,
  "number_of_in_flight_fetch" : 0
}
$ sudo apt-get install mysql-server
MySQL will bind to localhost (127.0.0.1) by default.
Check if it's running:
$ ps -ef|grep mysqld
mysql    18570     1  0 18:32 ?        00:00:00 /usr/sbin/mysqld

$ service mysql status
mysql start/running, process 18570
If it is not running, we can start it with:
$ sudo service mysql start
Run the mysql_secure_installation script to address several security concerns in a default MySQL installation:
$ sudo mysql_secure_installation
Answer 'y' to all questions.
To log in to MySQL as the root user:
$ mysql -u root -p
Enter password:
...
mysql>
Here is how we create a user and database:
(venv)$ mysql -u root -p
mysql> CREATE DATABASE pytunedb;
mysql> CREATE USER 'pytune'@'localhost' IDENTIFIED BY 'password';
mysql> GRANT ALL PRIVILEGES ON * . * TO 'pytune'@'localhost';
mysql> Flush Privileges;
Install php:
$ sudo apt-get install php5-fpm php5-mysql php5-cli
For security reason, in /etc/php5/fpm/php.ini, we need to set:
cgi.fix_pathinfo=0
Restart our PHP processor by typing:
$ sudo service php5-fpm restart
Modify the default config file for Nginx (/etc/nginx/sites-available) as below:
server {
    listen 80 default_server;
    listen [::]:80 default_server ipv6only=on;

    root /usr/share/nginx/html;
    index index.php index.html index.htm;

    server_name server_domain_name_or_IP;

    location / {
        try_files $uri $uri/ =404;
    }

    error_page 404 /404.html;
    error_page 500 502 503 504 /50x.html;
    location = /50x.html {
        root /usr/share/nginx/html;
    }

    location ~ \.php$ {
        try_files $uri =404;
        fastcgi_split_path_info ^(.+\.php)(/.+)$;
        fastcgi_pass unix:/var/run/php5-fpm.sock;
        fastcgi_index index.php;
        fastcgi_param SCRIPT_FILENAME $document_root$fastcgi_script_name;
        include fastcgi_params;
    }
}
Just for a typical test, let's create a php info file (/usr/share/nginx/html/info.php):
<?php phpinfo(); ?>
Restart Nginx and and visit a browser with:
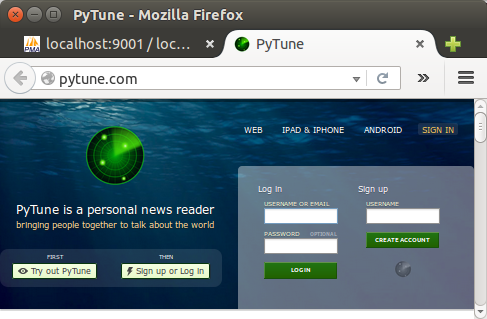
http://server_domain_name_or_IP/info.php
Now, we're ready to move on.
Install phpmyadmin:
$ sudo apt-get install phpmyadmin
Hit TAB to bypass for web server since Nginx is not listed. Then, select "Yes" dbconfig-common to configure a database for phpmyadmin to use. Provide the passwords for MySQL/admin.
For the Nginx web server to find and serve the phpMyAdmin files correctly, we just need to create a symbolic link from the installation files to our Nginx document root directory by typing this:
$ sudo ln -s /usr/share/phpmyadmin /usr/share/nginx/html
The last thing we need to do is enabling the mcrypt PHP module, which phpMyAdmin relies on. This was installed with phpMyAdmin so we just need to turn it on and restart our PHP processor:
$ sudo php5enmod mcrypt
$ sudo service php5-fpm restart
We want to access it from our local machine via ssh local port forwarding:
$ ssh -i ~/.ssh/bogo.pem -L 9001:localhost:80 -l ubuntu 52.9.222.239
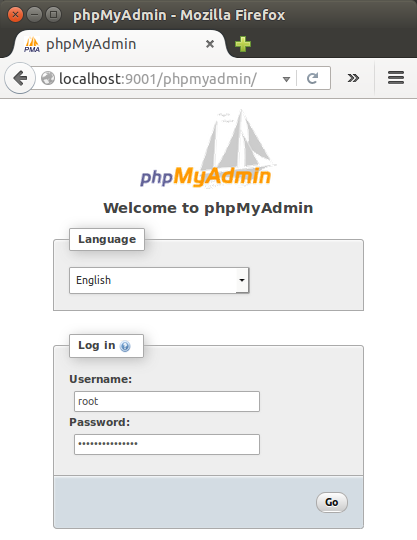
So, we can use local port 9001 and access remote 80 on AWS via ssh.
The guide for installing mongodb can be found Install MongoDB Community Edition on Ubuntu.
$ sudo apt-key adv --keyserver hkp://keyserver.ubuntu.com:80 --recv EA312927
$ echo "deb http://repo.mongodb.org/apt/ubuntu trusty/mongodb-org/3.2 multiverse" | sudo tee /etc/apt/sources.list.d/mongodb-org-3.2.list
$ sudo apt-get install -y mongodb-org
$ mongod -version
db version v3.2.6
To start it:
$ sudo service mongod start

$ sudo service mongod status
mongod start/running, process 20293
Verify that the mongod process has started successfully by checking the contents of the log file at /var/log/mongodb/mongod.log for a line reading:
[initandlisten] waiting for connections on port <port>
where <port> is the port configured in /etc/mongod.conf, 27017 by default.
Note: we may want to setup one more thing.
MongoDB setting in /var/www/django/PyTune/settings.py:
MONGO_DB = {
    'host': 'localhost:27017',
Redis is an open source (BSD licensed), in-memory data structure store, used as database, cache and message broker.
$ sudo apt-get install redis-server
By default, the redis-server is started after installation.
We can check using the service command :
$ sudo service redis-server status
redis-server is running

$ pgrep redis-server
1815
Redis configuration is located in the /etc/redis/redis.conf file. In our case, Redis listens only on localhost. However, if we have a dedicated redis server and we're connecting from other servers, such as an application server, we may want to change Redis configuration directive so that it will listen to all network interfaces instead of only on localhost.
Virtualenv is to create isolated environments, each running their own versions of packages. It is the tool in Python which helps in creating new virtual environments for our projects. Since it has its own install directories, we can be isolated from the system directories.
Note: though I chose /var/..., we may want to work in a directory that we have a write permission.
We need pip, so let's install it first:
$ sudo apt-get -y install python-pip
To install virtualenv, we do:
$ cd /var/www/django/PyTune

/var/www/django/PyTune$ sudo pip install virtualenv
/var/www/django/PyTune$ sudo virtualenv venv
To activate:
$ source venv/bin/activate
While we're trying to install our packages via pip, we may get several errors as shown later in this section.
Here is the list of libraries that needs to be install before installing our packages:
sudo pip install libpq-dev python-dev libmysqlclient-dev libxml2-dev libxslt-dev lib32z1-dev libjpeg-dev libncurses5-dev libffi-dev
So, if we want to avoid hassle, we may want the libraries to be pre-installed.
Now, let's install our assorted packages:
(venv)$ sudo pip install -r requirements.txt
We may get an error for scipy. In that case:
$ sudo apt-get install libpq-dev python-dev
(venv)$ pip install -r requirements.txt
If there is an error : "mysql_config not found", do the following:
$ sudo apt-get install libmysqlclient-dev
To fix the error : libxml/xmlversion.h: No such file or directory:
$ sudo apt-get install libxml2-dev libxslt-dev lib32z1-dev
We may get "lxml installation error" during compilation. This is a memory issue. So, switch instance type to the one that has more memory.
For the error during Pillow such as "ValueError: jpeg is required ...", we should do:
$ sudo apt-get install libjpeg-dev
If we get "usr/bin/ld: cannot find -lncurses" error, install the library, ncurses:
$ sudo apt-get install libncurses5-dev
For cryptography:
$ sudo apt-get install libffi-dev
We may also need to install the following packages as well:
(venv)$ pip install urllib3
(venv)$ pip install pyopenssl
(venv)$ pip install python-oauthlib
(venv)$ pip install scipy
We need two files for settings: settings.py and local_settings.py, especially, for the following items:
PYTUNE_URL            = 'pytune.com'
SESSION_COOKIE_DOMAIN = '.pytune.com'
and we need to match SITE_ID with the django_site table:
SITE_ID = 1

Set permissions for media and logs directories:
$ sudo chown -R www-data:www-data media
sudo chown -R www-data:www-data logs
File permission change:
(venv)$ sudo chmod u+x manage.py
(venv)$ sudo ./manage.py syncdb --all
You just installed Django's auth system, which means you don't have any superusers defined.
Would you like to create one now? (yes/no): No
...
(venv)$ sudo ./manage.py migrate --fake
(venv)$ sudo ./manage.py migrate
(venv)$ sudo ./manage.py loaddata config/fixtures/bootstrap.json
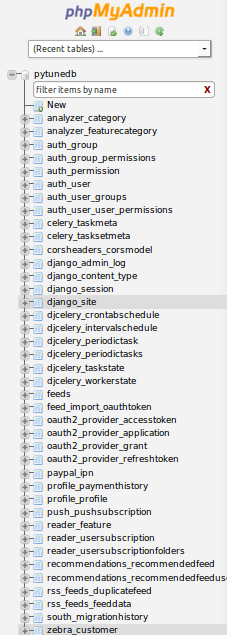
Here are the tables created:
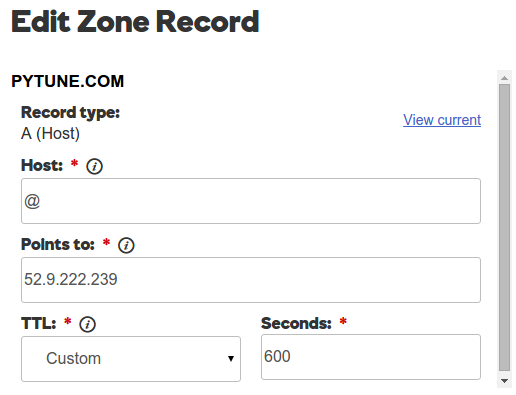
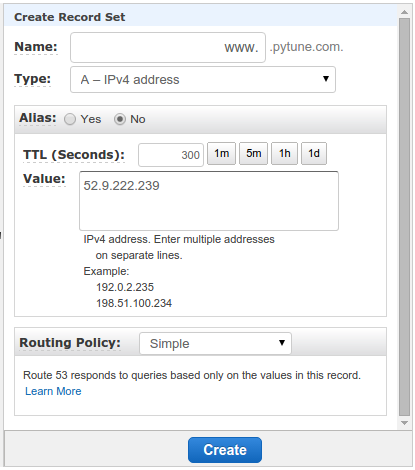
Make sure the instance have a dedicated Elastic IP. In this case, it's 52.9.222.239.
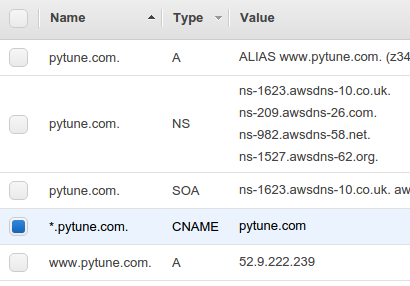
Here is a newly created Hosted Zone with a domain name pytune.com in AWS Route 53:
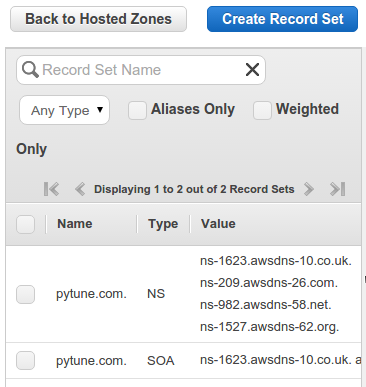
Since the registrar for pytune.com is GoDaddy, we need to tell GoDaddy what're the name servers as below:

Also, a Zone File of GoDaddy should point to the AWS instance:
Now, back to AWS Route 53 and create Record Set.
A record for www.pytune.com:
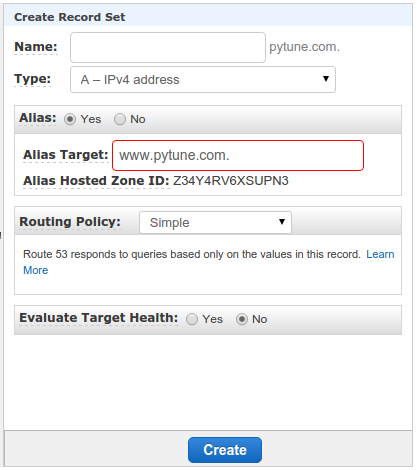
Then Alias to www.pytune.com:
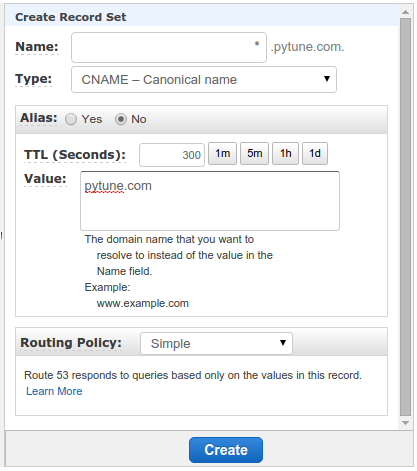
We also want to set CNAME:
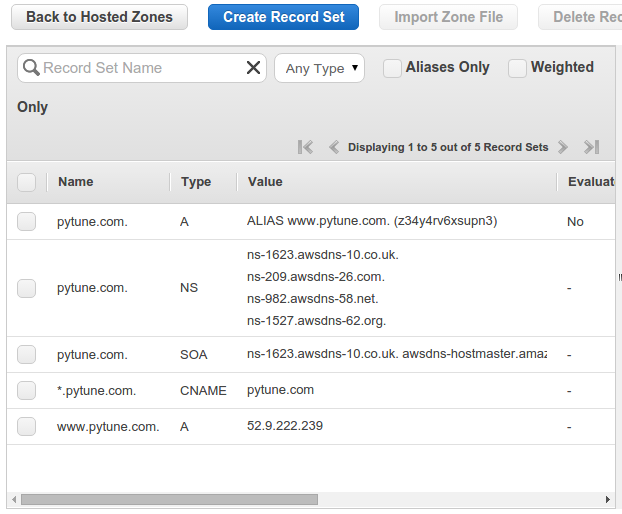
Here is the final result for Route 53 setup:
As discussed earlier, we can run the app using interactive uWSGI:
$ sudo uwsgi --ini pytune-app.ini --uid root --gid www-data
However, for production app, we want to run it as a daemon service:
(venv)$ sudo start pytune-app

(venv)$ ps aux|grep pytune|grep -v grep
root      7822  0.1  3.9  66072 20000 ?        S    07:31   0:00 uwsgi --ini pytune-app.ini
root      7823  0.0  3.1  66072 15708 ?        S    07:31   0:00 uwsgi --ini pytune-app.ini
root      7824  0.0  3.1  66072 15708 ?        S    07:31   0:00 uwsgi --ini pytune-app.ini
root      7825  0.0  3.1  66072 15708 ?        S    07:31   0:00 uwsgi --ini pytune-app.ini
root      7826  0.0  3.1  66072 15708 ?        S    07:31   0:00 uwsgi --ini pytune-app.ini
root      7827  0.0  3.1  66072 15704 ?        S    07:31   0:00 uwsgi --ini pytune-app.ini
There are things that can go wrong.
- 502 Bad Gateway: Nginx on but uWSGI failed to run.
When DEBUG turned off, Raven kicks in while the Sentry not being setup properly. So, we may get SENTRY_DSN error. So, the lines in settings.py commented out:''' if not DEBUG: INSTALLED_APPS += ( 'raven.contrib.django', 'django_ses', ) # RAVEN_CLIENT = raven.Client(dsn=SENTRY_DSN, release=raven.fetch_git_sha(os.path.dirname(__file__))) #RAVEN_CLIENT = raven.Client(SENTRY_DSN) ''' - Permission error : when we run uWSGI in interactive mode, we may get permission error for /var/www/django/PyTune/pytune-app.sock. So, we need to run it with --uid root --gid www-data:
$ sudo uwsgi --ini pytune-app.ini --uid root --gid www-data
Three things should be done to activate sub-domains:
- Route 53 CNAME *.pytune.com.
- uWSGI ini file setup.
- Nginx configuration.
To set sub-domain at Route 53, we need to create a CNAME. Actually, we've already done it when we created a CNAME with *.pytune.com:
/etc/init/dev-pytune-app.conf
description "uWSGI instance to serve pytune4-app"

start on runlevel [2345]
stop on runlevel [!2345]

setuid root
setgid www-data

script
    cd /var/www/django/dev-PyTune
    . venv/bin/activate
    uwsgi --ini dev-pytune-app.ini
end script
/var/www/django/dev-PyTune/dev-pytune-app.ini:
[uwsgi]
module = wsgi:application

master = true
processes = 5

socket = dev-pytune-app.sock
chmod-socket = 664
vacuum = true

die-on-term = true
Lastly, Nginx setup.
/etc/nginx/sites-available/dev-pytune.com.conf:
server {
    listen 80;
    server_name dev.pytune.com;

    location / {
        include         uwsgi_params;
        uwsgi_pass      unix:/var/www/django/dev-PyTune/dev-pytune-app.sock;
    }
}
Make a link for the dev:
$ sudo ln -s /etc/nginx/sites-available/dev-pytune.com.conf /etc/nginx/sites-enabled/dev-pytune.com.conf

$ ls -la ../sites-enabled/
lrwxrwxrwx 1 root root   34 May 27 03:27 default -> /etc/nginx/sites-available/default
lrwxrwxrwx 1 root root   46 May 27 19:55 dev-pytune.com.conf -> /etc/nginx/sites-available/dev-pytune.com.conf
lrwxrwxrwx 1 root root   42 May 27 03:28 pytune.com.conf -> /etc/nginx/sites-available/pytune.com.conf
Now everything is ready:
Restart Nginx:
$ sudo service nginx restart
We can run the uWSGI ini file like this:
(venv)$ sudo start dev-pytune-app
root      2906  5.2  1.9  66068 20004 ?        S    20:05   0:00 uwsgi --ini dev-pytune-app.ini
root      2907  0.0  1.5  66068 15684 ?        S    20:05   0:00 uwsgi --ini dev-pytune-app.ini
root      2908  0.0  1.5  66068 15684 ?        S    20:05   0:00 uwsgi --ini dev-pytune-app.ini
root      2909  0.0  1.5  66068 15684 ?        S    20:05   0:00 uwsgi --ini dev-pytune-app.ini
root      2910  0.0  1.5  66068 15684 ?        S    20:05   0:00 uwsgi --ini dev-pytune-app.ini
root      2911  0.0  1.5  66068 15684 ?        S    20:05   0:00 uwsgi --ini dev-pytune-app.ini
Note : put dev on another AWS instance.
We need to keep PyTune fresh and updated:
- Fetching feeds:
If we just want to fetch feeds once, we can use the refresh_feeds management command:./manage.py refresh_feeds --force
- Feedback:
To populate the feedback table on the homepage, use the collect_feedback management command every few minutes:./manage.py collect_feedback
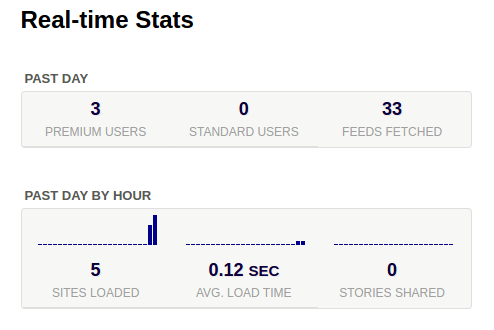
- Statistics:
To populate the statistics graphs on the homepage, use the collect_stats management command every few minutes:./manage.py collect_stats
- Bootstrapping Search:
Once we have an elasticsearch server running, we'll want to bootstrap it with feed and story indexes../manage.py index_feeds
Stories will be indexed automatically.
We may want to run the above commands via "crontab":
$ crontab -e
# m h  dom mon dow   command
0 */2 * * * /vol1/MySites/PyTune3/statistics.sh
where the statistics.sh looks like this:
source /vol1/MySites/PyTune3/venv/bin/activate
/vol1/MySites/PyTune3/venv/bin/python /vol1/MySites/PyTune3/manage.py refresh_feeds --force
/vol1/MySites/PyTune3/venv/bin/python /vol1/MySites/PyTune3/manage.py collect_stats
/vol1/MySites/PyTune3/venv/bin/python /vol1/MySites/PyTune3/manage.py index_feeds
/vol1/MySites/PyTune3/venv/bin/python /vol1/MySites/PyTune3/manage.py collect_feedback
Upgrade 'pip':
$ pip install --upgrade pip
Modify requirements.txt:
Django>=1.8
Got the following errors when trying to makemigrations:
ValueError: Unable to configure handler 'null': Cannot resolve 'django.utils.log.NullHandler': No module named NullHandler
Replaced 'django.utils.log.NullHandler' with 'logging.NullHandler' in settings.py:
    'handlers': {
        'null': {
            'level':'DEBUG',
            #'class':'django.utils.log.NullHandler',
            'class':'logging.NullHandler',
        },
Another error:
ImportError: cannot import name simplejson
Simply changed
from django.utils import simplejson as json
to
import json
" Cannot import name SingleRelatedObjectDescriptor..."
Fix:
replaced:
from django.db.models.fields.related import SingleRelatedObjectDescriptor
with:
try:
      from django.db.models.fields.related import SingleRelatedObjectDescriptor
except ImportError:
      from django.db.models.fields.related_descriptors import ForwardManyToOneDescriptor as SingleRelatedObjectDescriptor
Error:
  File "/var/www/django/pytune5/utils/fields.py", line 9, in <module>
    from south.modelsinspector import add_introspection_rules
  File "/usr/local/lib/python2.7/dist-packages/south/modelsinspector.py", line 20, in <module>
    from django.contrib.contenttypes import generic
The following lines are removed from utils/fields.py:
# from south.modelsinspector import add_introspection_rules
# add_introspection_rules([], ["^utils\.fields\.AutoOneToOneField"])
Also removed from apps/feed_import/models.py
#from south.modelsinspector import add_introspection_rules
#add_introspection_rules([], ["^oauth2client\.django_orm\.FlowField"])
#add_introspection_rules([], ["^oauth2client\.django_orm\.CredentialsField"])
Removed from vendor/timezones/fields.py
#from south.modelsinspector import add_introspection_rules
#add_introspection_rules([], ["^vendor\.timezones\.fields\.TimeZoneField"])
South related error:
There is no South database module 'south.db.mysql' for your database. Please either choose a supported database, check for SOUTH_DATABASE_ADAPTER[S] settings, or remove South from INSTALLED_APPS.
Removed South from INSTALLED_APPS and pip uninstall it.
django.core.exceptions.ImproperlyConfigured: Creating a ModelForm without either the 'fields' attribute or the 'exclude' attribute is prohibited; form PeriodicTaskForm needs updating.
Updated : django-celery==3.1.17, celery==3.1.17
  File "/usr/local/lib/python2.7/dist-packages/djcelery/models.py", line 18, in <module>
    from .picklefield import PickledObjectField
  File "/usr/local/lib/python2.7/dist-packages/djcelery/picklefield.py", line 22, in <module>
    from celery.five import with_metaclass
ImportError: No module named five
Upgraded : kombu==3.0.29.
RuntimeError: Conflicting 'customer' models in application 'zebra': <class 'vendor.zebra.models.Customer'> and <class 'zebra.models.Customer'>.
Off vendor from INSTALLED_APP in settings.py:
#'vendor.zebra',
'zebra',
Error:
RuntimeError: Conflicting 'paypalipn' models in application 'ipn': <class 'vendor.paypal.standard.ipn.models.PayPalIPN'> and <class 'paypal.standard.ipn.models.PayPalIPN'>.
INSTALLED_APPS = (
    #'vendor.paypal.standard.ipn',
    'paypal.standard.ipn',
For installations on which you want to use the sandbox, set PAYPAL_TEST to True
Also:$ rm -rf vendor/paypal
  File "/var/www/django/pytune5/apps/reader/views.py", line 22, in <module>
    from django.core.validators import email_re
ImportError: cannot import name email_re
Fix:
from django.core.validators import EmailValidator
Or:
from django.core.exceptions import ValidationError
from django.core.validators import validate_email
try:
    validate_email("foo.bar@baz.qux")
except ValidationError as e:
    print "oops! wrong email"
vendor/zebra/views.py", line 2, in <module>
    from django.utils import simplejson
ImportError: cannot import name simplejson
Fix:
#from django.utils import simplejson
import json as simplejson
Error:
File "/var/www/django/pytune5/utils/json_functions.py", line 165, in json_response
    return HttpResponse(json, mimetype='application/json', status=code)

TypeError: __init__() got an unexpected keyword argument 'mimetype'
Fix: remove mimetype arg
return HttpResponse(json, status=code)
Same to :
  File "/var/www/django/pytune5/apps/rss_feeds/views.py", line 85, in load_feed_favicon
    return HttpResponse(icon_data, mimetype='image/png')
Errors at "./manage.py migrate --fake"
    "Error creating new content types. Please make sure contenttypes "
RuntimeError: Error creating new content types. Please make sure contenttypes is migrated before trying to migrate apps individually.
RUN TIME ERRORS
When trying to add a new feed, got the following error. After logged back in, the feed has been added. Weird!
  File "/var/www/django/pytune5/utils/feed_fetcher.py", line 632, in process_feed_wrapper
    ret_feed, ret_entries = pfeed.process()
  File "/var/www/django/pytune5/utils/feed_fetcher.py", line 428, in process
    tagline = self.fpf.feed.get('tagline', self.feed.data.feed_tagline)
  File "/var/www/django/pytune5/utils/fields.py", line 16, in __get__
    return super(AutoSingleRelatedObjectDescriptor, self).__get__(instance, instance_type)
  File "/usr/local/lib/python2.7/dist-packages/django/db/models/fields/related.py", line 462, in __get__
    self.related.get_accessor_name()
RelatedObjectDoesNotExist: Feed has no data.
It seems to be related to the Django 1.9 fix which is:
try:
      from django.db.models.fields.related import SingleRelatedObjectDescriptor
except ImportError:
      from django.db.models.fields.related_descriptors import ForwardManyToOneDescriptor as SingleRelatedObjectDescriptor
Ph.D. / Golden Gate Ave, San Francisco / Seoul National Univ / Carnegie Mellon / UC Berkeley / DevOps / Deep Learning / Visualization