Meteor Angular Todo App with MongoDB (Part II)

Continuing from my previous tutorial: Meteor Angular Todo App with MongoDB (Part I).
In this chapter, we will add more features to our app:
- Add functionality to our app's UI so that we can add items without using the database console.
- Also, we'll add 'delete' and 'checked-off' features.
- More important one is : we'll have user account UI and with MongoDB hooked up!.
We'll add an input field for users to add items to the list.
Let's update our template, simple-todos-angular.html:
<head>
  <title>Todo List</title>
</head>

<body>
<div class="container"
  ng-app="simple-todos"
  ng-controller="TodosListCtrl">

  <header>
    <h1>Todo List</h1>

    <form class="new-item" ng-submit="addItem(newItem); newItem='';">
      <input ng-model="newItem" type="text"
             name="text" placeholder="Type to add new items" />
    </form>

  </header>

  <ul>
    <li ng-repeat="item in items">{{item.text}}</li>
  </ul>

</div>
</body>
Now our app has a new input field. To add an item, just type into the input field and hit enter. If we open a new browser and open the app again, we'll see that the list is automatically synchronized between all clients.
We have an updated JavaScript code to listen to the submit event on the form we made in the previous section:
Items = new Mongo.Collection('items');

if (Meteor.isClient) {

  // This code only runs on the client
  angular.module('simple-todos',['angular-meteor']);

  angular.module('simple-todos').controller('TodosListCtrl', ['$scope', '$meteor',
    function ($scope, $meteor) {

      $scope.items = $meteor.collection(Items);
      $scope.addItem = function (newItem) {
        $scope.items.push( {
          text: newItem,
          createdAt: new Date() }
        );
      };

    }]);
}
Note that we are listening to the submit event on our form to call the addItem scope function and to reset the input field.
Inside our scope function, we are adding an item to the items collection by simply calling $scope.items.push().
We can assign any properties to the item object, such as the time created, since we don't ever have to define a schema for the collection.
Now our app has a new input field.
To add an item, just type into the input field and hit Enter, then we'll see that the list is automatically synchronized between all clients.
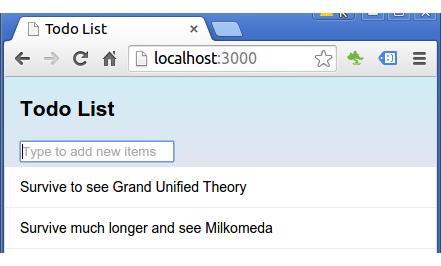
So, we're able to insert anything into the database from the client.
However, it isn't not secure, and in later section, we'll see how we can make our app secure and restrict how data is inserted into the database.
At this point, it's not critical but we may want to add sort feature to our app:
Items = new Mongo.Collection('items');

if (Meteor.isClient) {

  // This code only runs on the client
  angular.module('simple-todos',['angular-meteor']);

  angular.module('simple-todos').controller('TodosListCtrl', ['$scope', '$meteor',
    function ($scope, $meteor) {

      $scope.items = $meteor.collection( function() {
        return Items.find({}, { sort: { createdAt: -1 } })
      });

      $scope.addItem = function (newItem) {
        $scope.items.push( {
          text: newItem,
          createdAt: new Date() }
        );
      };

    }]);
}
Our new function will return a the result of calling the find function with the sort parameter on our Items collection.
What we want to do with our Todo app is not only adding items but also we want to delete or check-off items.
So, let's add two more elements to our item template, a checkbox and a delete button:
<head>
  <title>Todo List</title>
</head>

<body>
<div class="container"
  ng-app="simple-todos"
  ng-controller="TodosListCtrl">

  <header>
    <h1>Todo List</h1>

    <form class="new-item" ng-submit="addItem(newItem); newItem='';">
      <input ng-model="newItem" type="text"
             name="text" placeholder="Type to add new items" />
    </form>

  </header>

  <ul>
    <li ng-repeat="item in items" ng-class="{'checked': item.checked}">
      <button class="delete" ng-click="items.remove(item)">×</button>
      <input type="checkbox" ng-model="item.checked" class="toggle-checked" />
      <span class="text">{{item.text}}</span>
    </li>
  </ul>

</div>
</body>
We simply bind the checked state of each item to a checkbox with Angular.
Then Meteor takes care of saving and syncing the state across all clients without any extra code.
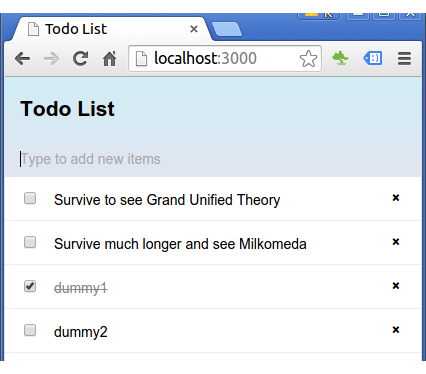
The $meteor.collection gives us a simple helper method called remove that can take an object or an id of an object and will remove it from the database.
...
$scope.items = $meteor.collection( function() {
   return Items.find({}, { sort: { createdAt: -1 } })
});
...
As we can see from the UI, if we checked off some items, the item a line through it. That's because we bind the checked state of an item to a class with ng-class:
<li ng-class="{'checked': item.checked}">
With the code, if the checked property of a item is true, the checked class is added to our list item. Using this class, we can make checked-off items look different in our CSS.
Now that we have a functioning Todo list app, and we want to put it up on the internet.
Just to our app directory, and type:
$ meteor deploy my_app_name_is_bogo.meteor.com
...
Deploying to my_app_name_is_bogo.meteor.com.
Now serving at http://my_app_name_is_bogo.meteor.com
...
Then, follow the instructions.
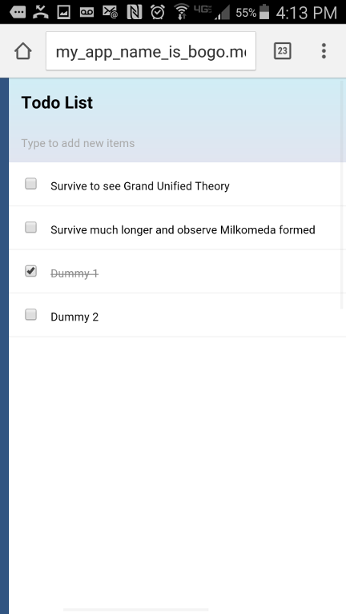
Here is the screenshot of the deployed app on my Android phone:
There are other section on the original tutorial such as Filtering collections and Running your app on Android or iOS but I'll skip those.
Instead, we'll move on to Adding user accounts section.
Meteor provides us with an accounts system and a drop-in login user interface.
This enables us to add multi-user functionality to our app without much hassle.
To get those features we need to run the following command:
$ meteor add accounts-password dotansimha:accounts-ui-angular
The accounts-password is a package that includes all the logic for password based authentication, and the dotansimha:accounts-ui-angular is AngularJS wrapper for Meteor's Account-UI package which includes the <login-buttons> directive that contains all the HTML and CSS we need for user authentication forms.
Let's add 'accounts.ui' dependency to Angular app simple-todos-angular.js.
Items = new Mongo.Collection('items');

if (Meteor.isClient) {

  // This code only runs on the client
  angular.module('simple-todos',['angular-meteor', 'accounts.ui']);

  angular.module('simple-todos').controller('TodosListCtrl', ['$scope', '$meteor',
    function ($scope, $meteor) {

      $scope.items = $meteor.collection( function() {
        return Items.find({}, { sort: { createdAt: -1 } })
      });

      $scope.addItem = function (newItem) {
        $scope.items.push( {
          text: newItem,
          createdAt: new Date() }
        );
      };

    }]);
}
Once our app has the accounts-ui package, to add a login dropdown is straight-forward.
All we have to do is to include the loginButtons template.
So, let's do that.
In the HTML, add loginButtons directive to simple-todos-angular.html:
<head>
  <title>Todo List</title>
</head>

<body>
<div class="container"
  ng-app="simple-todos"
  ng-controller="TodosListCtrl">

  <header>
    <h1>Todo List</h1>

    <login-buttons></login-buttons>

    <form class="new-item" ng-submit="addItem(newItem); newItem='';">
      <input ng-model="newItem" type="text"
             name="text" placeholder="Type to add new items" />
    </form>
  </header>

  <ul>
    <li ng-repeat="item in items" ng-class="{'checked': item.checked}">
      <button class="delete" ng-click="items.remove(item)">×</button>
      <input type="checkbox" ng-model="item.checked" class="toggle-checked" />
      <span class="text">{{item.text}}</span>
    </li>
  </ul>

</div>
</body>
Now we have SignIn dropdown!
This dropdown detects which login methods have been added to the app and displays the appropriate controls.
In our case, the only enabled login method is accounts-password, so the dropdown displays a password field.
If we add the accounts-facebook package to enable Facebook login in our app - the Facebook button will automatically appear in the dropdown.
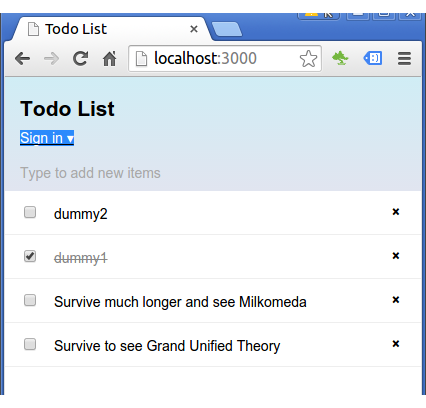
users can create accounts and log into our app!
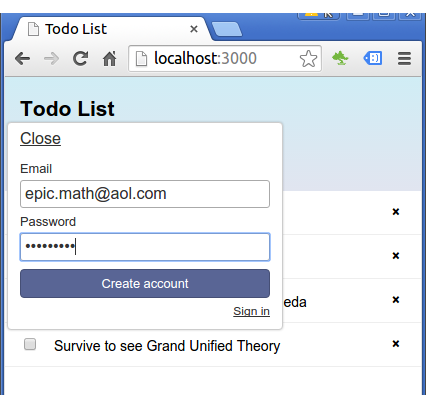
After a new user hit the "Create" button, we can see the user is now logged in:
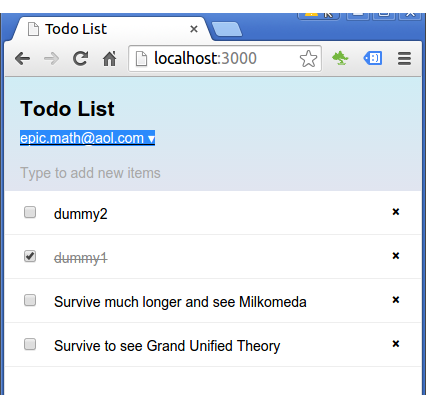
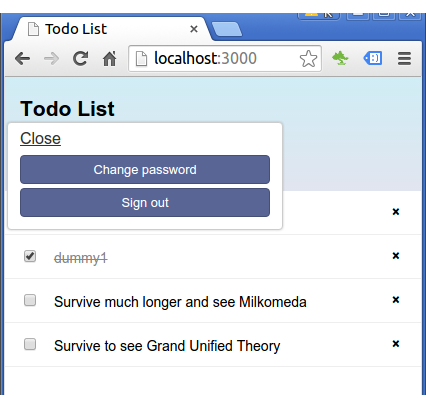
Users can "Change password" or "Sign out":
We'll deal with social login in next tutorial (Meteor Angular App with MongoDB (Part III - Facebook / Twitter / Google logins)), but we can guess how easy it will be.
For Facebook, all we have to do add the Facebook package, just one command:
$ meteor add accounts-facebook
Then, our UI will look like this:
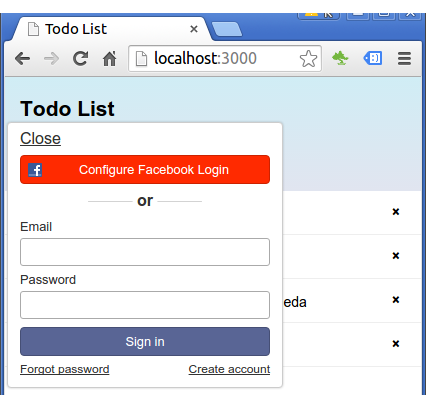
We do not have the complete Facebook sign-in yet because it needs configuration.
However, it looks promising considering we simply added the package, and Facebook already appeared in Sign-in dropdown menu!
AngularJS
Ph.D. / Golden Gate Ave, San Francisco / Seoul National Univ / Carnegie Mellon / UC Berkeley / DevOps / Deep Learning / Visualization