Docker Networks - Bridge driver network
To see the default docker network, we may want to remove unused networks that we built while we were playing with docker. We can do it with:
$ docker system prune
Now, let's see the default networks on our local machine:
$ docker network ls
NETWORK ID          NAME                DRIVER              SCOPE
c48c8f37fc21        bridge              bridge              local
b83022b50e7a        host                host                local
500e68f4bd59        none                null                local
As we can see from the output, Docker provides 3 networks. The bridge is the one we're interested in this post.
If we want to get more info about a specific network, for example, the bridge:
$ docker network inspect bridge
[
    {
        "Name": "bridge",
        "Id": "c48c8f37fc21c05a0c46bff6991d6ca31b6dd2907c4dcc74592bfb02db2794cf",
        "Created": "2018-12-05T04:54:33.509358655Z",
        "Scope": "local",
        "Driver": "bridge",
        "EnableIPv6": false,
        "IPAM": {
            "Driver": "default",
            "Options": null,
            "Config": [
                {
                    "Subnet": "172.17.0.0/16",
                    "Gateway": "172.17.0.1"
                }
            ]
        },
        "Internal": false,
        "Attachable": false,
        "Ingress": false,
        "ConfigFrom": {
            "Network": ""
        },
        "ConfigOnly": false,
        "Containers": {},
        "Options": {
            "com.docker.network.bridge.default_bridge": "true",
            "com.docker.network.bridge.enable_icc": "true",
            "com.docker.network.bridge.enable_ip_masquerade": "true",
            "com.docker.network.bridge.host_binding_ipv4": "0.0.0.0",
            "com.docker.network.bridge.name": "docker0",
            "com.docker.network.driver.mtu": "1500"
        },
        "Labels": {}
    }
]
Note that this network has no containers attache to it yet.
When we start Docker, a default bridge network is created automatically, and newly-started containers connect to it.
In docker, a bridge network uses a software bridge which allows containers connected to the same bridge network to communicate, while providing isolation from containers which are not connected to that bridge network. The Docker bridge driver automatically installs rules in the host machine so that containers on different bridge networks cannot communicate directly with each other.
By default, the Docker server creates and configures the host system's an ethernet bridge device, docker0.
Docker will attach all containers to a single docker0 bridge, providing a path for packets to travel between them.
Container network model (CNM) is an open source container network specification. CNM defines sandboxes, endpoints, and networks.
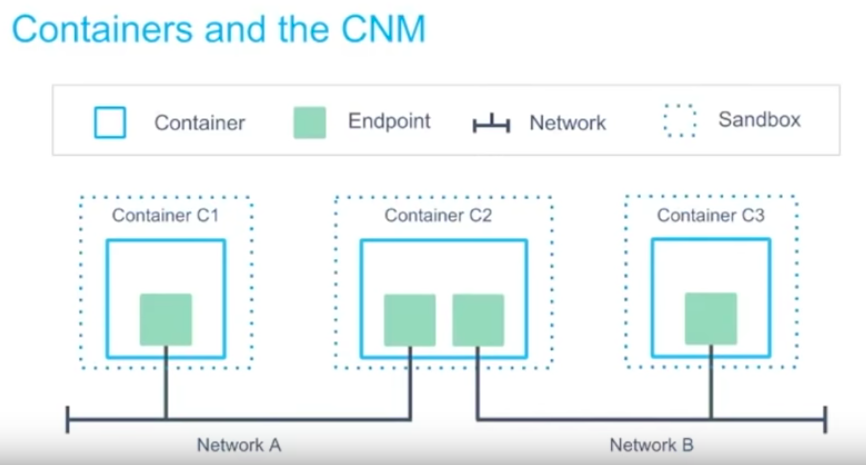
Picture from Docker Networking
Libnetwork is Docker's implementation of the CNM. Libnetwork is extensible via pluggable drivers.
Let's create a container and see how the bridge network works.
$ docker run -it alpine sh
Unable to find image 'alpine:latest' locally
latest: Pulling from library/alpine
4fe2ade4980c: Already exists
Digest: sha256:621c2f39f8133acb8e64023a94dbdf0d5ca81896102b9e57c0dc184cadaf5528
Status: Downloaded newer image for alpine:latest

/ # ip a
1: lo: <LOOPBACK,UP,LOWER_UP> mtu 65536 qdisc noqueue state UNKNOWN qlen 1
    link/loopback 00:00:00:00:00:00 brd 00:00:00:00:00:00
    inet 127.0.0.1/8 scope host lo
       valid_lft forever preferred_lft forever
2: tunl0@NONE: <NOARP> mtu 1480 qdisc noop state DOWN qlen 1
    link/ipip 0.0.0.0 brd 0.0.0.0
3: ip6tnl0@NONE: <NOARP> mtu 1452 qdisc noop state DOWN qlen 1
    link/tunnel6 00:00:00:00:00:00:00:00:00:00:00:00:00:00:00:00 brd 00:00:00:00:00:00:00:00:00:00:00:00:00:00:00:00
87: eth0@if88: <BROADCAST,MULTICAST,UP,LOWER_UP,M-DOWN> mtu 1500 qdisc noqueue state UP
    link/ether 02:42:ac:11:00:02 brd ff:ff:ff:ff:ff:ff
    inet 172.17.0.2/16 brd 172.17.255.255 scope global eth0
       valid_lft forever preferred_lft forever
$ docker network inspect bridge
[
    {
        "Name": "bridge",
        "Id": "c48c8f37fc21c05a0c46bff6991d6ca31b6dd2907c4dcc74592bfb02db2794cf",
        "Created": "2018-12-05T04:54:33.509358655Z",
        "Scope": "local",
        "Driver": "bridge",
        "EnableIPv6": false,
        "IPAM": {
            "Driver": "default",
            "Options": null,
            "Config": [
                {
                    "Subnet": "172.17.0.0/16",
                    "Gateway": "172.17.0.1"
                }
            ]
        },
        "Internal": false,
        "Attachable": false,
        "Ingress": false,
        "ConfigFrom": {
            "Network": ""
        },
        "ConfigOnly": false,
        "Containers": {
            "34f1ccc8888138aff6665ae106ae6037de2f244d7f79f721f72d0517227c5892": {
                "Name": "awesome_proskuriakova",
                "EndpointID": "5abb16d7bb8748e34cbdcd76e784cff8f23b38bdfbb956e4840e8071a046cd9e",
                "MacAddress": "02:42:ac:11:00:02",
                "IPv4Address": "172.17.0.2/16",
                "IPv6Address": ""
            }
        },
        "Options": {
            "com.docker.network.bridge.default_bridge": "true",
            "com.docker.network.bridge.enable_icc": "true",
            "com.docker.network.bridge.enable_ip_masquerade": "true",
            "com.docker.network.bridge.host_binding_ipv4": "0.0.0.0",
            "com.docker.network.bridge.name": "docker0",
            "com.docker.network.driver.mtu": "1500"
        },
        "Labels": {}
    }
]
Now we can see we have a new container attached to the bridge network.
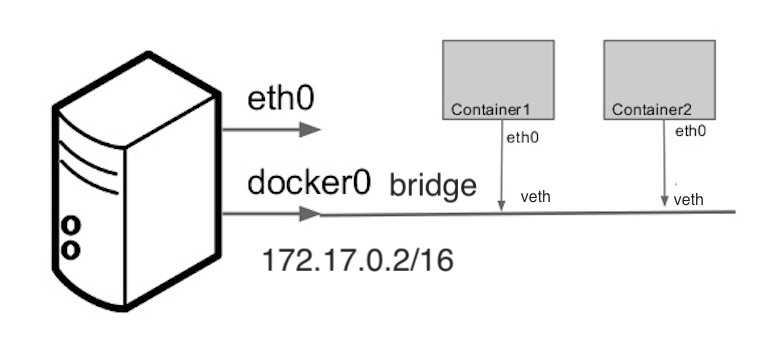
When we install Docker Engine it creates a bridge network automatically. This network corresponds to the docker0 bridge. When we launch a new container with docker run it automatically connects to this bridge network.
Though we cannot remove this default bridge network, we can create new ones using the network create command. We can attach a new container by specifying the network name while it's being created.
$ docker network create -d bridge my-bridge-network
43539acb896e522a9872b9e1a29716baee9c31448de6109c774437f048829f6c

$ docker network ls
NETWORK ID          NAME                DRIVER              SCOPE
c48c8f37fc21        bridge              bridge              local
b83022b50e7a        host                host                local
43539acb896e        my-bridge-network   bridge              local
500e68f4bd59        none                null                local
We see we've just created a new bridge network!
Note that each of the two bridge networks is isolated and not aware of each other.
Two illustrate the communications between containers created in different bridge network, we'll create two nginx servers.
Let's launch a new container from nginx:alpine with a name "nginx-server1" in detached mode. This container will be using the default bridge network, docker0.
$ docker run -d -p 8088:80 --name nginx-server1 nginx:alpine
We can check the container has been attached to bridge network:
$ docker inspect nginx-server1
[
...
            "Networks": {
                "bridge": {
                    "IPAMConfig": null,
                    "Links": null,
                    "Aliases": null,
                    "NetworkID": "c48c8f37fc21c05a0c46bff6991d6ca31b6dd2907c4dcc74592bfb02db2794cf",
                    "EndpointID": "9685480777bb2b3dfb6d07d602d1d77efe284e90cdacffc98a1b74aab7b7585a",
                    "Gateway": "172.17.0.1",
                    "IPAddress": "172.17.0.3",
                    "IPPrefixLen": 16,
                    "IPv6Gateway": "",
                    "GlobalIPv6Address": "",
                    "GlobalIPv6PrefixLen": 0,
                    "MacAddress": "02:42:ac:11:00:03",
                    "DriverOpts": null
                }
            }
        }
    }
]
Go to "localhost:8088":
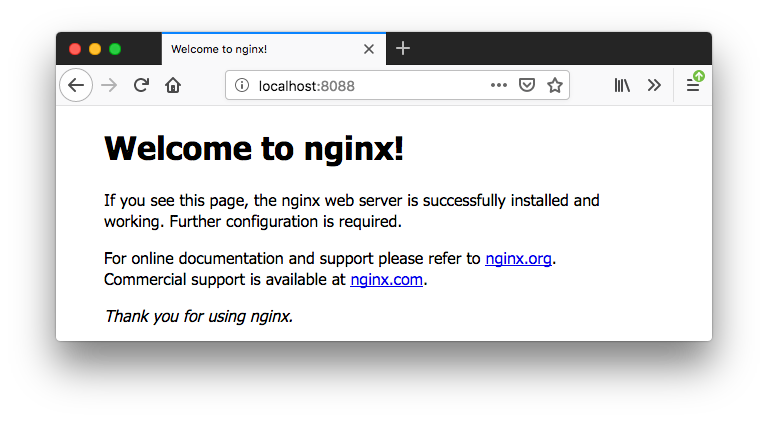
Then, we want to launch the second container from nginx:alpine with a name "nginx-server2" in detached mode. This container will be using the custom bridge network, my-bridge-network we've just created.
$ docker run -d -p 8788:80 --network="my-bridge-network" --name nginx-server2 nginx:alpine
We can check the container has been attached to my-bridge-network:
$ docker inspect nginx-server2
[
...
            "Networks": {
                "my-bridge-network": {
                    "Links": null,
                    "Aliases": [
                        "5340fce28a3c"
                    ],
                    "NetworkID": "43539acb896e522a9872b9e1a29716baee9c31448de6109c774437f048829f6c",
                    "EndpointID": "1bf3eaf7f60791eab2ae0a42c9d6b02c4095d5aa83473d4d3a38e6c0a66eb3af",
                    "Gateway": "172.20.0.1",
                    "IPAddress": "172.20.0.2",
                    "IPPrefixLen": 16,
                    "IPv6Gateway": "",
                    "GlobalIPv6Address": "",
                    "GlobalIPv6PrefixLen": 0,
                    "MacAddress": "02:42:ac:14:00:02",
                    "DriverOpts": null
                }
            }
        }
    }
]
Let's access the 2nd container with "localhost:8788":
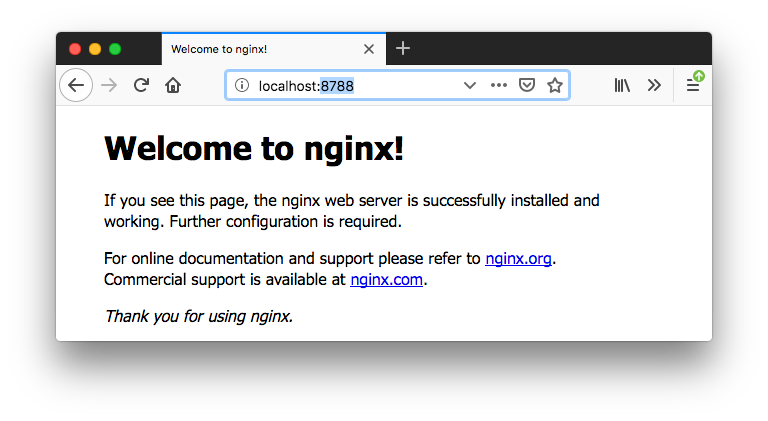
Let's navigate into the 2nd container:
$ docker exec -it nginx-server2 sh

/ # ping nginx-server1
ping: bad address 'nginx-server1'
/ #
The 2nd server not talking to the 1st server since they are in different networks. To make sure we can try with IP address:
# ping 172.17.0.3
PING 172.17.0.3 (172.17.0.3): 56 data bytes
Not working. We can compare it with the case when self-ping'ed:
# ping 172.20.0.2
PING 172.20.0.2 (172.20.0.2): 56 data bytes
64 bytes from 172.20.0.2: seq=0 ttl=64 time=0.148 ms
64 bytes from 172.20.0.2: seq=1 ttl=64 time=0.123 ms
...
Let's remove the 1st server and recreate it into the customized bridge network.
$ docker run -d -p 8088:80 --network="my-bridge-network" --name nginx-server1 nginx:alpine

$ docker ps
CONTAINER ID        IMAGE               COMMAND                  CREATED             STATUS              PORTS                  NAMES
40af30a944d0        nginx:alpine        "nginx -g 'daemon of…"   4 seconds ago       Up 3 seconds        0.0.0.0:8088->80/tcp   nginx-server1
5340fce28a3c        nginx:alpine        "nginx -g 'daemon of…"   21 minutes ago      Up 21 minutes       0.0.0.0:8788->80/tcp   nginx-server2
Let's go into the 2nd container and check if we can ping to the 1st container:
$ docker exec -it nginx-server2 sh

/ # ping nginx-server1
PING nginx-server1 (172.20.0.3): 56 data bytes
64 bytes from 172.20.0.3: seq=0 ttl=64 time=0.120 ms
64 bytes from 172.20.0.3: seq=1 ttl=64 time=0.138 ms
64 bytes from 172.20.0.3: seq=2 ttl=64 time=0.140 ms
64 bytes from 172.20.0.3: seq=3 ttl=64 time=0.165 ms
...
We can see they are now talking each other (hostnames are recognized) since they are in the same network!
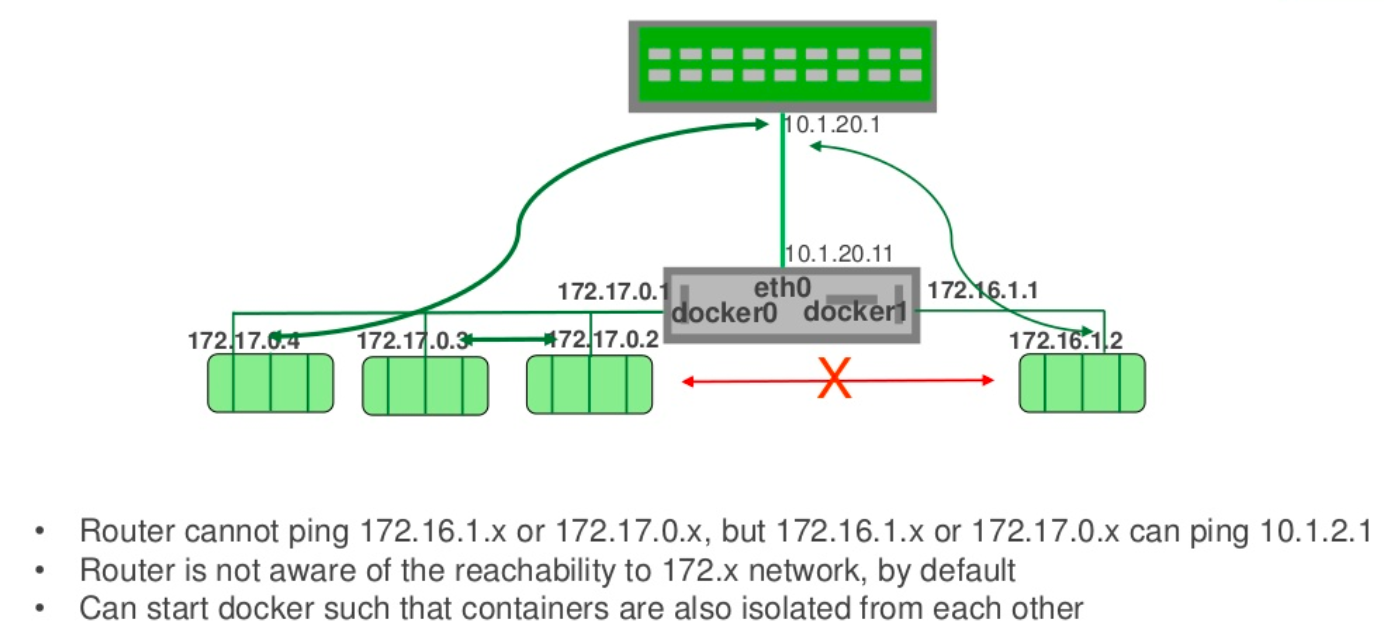
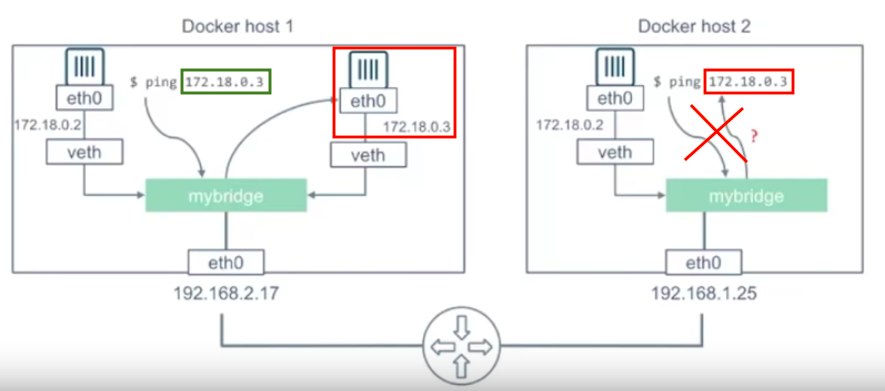
The following picture from Microservices Network Architecture 101 illustrates how the communications between different bridge networks (docker0 and docker1) work:
Picture from Docker Networking
Let's delete the user defined network:
$ docker network rm 43539acb896e
Now, we're back to the default networks:
$ docker network ls
NETWORK ID          NAME                DRIVER              SCOPE
c48c8f37fc21        bridge              bridge              local
b83022b50e7a        host                host                local
500e68f4bd59        none                null                local
Before the Docker network feature, we could use the Docker link feature to allow containers to discover each other. With the introduction of Docker networks, containers can be discovered by its name automatically.
Unless we absolutely need to continue using the link, it is recommended that we use user-defined networks to communicate between two containers.
Here is a simplified sample version for WordPress using the legacy link, docker-compose.yaml
wordpress:
  image: wordpress
  links:
    - wordpress_db:mysql
wordpress_db:
  image: mariadb
Because docker-compose creates containers into its own bridge network, the containers within the network can talk each other. So, we don't need to use the legacy link as shown in the following docker-compose.yaml file:
version: '3.3'

services:
   db:
     image: mysql:5.7
     volumes:
       - db_data:/var/lib/mysql
     restart: always
     environment:
       MYSQL_ROOT_PASSWORD: somewordpress
       MYSQL_DATABASE: wordpress
       MYSQL_USER: wordpress
       MYSQL_PASSWORD: wordpress

   wordpress:
     depends_on:
       - db
     image: wordpress:latest
     ports:
       - "8000:80"
     restart: always
     environment:
       WORDPRESS_DB_HOST: db:3306
       WORDPRESS_DB_USER: wordpress
       WORDPRESS_DB_PASSWORD: wordpress
volumes:
    db_data: {}
Run docker-compose:
$ docker-compose up -d
Creating network "wordpress_default" with the default driver
Creating wordpress_db_1 ... done
Creating wordpress_wordpress_1 ... done
Let's check if the network has been created:
$ docker network ls
NETWORK ID          NAME                DRIVER              SCOPE
c48c8f37fc21        bridge              bridge              local
b83022b50e7a        host                host                local
500e68f4bd59        none                null                local
a86637c93977        wordpress_default   bridge              local
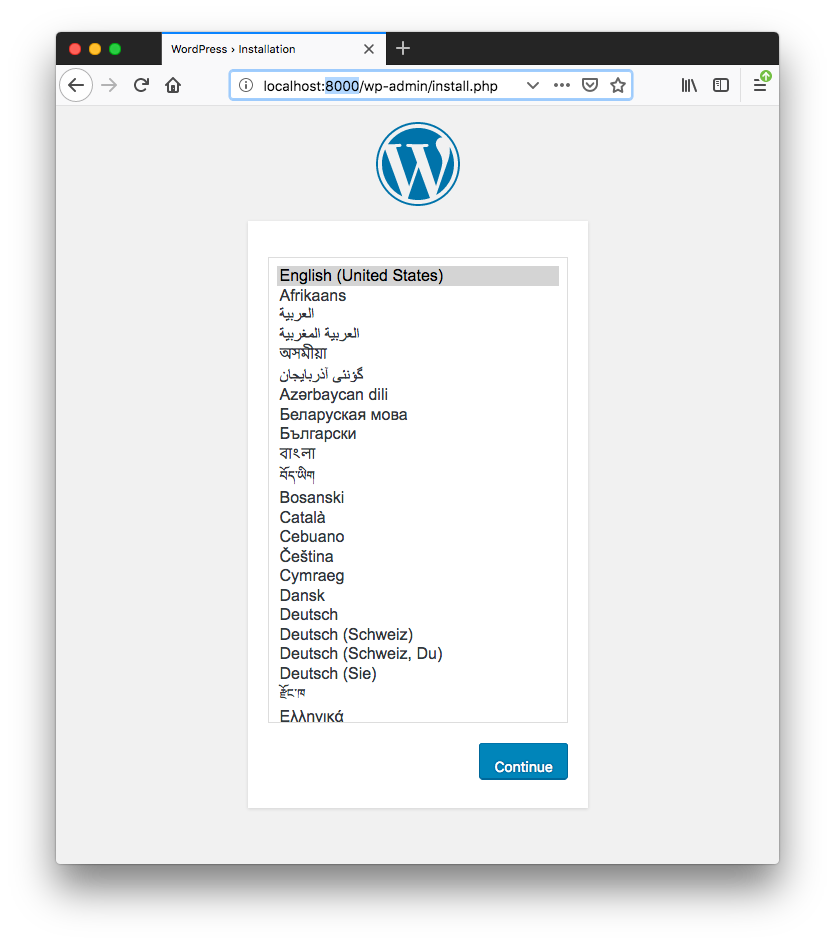
We can remove the network:
$ docker-compose down
Stopping wordpress_wordpress_1 ... done
Stopping wordpress_db_1        ... done
Removing wordpress_wordpress_1 ... done
Removing wordpress_db_1        ... done
Removing network wordpress_default

$ docker network ls
NETWORK ID          NAME                DRIVER              SCOPE
c48c8f37fc21        bridge              bridge              local
b83022b50e7a        host                host                local
500e68f4bd59        none                null                local
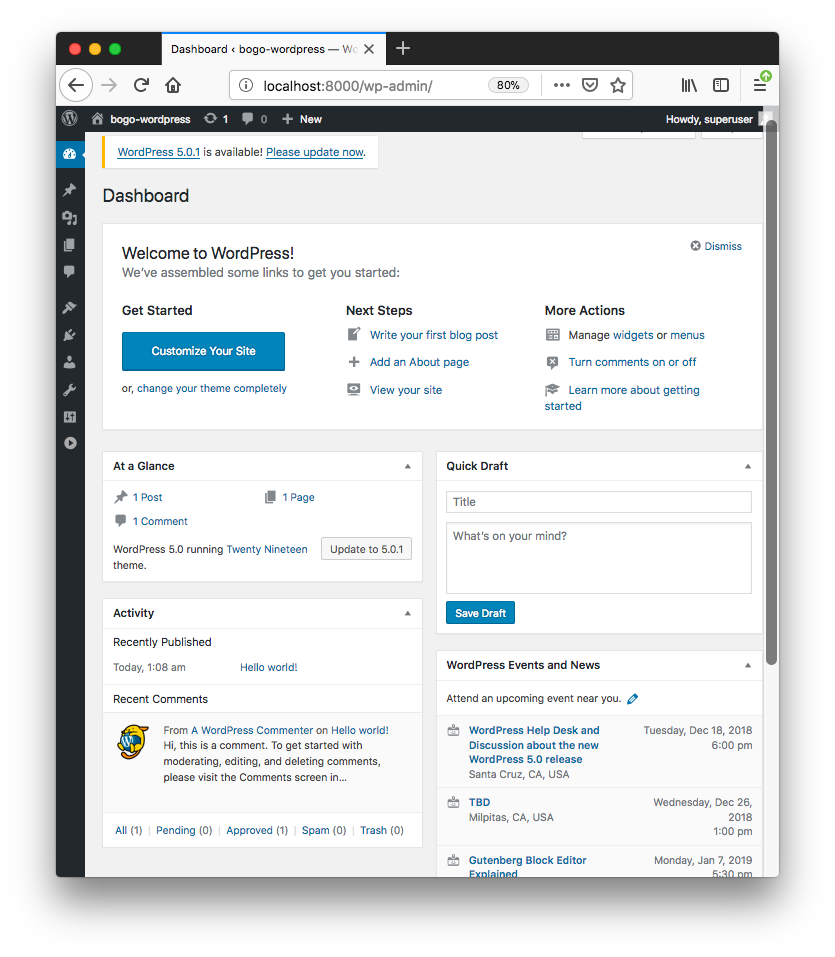
With the compose file, the default bridge network for the compose has been created for us. But note that we can specify our own bridge network in the compose file:
version: '3.3'

services:
   db:
     image: mysql:5.7
     volumes:
       - db_data:/var/lib/mysql
     restart: always
     environment:
       MYSQL_ROOT_PASSWORD: somewordpress
       MYSQL_DATABASE: wordpress
       MYSQL_USER: wordpress
       MYSQL_PASSWORD: wordpress
     networks:
       - my_bridge_network

   wordpress:
     depends_on:
       - db
     image: wordpress:latest
     ports:
       - "8000:80"
     restart: always
     environment:
       WORDPRESS_DB_HOST: db:3306
       WORDPRESS_DB_USER: wordpress
       WORDPRESS_DB_PASSWORD: wordpress
     networks:
       - my_bridge_network

volumes:
    db_data: {}

networks:
    my_bridge_network:
$ docker-compose up -d
Creating network "wordpress_my_bridge_network" with the default driver
Creating wordpress_db_1 ... done
Creating wordpress_wordpress_1 ... done

$ docker network ls
NETWORK ID          NAME                          DRIVER              SCOPE
c48c8f37fc21        bridge                        bridge              local
b83022b50e7a        host                          host                local
500e68f4bd59        none                          null                local
3cceb09613bc        wordpress_my_bridge_network   bridge              local
Network driver summary from https://docs.docker.com/network/. Docker's networking subsystem is pluggable, using drivers. Several drivers exist by default, and provide core networking functionality:
- User-defined bridge networks are best when we need multiple containers to communicate on the same Docker host.
- Host networks are best when the network stack should not be isolated from the Docker host, but we want other aspects of the container to be isolated.
- Overlay networks are best when we need containers running on different Docker hosts to communicate, or when multiple applications work together using swarm services.
Docker & K8s
- Docker install on Amazon Linux AMI
- Docker install on EC2 Ubuntu 14.04
- Docker container vs Virtual Machine
- Docker install on Ubuntu 14.04
- Docker Hello World Application
- Nginx image - share/copy files, Dockerfile
- Working with Docker images : brief introduction
- Docker image and container via docker commands (search, pull, run, ps, restart, attach, and rm)
- More on docker run command (docker run -it, docker run --rm, etc.)
- Docker Networks - Bridge Driver Network
- Docker Persistent Storage
- File sharing between host and container (docker run -d -p -v)
- Linking containers and volume for datastore
- Dockerfile - Build Docker images automatically I - FROM, MAINTAINER, and build context
- Dockerfile - Build Docker images automatically II - revisiting FROM, MAINTAINER, build context, and caching
- Dockerfile - Build Docker images automatically III - RUN
- Dockerfile - Build Docker images automatically IV - CMD
- Dockerfile - Build Docker images automatically V - WORKDIR, ENV, ADD, and ENTRYPOINT
- Docker - Apache Tomcat
- Docker - NodeJS
- Docker - NodeJS with hostname
- Docker Compose - NodeJS with MongoDB
- Docker - Prometheus and Grafana with Docker-compose
- Docker - StatsD/Graphite/Grafana
- Docker - Deploying a Java EE JBoss/WildFly Application on AWS Elastic Beanstalk Using Docker Containers
- Docker : NodeJS with GCP Kubernetes Engine
- Docker : Jenkins Multibranch Pipeline with Jenkinsfile and Github
- Docker : Jenkins Master and Slave
- Docker - ELK : ElasticSearch, Logstash, and Kibana
- Docker - ELK 7.6 : Elasticsearch on Centos 7
- Docker - ELK 7.6 : Filebeat on Centos 7
- Docker - ELK 7.6 : Logstash on Centos 7
- Docker - ELK 7.6 : Kibana on Centos 7
- Docker - ELK 7.6 : Elastic Stack with Docker Compose
- Docker - Deploy Elastic Cloud on Kubernetes (ECK) via Elasticsearch operator on minikube
- Docker - Deploy Elastic Stack via Helm on minikube
- Docker Compose - A gentle introduction with WordPress
- Docker Compose - MySQL
- MEAN Stack app on Docker containers : micro services
- MEAN Stack app on Docker containers : micro services via docker-compose
- Docker Compose - Hashicorp's Vault and Consul Part A (install vault, unsealing, static secrets, and policies)
- Docker Compose - Hashicorp's Vault and Consul Part B (EaaS, dynamic secrets, leases, and revocation)
- Docker Compose - Hashicorp's Vault and Consul Part C (Consul)
- Docker Compose with two containers - Flask REST API service container and an Apache server container
- Docker compose : Nginx reverse proxy with multiple containers
- Docker & Kubernetes : Envoy - Getting started
- Docker & Kubernetes : Envoy - Front Proxy
- Docker & Kubernetes : Ambassador - Envoy API Gateway on Kubernetes
- Docker Packer
- Docker Cheat Sheet
- Docker Q & A #1
- Kubernetes Q & A - Part I
- Kubernetes Q & A - Part II
- Docker - Run a React app in a docker
- Docker - Run a React app in a docker II (snapshot app with nginx)
- Docker - NodeJS and MySQL app with React in a docker
- Docker - Step by Step NodeJS and MySQL app with React - I
- Installing LAMP via puppet on Docker
- Docker install via Puppet
- Nginx Docker install via Ansible
- Apache Hadoop CDH 5.8 Install with QuickStarts Docker
- Docker - Deploying Flask app to ECS
- Docker Compose - Deploying WordPress to AWS
- Docker - WordPress Deploy to ECS with Docker-Compose (ECS-CLI EC2 type)
- Docker - WordPress Deploy to ECS with Docker-Compose (ECS-CLI Fargate type)
- Docker - ECS Fargate
- Docker - AWS ECS service discovery with Flask and Redis
- Docker & Kubernetes : minikube
- Docker & Kubernetes 2 : minikube Django with Postgres - persistent volume
- Docker & Kubernetes 3 : minikube Django with Redis and Celery
- Docker & Kubernetes 4 : Django with RDS via AWS Kops
- Docker & Kubernetes : Kops on AWS
- Docker & Kubernetes : Ingress controller on AWS with Kops
- Docker & Kubernetes : HashiCorp's Vault and Consul on minikube
- Docker & Kubernetes : HashiCorp's Vault and Consul - Auto-unseal using Transit Secrets Engine
- Docker & Kubernetes : Persistent Volumes & Persistent Volumes Claims - hostPath and annotations
- Docker & Kubernetes : Persistent Volumes - Dynamic volume provisioning
- Docker & Kubernetes : DaemonSet
- Docker & Kubernetes : Secrets
- Docker & Kubernetes : kubectl command
- Docker & Kubernetes : Assign a Kubernetes Pod to a particular node in a Kubernetes cluster
- Docker & Kubernetes : Configure a Pod to Use a ConfigMap
- AWS : EKS (Elastic Container Service for Kubernetes)
- Docker & Kubernetes : Run a React app in a minikube
- Docker & Kubernetes : Minikube install on AWS EC2
- Docker & Kubernetes : Cassandra with a StatefulSet
- Docker & Kubernetes : Terraform and AWS EKS
- Docker & Kubernetes : Pods and Service definitions
- Docker & Kubernetes : Service IP and the Service Type
- Docker & Kubernetes : Kubernetes DNS with Pods and Services
- Docker & Kubernetes : Headless service and discovering pods
- Docker & Kubernetes : Scaling and Updating application
- Docker & Kubernetes : Horizontal pod autoscaler on minikubes
- Docker & Kubernetes : From a monolithic app to micro services on GCP Kubernetes
- Docker & Kubernetes : Rolling updates
- Docker & Kubernetes : Deployments to GKE (Rolling update, Canary and Blue-green deployments)
- Docker & Kubernetes : Slack Chat Bot with NodeJS on GCP Kubernetes
- Docker & Kubernetes : Continuous Delivery with Jenkins Multibranch Pipeline for Dev, Canary, and Production Environments on GCP Kubernetes
- Docker & Kubernetes : NodePort vs LoadBalancer vs Ingress
- Docker & Kubernetes : MongoDB / MongoExpress on Minikube
- Docker & Kubernetes : Load Testing with Locust on GCP Kubernetes
- Docker & Kubernetes : MongoDB with StatefulSets on GCP Kubernetes Engine
- Docker & Kubernetes : Nginx Ingress Controller on Minikube
- Docker & Kubernetes : Setting up Ingress with NGINX Controller on Minikube (Mac)
- Docker & Kubernetes : Nginx Ingress Controller for Dashboard service on Minikube
- Docker & Kubernetes : Nginx Ingress Controller on GCP Kubernetes
- Docker & Kubernetes : Kubernetes Ingress with AWS ALB Ingress Controller in EKS
- Docker & Kubernetes : Setting up a private cluster on GCP Kubernetes
- Docker & Kubernetes : Kubernetes Namespaces (default, kube-public, kube-system) and switching namespaces (kubens)
- Docker & Kubernetes : StatefulSets on minikube
- Docker & Kubernetes : RBAC
- Docker & Kubernetes Service Account, RBAC, and IAM
- Docker & Kubernetes - Kubernetes Service Account, RBAC, IAM with EKS ALB, Part 1
- Docker & Kubernetes : Helm Chart
- Docker & Kubernetes : My first Helm deploy
- Docker & Kubernetes : Readiness and Liveness Probes
- Docker & Kubernetes : Helm chart repository with Github pages
- Docker & Kubernetes : Deploying WordPress and MariaDB with Ingress to Minikube using Helm Chart
- Docker & Kubernetes : Deploying WordPress and MariaDB to AWS using Helm 2 Chart
- Docker & Kubernetes : Deploying WordPress and MariaDB to AWS using Helm 3 Chart
- Docker & Kubernetes : Helm Chart for Node/Express and MySQL with Ingress
- Docker & Kubernetes : Deploy Prometheus and Grafana using Helm and Prometheus Operator - Monitoring Kubernetes node resources out of the box
- Docker & Kubernetes : Deploy Prometheus and Grafana using kube-prometheus-stack Helm Chart
- Docker & Kubernetes : Istio (service mesh) sidecar proxy on GCP Kubernetes
- Docker & Kubernetes : Istio on EKS
- Docker & Kubernetes : Istio on Minikube with AWS EC2 for Bookinfo Application
- Docker & Kubernetes : Deploying .NET Core app to Kubernetes Engine and configuring its traffic managed by Istio (Part I)
- Docker & Kubernetes : Deploying .NET Core app to Kubernetes Engine and configuring its traffic managed by Istio (Part II - Prometheus, Grafana, pin a service, split traffic, and inject faults)
- Docker & Kubernetes : Helm Package Manager with MySQL on GCP Kubernetes Engine
- Docker & Kubernetes : Deploying Memcached on Kubernetes Engine
- Docker & Kubernetes : EKS Control Plane (API server) Metrics with Prometheus
- Docker & Kubernetes : Spinnaker on EKS with Halyard
- Docker & Kubernetes : Continuous Delivery Pipelines with Spinnaker and Kubernetes Engine
- Docker & Kubernetes : Multi-node Local Kubernetes cluster : Kubeadm-dind (docker-in-docker)
- Docker & Kubernetes : Multi-node Local Kubernetes cluster : Kubeadm-kind (k8s-in-docker)
- Docker & Kubernetes : nodeSelector, nodeAffinity, taints/tolerations, pod affinity and anti-affinity - Assigning Pods to Nodes
- Docker & Kubernetes : Jenkins-X on EKS
- Docker & Kubernetes : ArgoCD App of Apps with Heml on Kubernetes
- Docker & Kubernetes : ArgoCD on Kubernetes cluster
- Docker & Kubernetes : GitOps with ArgoCD for Continuous Delivery to Kubernetes clusters (minikube) - guestbook
Ph.D. / Golden Gate Ave, San Francisco / Seoul National Univ / Carnegie Mellon / UC Berkeley / DevOps / Deep Learning / Visualization